Experience Sitecore ! | August 2024

Experience Sitecore !

More than 200 articles about the best DXP by Martin Miles

.NET Core Renderings for XM Cloud finally gets some love

That is not a secret – Sitecore always used to prioritize Next.Js framework as the first-class citizen for XM Cloud. All the best and finest features tend to find their way to a given framework in the first place. However, recently, there has been much activity around the .NET Core Rendering Framework which makes a lot of sense given most of us, Sitecore tech professionals, originate from the Microsoft and .NET background. More excitement – that is done on .NET 8, which is the latest LST runtime!

Starter Kit

ASP.NET Core framework was with us for a while, periodically receiving some minor updates and fixes. But let’s be honest: having an SDK on its own is one thing, but receiving a decent starter kit on top of that framework is what makes us developers actually create at scale. And that moment has just occurred – without any loud fanfare, XMC ASP.NET Core Starter Kit went public. Please be aware that this is only a PRE-RELEASE version and has its own temporal shortcomings, I gave it a try and want to share my findings with you.

What are these shortcomings? Just a few:

  • FEaaS and BYOC components are not yet supported, therefore you also cannot use Form since it leverages those
  • System.Text.Json serializer is more strict than Newtonsoft which was removed in favor of a built-in solution, thus some components may fail
  • SITECORE_EDGE_CONTEXT_ID variable is not supported

Everything else seems to work the same. There are also some expectations of XM Cloud supporting .NET Rendering at a built-in editing host at some time later in the same manner that works today along with JSS applications, but I do not work for Sitecore and can only make assumptions and guesses without any certainty to it.

First Impression

I forked the repo and cloned the forked code into my computer. Let’s take a look at what we have got there.

VS Code

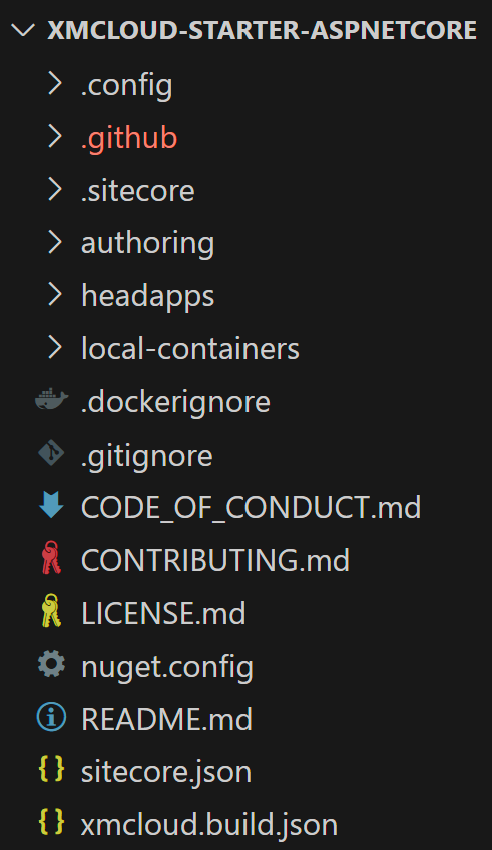
  • the code varies from what we used to see from XM Cloud Foundation Head starter kit, and that’s understood
  • at the root folder we still have xmcloud.build.jsonsitecore.json and folders – .config and .sitecore
  • xmcloud.build.json is required for cloud deploy, but does not have renderingHosts root section required for editing host(s), as I explained above
  • there is headapps folder to keep the solution file along with .NET projects subfolder(s), currently just a single one – aspnet-core-starter
  • there is also local-containers folder that contains docker-compose files, .env, docker files, scripts, Traefik, and the rest of the container assets we got used to
  • another difference – authoring folder contains serialization settings and items as well as .NET framework project for CM customizations
  • however, there are no init.ps1 and up.ps1 files, but that is easy to create yourself by stealing and modifying those from XM Cloud Foundation Head

With that in mind, we can start investigating. There is a ReadMe document explaining how to deploy this codebase, but before going ahead with it I of course decided to:

Run Local Containers

There are no instructions on container setup, only for cloud deployment, but after spending a few years with Foundation Head, the very first thing that naturally comes into my mind is running this starter kit in local Docker containers. Why not?

There are a couple of things one should do first before spinning up containers.

1. Modify settings in .ENV file – at least these two:

# Enter the value for SQL Server admin password:
SQL_SA_PASSWORD=SA_PASSWORD
# Provide a folder storing a Sitecore license file:
HOST_LICENSE_FOLDER=C:\Projects
 
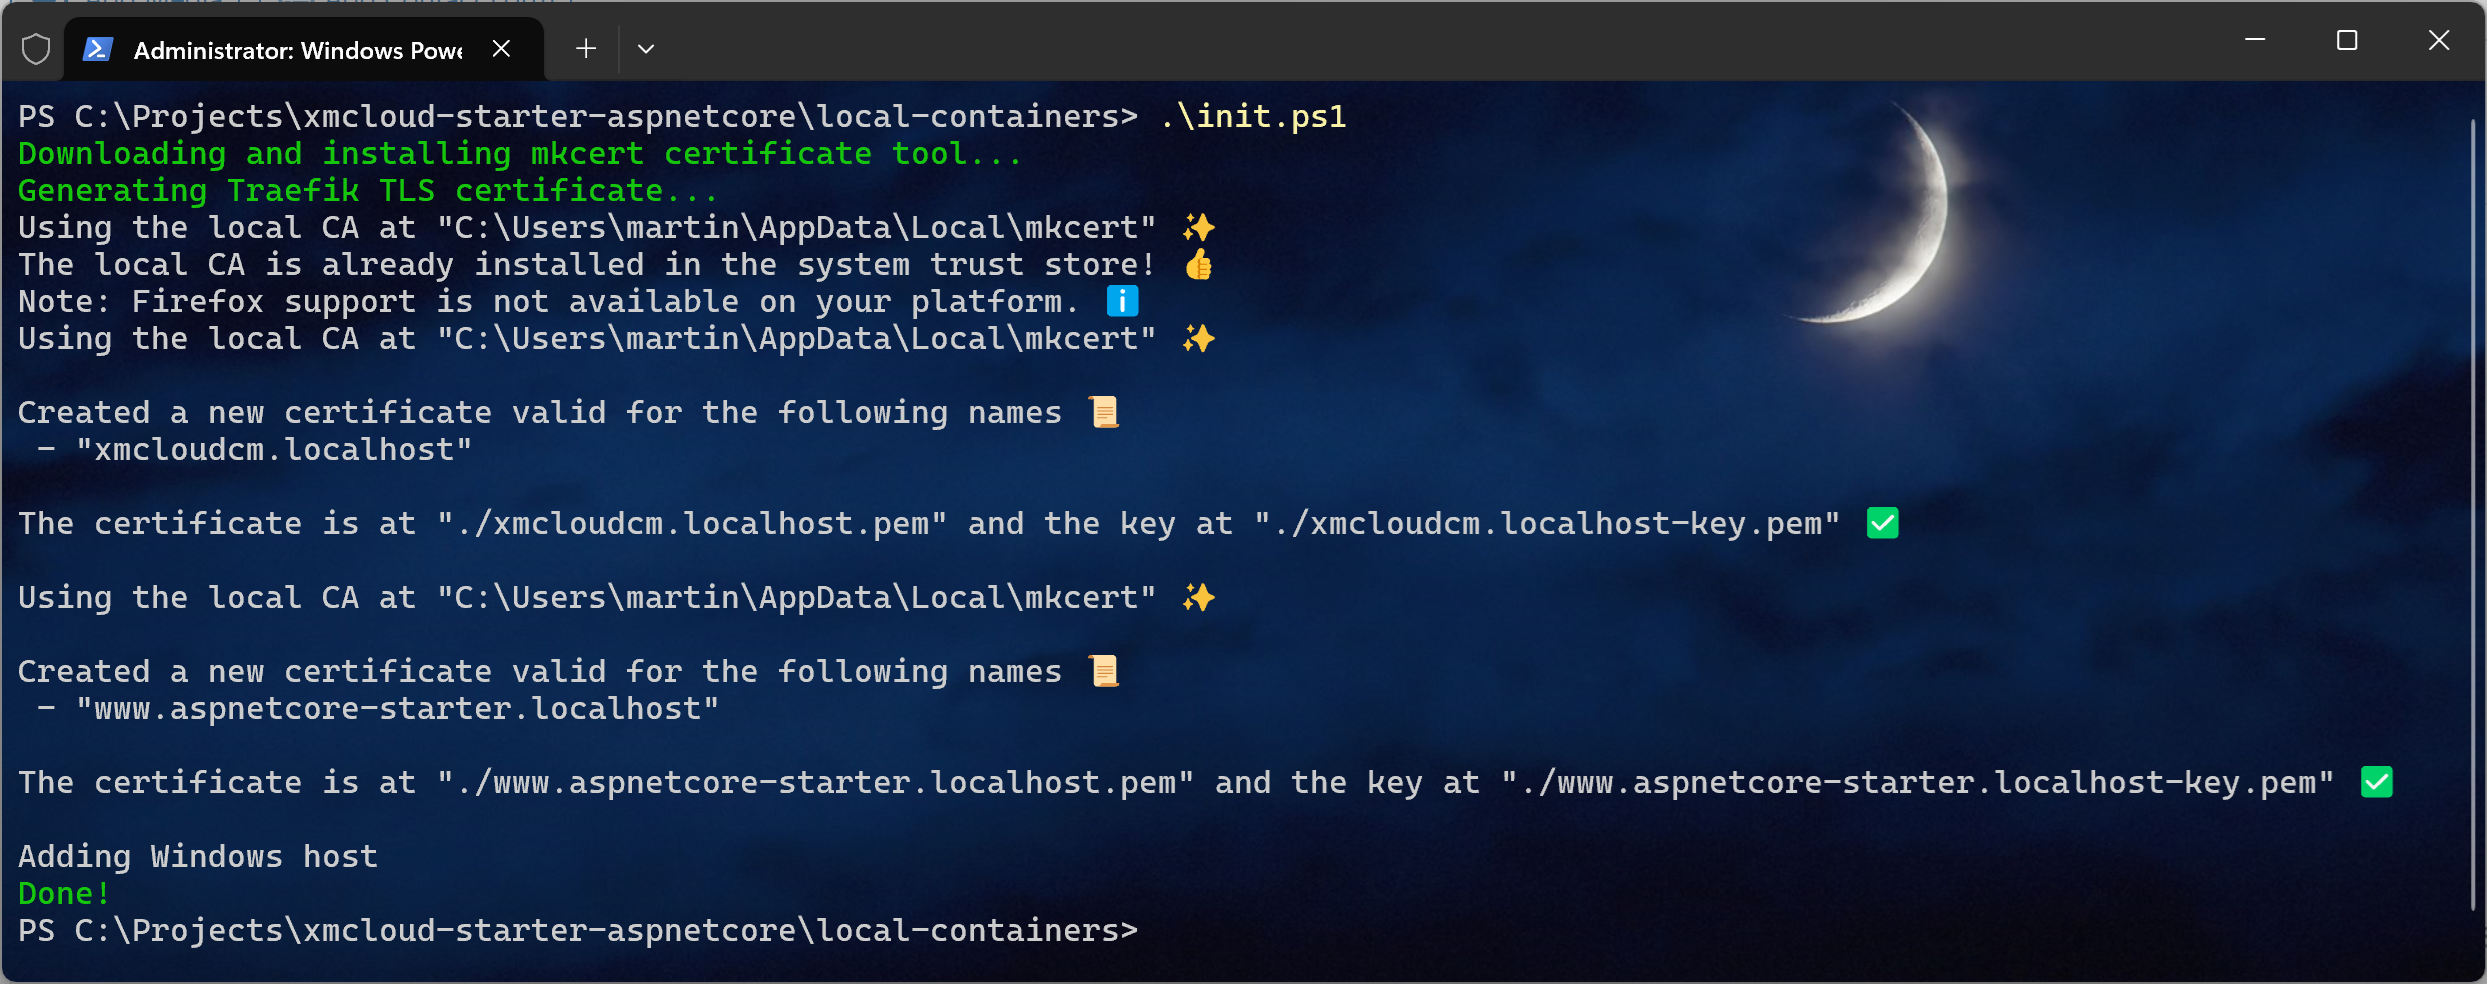
2. We need to generate Traefik SSL Certificates. To do so let’s create .\local-containers\init.ps1 script with the below content:
    [CmdletBinding(DefaultParameterSetName = "no-arguments")]
    Param()
    $ErrorActionPreference = "Stop";
    
    # duplicates in Up.ps1 scrips
    $envContent = Get-Content .env -Encoding UTF8
    $xmCloudHost = $envContent | Where-Object {$_ -imatch "^CM_HOST=.+"}
    $renderingHost = $envContent | Where-Object {$_ -imatch "^RENDERING_HOST=.+"}
    $xmCloudHost = $xmCloudHost.Split("=")[1]
    $renderingHost = $renderingHost.Split("=")[1]
    
    Push-Location docker\traefik\certs
    try{
        $mkcert = ".\mkcert.exe"
        if($null -ne(Get-Command mkcert.exe -ErrorAction SilentlyContinue)){
            # mkcert installed in PATH
            $mkcert = "mkcert"
        }elseif(-not(Test-Path$mkcert)){
            Write-Host "Downloading and installing mkcert certificate tool..." -ForegroundColor Green
            Invoke-WebRequest "https://github.com/FiloSottile/mkcert/releases/download/v1.4.1/mkcert-v1.4.1-windows-amd64.exe" -UseBasicParsing -OutFile mkcert.exe
            if((Get-FileHash mkcert.exe).Hash -ne "1BE92F598145F61CA67DD9F5C687DFEC17953548D013715FF54067B34D7C3246"){
                Remove-Item mkcert.exe -Force
                throw "Invalid mkcert.exe file"
            }
        }
        Write-Host "Generating Traefik TLS certificate..." -ForegroundColor Green
        & $mkcert -install
        & $mkcert "$xmCloudHost"
        & $mkcert "$renderingHost"
    }
    catch{
        Write-Error "An error occurred while attempting to generate TLS certificate: $_"
    }
    finally{
        Pop-Location
    }

    Write-Host "Adding Windows host"
    Add-HostsEntry "$renderingHost"
    Add-HostsEntry "$xmCloudHost"

    Write-Host "Done!" -ForegroundColor Green
 

And then execute this script:

Certs

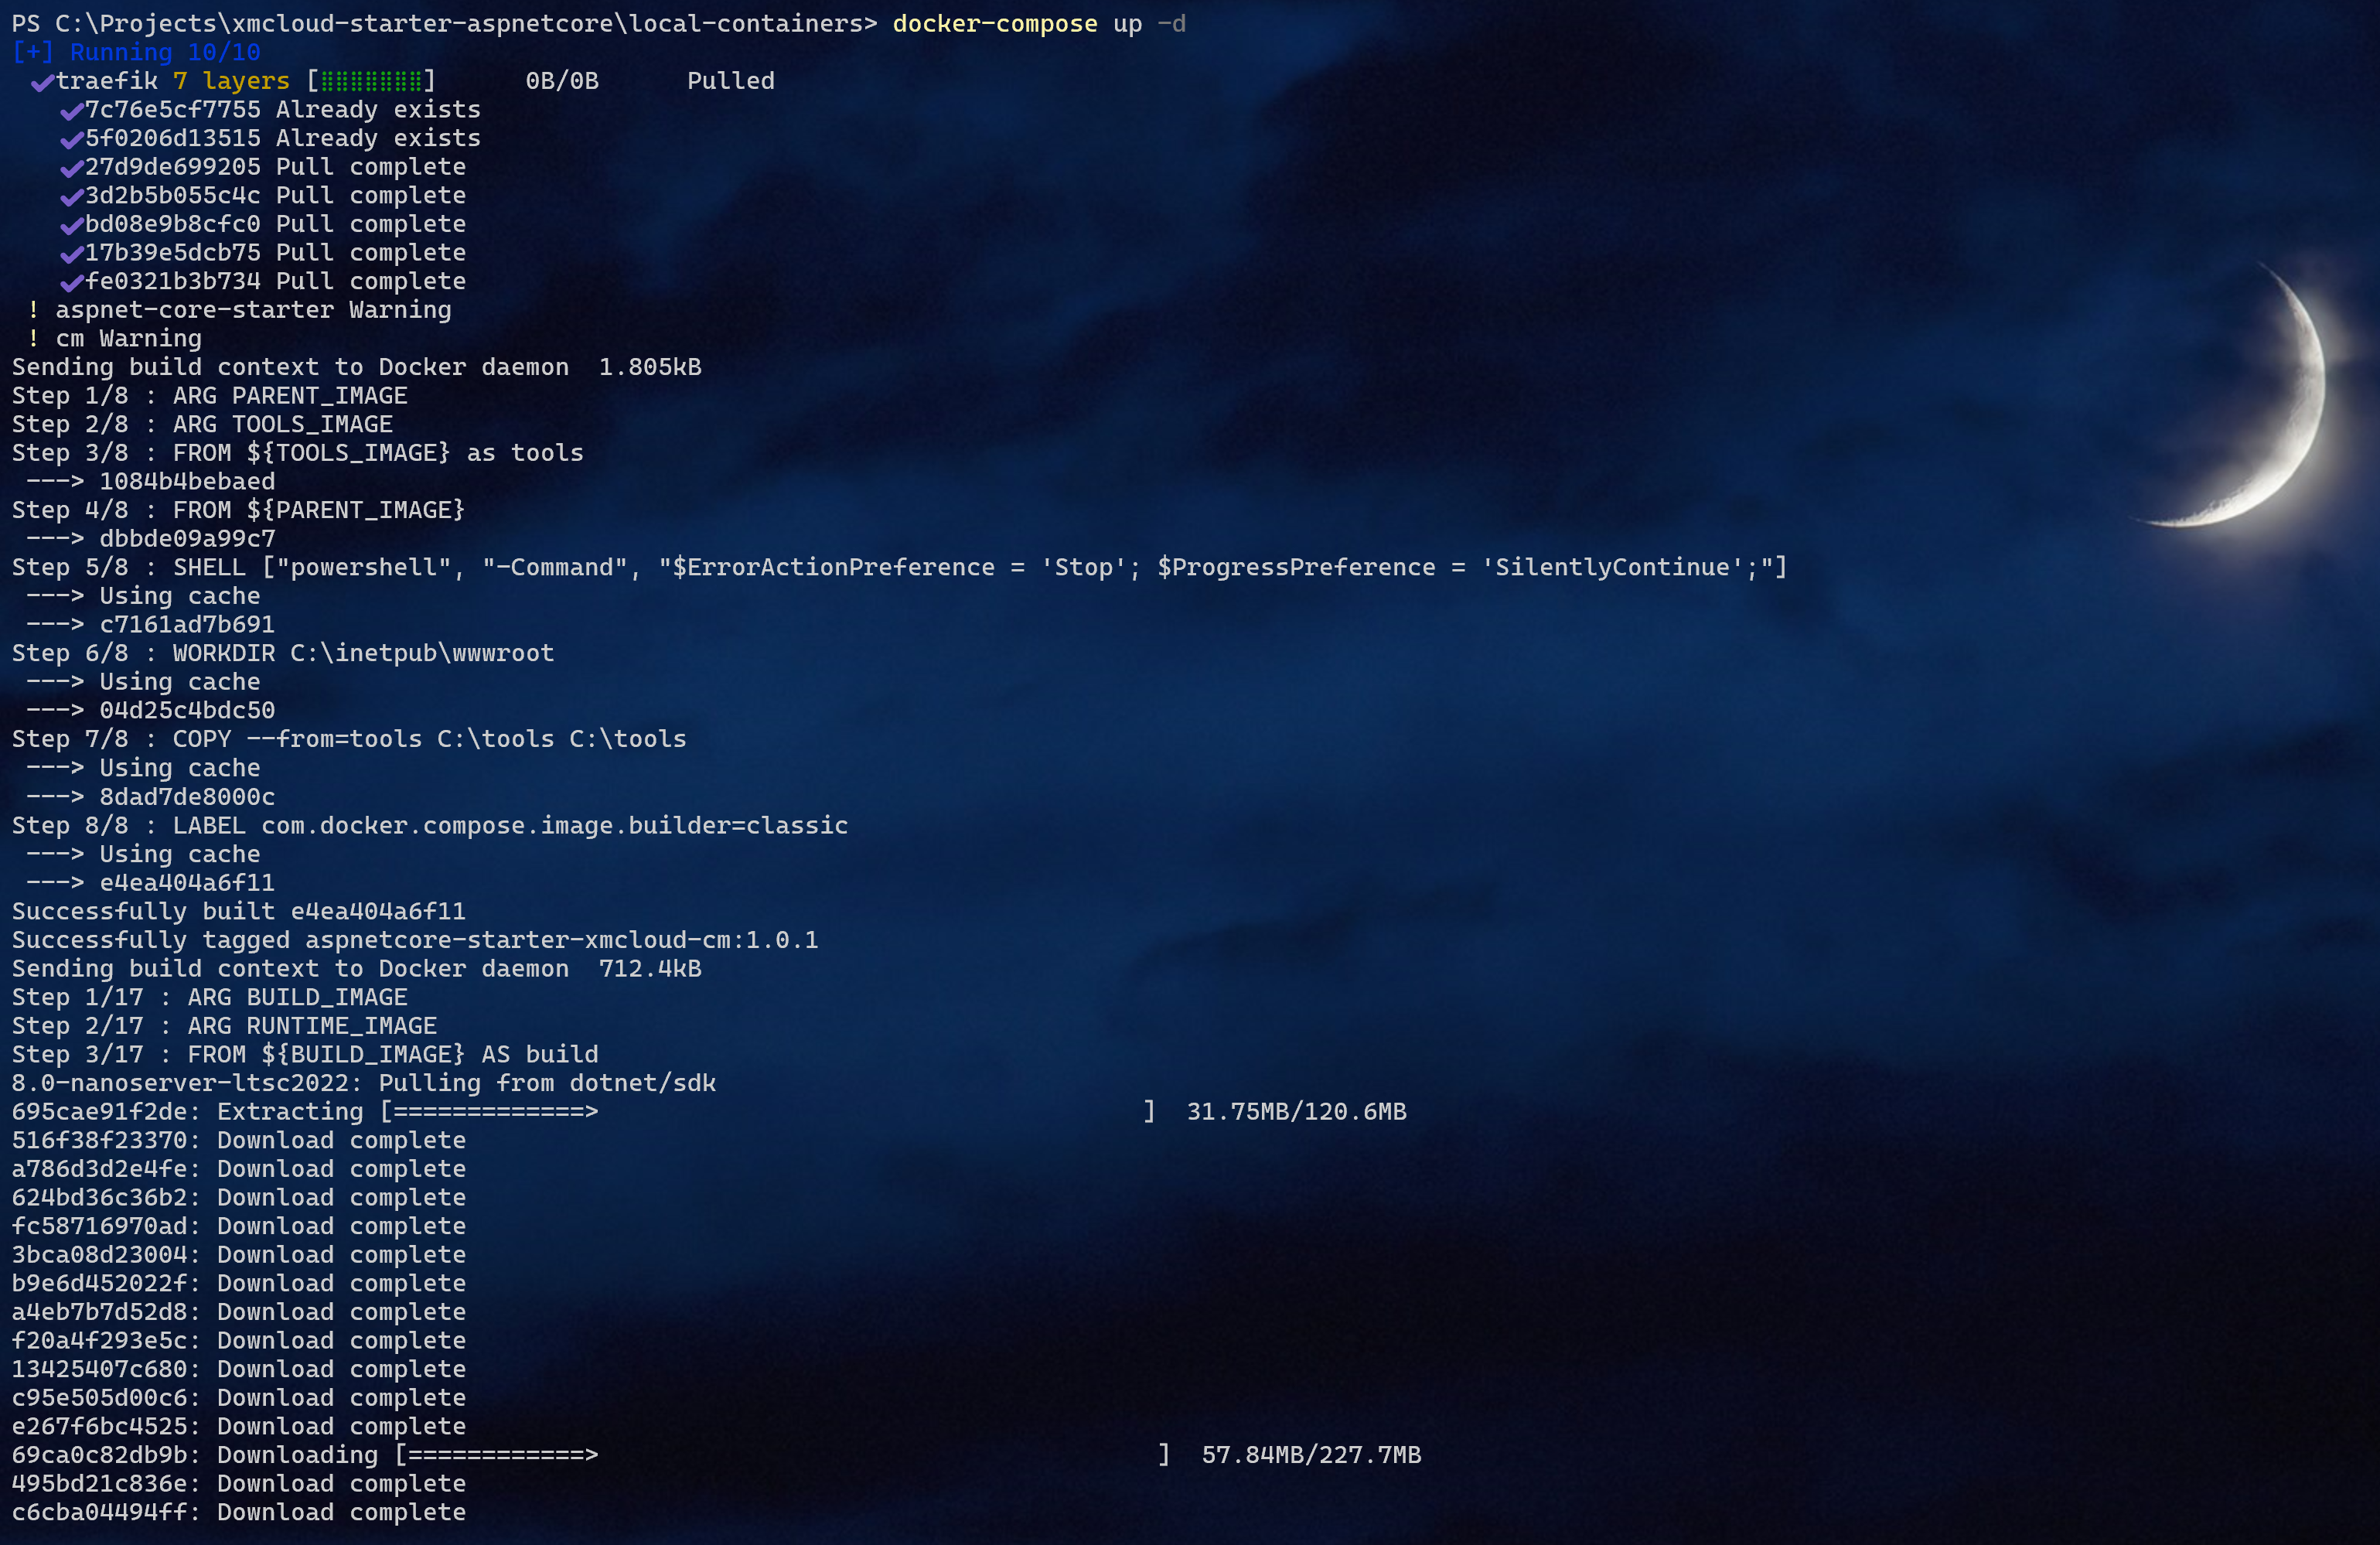
There is no up.ps1 script, so instead let’s run docker-compose directly: docker compose up -d

You may notice some new images show up, and you also see a new container: aspnet-core-starter

Docker

If everything is configured correctly, the script will execute successfully. Run Sitecore from its default hostname, as configured in .env file: https://xmcloudcm.localhost/sitecore

From there you will see no significant changes. Containers just work well! Sitecore has no content to interact with the head application. I will add the content from the template but let’s make the could deployment first.

Deploy to the Cloud

ReadMe document suggests an inconvenient way of cloud deployment:

1. Create a repository from this template.

2. Log into the Sitecore Deploy Portal.

3. Create a new project using the ‘bring your code’ option, and select the repository you created in step 1.

For the majority of us, who are on the Sitecore Partner side, there are only six environments available grouped into two projects. These allocations are priceless and are carefully shared between all XM Cloud enthusiasts and aspirants who are learning a new platform. We cannot simply “create a new project” because we don’t have that spare project, so in order to create one we have to delete the existing one. Deleting a project requires deleting all (three) of its environments in the first place, which is half of the sandbox capacity, carrying valuable work in progress for many individuals.

That is why I decided to use CLI instead. Luckily it works exactly the same as it does with Next.Js starter kits, and from .\.config\dotnet-tools.json you may see that it uses that same version. You deploy the root folder holding xmcloud.build.json file as a working directory, so there are no changes in execution.

Eventually, once deployed we navigate to XM cloud. I decided to follow the ReadMe and create a Basic site from Skate Park template. Basically, I am following steps 4-18 from the ReadMe file.


As a side exercise, you will need to remove a Navigation component from a Header partial item, located at /sitecore/content/Basic/Basic/Presentation/Partial Designs/Header. Basic site will break in the debugger if you do not delete currently incompatible rendering that has a serialization issue.

Building Dev Tunnel in Visual Studio

Next, let’s open and build the solution in the Visual Studio IDE, which refers to .\headapps\aspnet-core-starter.sln file. You may see it related to three Sitecore dependencies from Sitecore.AspNetCore.SDK.LayoutService.Client:

  • Transient: Sitecore.AspNetCore.SDK.LayoutService.Client.Interfaces.ISitecoreLayoutClient
  • Singleton: Sitecore.AspNetCore.SDK.LayoutService.Client.Serialization.ISitecoreLayoutSerialize
  • Singleton: Sitecore.AspNetCore.SDK.LayoutService.Client.Serialization.Converter.IFieldParser

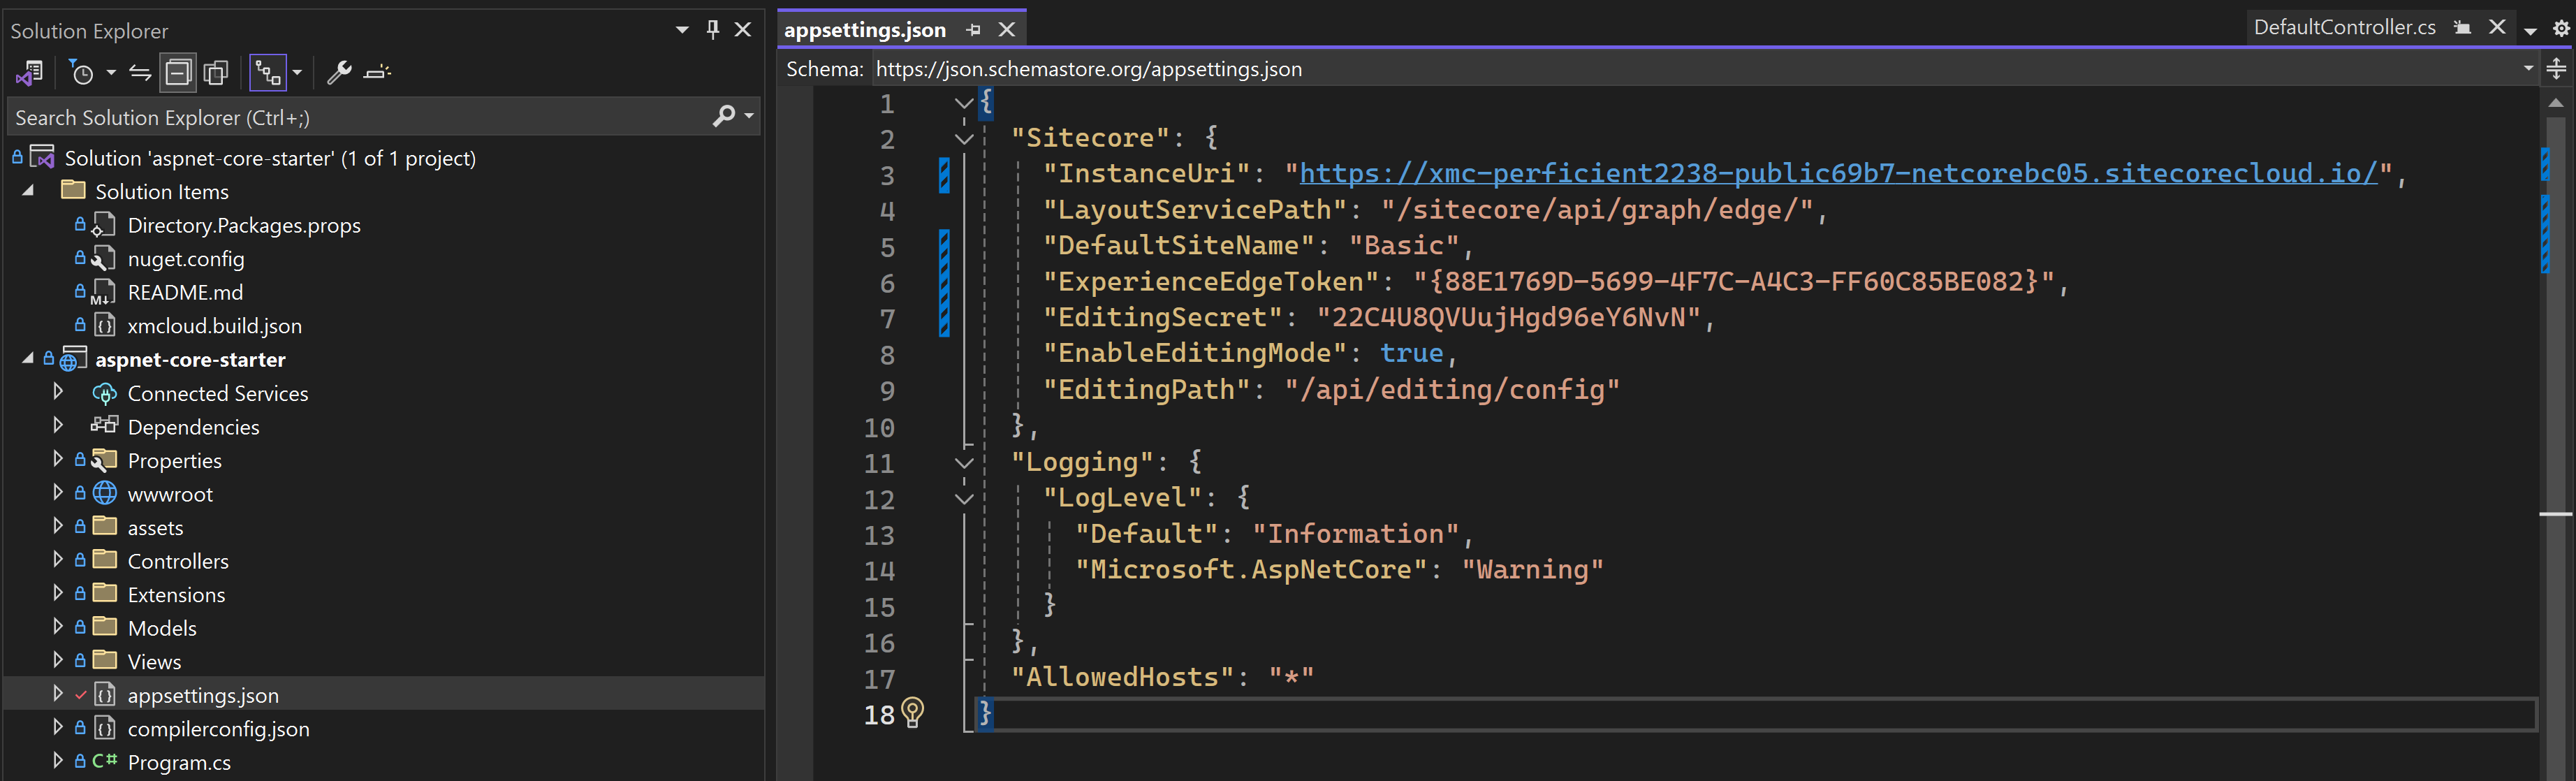
Modify .\headapps\aspnet-core-starter\appsettings.json with the setting values collected from the previous steps. You will end up with something looking as:

Appsettings.json

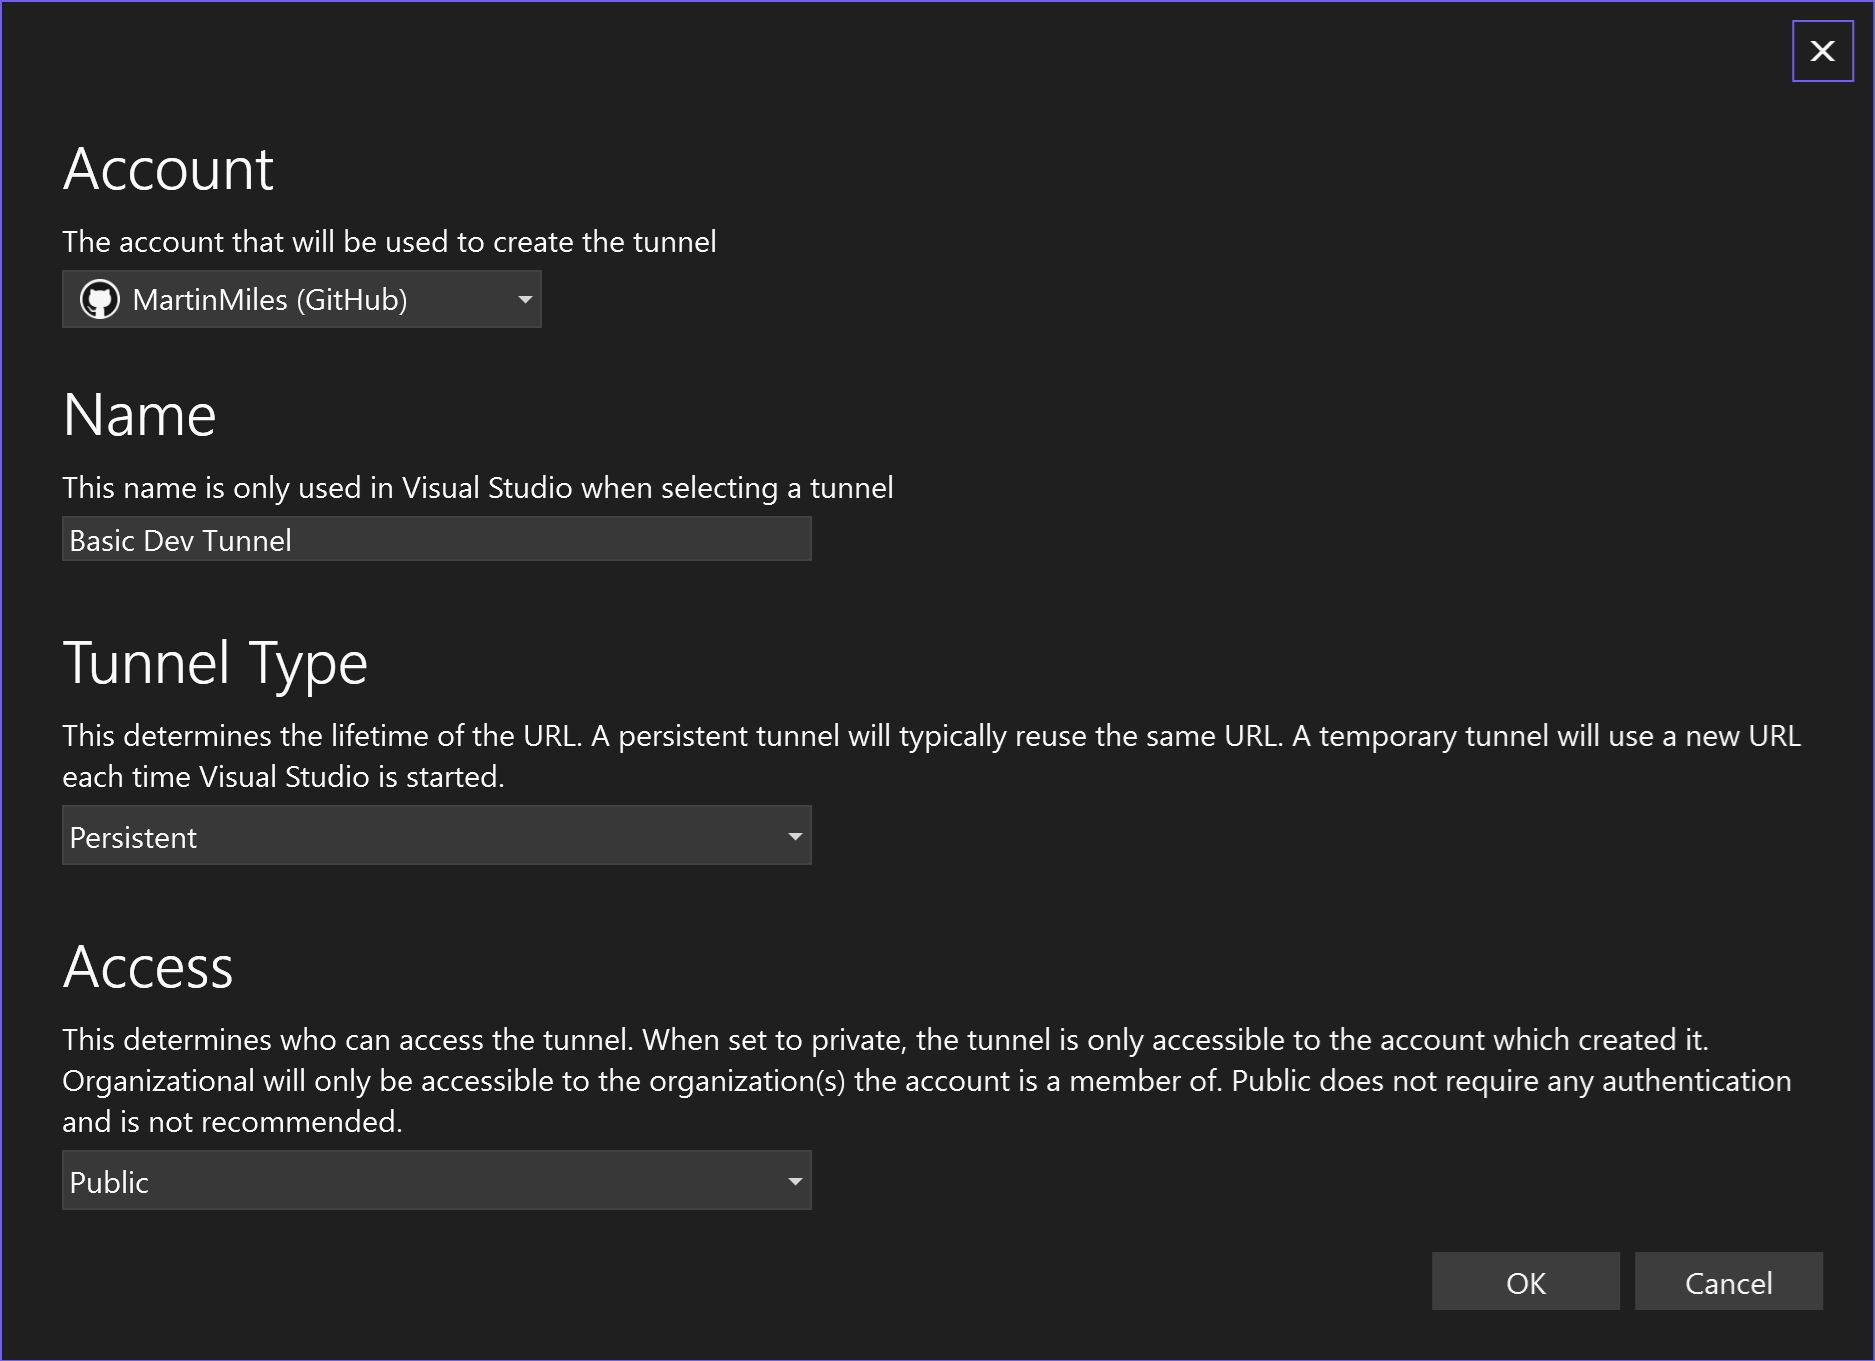
Now let’s create a Dev Tunnel in VisualStudio:

Dev Tunnel

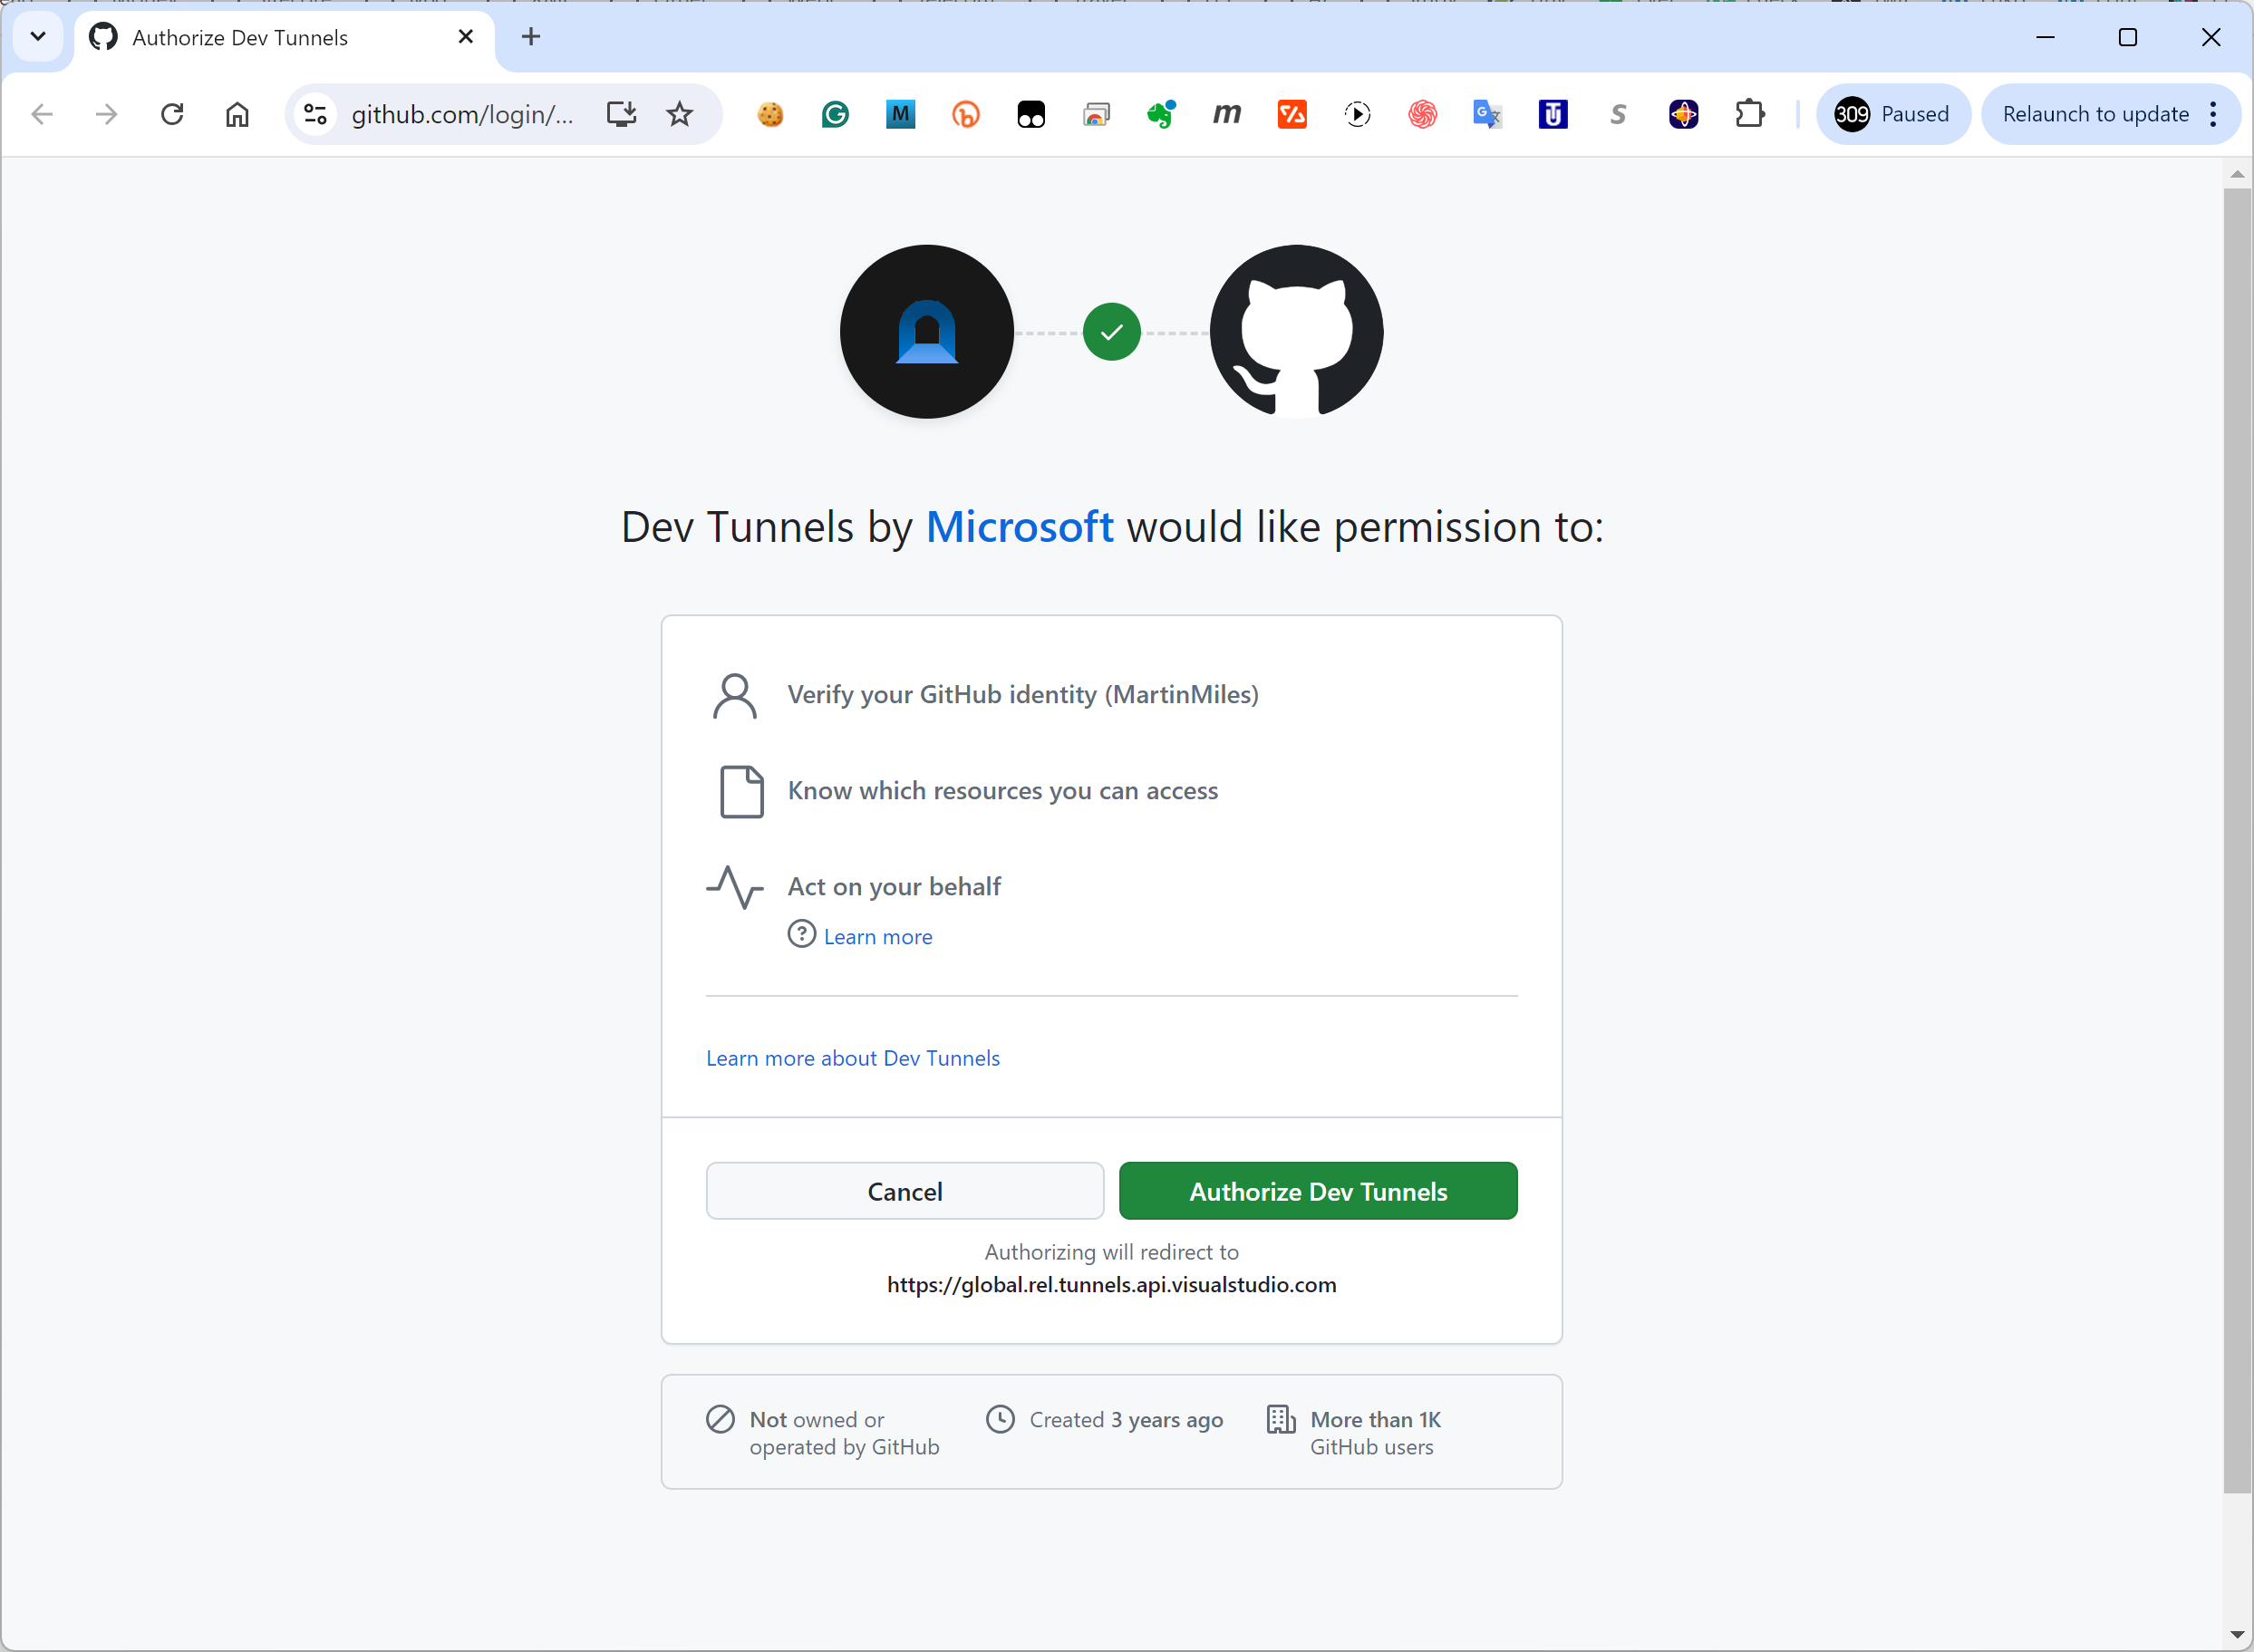
There will be at least two security prompts:

Dev Tunnel Authorize Github Dev Tunnel Authorize Notice

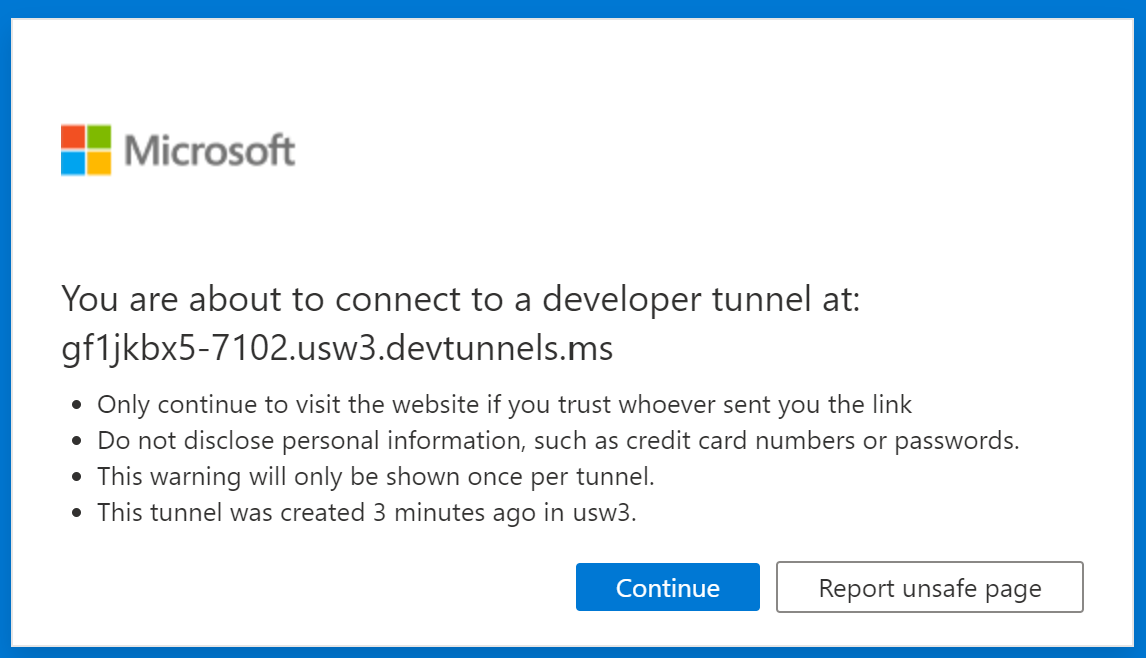
If everything goes well, a confirmation message pops up:

Dev Tunnel Created

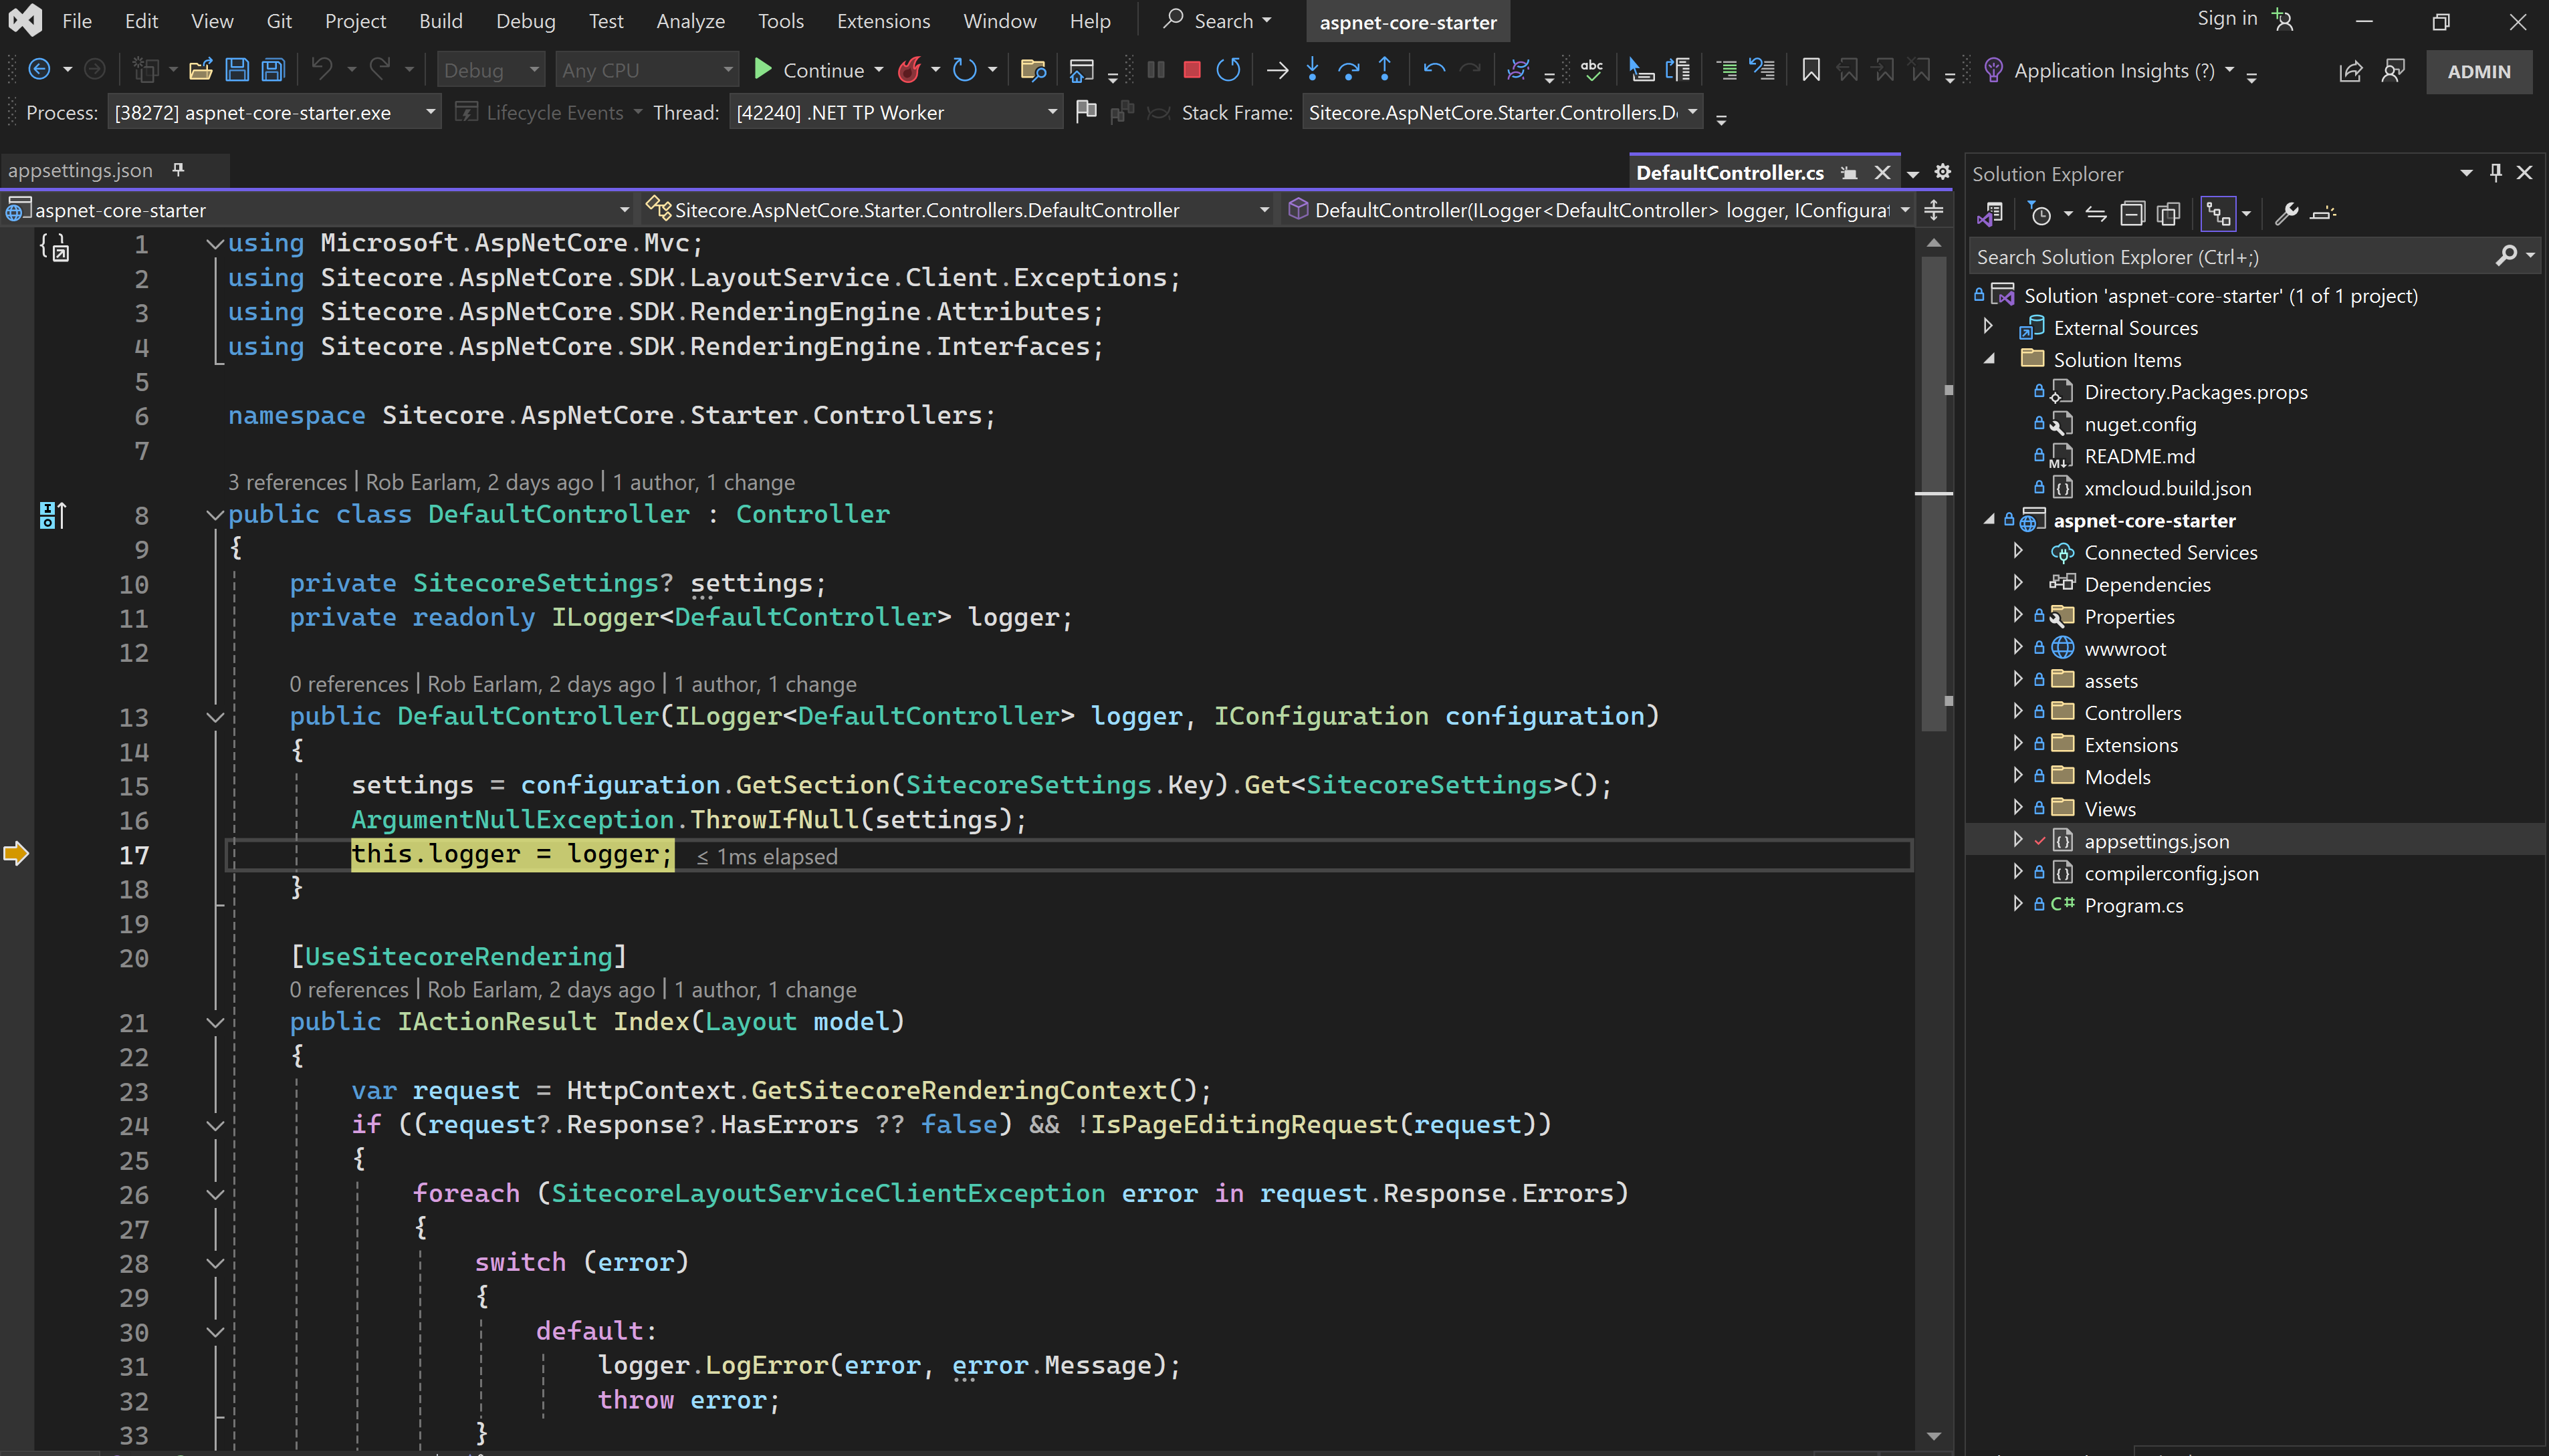
Now you will be able to run and debug your code in Visual Studio:

Debugger Works

Make a note of the dev tunnel URL, so that we can use it to configure Rendering Host, as described at step 27 of ReadMe. You will end up with something as below:

Rendering Hosts

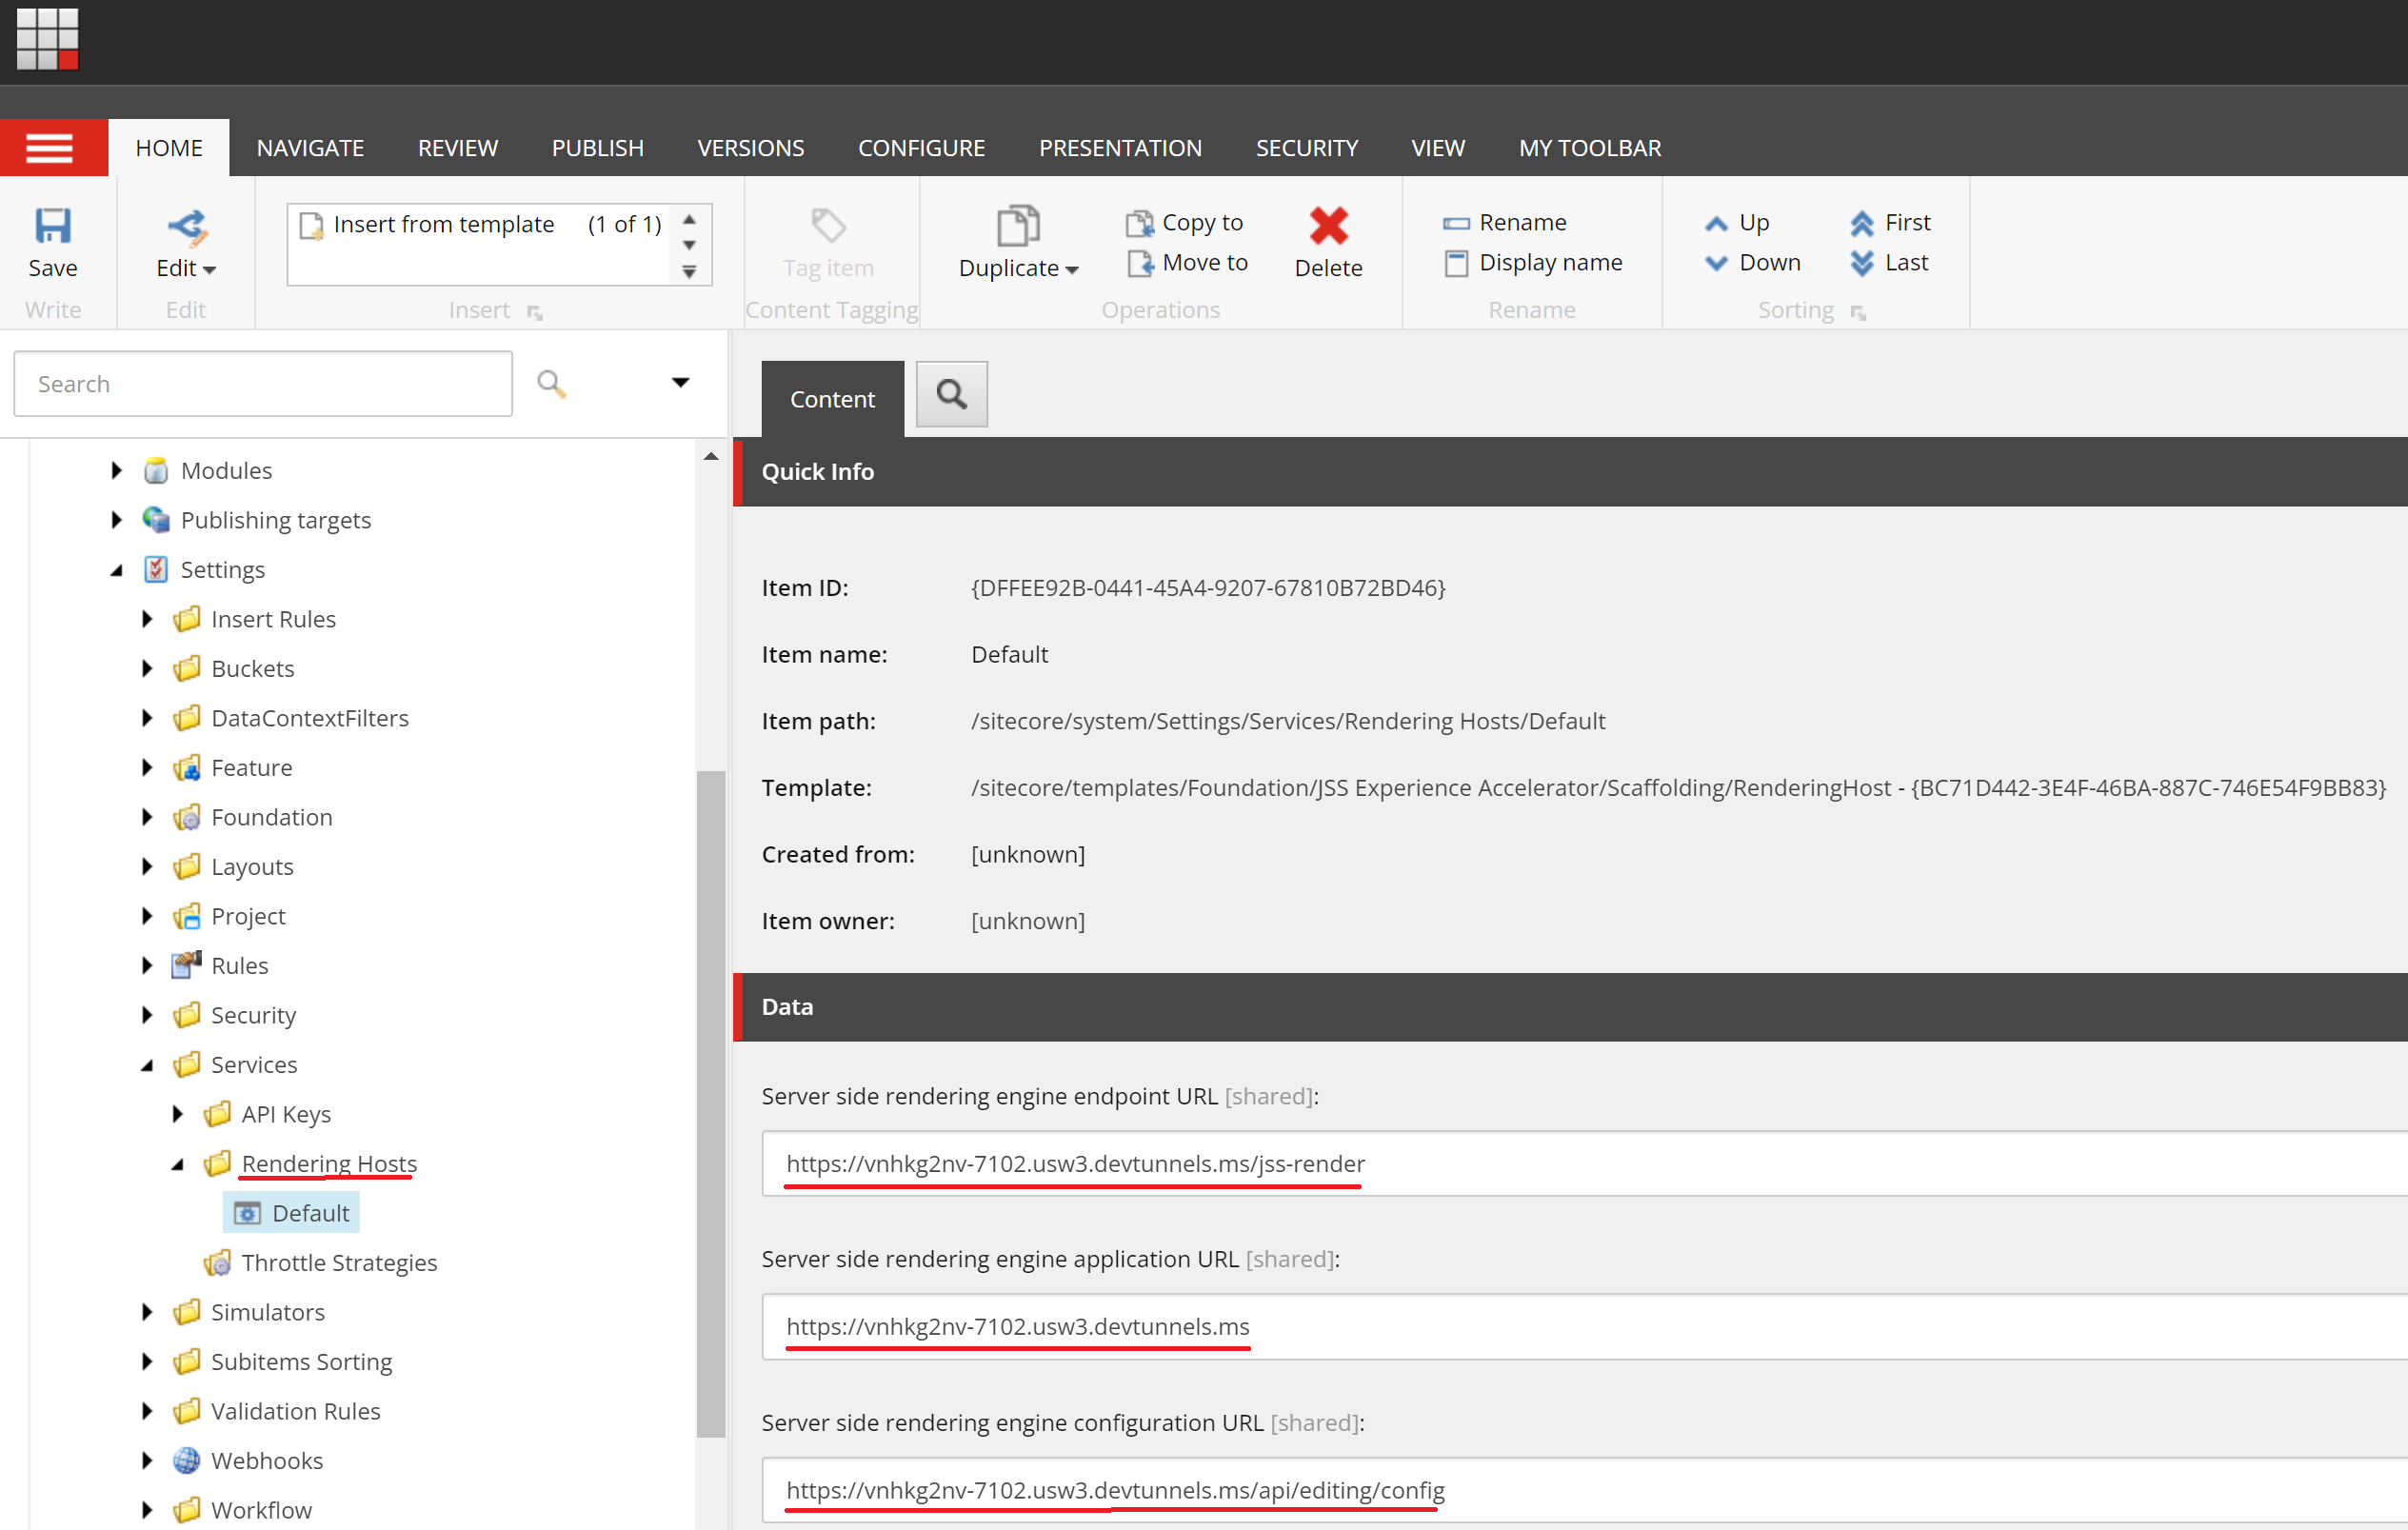
So far so good. You can now run the website by URL and in Experience Editor. Running in Page will however not work yet due to the below error:

No Pages Without Publish

To explain that, Experience Editor runs as a part of CM and pulls content from a GraphQL endpoint on that same CM. Pages instead is a standalone separate application, so it does not have access neither to the endpoint nor to the Rendering Hosts settings item. It only has access to Experience Edge so we must publish first. Make sure you publish the entire Site Collection. Once complete, Page works perfectly well and displays the site:

Pages Work 1 Pages Work 2

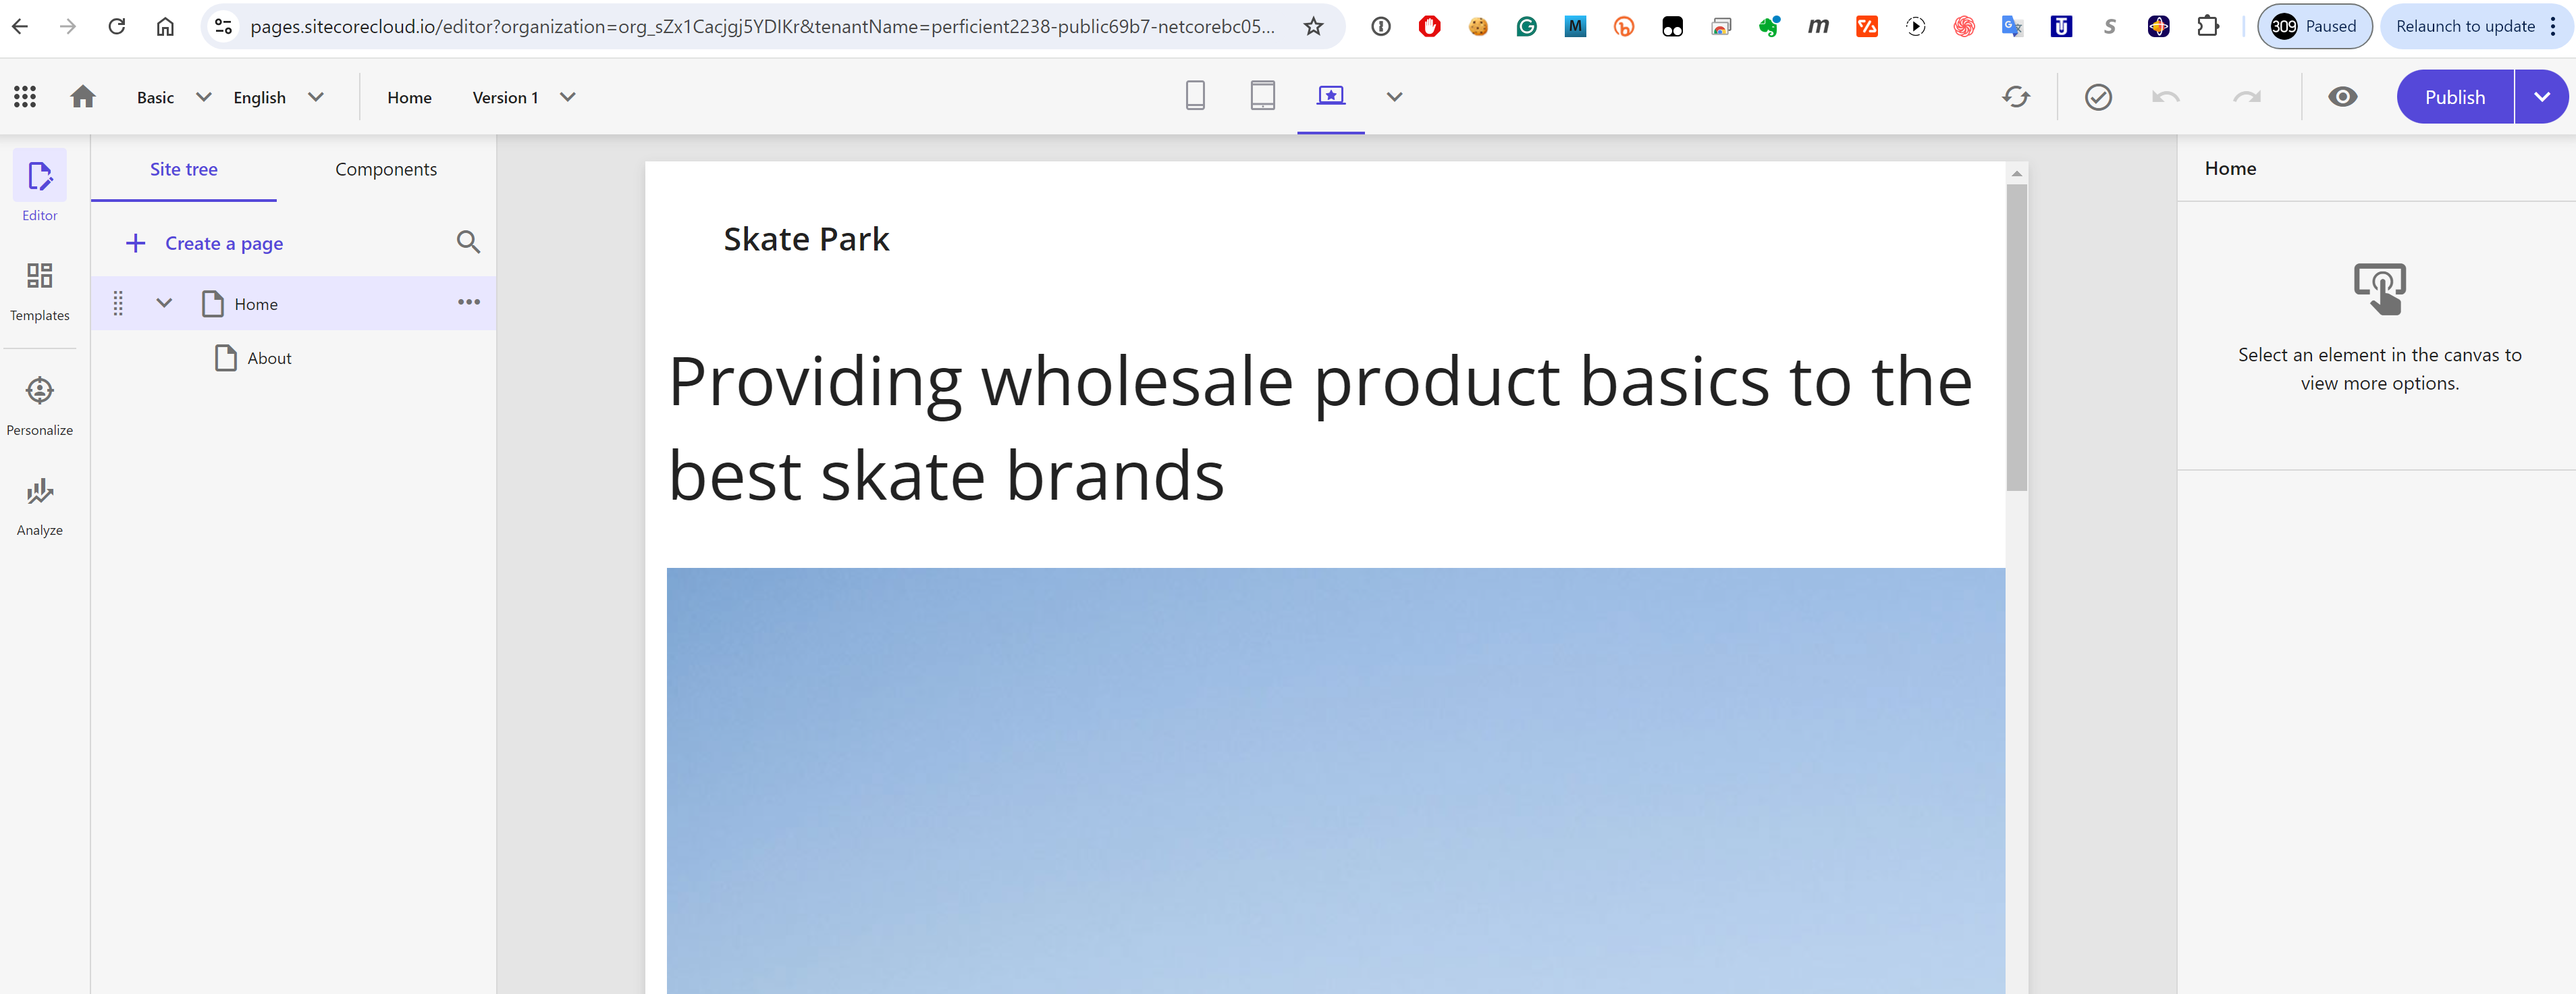
To explain what happens above: Pages app (which is a SaaS-run editor) pulls Experience Edge for the settings of the rendering editing host (which runs in a debuggable dev tunnel from Visual Studio) and renders HTML right there with the layout data and content pulled from Experience Edge.

Deploy Rendering Host to Cloud

Without much thinking, I decided to deploy the rendering host as Azure Web App, with the assumption that the .NET 8 application would be best supported in its native cloud.

Web App Configure

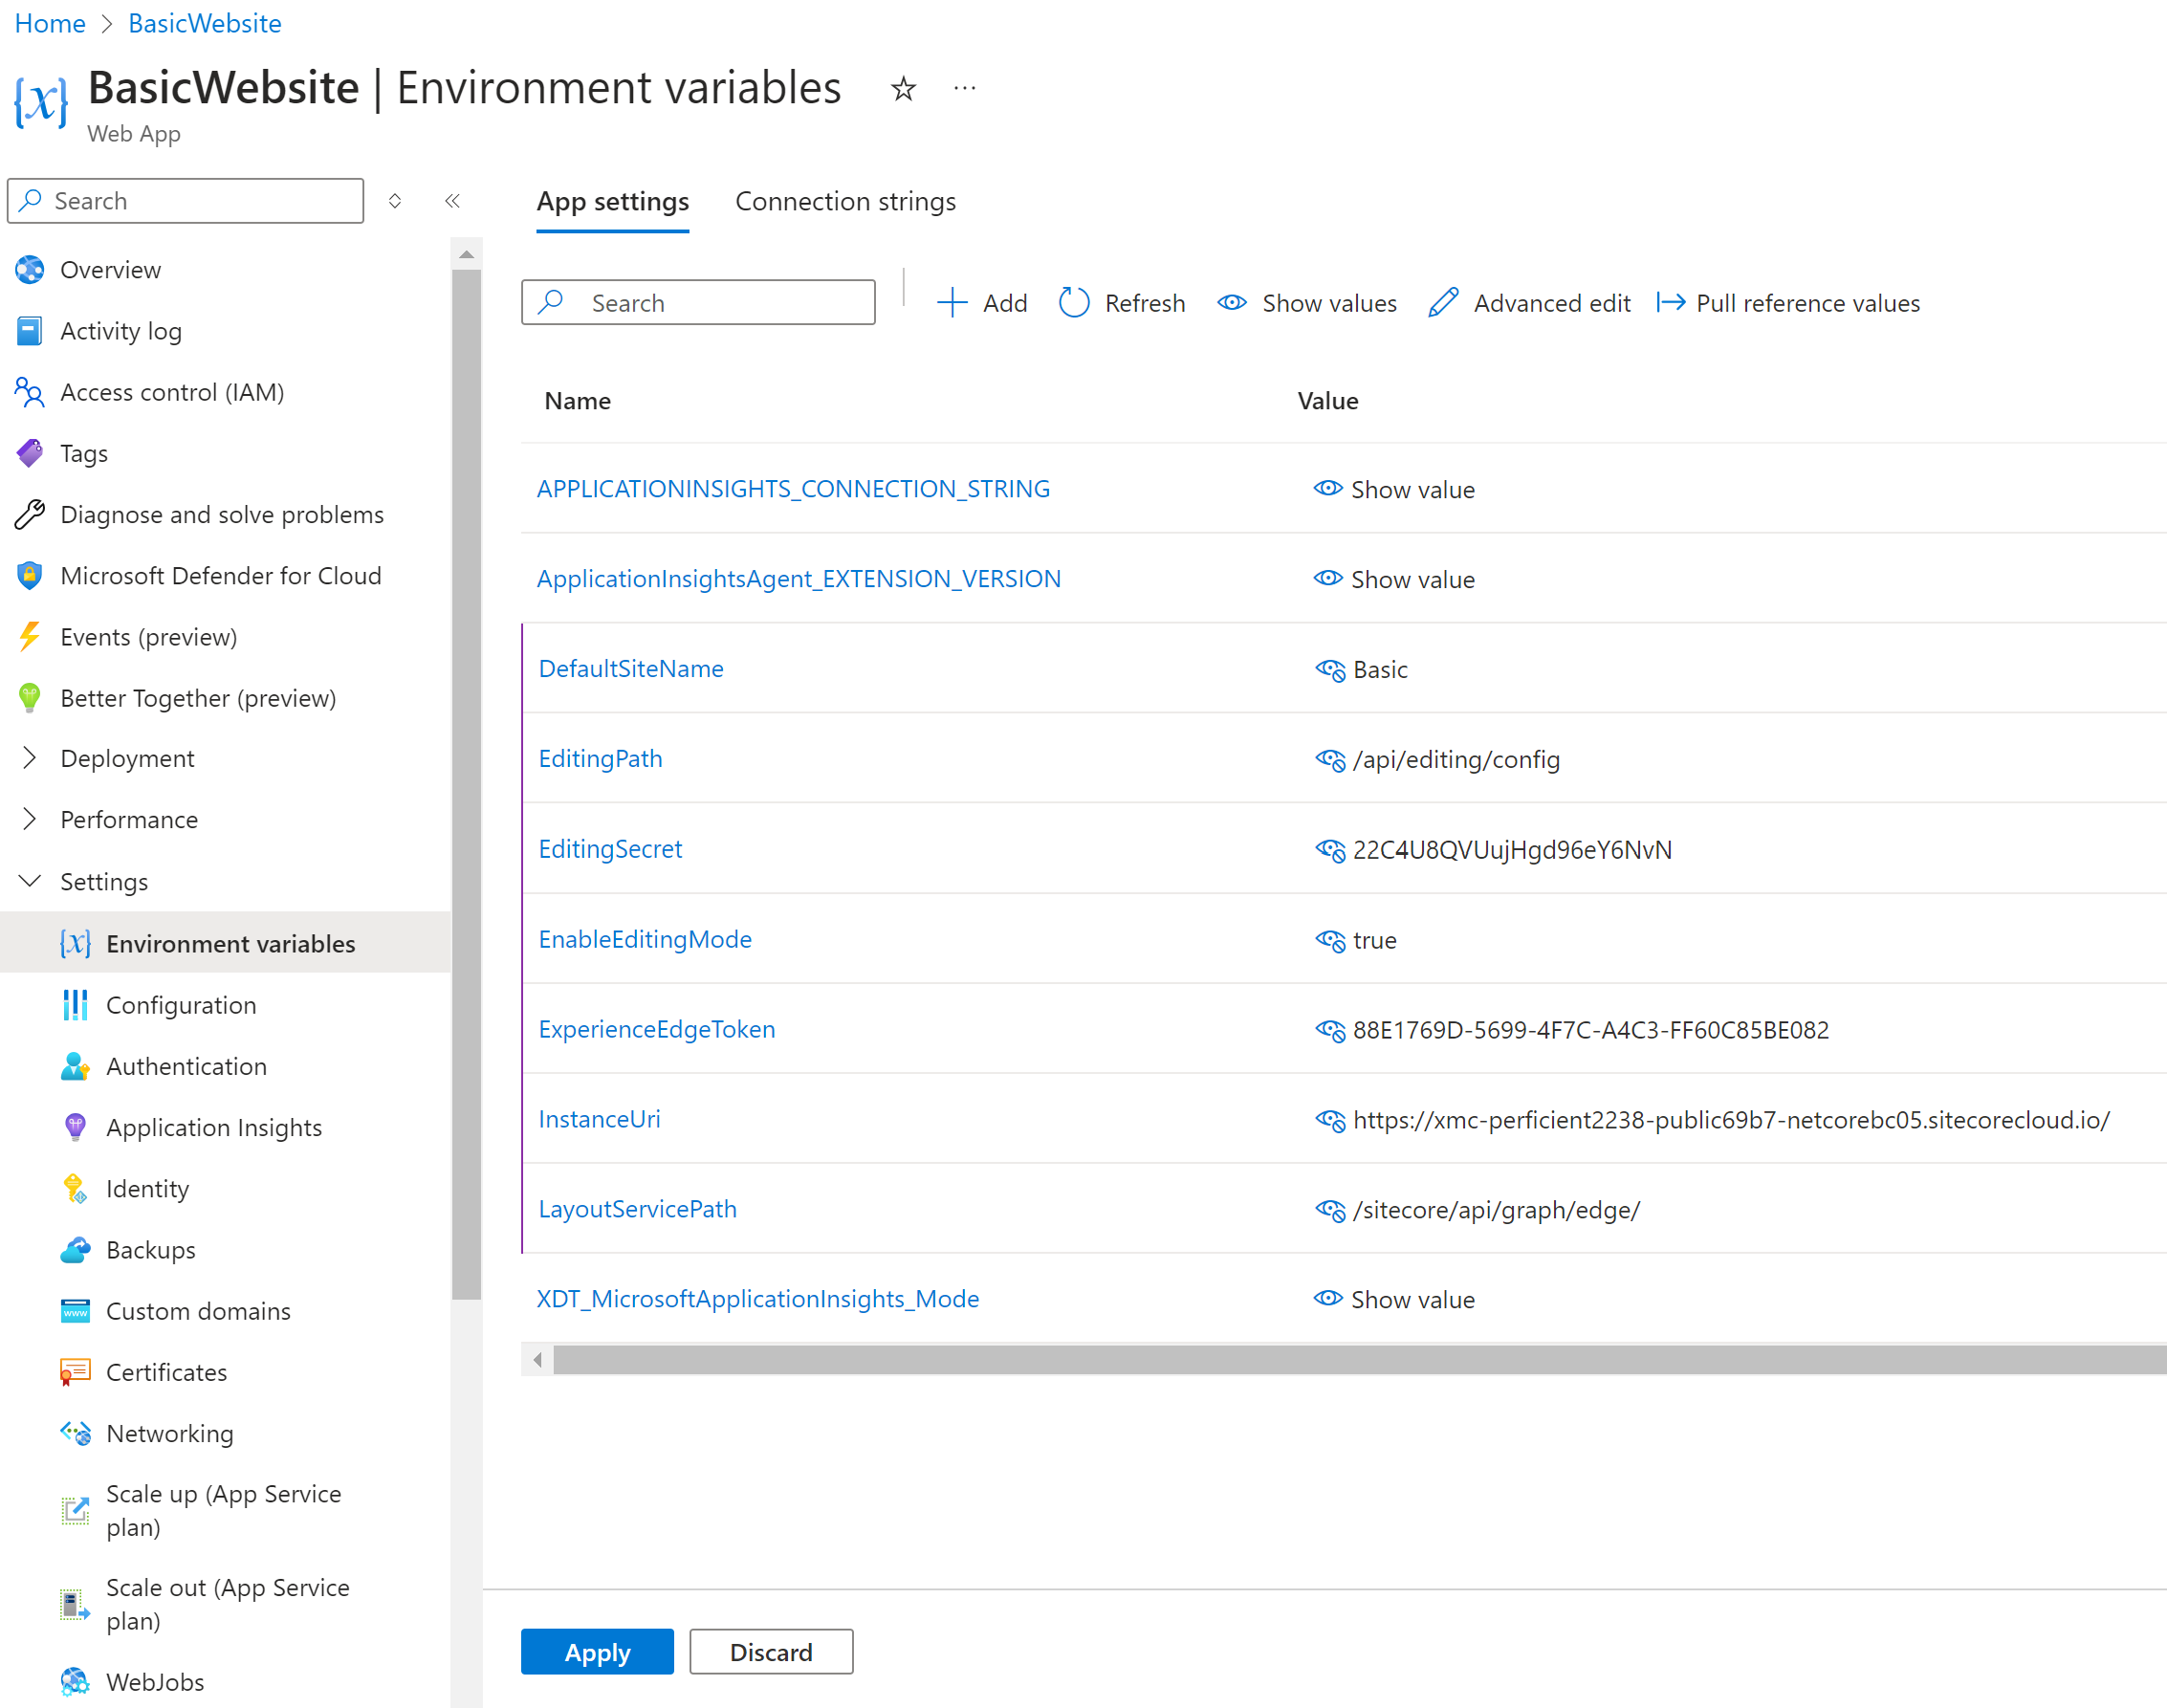
After the Web App is created, add the required environmental variables. The modern SITECORE_EDGE_CONTEXT_ID variable is not yet supported with .NET Core SDK, so we should go the older way:

Azure App Settings

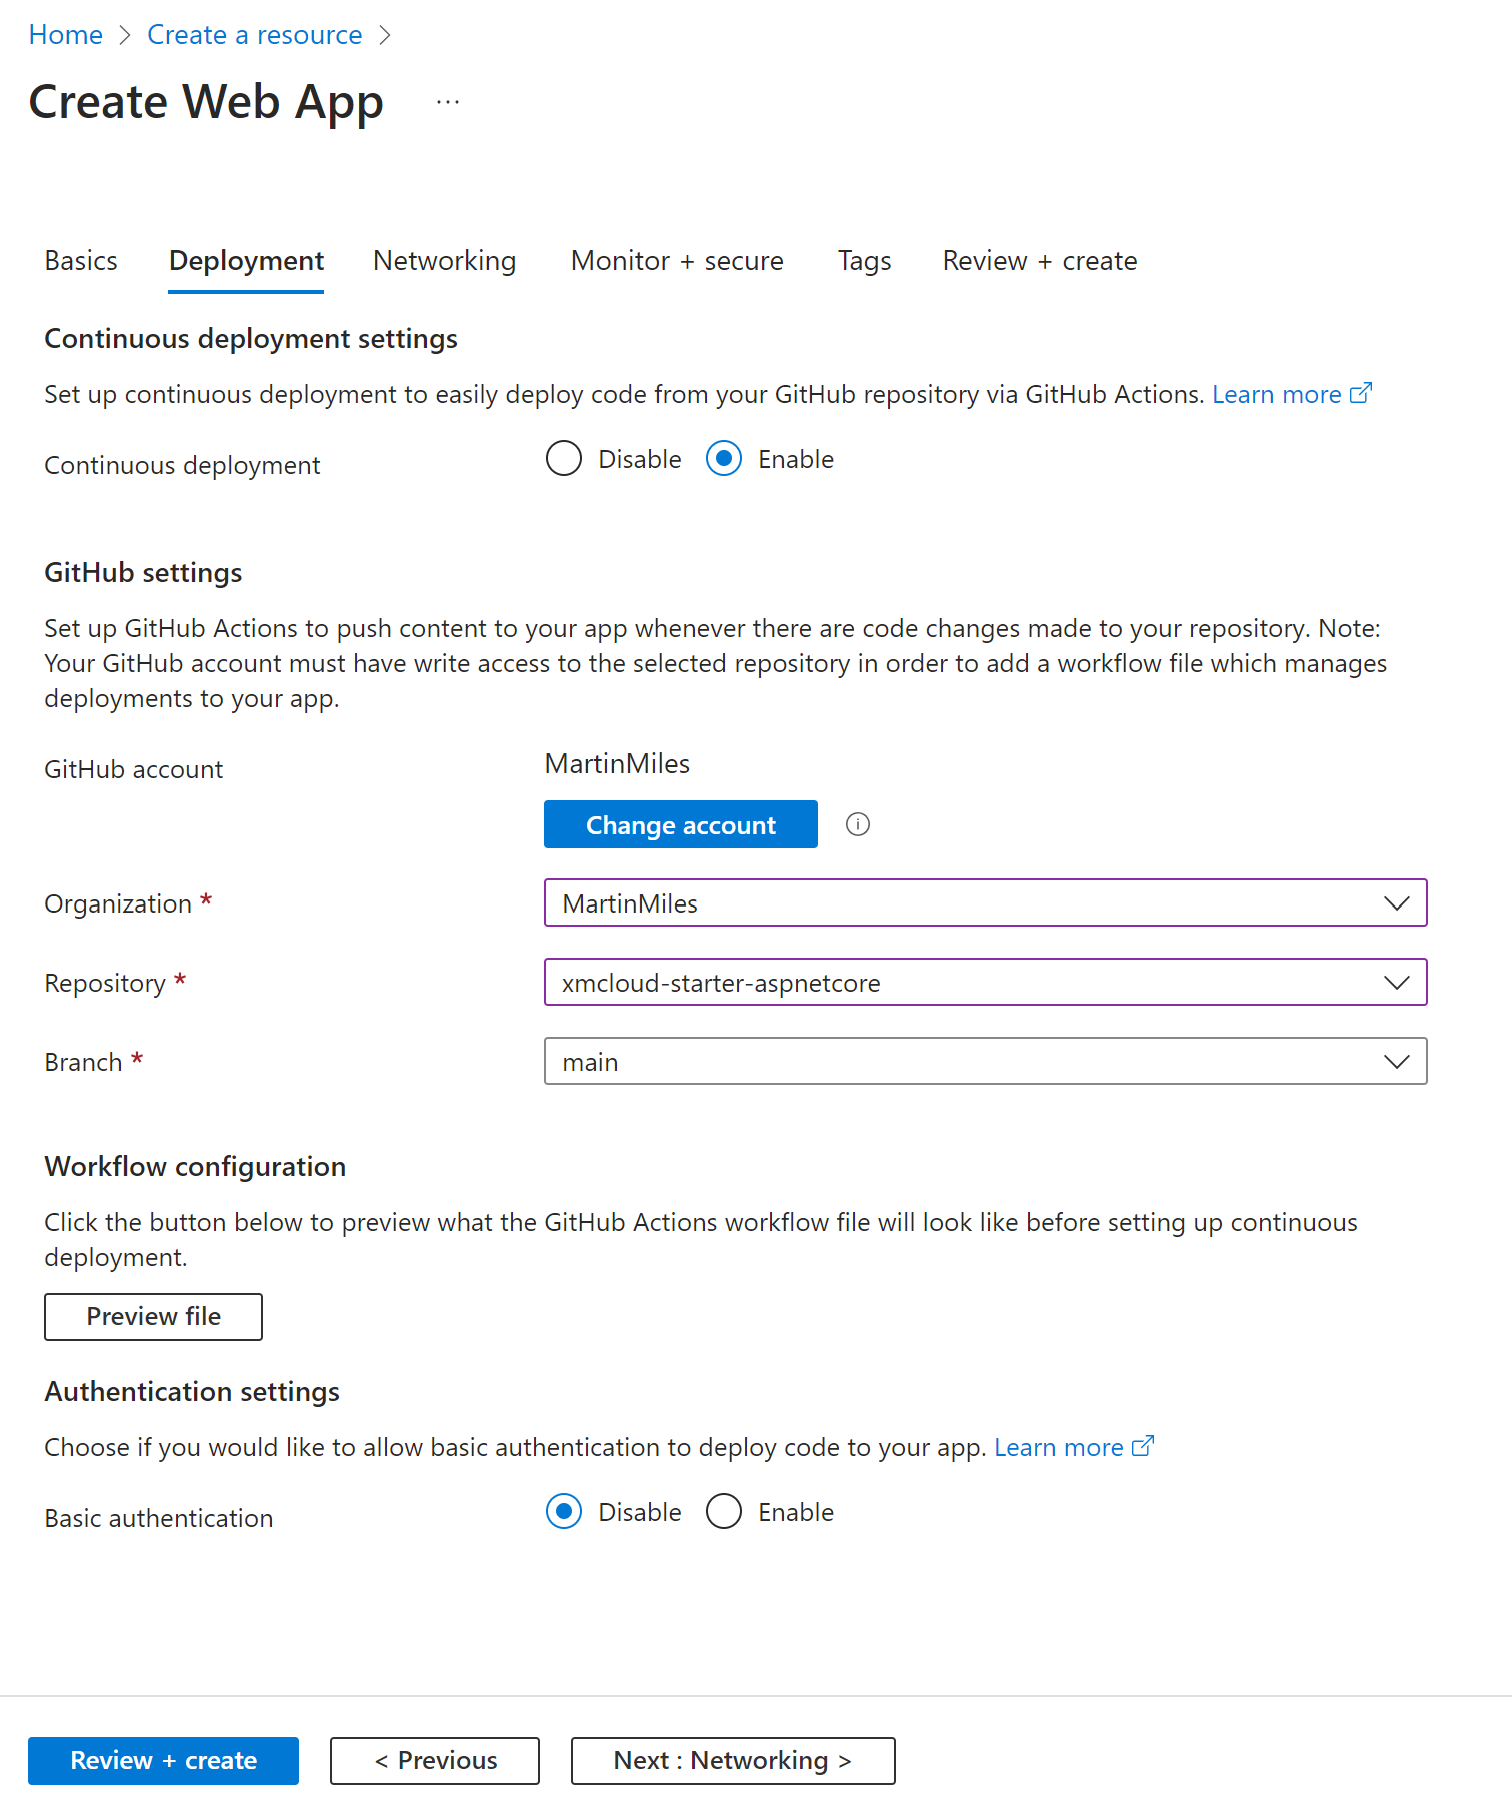
A pleasant bonus of GitHub integration is that Azure creates GitHub Actions workflow with the default functional build and deployment. There is almost nothing to change,  I only made a single fix replacing this run: dotnet publish -c Release -o ${{env.DOTNET_ROOT}}/myapp with a hardcoded path since this variable contains space from “Program Files” part and is incorrectly tokenized breaking the build. After this fix, GitHub actions got built the right way and I started receiving green status:

Github Actions

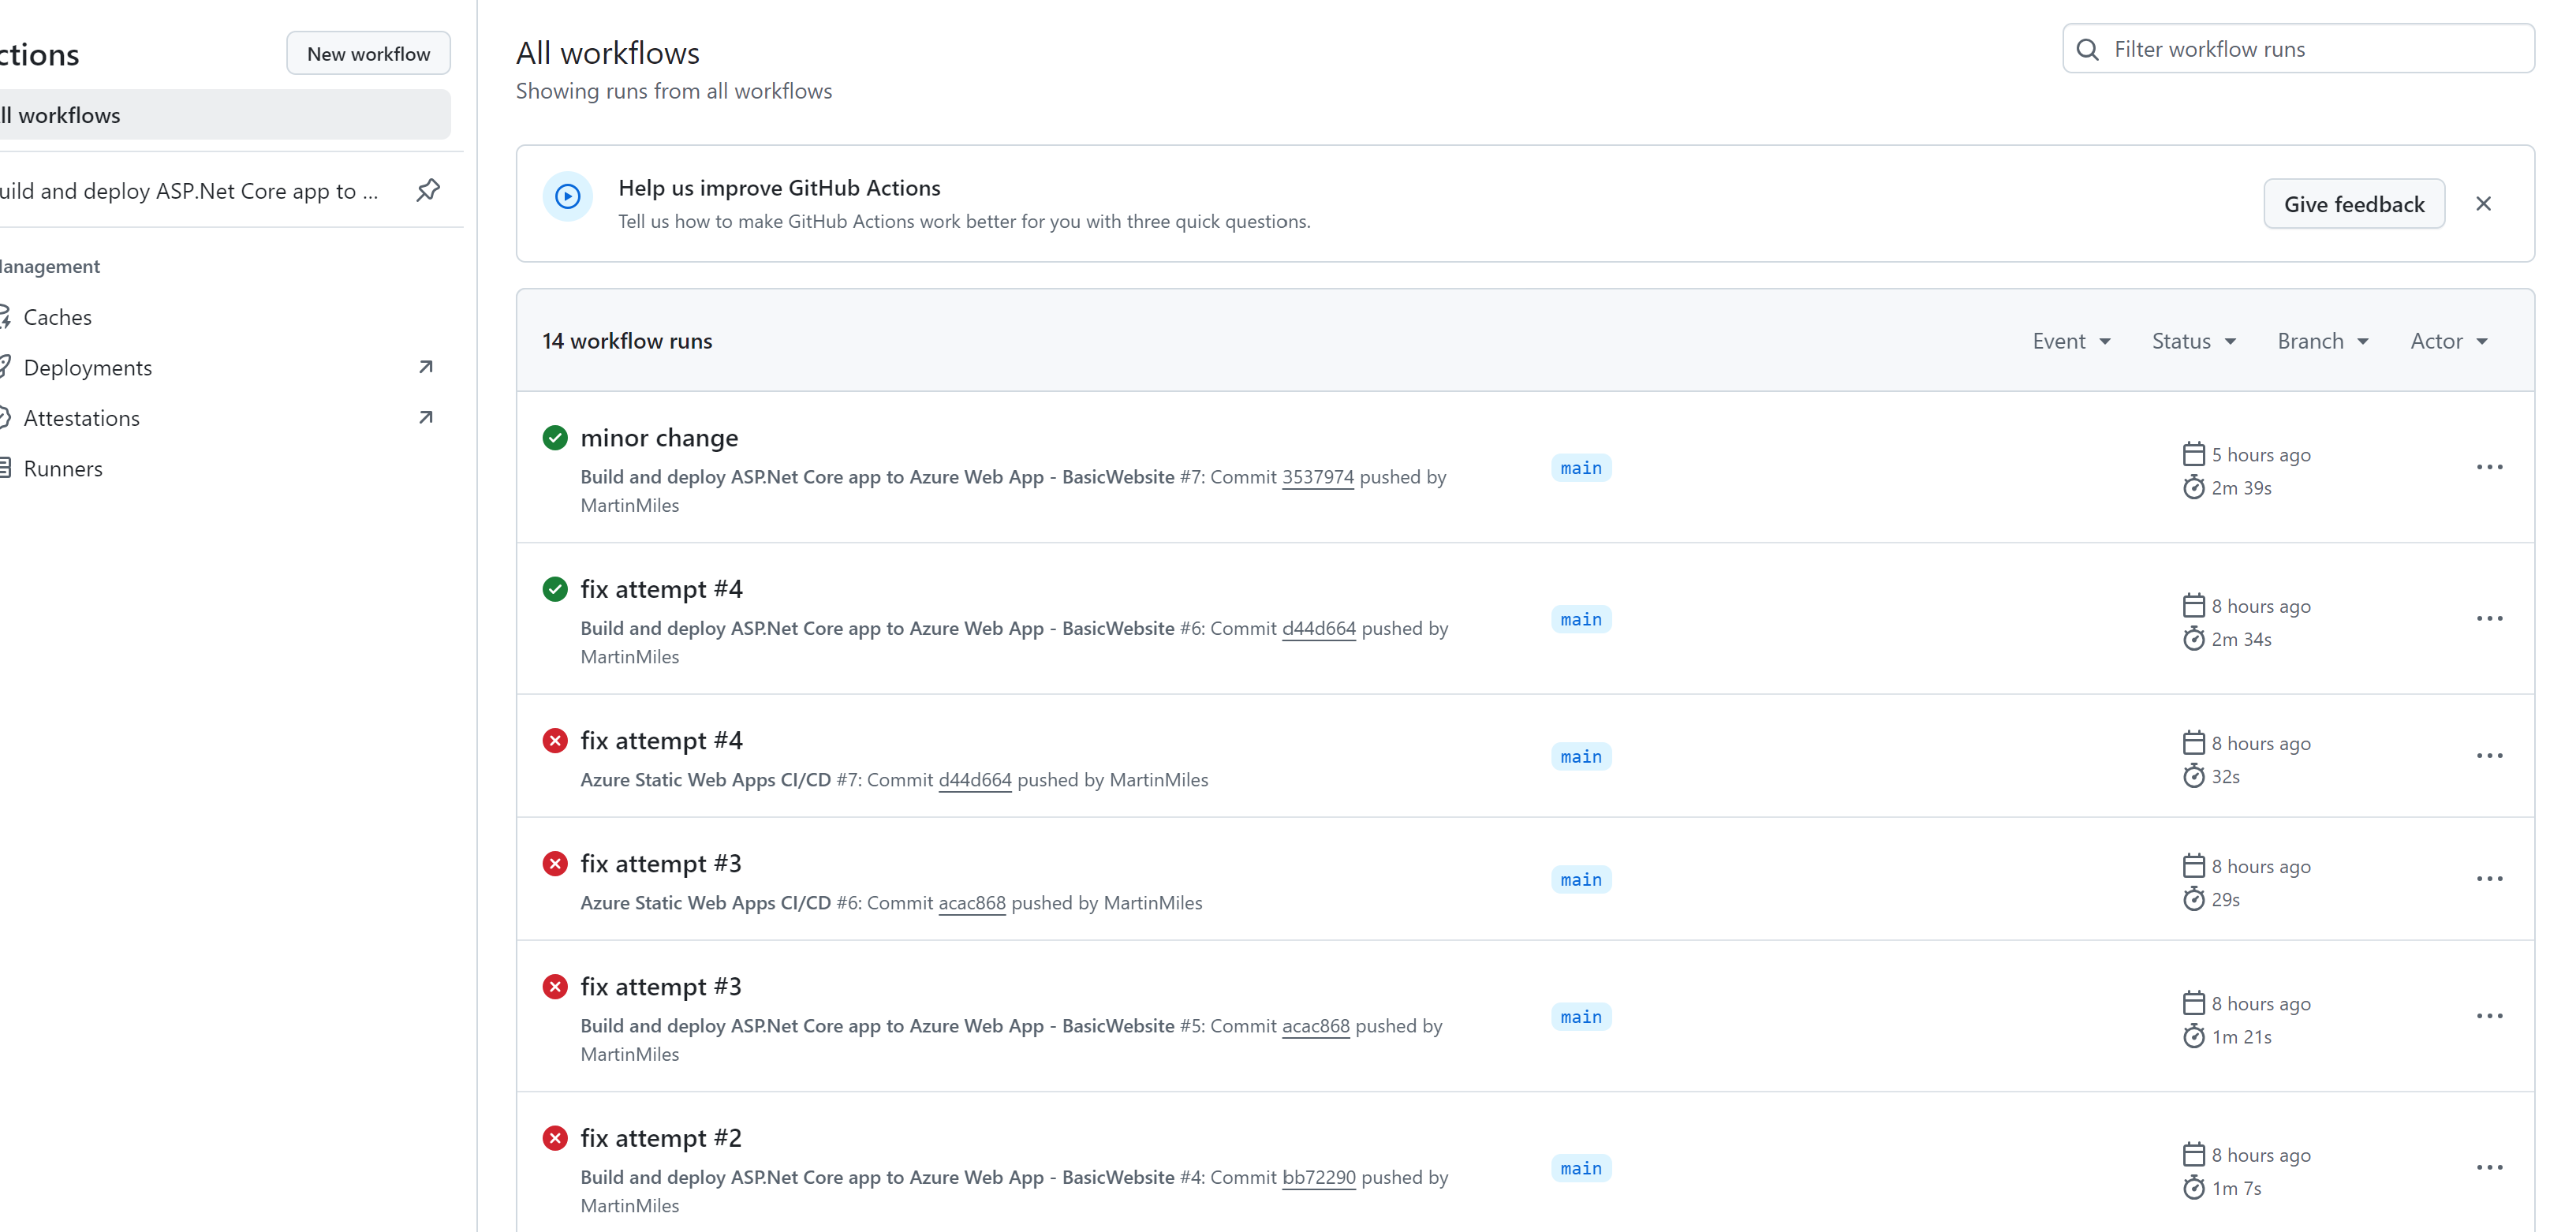
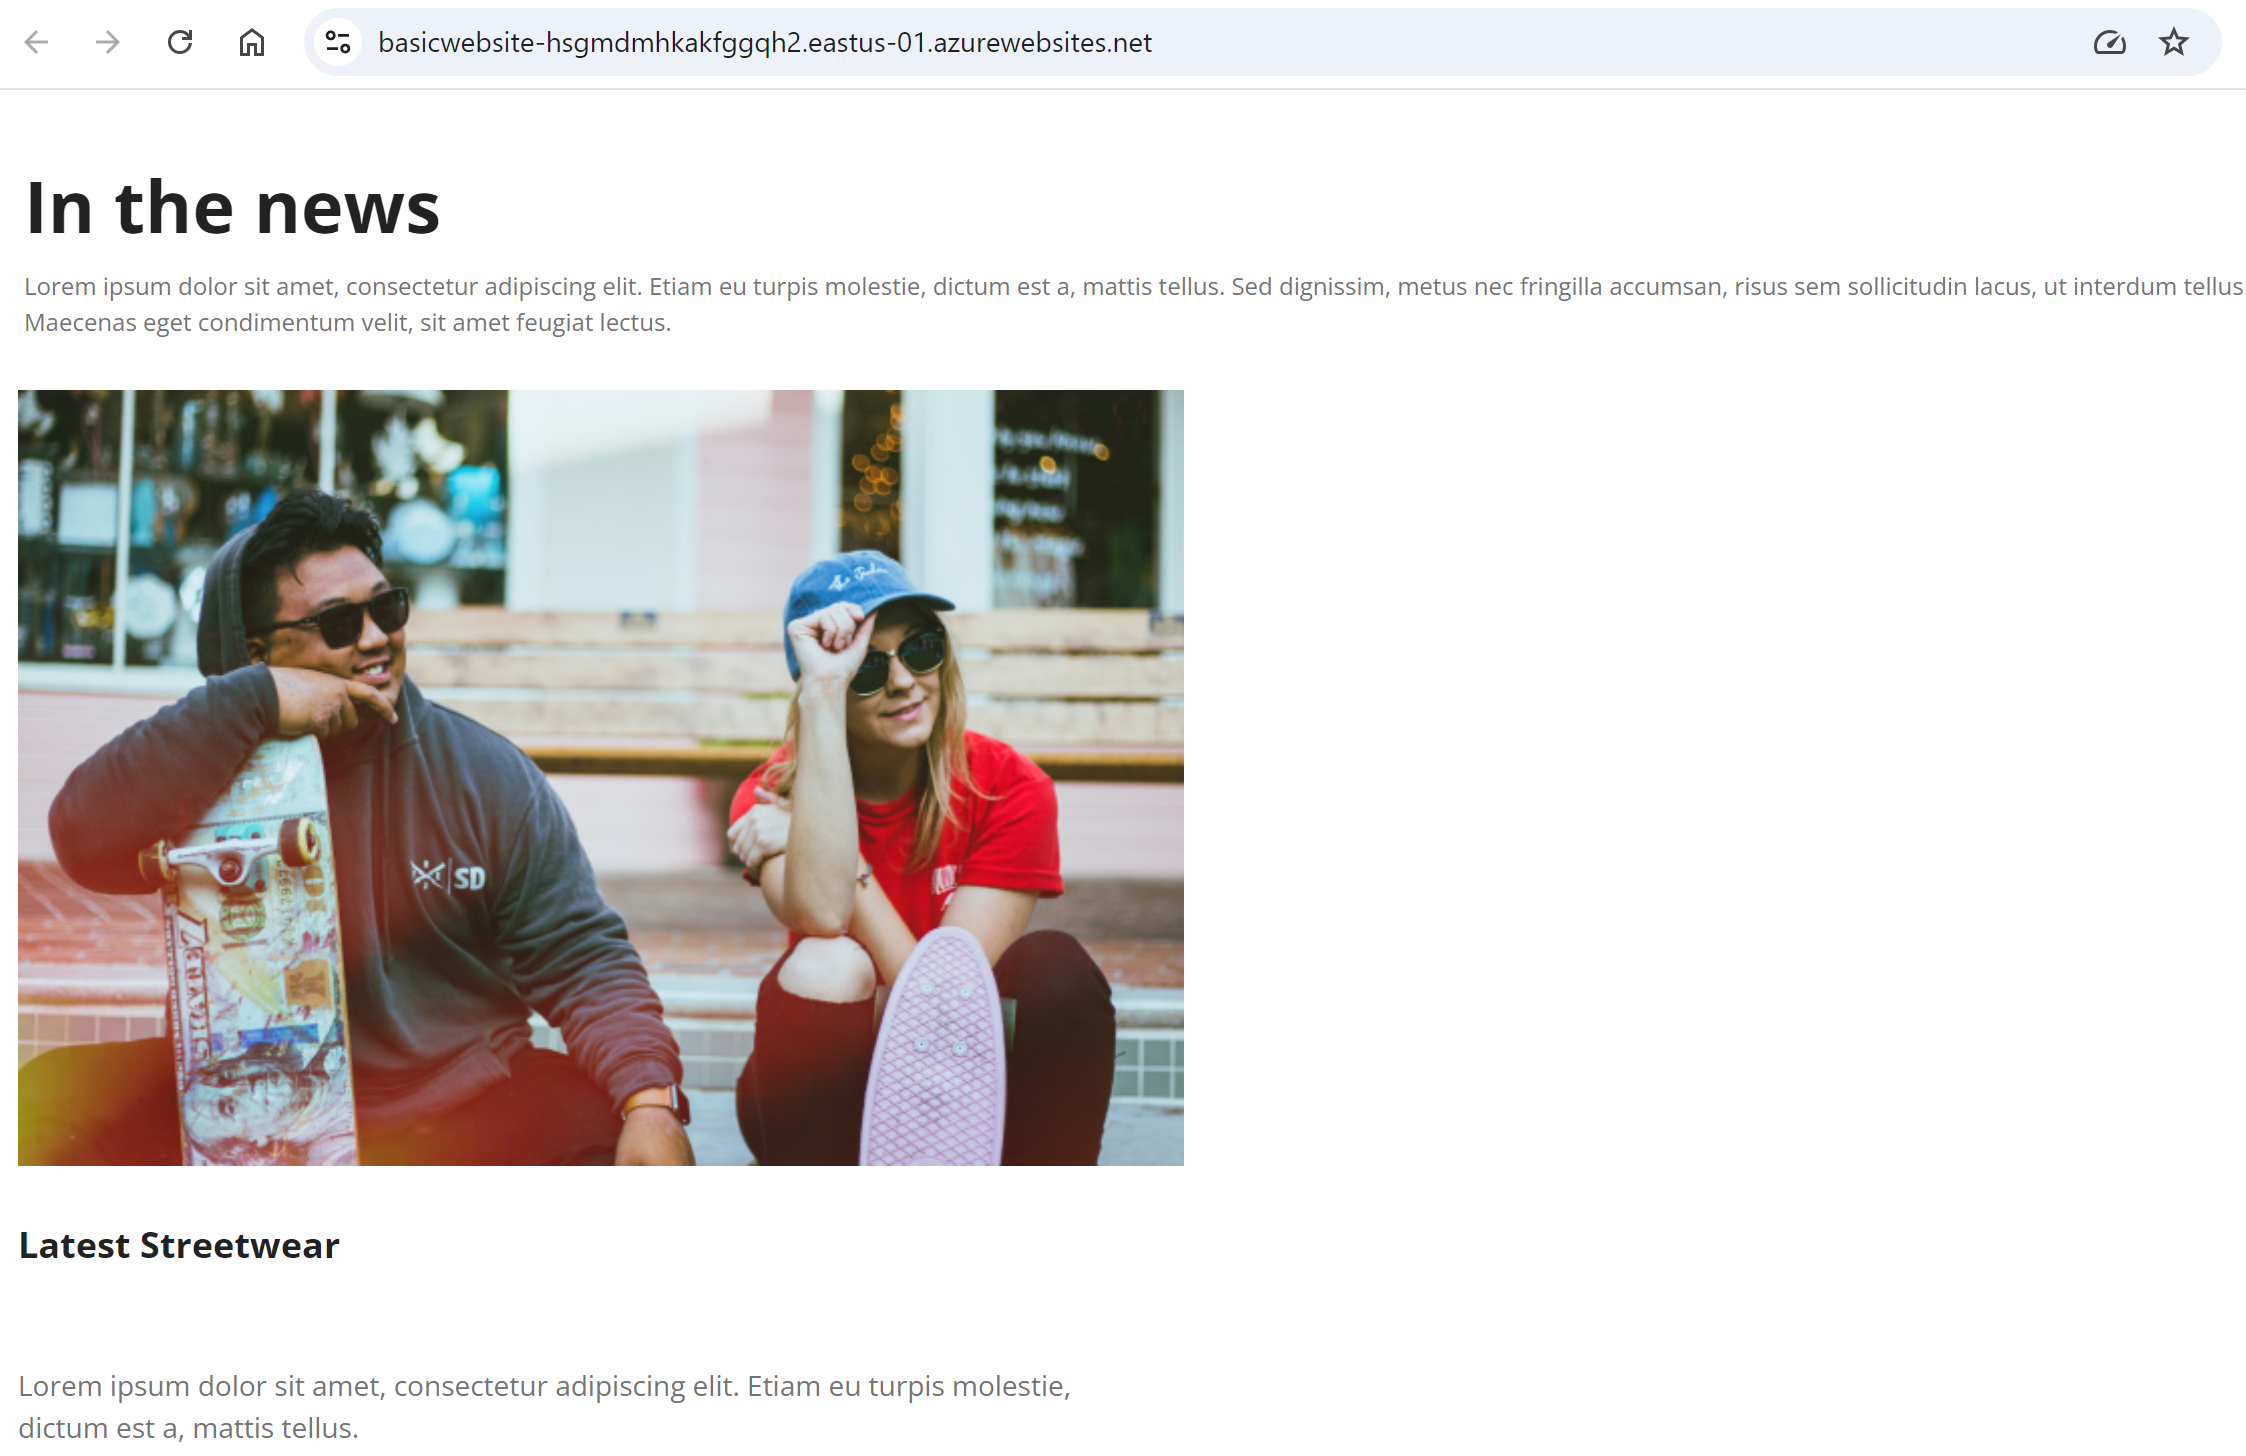
… and the published site shows up from the Azure Web App powered rendering host:

Published Site

Finally, we can get rid of Dev Tunnel, replacing it with the actual “published site” hostnames:

Getting Rid Of Dev Tunnel

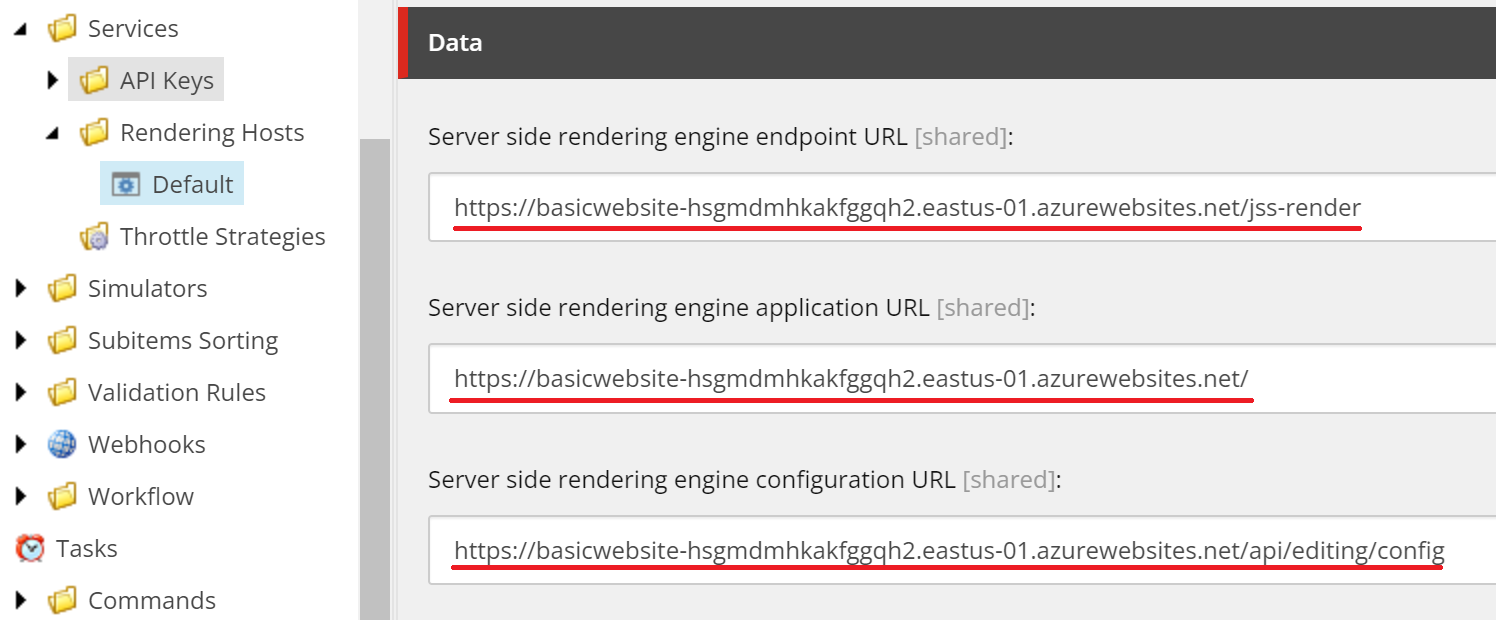
After republishing the Rendering Host item to Edge, we can stop the debugger and close Visual Studio. Both Experience Editor and Pages app are now working with an editing host served by the Azure Web App.

Verdict

Of course, that would be much anticipated for XM Cloud to have built-in .NET editing host capabilities same way as JSS does. But even without it, I applaud to Sitecore development team for making and keeping working on this starter kit as that is a big milestone for all of us within the .NET Community!

With this kit, we can now start building XM Cloud powered .NET app at a faster pace. I believe all the missing features will find their way to the product, and maybe later there will be some (semi)official SSG support for .NET, something like  Statiq. That will allow deployments to a wider set of hosting, such as Azure Static Web Apps, Netlify, and even Vercel which does not support .NET as of today.

Full guide to enabling Headless Multisite Add-On for your XM Cloud solution

Sitecore Headless Next.Js SDK recently brought the feature that makes it possible to have multiple websites from Sitecore content tree being served by the same rendering hoist JSS application. It uses Next.js Middleware to serve the correct Sitecore site based on the incoming hostname.

Why and When to Use the Multisite Add-on

The Multisite Add-on is particularly useful in scenarios where multiple sites share common components or when there is a need to centralize the rendering logic. It simplifies deployment pipelines and reduces infrastructure complexity, making it ideal for enterprises managing a portfolio of websites under a unified architecture. This approach saves resources and ensures a consistent user experience across all sites.

How it works

The application fetches site information at build-time, not at runtime (for performance reasons). Every request invokes all Next.js middleware. Because new site additions are NOT frequent, fetching site information at runtime (while technically possible) is not the best solution due to the potential impact on visitor performance. You can automate this process using a webhook to trigger automatic redeployments of your Next.js app on publish.

Sitecore provides a relatively complicated diagram of how it works (pictured below), but if you do not get it from the first look, do not worry as you’ll get the understanding after reading this article.

Uuid 8601bf89 50ab 5913 42ed 4773b05ab2c3[1]

Technical Implementation

There are a few steps one must encounter to make it work. Let’s start with the local environment.

Since multisite refers to different sites, we need to configure hostnames. The Main site operates on main.localhost hostname, and it is already configured as below:

.\.env
    RENDERING_HOST=main.localhost
.\docker-compose.override.yml
    PUBLIC_URL: "https://${RENDERING_HOST}"

For the sake of the experiment, we plan to create a second website served by second.localhost locally. To do so, let’s add a new environmental variable to the root .env file (SECOND_HOST=second.localhost) and introduce some changes to init.ps1 script:

$renderingHost = $envContent | Where-Object{$_ -imatch "^RENDERING_HOST=.+"}
$secondHost = $envContent | Where-Object{$_ -imatch "^SECOND_HOST=.+"}
$renderingHost = $renderingHost.Split("=")[1]
$secondHost = $secondHost .Split("=")[1]

down below the file we also want to create SSL certificate for this domain by adding a line at the bottom:

& $mkcert -install
# & $mkcert "*.localhost"
& $mkcert"$xmCloudHost"
& $mkcert"$renderingHost"
& $mkcert"$secondHost"

For Traefic to pick up the generated certificate and route traffic as needed, we need to add two more lines at the end of .\docker\traefik\config\dynamic\certs_config.yaml file:

tls:
certificates:
    - certFile:C:\etc\traefik\certs\xmcloudcm.localhost.pem
keyFile:C:\etc\traefik\certs\xmcloudcm.localhost-key.pem
    - certFile:C:\etc\traefik\certs\main.localhost.pem
keyFile:C:\etc\traefik\certs\main.localhost-key.pem
    - certFile:C:\etc\traefik\certs\second.localhost.pem
keyFile:C:\etc\traefik\certs\second.localhost-key.pem

If you try initializing and running – it may seem to work at first glance. But navigating to second.localhost in the browser will lead to an infinite redirect loop. Inspecting the cause I realized that occurs due to CORS issue, namely that second.localhost does not have CORS configured. Typically, when configuring the rendering host from docker-compose.override.yml we provide PUBLIC_URL environmental variable into the rendering host container, however, that is a single value and we cannot pass multiple.

Here’s the more descriptive StackOverflow post I created to address a given issue

To resolve it, we must provide the second host in the below syntax as well as define CORS rules as labels into the rendering host, as below:

labels:
  - "traefik.enable=true"
  - "traefik.http.routers.rendering-secure.entrypoints=websecure"
  - "traefik.http.routers.rendering-secure.rule=Host(`${RENDERING_HOST}`,`${SECOND_HOST}`)"
  - "traefik.http.routers.rendering-secure.tls=true"
# Add CORS headers to fix CORS issues in Experience Editor with Next.js 12.2 and newer
  - "traefik.http.middlewares.rendering-headers.headers.accesscontrolallowmethods=GET,POST,OPTIONS"
  - "traefik.http.middlewares.rendering-headers.headers.accesscontrolalloworiginlist=https://${CM_HOST}, https://${SECOND_HOST}"
  - "traefik.http.routers.rendering-secure.middlewares=rendering-headers"

Once the above is done, you can run the PowerShell prompt, initialize, and spin up Sitecore containers, as normal, by executing init.ps1 and up.ps1 scripts.

Configuring Sitecore

Wait until Sitecore spins up, navigate to a site collection, right-click it, and add another website calling it Second running on a hostname second.localhost.

Make sure second site uses the same exact application name as main, you can configure that from /sitecore/content/Site Collection/Second/Settings item, App Name field. That ensures the purpose of this exercise is for both sites to reuse the same rendering host application.

You should also make sure to match the values of the Predefined application rendering host fields of /sitecore/content/Site Collection/Second/Settings/Site Grouping/Second and /sitecore/content/Site Collection/Main/Settings/Site Grouping/Main items.

Another important field here is Hostname, make sure to set these fields for both websites:

Hostname


Now you are good to edit Home item of Second site. Multisite middleware does not affect the editing mode of Sitecore, so from there, you’ll see no difference.

Troubleshooting

If you’ve done everything right, but second.localhost resolves to the Main website, let’s troubleshoot. The very first location to check is .\src\temp\config.js file. This file contains sites variable with the array of sites and related hostnames to be used for the site resolution. The important fact is that a given file is generated at the build time, not runtime.

So, you open it up and see an empty array (config.sites = process.env.SITES || '[]') that means you just need to initialize the build, for example by simply removing and recreating the rendering host container:

docker-compose kill rendering
docker-compose rm rendering -f
docker-compose up rendering -d

Also, before running the above, it helps to check SXA Site Manager, which is available under the PowerShell Toolbox in Sitecore Desktop. You must see both sites and relevant hostnames there and in the correct order – make sure to move them as high as possible, as this site chain works by “first come – first served” principle.

Multisite

After rendering host gets recreated (it may take a while for both build and spinning up steps), check the site’s definition at .\src\temp\config.js again. It should look as below:

config.sites = process.env.SITES || '[{"name":"second","hostName":"second.localhost","language":""},{"name":"main","hostName":"main.localhost","language":""}]'

The amount of SXA client site records must match the records from SXA Site Manager. Now, running second.localhost in the browser should show you rendered home page of the second site.

Another technique of troubleshooting is to inspect middleware logs. To do so, create .env.local file at the rendering host app root (if does not exist yet) and add the debugging parameter:

DEBUG=sitecore-jss:multisite

Now, rendering host container logs will expose you the insights into how multisite middleware processes your requests and resolves site contexts, and sets site cookies. Below is a sample (and correct) output of the log:

sitecore-jss:multisite multisite middleware start: { pathname: '/', language: 'en', hostname: 'second.localhost' } +8h
sitecore-jss:multisite multisite middleware end in 7ms: {
  rewritePath: '/_site_second/',
  siteName: 'second',
  headers: {
  set-cookie: 'sc_site=second; Path=/',
  x-middleware-rewrite: 'https://localhost:3000/_site_second',
  x-sc-rewrite: '/_site_second/'
},
  cookies: ResponseCookies {"sc_site":{"name":"sc_site","value":"second","path":"/"}}
} +7ms

The above log is crucial to understanding how multisite middleware works internally. The internal request comes rewrites as <https://localhost:3000/_site_second where ‘second‘ is a tokenized site name parameter. If .\src\main\src\temp\config.js file contains the corresponding site record, site gets resolved and sc_site cookie is set.

If you still have the issues of showing up the Second website that resolves to Main website despite the multisite middleware log outputs correct site resolution, that may be likely caused by conflicting with other middleware processors.  This would be your number one thing to check especially if you have multiple custom middleware. Miltisie middleware is especially sensitive to the execution order, as it sets cookies. In my case, that problem was because Sitecore Personalize Engage SDK was registered through middleware and also programmed to set its own cookie, and somehow configured with multisite middleware.

In that case, you have to play with order constant within each conflicting middleware (they are all located under .\src\lib\middleware\plugins folder) with the following restart of a rendering host.

Resources Sharing

Since the multisite add-on leverages the same rendering host app for the multiple sites that use it, all the components and layouts TSX markups, middleware, and the rest of the resources become automatically available for the second site. However, that is not true by default for the Sitecore resources. We must assign at least one website that will share its assets, such as renderings, partials, layouts, etc across the entire Site Collection. Luckily, that is pretty easy to do at the site collection level:

Site Collection

For the sake of an experiment, let’s make Second website to use Page Designs from the Main site. After the above sharing permission, they are automatically available at /sitecore/content/Site Collection/Second/Presentation/Page Designs item.

Configuring the cloud

Once we make the multisite add-on function well, let’s make the same work in the cloud.

  1. First of all, check all the changes to the code repository, and trigger the deployment, either from Deploy App, CLI, or your preferred CI/CD
  2. After your changes arrive at XM Cloud environment – let’s bring the required changes to Vercel, starting with defining the hostnames for the sites:Vercel
  3. After you define the hostnames in Vercel, change the hostname under Site Grouping item for this particular cloud environment to match the above hostname configured earlier in Vercel.
  4. Save changes and smart publish Site Collection. Publishing takes some time, so please stay patient.
  5. Finally, you must also do Vercel full re-deployment, to force regenerating \src\temp\config.js file with the hostnames from Experience Edge published at the previous step

Testing

If everything is done right in the previous steps, you can access the published Second website from Vercel by its hostname, in our case that would be https://dev-second.vercel.app. Make sure all the shared partial layouts are seen as expected.

When testing 404 and 500 you will see that these are shared between both sites automatically, but you cannot configure them individually per site. This occurs because both are located at .\src\pages\404.tsx and .\src\pages\500.tsx of the same rendering host app and use different internal mechanics rather than generic content served from Sitecore throughout .\src\pages\[[...path]].tsx route. These error pages however could be multi-lingual, if needed.

Hope you find this article useful!