Experience Sitecore ! | More than 300 articles about the best DXP by Martin Miles

Experience Sitecore !

More than 300 articles about the best DXP by Martin Miles

Blog content

So, don't miss out! Subscribe to this blog/twitter from the buttons above!

Troubleshooting SitecoreAI Page Builder Stuck Forever on the Loading Spinner

Have you experienced that at least once? You open a page in SitecoreAI Page Builder, the page itself visually loads inside the editor iframe, you can clearly see the website content, but the editing UI never becomes available. Instead, the ng-spd-loading-indicator remains on top forever, blocking any interaction with the page.

That is a frustrating one, because at first sight the rendering host seems to work. The page is not blank. The app does not completely crash. There is no obvious "rendering host is unavailable" message. You may even see only one unrelated-looking browser console error, for example, something like a duplicate third-party script initialization.

In my case, the visible symptom was exactly that: Page Builder loaded the page content, but the Sitecore loading overlay never disappeared. The same fix had to be applied and verified on DEV, UAT, and PROD, with slightly different deployment mechanics per environment.

Let's walk through the troubleshooting route from the first false assumptions to the final fix.

Something to start with ...

Before digging into implementation details, it is worth refreshing how Page Builder rendering is supposed to work in XM Cloud / SitecoreAI.

The most important references are:

The key thing to remember is that Page Builder does not simply browse your public website. It talks to a rendering endpoint, typically:

https://<editing-host-or-rendering-host>/api/editing/render

That endpoint validates the editing secret, extracts Sitecore editing parameters, fetches editing layout data, renders the page with metadata, and returns markup that Page Builder can understand.

That "with metadata" part is important. A page that visually renders as a website is not automatically a page that Page Builder can edit.

What I First Suspected

When Page Builder hangs with a spinner, there are many tempting directions to investigate first. Some of them are absolutely valid in different cases.

1. Broken Rendering Host Configuration

The first obvious suspect is the rendering host item under:

/sitecore/system/Settings/Services/Rendering Hosts

For metadata-based editing, the important fields are:

Server side rendering engine endpoint URL:
https://<host>/api/editing/render

Server side rendering engine application URL:
https://<host>/

Server side rendering engine configuration URL:
https://<host>/api/editing/config

If these are wrong, Page Builder may fail early. In my case they were not the main reason, but they are still always worth checking.

2. Missing Environment Variables

The next suspect is environment configuration. The editing host and external rendering hosts need the right variables for Preview context and editing:

SITECORE_EDGE_CONTEXT_ID
NEXT_PUBLIC_SITECORE_EDGE_CONTEXT_ID
NEXT_PUBLIC_DEFAULT_SITE_NAME
SITECORE_EDITING_SECRET

If one of those is missing, the render endpoint may return 401, 404, or 500 depending on where the application fails. I did find environment differences during the overall investigation, but fixing variables alone was not sufficient for the spinner problem.

3. Content, Presentation Details, or Personalization

Because the page content appeared in the iframe, it was natural to suspect some content-level issue:

  • broken final/shared presentation
  • component throwing only in edit mode
  • datasource item missing in Preview
  • personalization rule breaking layout service output
  • page relying on a rendering that does not support metadata

Those issues can absolutely break Page Builder. However, in this case the same application-level behavior appeared across pages and environments, which made a single content item less likely.

4. Experience Edge, Publishing, Indexing, or Links Database

Another direction is backend state:

  • item not published to Edge
  • stale Edge cache
  • index not rebuilt
  • links database not rebuilt
  • bad page route resolution

These are valid checks for missing content on a public site. But Page Builder editing uses Preview context and editing layout data. A public rendering problem and an editing render problem may look similar in the browser, but they are not the same thing.

5. Browser Console Errors

There was also a console error about duplicate initialization of a third-party SDK. It looked suspicious, but it was not the blocker. This is a good reminder: browser console noise is useful, but do not let the loudest warning own the investigation.

The Actual Symptom to Focus On

The important symptom was not simply "the page does not load".

The more precise symptom was:

The page content renders, but Page Builder never receives the successful editing-render completion it expects, so the ng-spd-loading-indicator never goes away.

This distinction matters a lot.

If a page is fully broken, you usually chase a rendering exception. If the page renders but Page Builder cannot edit it, you need to inspect the editing render flow.

The critical request is:

/api/editing/render

That is the request Page Builder makes to get editable metadata-backed markup.

How the Render Flow Is Supposed to Work

With Content SDK and Next.js, Page Builder calls the render API route with parameters similar to:

/api/editing/render
  ?secret=<editing-secret>
  &sc_site=<site-name>
  &sc_itemid=<item-id>
  &sc_lang=en
  &route=/
  &mode=edit
  &sc_version=latest
  &sc_layoutKind=shared

The SDK render middleware then:

  1. Validates the editing secret.
  2. Extracts the editing parameters.
  3. Enables preview/editing mode.
  4. Calls back into the application to render the requested page.
  5. Returns HTML that includes the metadata Page Builder needs.

That callback into the application is where this case became interesting.

The application was using App Router with a multisite route shape:

/{site}/{locale}/[[...path]]

The normal page route worked perfectly for public traffic. But for Page Builder, the default render handler was not explicit enough. The internal editing render request was going through the normal routing and middleware chain instead of a dedicated editing route.

That created a half-broken experience:

  • the page could visually render
  • middleware and routing still interfered with the editing request
  • Page Builder did not receive exactly the response it needed
  • the spinner never disappeared

The Fix: Create a Dedicated Editing Render Page

The fix was to stop sending the SDK render handler back through the normal public route and give Page Builder a dedicated private route for editing render.

The render API route changed from this:

import { createEditingRenderRouteHandlers } from '@sitecore-content-sdk/nextjs/route-handler';

export const { GET, POST, OPTIONS } = createEditingRenderRouteHandlers({});

to this:

import { createEditingRenderRouteHandlers } from '@sitecore-content-sdk/nextjs/route-handler';

export const { GET, POST, OPTIONS } = createEditingRenderRouteHandlers({
  allowedQueryParams: ['secret'],
  resolvePageUrl: () => '/sitecore-editing',
});

That tells the SDK:

  • preserve the secret query parameter
  • render editing requests through /sitecore-editing
  • do not guess the public page URL for the internal request

Then I added a private App Router page:

src/app/sitecore-editing/page.tsx

Its job is not to serve public traffic. Its job is to render a Sitecore page in editing mode after the SDK has transformed the original sc_* query parameters into the editing request.

The page does three important things.

First, it validates the request:

const CONTENT_SDK_PREVIEW_HEADER = "__content_sdk_preview";

if (
  !editingPreviewData ||
  requestHeaders.get(CONTENT_SDK_PREVIEW_HEADER) !== "1" ||
  secret !== scConfig.editingSecret
) {
  notFound();
}

Second, it constructs the editing preview data:

return {
  site,
  itemId,
  language,
  mode: mode === "edit"
    ? LayoutServicePageState.Edit
    : LayoutServicePageState.Preview,
  variantIds: getSearchParam(searchParams, "variantIds") || DEFAULT_VARIANT,
  version: getSearchParam(searchParams, "version"),
  layoutKind: getSearchParam(searchParams, "layoutKind") as LayoutKind | undefined,
};

Third, it fetches Sitecore preview data instead of public page data:

const page = await client.getPreview(editingPreviewData);

After that, it renders the same layout and providers as the normal public page. The difference is that the data source is now the editing preview data, and the route is isolated from public routing behavior.

Do Not Forget Middleware

This was the other important part.

If the application has middleware for multisite routing, localization, redirects, personalization, authentication, language cookies, or anything similar, that middleware may intercept /sitecore-editing.

For public traffic that is normal. For the internal editing render request, it is dangerous.

So the proxy/middleware needs to bypass this route:

export async function proxy(req: NextRequest, _ev: NextFetchEvent) {
  const langCookie = req.cookies.get(LANG_COOKIE_NAME)?.value;
  const pathname = req.nextUrl.pathname;

  if (pathname === '/sitecore-editing') {
    return NextResponse.next();
  }

  // normal middleware logic follows
}

That one small bypass is the difference between "the route exists" and "the route is actually usable by the editing render pipeline".

How I Verified the Fix

There are a few useful checks that do not require opening Page Builder first.

1. Check the Render API Route

The render endpoint should answer OPTIONS:

curl.exe -sS -o NUL -D - -X OPTIONS https://<host>/api/editing/render

A good response is:

HTTP/1.1 204 No Content
X-Matched-Path: /api/editing/render

That confirms the route exists on the deployed host.

2. Check the Private Editing Route

Direct browser access to /sitecore-editing should not show the page. It should be protected:

curl.exe -sS -o NUL -D - https://<host>/sitecore-editing

Expected result:

HTTP/1.1 404 Not Found
X-Matched-Path: /sitecore-editing

This is a very useful result. It means the route is deployed and matched, but the security checks are working because the direct request does not include the internal preview header and secret.

3. Check the Actual Page Builder Network Flow

After that, open Page Builder and watch the Network tab.

The request to /api/editing/render should complete. If it returns a normal error, troubleshoot that error. If it returns an HTML page that looks like a public route, check that resolvePageUrl is actually pointing to /sitecore-editing and that middleware is not rewriting it.

Deployment Gotchas Across DEV, UAT, and PROD

The code fix was the same, but deployment was not.

In DEV, the application branch already contained the shared render helper, so the fix was straightforward and went through the development branch.

In UAT, the same fix had to be deployed both to the Sitecore editing host and the external Vercel rendering host, because Page Builder may use either depending on the rendering host item configuration.

In PROD, there was an additional twist: the production editing host was tied to main, not the development branch. Therefore, blindly pushing the full development branch would have been wrong. The fix had to be backported narrowly to main, including only:

src/app/api/editing/render/route.ts
src/app/sitecore-editing/page.tsx
src/proxy.ts

Then the production editing host was deployed from main, and the production Vercel projects were deployed manually because Git deployments were disabled for those projects.

That is another important lesson: when fixing Page Builder, do not assume the public rendering host and the Sitecore editing host are deployed by the same mechanism. Check both.

The Minimal Checklist

If I had to reduce the whole troubleshooting route to a checklist, it would be this:

  1. Confirm Page Builder is failing at the editing render stage, not just public page rendering.
  2. Check /api/editing/render on the host configured in Sitecore.
  3. Confirm the rendering host item points to the metadata endpoint, not an old /jss-render endpoint.
  4. Confirm SITECORE_EDITING_SECRET and Edge preview variables exist on the host.
  5. Check whether App Router, middleware, redirects, localization, or multisite proxy logic intercepts editing requests.
  6. Add a dedicated /sitecore-editing route for App Router editing render.
  7. Point createEditingRenderRouteHandlers to that route with resolvePageUrl.
  8. Bypass middleware for /sitecore-editing.
  9. Deploy both the Sitecore editing host and any external rendering host Page Builder may use.
  10. Verify OPTIONS /api/editing/render and protected direct access to /sitecore-editing.

Final Thoughts

This problem is confusing because it does not look like a classic crash. The site renders. The content is visible. The browser may even show unrelated console errors. But Page Builder is still blocked because visual rendering is only half of the contract.

For SitecoreAI Page Builder, the rendering host must return an editing-aware, metadata-enabled response. With Next.js App Router and custom middleware, the safest approach is to give the SDK render handler a dedicated private route and keep that route out of the normal public routing pipeline.

Once that was done, the spinner disappeared and the editing experience started behaving normally across the environments.

Sometimes the fix is not in the component that appears broken, nor in the content item being edited. It is in the invisible bridge between Page Builder and the rendering host.

SitecoreAI Containers Without Docker Desktop

If you have ever tried to run SitecoreAI containers locally and hit the Docker Desktop licensing wall, you are not alone. Docker Desktop requires a paid subscription for organizations with more than 250 employees or an annual revenue of more than $10 million. That forces a question: can you run the XM Cloud local container stack without Docker Desktop at all?

The short answer is yes, but the full picture is more nuanced. I went through Sitecore's official documentation, the starter kit repositories, and every community walkthrough I could find to map out what is actually supported, what is community-derived, and where the gaps are. 

The approach is to install and run the standalone Docker Engine directly as a Windows service, then use Docker Compose from the CLI plugin path that modern Docker tooling expects. This is useful when Docker Desktop is unavailable, undesired, restricted by licensing, or unstable in a local Sitecore development environment.

1. Already got Docker Desktop? Remove it first

If Docker Desktop is already installed, stop it first. If you are replacing it entirely, uninstall Docker Desktop before installing the standalone Docker Engine.

You may also want to clean old Docker resources before continuing, especially if your Windows container layers have grown very large.

A related cleanup approach from Vikrant Punwatkar’s Docker cleanup guidance uses a longer shutdown timeout for Docker daemon cleanup:

dockerd -D --shutdown-timeout 900

This can help when Docker needs more time to clean large Windows container layers.

2. Enable required Windows features

If you used Docker Desktop previously, you'll likely have the following features available; if not, run PowerShell as Administrator:

Enable-WindowsOptionalFeature -Online -FeatureName Microsoft-Hyper-V -All
Enable-WindowsOptionalFeature -Online -FeatureName containers -All

Restart Windows if prompted.

Both Hyper-V and Containers are commonly required for Windows container development.

3. Download standalone Docker Engine for Windows

Run PowerShell as Administrator:

curl.exe -o docker.zip -LO https://download.docker.com/win/static/stable/x86_64/docker-20.10.13.zip

Extract it:

Expand-Archive docker.zip -DestinationPath C:\

After extraction, Docker binaries should be available under:

C:\docker

4. Add Docker to PATH

Run this as a single line in Administrator PowerShell:

[Environment]::SetEnvironmentVariable("Path", "$([Environment]::GetEnvironmentVariable('Path', 'Machine'));C:\docker", [System.EnvironmentVariableTarget]::Machine)

Then refresh the current shell session path:

$env:Path = [System.Environment]::GetEnvironmentVariable("Path", "Machine")

Close and reopen PowerShell if docker is still not recognized.

5. Register Docker daemon as a Windows service

Register Docker Engine as a Windows service:

dockerd --register-service

Start the Docker service:

Start-Service docker

Verify Docker is running:

docker version
docker info

Test a basic container run:

docker run hello-world

6. Install Docker Compose v2 CLI plugin

Create the Docker CLI plugin directory:

New-Item -ItemType Directory -Force -Path "C:\Program Files\Docker\cli-plugins"

Download Docker Compose v2:

curl.exe -L "https://github.com/docker/compose/releases/download/v2.18.1/docker-compose-windows-x86_64.exe" -o "C:\Program Files\Docker\cli-plugins\docker-compose.exe"

We also need adding it to PATH by using the below PowerShell in admin mode;

$d='C:\Program Files\Docker\cli-plugins'; $m=((([Environment]::GetEnvironmentVariable('Path','Machine') -split ';') | ? { $_ -and $_  -ne "$d\docker-compose.exe" -and $_ -ne $d } | select -Unique) + $d) -join ';';  [Environment]::SetEnvironmentVariable('Path',$m,'Machine'); $env:Path=$m

Verify Compose:

docker compose version
docker-compose version

The important path is:

C:\Program Files\Docker\cli-plugins\docker-compose.exe

This path allows docker compose to work as a Docker CLI plugin.

7. Configure Docker daemon if needed

Create or edit this file:

C:\ProgramData\docker\config\daemon.json

A safe baseline configuration for many Sitecore Windows container setups is:

{
  "experimental": true,
  "features": {
    "buildkit": false
  }
}

Restart Docker after changing daemon configuration:

Restart-Service docker

For Sitecore projects, experimental: true may be needed when the solution mixes Windows and Linux containers. This is common in some older Sitecore container setups.

8. Stop local IIS and Solr before starting Sitecore containers

Local IIS or Solr services can conflict with Sitecore container ports.

Stop IIS:

iisreset /stop

If you have a local Solr Windows service installed, stop it from services.msc, or stop it by service name if you know it:

Stop-Service -Name "solr-*"

If that wildcard does not match your service, list services first:

Get-Service *solr*

9. Run your Sitecore project

From the project root, the command depends on the project structure.

For many SitecoreAI local container setups that may look as below.

If you have not run it ever before, you must initialize it first:

cd .\local-containers\scripts
.\init.ps1 -InitEnv -LicenseXmlPath C:\Projects\license.xml -AdminPassword b -baseOs ltsc2022

Then just run the main script:

.\local-containers\scripts\up.ps1

Now sit comfortable, grab your coffee and wait until it pulls all the required images and runs:

Typical Sitecore local container startup scripts may do several things:

  • Pull or update images
  • Build custom images
  • Configure hosts file entries
  • Start Docker Compose services
  • Start the CM container
  • Install Sitecore CLI plugins
  • Populate Solr schemas
  • Rebuild indexes
  • Push serialized items
At the end, you will see SitecoreAI authentication screen in a browser:

Troubleshooting checklist

Before going into specific issues, I just want to advise you to check if you're running scripts in the admin mode - that is especially crucial on the corporate and enterprise restricted machines.

Docker service does not start

Check the service:

Get-Service docker
Start-Service docker

Check Docker info:

docker info

If Docker fails with references to panic.log, try removing this file and starting Docker again:

Remove-Item "C:\ProgramData\docker\panic.log" -Force
Start-Service docker

Docker command is not recognized

Confirm Docker is in the machine PATH:

[Environment]::GetEnvironmentVariable("Path", "Machine")

Confirm the binary exists:

dir C:\docker\docker.exe

Refresh current PowerShell PATH:

$env:Path = [System.Environment]::GetEnvironmentVariable("Path", "Machine")

Docker Compose is not recognized

Confirm the plugin exists:

dir "C:\Program Files\Docker\cli-plugins\docker-compose.exe"

Verify Compose:

docker compose version

Ports are already in use

Check common Sitecore container ports:

netstat -ano | findstr ":443"
netstat -ano | findstr ":8079"
netstat -ano | findstr ":8984"
netstat -ano | findstr ":14330"

If IIS is using port 443:

iisreset /stop

Windows container layers consume too much disk space

Windows container layers can accumulate under Docker’s storage folders, especially after repeated Sitecore container rebuilds.

Common cleanup commands:

docker system df
docker system prune -a

For stubborn Windows layer cleanup, a longer Docker daemon shutdown timeout may help:

dockerd -D --shutdown-timeout 900

Use caution when manually deleting Docker layer folders. Prefer Docker’s own cleanup commands first.

How to run multiple SitecoreAI Docker instances simultaneously on a single host machine

If you've ever worked on multiple SitecoreAI (XM Cloud) projects at the same time, you know the pain. Often you have to terminate working on Project A, run docker compose down, wait, switch .env files, run docker compose up, wait some more... and then realize you need to quickly check something back in Project A. Rinse, repeat, lose your sanity. What a time waste!

What if I told you there's a way to run three completely independent XM Cloud Docker environments side by side, all on the same Windows machine, all accessible on standard HTTPS port 443, with full network isolation between for each of them?

Let's dig into how I made it work.

The Problem - Why Can't We Just Run Three Docker Compose Stacks?

At first glance, running three copies of the XM Cloud starter kit seems straightforward. Clone the repo three times, change some ports, and done. Right?

Not quite. There are two showstoppers:

1. The Hostname Lock-In

Sitecore's XM Cloud identity server (Auth0) expects callbacks to xmcloudcm.localhost or *.xmcloudcm.localhost. This is hardcoded on their end. Every single CM instance in the standard setup uses xmcloudcm.localhost as its hostname. If three CM containers all claim the same hostname, only one wins.

2. The Traefik Port War

Each codebase ships with its own Traefik reverse proxy, and all of them want port 443 and port 8079. Docker will happily start the first one and reject the rest due to a port conflict.

And there are secondary conflicts too - MSSQL (port 14330) and Solr (port 8984) also collide.

The Solution - A Shared Traefik Gateway with Subdomain Routing

The architecture I landed on is built around three key ideas:

One Traefik to rule them all. Instead of three competing Traefik instances, we run a single shared Traefik at the root level that acts as the gateway for all environments.

Third-level subdomains for CM. Since Auth0 accepts *.xmcloudcm.localhost, we use one.xmcloudcm.localhost, two.xmcloudcm.localhost, and three.xmcloudcm.localhost. One wildcard TLS certificate covers all three, and the codebases configured as below:

  ┌────────────┬─────────────────────────────────────────────┬────────────┬───────────┐
  │  Codebase  │                 CM Hostname                 │ MSSQL Port │ Solr Port │
  ├────────────┼─────────────────────────────────────────────┼────────────┼───────────┤
  │ codebase-1 │ https://one.xmcloudcm.localhost/sitecore/   │ 14331      │ 8984      │
  ├────────────┼─────────────────────────────────────────────┼────────────┼───────────┤
  │ codebase-2 │ https://two.xmcloudcm.localhost/sitecore/   │ 14332      │ 8985      │
  ├────────────┼─────────────────────────────────────────────┼────────────┼───────────┤
  │ codebase-3 │ https://three.xmcloudcm.localhost/sitecore/ │ 14333      │ 8986      │
  └────────────┴─────────────────────────────────────────────┴────────────┴───────────┘

A shared bridge network for Traefik routing. CM and rendering containers from each codebase join a shared nat network so Traefik can reach them, while internal infrastructure (MSSQL, Solr) stays isolated on each project's default network.

Here's the high-level picture:

                     +----------------------+
                     |   Shared Traefik     |
                     |   Port 443 / 8079    |
                     +--+-------+-------+---+
                        |       |       |
                   traefik-shared (nat network)
                        |       |       |
   +----------+--+  +---+------+---+  +--+----------+
   | codebase-1  |  | codebase-2   |  | codebase-3  |
   |  xmc-one    |  |  xmc-two     |  |  xmc-three  |
   | MSSQL:14331 |  | MSSQL:14332  |  | MSSQL:14333 |
   | Solr:8984   |  | Solr:8985    |  | Solr:8986   |
   +-------------+  +--------------+  +-------------+

And the hostname mapping should loke as:

  ┌─────────────┬─────────────────────────────────────────────┐
  │   Service   │                  Hostname                   │
  ├─────────────┼─────────────────────────────────────────────┤
  │ CM 1        │ https://one.xmcloudcm.localhost/sitecore/   │
  ├─────────────┼─────────────────────────────────────────────┤
  │ CM 2        │ https://two.xmcloudcm.localhost/sitecore/   │
  ├─────────────┼─────────────────────────────────────────────┤
  │ CM 3        │ https://three.xmcloudcm.localhost/sitecore/ │
  ├─────────────┼─────────────────────────────────────────────┤
  │ Rendering 1 │ https://nextjs.xmc-one.localhost/           │
  ├─────────────┼─────────────────────────────────────────────┤
  │ Rendering 2 │ https://nextjs.xmc-two.localhost/           │
  ├─────────────┼─────────────────────────────────────────────┤
  │ Rendering 3 │ https://nextjs.xmc-three.localhost/         │
  └─────────────┴─────────────────────────────────────────────┘

What We Need to Change

The beauty of this solution is how little needs to change. Let me walk through every modification.

Step 1: The Shared Traefik

Create a shared-traefik folder at the root of your multi-docker directory. It gets its own docker-compose.yml:

services:
  traefik:
    isolation: hyperv
    image: traefik:v3.6.4-windowsservercore-ltsc2022
    command:
      - "--ping"
      - "--api.insecure=true"
      - "--providers.docker.endpoint=npipe:////./pipe/docker_engine"
      - "--providers.docker.exposedByDefault=false"
      - "--providers.file.directory=C:/etc/traefik/config/dynamic"
      - "--entryPoints.websecure.address=:443"
      - "--entryPoints.websecure.forwardedHeaders.insecure"
    ports:
      - "443:443"
      - "8079:8080"
    healthcheck:
      test: ["CMD", "traefik", "healthcheck", "--ping"]
    volumes:
      - source: \\.\pipe\docker_engine\
        target: \\.\pipe\docker_engine\
        type: npipe
      - ./traefik:C:/etc/traefik
    networks:
      - traefik-shared

networks:
  traefik-shared:
    name: traefik-shared
    external: true

The key insight here: a single Traefik connects to the Docker engine via a Windows named pipe, enabling it to discover all containers across all Compose projects. It joins the traefik-shared network to actually reach the CM and rendering containers.

Before starting Traefik, create the shared network with the Windows nat driver:

docker network create -d nat traefik-shared

Why nat and not bridge? Windows containers don't support the bridge driver. If you try docker network create traefik-shared without -d nat, you'll get: "could not find plugin bridge in v1 plugin registry". This was one of the first gotchas I ran into.

The TLS config (shared-traefik/traefik/config/dynamic/certs_config.yaml) references wildcard certificates:

tls:
  certificates:
    - certFile: C:\etc\traefik\certs\_wildcard.xmcloudcm.localhost.pem
      keyFile: C:\etc\traefik\certs\_wildcard.xmcloudcm.localhost-key.pem
    - certFile: C:\etc\traefik\certs\_wildcard.xmc-one.localhost.pem
      keyFile: C:\etc\traefik\certs\_wildcard.xmc-one.localhost-key.pem
    - certFile: C:\etc\traefik\certs\_wildcard.xmc-two.localhost.pem
      keyFile: C:\etc\traefik\certs\_wildcard.xmc-two.localhost-key.pem
    - certFile: C:\etc\traefik\certs\_wildcard.xmc-three.localhost.pem
      keyFile: C:\etc\traefik\certs\_wildcard.xmc-three.localhost-key.pem

Step 2: Parameterize the Traefik Labels

This is the most important change to the existing codebase, and also the most subtle.

When Traefik uses the Docker provider, it reads labels from containers to build its routing table. In the stock docker-compose.yml, the CM service has labels like:

- "traefik.http.routers.cm-secure.rule=Host(`${CM_HOST}`)"

The router name cm-secure is hardcoded. If three CM containers all define cm-secure, Traefik merges them into a single router with unpredictable results.

The fix is elegant: prefix every router, middleware, and service name with ${COMPOSE_PROJECT_NAME}:

- "traefik.http.routers.${COMPOSE_PROJECT_NAME}-cm-secure.rule=Host(`${CM_HOST}`)"

Since each codebase has a unique COMPOSE_PROJECT_NAME in its .env (e.g., xmc-one, xmc-two, xmc-three), the router names become xmc-one-cm-secure, xmc-two-cm-secure, etc. Globally unique. Zero conflicts.

This same change applies to all Traefik label lines in both docker-compose.yml (CM labels) and docker-compose.override.yml (rendering host labels).

I also parameterized the MSSQL and Solr host ports while I was in there:

# Was: "14330:1433"
ports:
  - "${MSSQL_PORT:-14330}:1433"

The :-14330 default means if you don't set MSSQL_PORT, nothing changes. Backward compatible.

Step 3: The Multi-Instance Override

Each codebase gets a docker-compose.multi.yml that does three things:

  1. Disables the per-codebase Traefik (since the shared one handles everything)
  2. Connects CM and rendering to the shared Traefik network
  3. Passes the site name to the rendering container
services:
  traefik:
    deploy:
      replicas: 0

  cm:
    labels:
      - "traefik.docker.network=traefik-shared"
    networks:
      - default
      - traefik-shared

  rendering-nextjs:
    environment:
      NEXT_PUBLIC_DEFAULT_SITE_NAME: ${SITE_NAME:-xmc-one}
    labels:
      - "traefik.docker.network=traefik-shared"
    networks:
      - default
      - traefik-shared

networks:
  traefik-shared:
    name: traefik-shared
    external: true

The traefik.docker.network label is critical - it tells the shared Traefik which network to use when routing to this container. Without it, Traefik might try to route via the wrong network and fail silently.

This file is loaded automatically via the COMPOSE_FILE variable in .env:

COMPOSE_FILE=docker-compose.yml;docker-compose.override.yml;docker-compose.multi.yml

Windows gotcha: The COMPOSE_FILE separator on Windows is ; (semicolon), not : (colon). Using colons causes a cryptic CreateFile ... The filename, directory name, or volume label syntax is incorrect error. This one took me longer to figure out than I'd like to admit.

Step 4: Per-Codebase .env Configuration

Each codebase's .env gets a handful of unique values:

Variablecodebase-1codebase-2codebase-3
COMPOSE_PROJECT_NAMExmc-onexmc-twoxmc-three
CM_HOSTone.xmcloudcm.localhosttwo.xmcloudcm.localhostthree.xmcloudcm.localhost
RENDERING_HOST_NEXTJSnextjs.xmc-one.localhostnextjs.xmc-two.localhostnextjs.xmc-three.localhost
MSSQL_PORT143311433214333
SOLR_PORT898489858986
SITE_NAMExmc-onexmc-twoxmc-three

Don't forget SITECORE_FedAuth_dot_Auth0_dot_RedirectBaseUrl - it must match the CM hostname, for example:

SITECORE_FedAuth_dot_Auth0_dot_RedirectBaseUrl=https://one.xmcloudcm.localhost/

Step 5: The Hosts File

This is pretty simple - just add these entries to C:\Windows\System32\drivers\etc\hosts:

127.0.0.1	one.xmcloudcm.localhost
127.0.0.1	two.xmcloudcm.localhost
127.0.0.1	three.xmcloudcm.localhost
127.0.0.1	nextjs.xmc-one.localhost
127.0.0.1	nextjs.xmc-two.localhost
127.0.0.1	nextjs.xmc-three.localhost

Step 6: Fix up.ps1

The up.ps1 script has a Traefik health check that uses the hardcoded router name cm-secure@docker. Since we parameterized it, we need to read COMPOSE_PROJECT_NAME and use it:

$composeProjectName = ($envContent | Where-Object {
    $_ -imatch "^COMPOSE_PROJECT_NAME=.+"
}).Split("=")[1]

# Updated health check
$status = Invoke-RestMethod "http://localhost:8079/api/http/routers/$composeProjectName-cm-secure@docker"

And the hardcoded Start-Process https://xmcloudcm.localhost/sitecore/ becomes:

Start-Process "https://$xmCloudHost/sitecore/"

Making the Next.js Rendering Hosts Work

Getting the CM to respond on a subdomain turned out to be the easy part. Wiring up the Next.js rendering hosts - that's where the real fun began.

The "Configuration error" Wall

After the CM instances were humming along on their subdomains, I turned my attention to the rendering hosts. Each codebase's rendering-nextjs container mounts the Next.js app from examples/basic-nextjs and runs npm install && npm run dev as its entrypoint. Simple enough. Except all three containers immediately crashed with:

Error: Configuration error: provide either Edge contextId or
local credentials (api.local.apiHost + api.local.apiKey).

The issue? The stock sitecore.config.ts ships as a bare defineConfig({{}}) - no API configuration at all. This works when you're connecting to XM Cloud Edge in production, but in local Docker mode, the Content SDK's build tools need to know where the CM lives.

The fix is to add the api.local block:

import { defineConfig } from '@sitecore-content-sdk/nextjs/config';

export default defineConfig({
  api: {
    local: {
      apiKey: process.env.SITECORE_API_KEY || '',
      apiHost: process.env.SITECORE_API_HOST || '',
    },
  },
  defaultSite: process.env.NEXT_PUBLIC_DEFAULT_SITE_NAME || 'xmc-one',
  defaultLanguage: 'en',
});

The SITECORE_API_HOST is set to http://cm by the compose override (the internal Docker DNS name for the CM container), and SITECORE_API_KEY comes from the .env file. So far so good.

The "Invalid API Key" Surprise

With the config in place, I restarted the rendering containers. They got further this time - the SDK successfully connected to the CM - but then:

ClientError: Provided SSC API keyData is not valid.

Here's the thing about Sitecore API keys: having a GUID in your .env file isn't enough. That GUID must be registered as an item inside Sitecore's content tree at /sitecore/system/Settings/Services/API Keys/. Without it, Sitecore rejects the key outright.

The standard up.ps1 flow handles this via the Sitecore CLI's serialization push, but since we're running three parallel instances, we need to do it for each:

cd codebase-1
dotnet sitecore cloud login                    # Browser auth required
dotnet sitecore connect --ref xmcloud `
  --cm https://one.xmcloudcm.localhost `
  --allow-write true -n default

& ./local-containers/docker/build/cm/templates/import-templates.ps1 `
  -RenderingSiteName 'xmc-one' `
  -SitecoreApiKey 'c46d10a5-9d62-4aa9-a83d-3e20a34bc981'

This creates the API key item under /sitecore/system/Settings/Services/API Keys/xmc-one with CORS and controller access set to *. The browser login is interactive (Auth0 device flow), but you only need to do it once per codebase.

The "//en" Path Mismatch Mystery

After registering the API keys and restarting the containers, the rendering hosts started successfully. Next.js reported Ready in 6.2s. I opened https://nextjs.xmc-one.localhost/ in the browser, and... "Page not found."

The container logs told the story:

[Error: Requested and resolved page mismatch: //en /en]
GET / 404 in 53ms

That double slash in //en was the clue. The Content SDK's multisite and locale middleware were fighting over path resolution. The locale middleware was adding /en to the path /, but without a defaultSite configured, the multisite resolver was confused about which site to use, producing a mangled double-slash path.

Two changes fixed it:

  1. Set defaultSite in sitecore.config.ts (shown above) - this tells the SDK which Sitecore site to resolve by default
  2. Pass NEXT_PUBLIC_DEFAULT_SITE_NAME as an environment variable to the rendering container via docker-compose.multi.yml

The Hostname Binding

Even with the path mismatch fixed, the rendering host still returned 404. The CM's layout service was responding correctly when queried directly - I verified this with:

curl -sk "https://one.xmcloudcm.localhost/sitecore/api/layout/render/jss?item=/&sc_apikey=&sc_site=xmc-one&sc_lang=en"

That returned valid JSON with the Home page route data. So the CM was fine. The problem was in Sitecore's site resolution.

In the Sitecore Content Editor, each site has a Site Grouping item with a Hostname field. This field tells Sitecore which incoming hostname maps to which site. Without it, when the rendering host queries the CM for layout data, Sitecore doesn't know which site the request is for.

The fix: go to each CM's Content Editor and set the Hostname to the rendering host's domain:

  • xmc-one site -> Hostname: nextjs.xmc-one.localhost
  • xmc-two site -> Hostname: nextjs.xmc-two.localhost
  • xmc-three site -> Hostname: nextjs.xmc-three.localhost

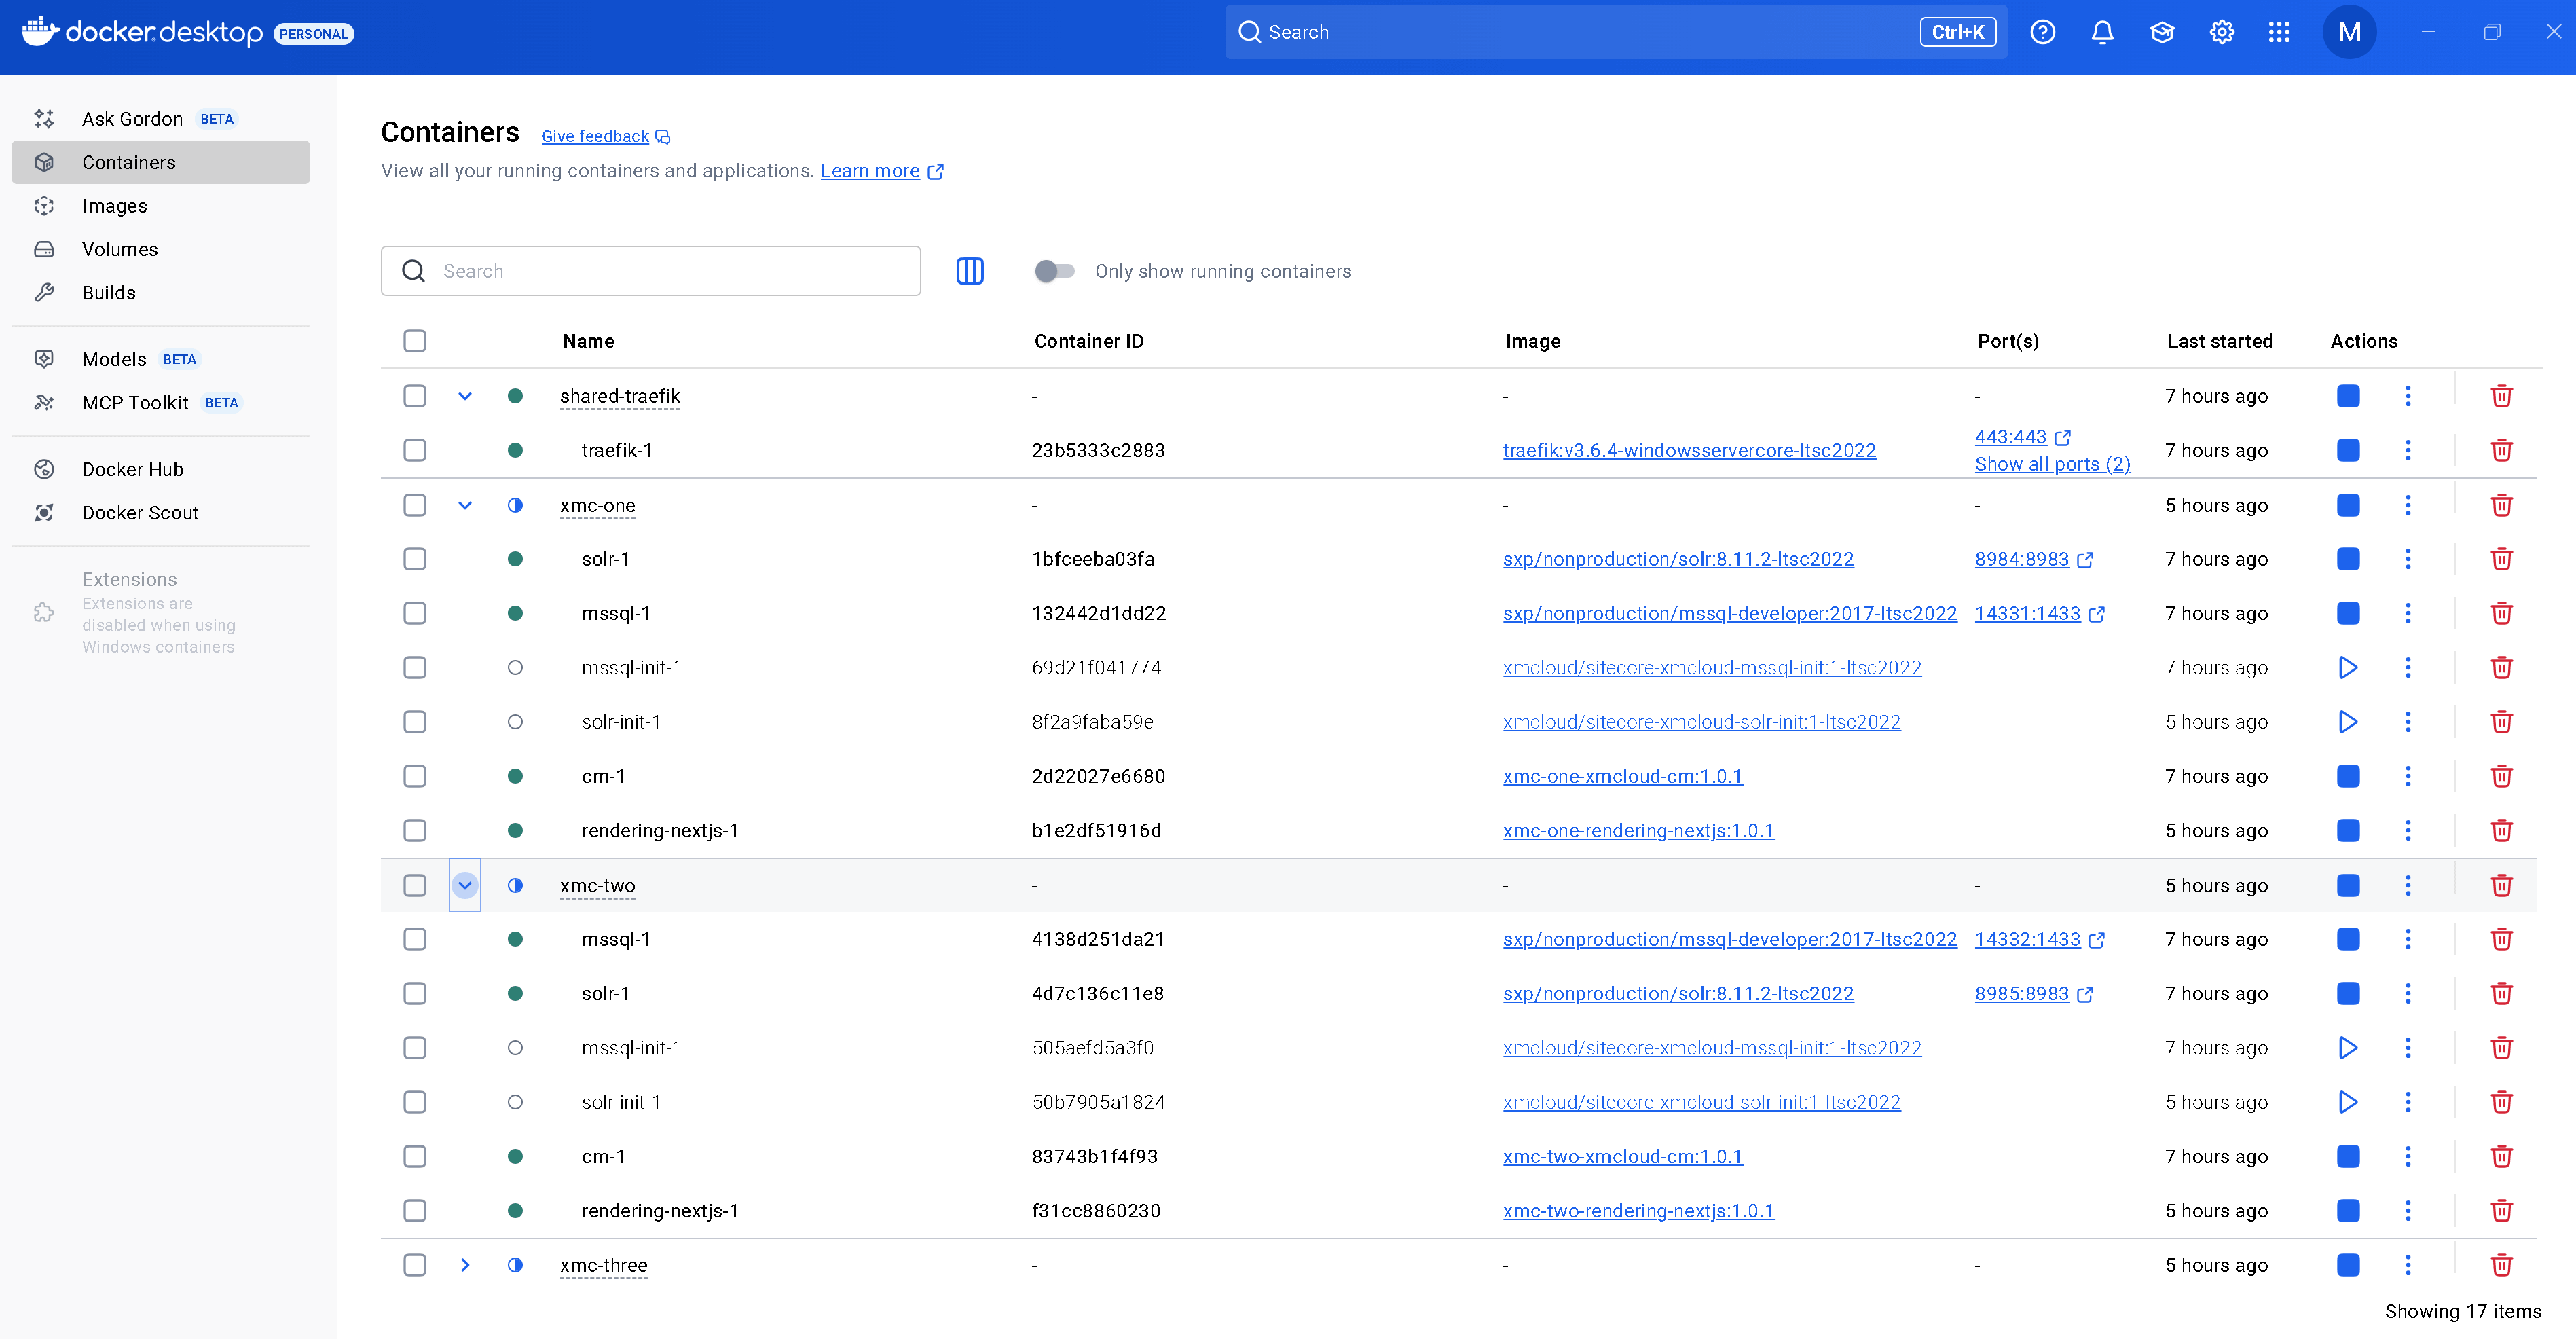
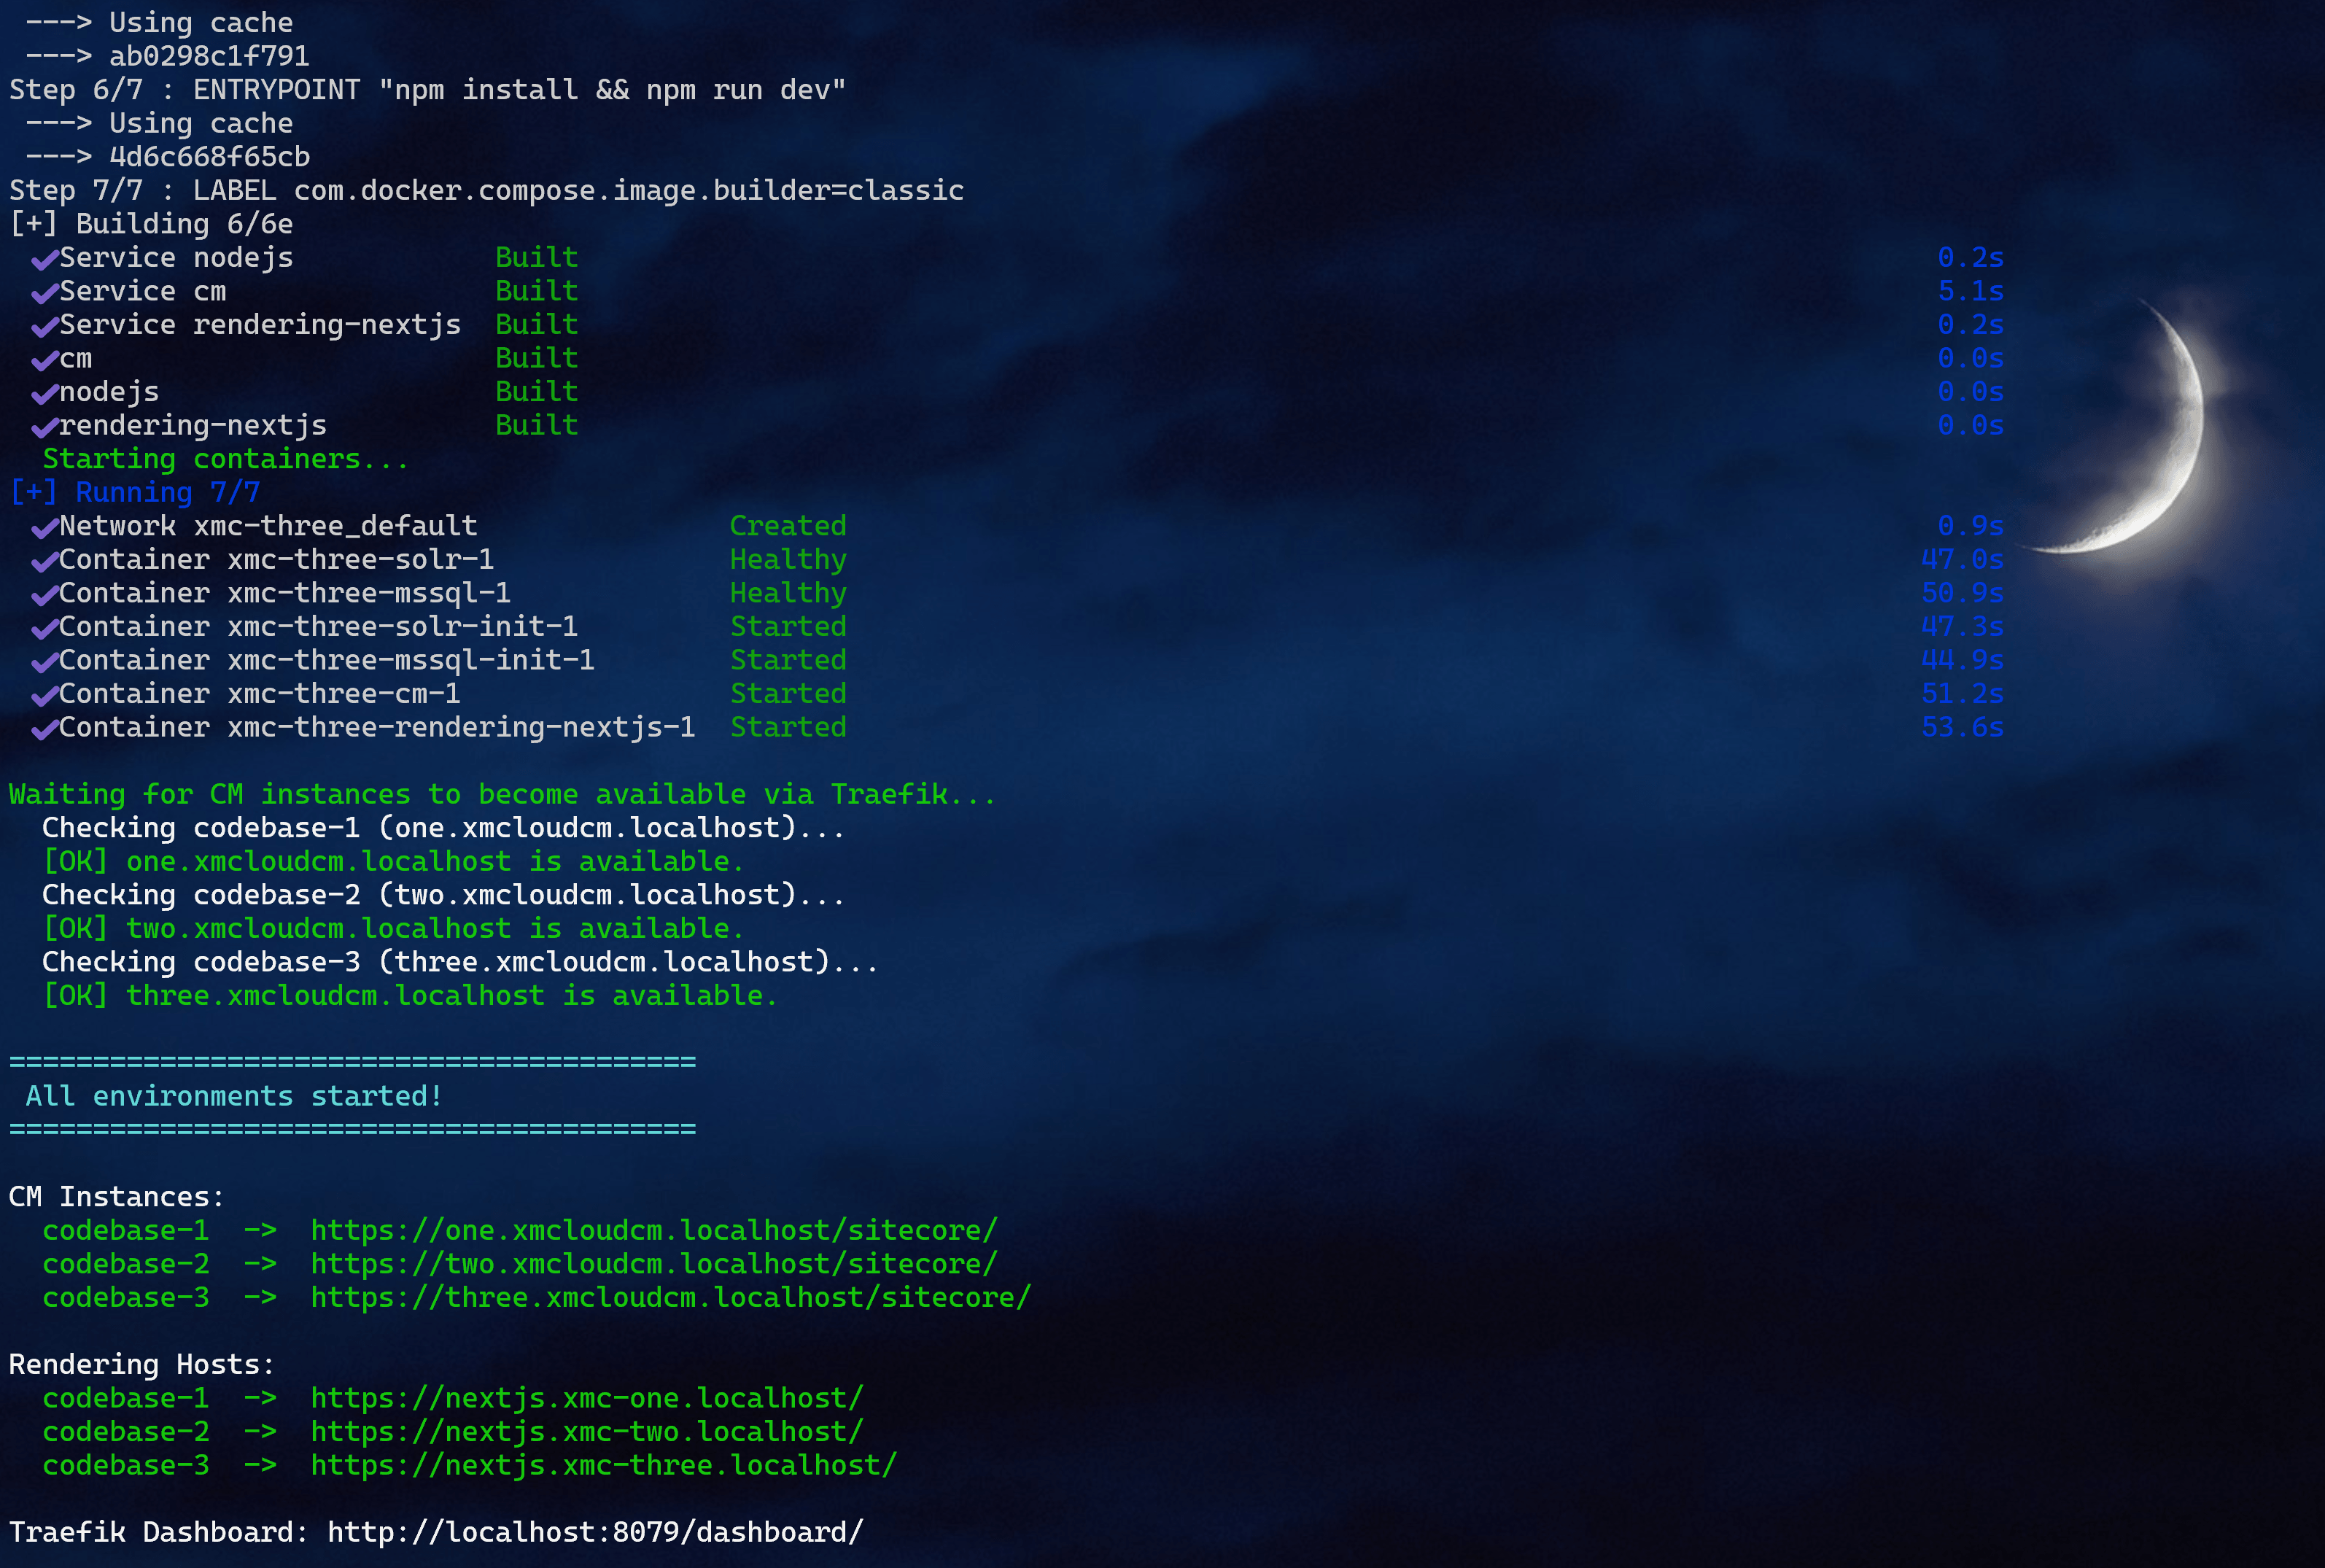
After that, all three rendering hosts returned HTTP 200, each serving content from their respective Sitecore instance. Three independent XM Cloud stacks, all running in parallel, all on standard HTTPS.

Running It All

First-Time Setup

# Run as Administrator
cd C:\Projects\SHIFT-AI\Multiple-Docker
.\setup-multi.ps1

This creates the Docker network, generates wildcard TLS certificates with mkcert, and updates the hosts file.

Then initialize each codebase (if not already done):

cd codebase-1\local-containers\scripts
.\init.ps1 -InitEnv -LicenseXmlPath C:\License\license.xml -AdminPassword "YourPassword"
# Repeat for codebase-2 and codebase-3

Daily Usage

# Start everything
.\start-all.ps1

# Start just one codebase
.\start-all.ps1 -Codebases @("codebase-2")
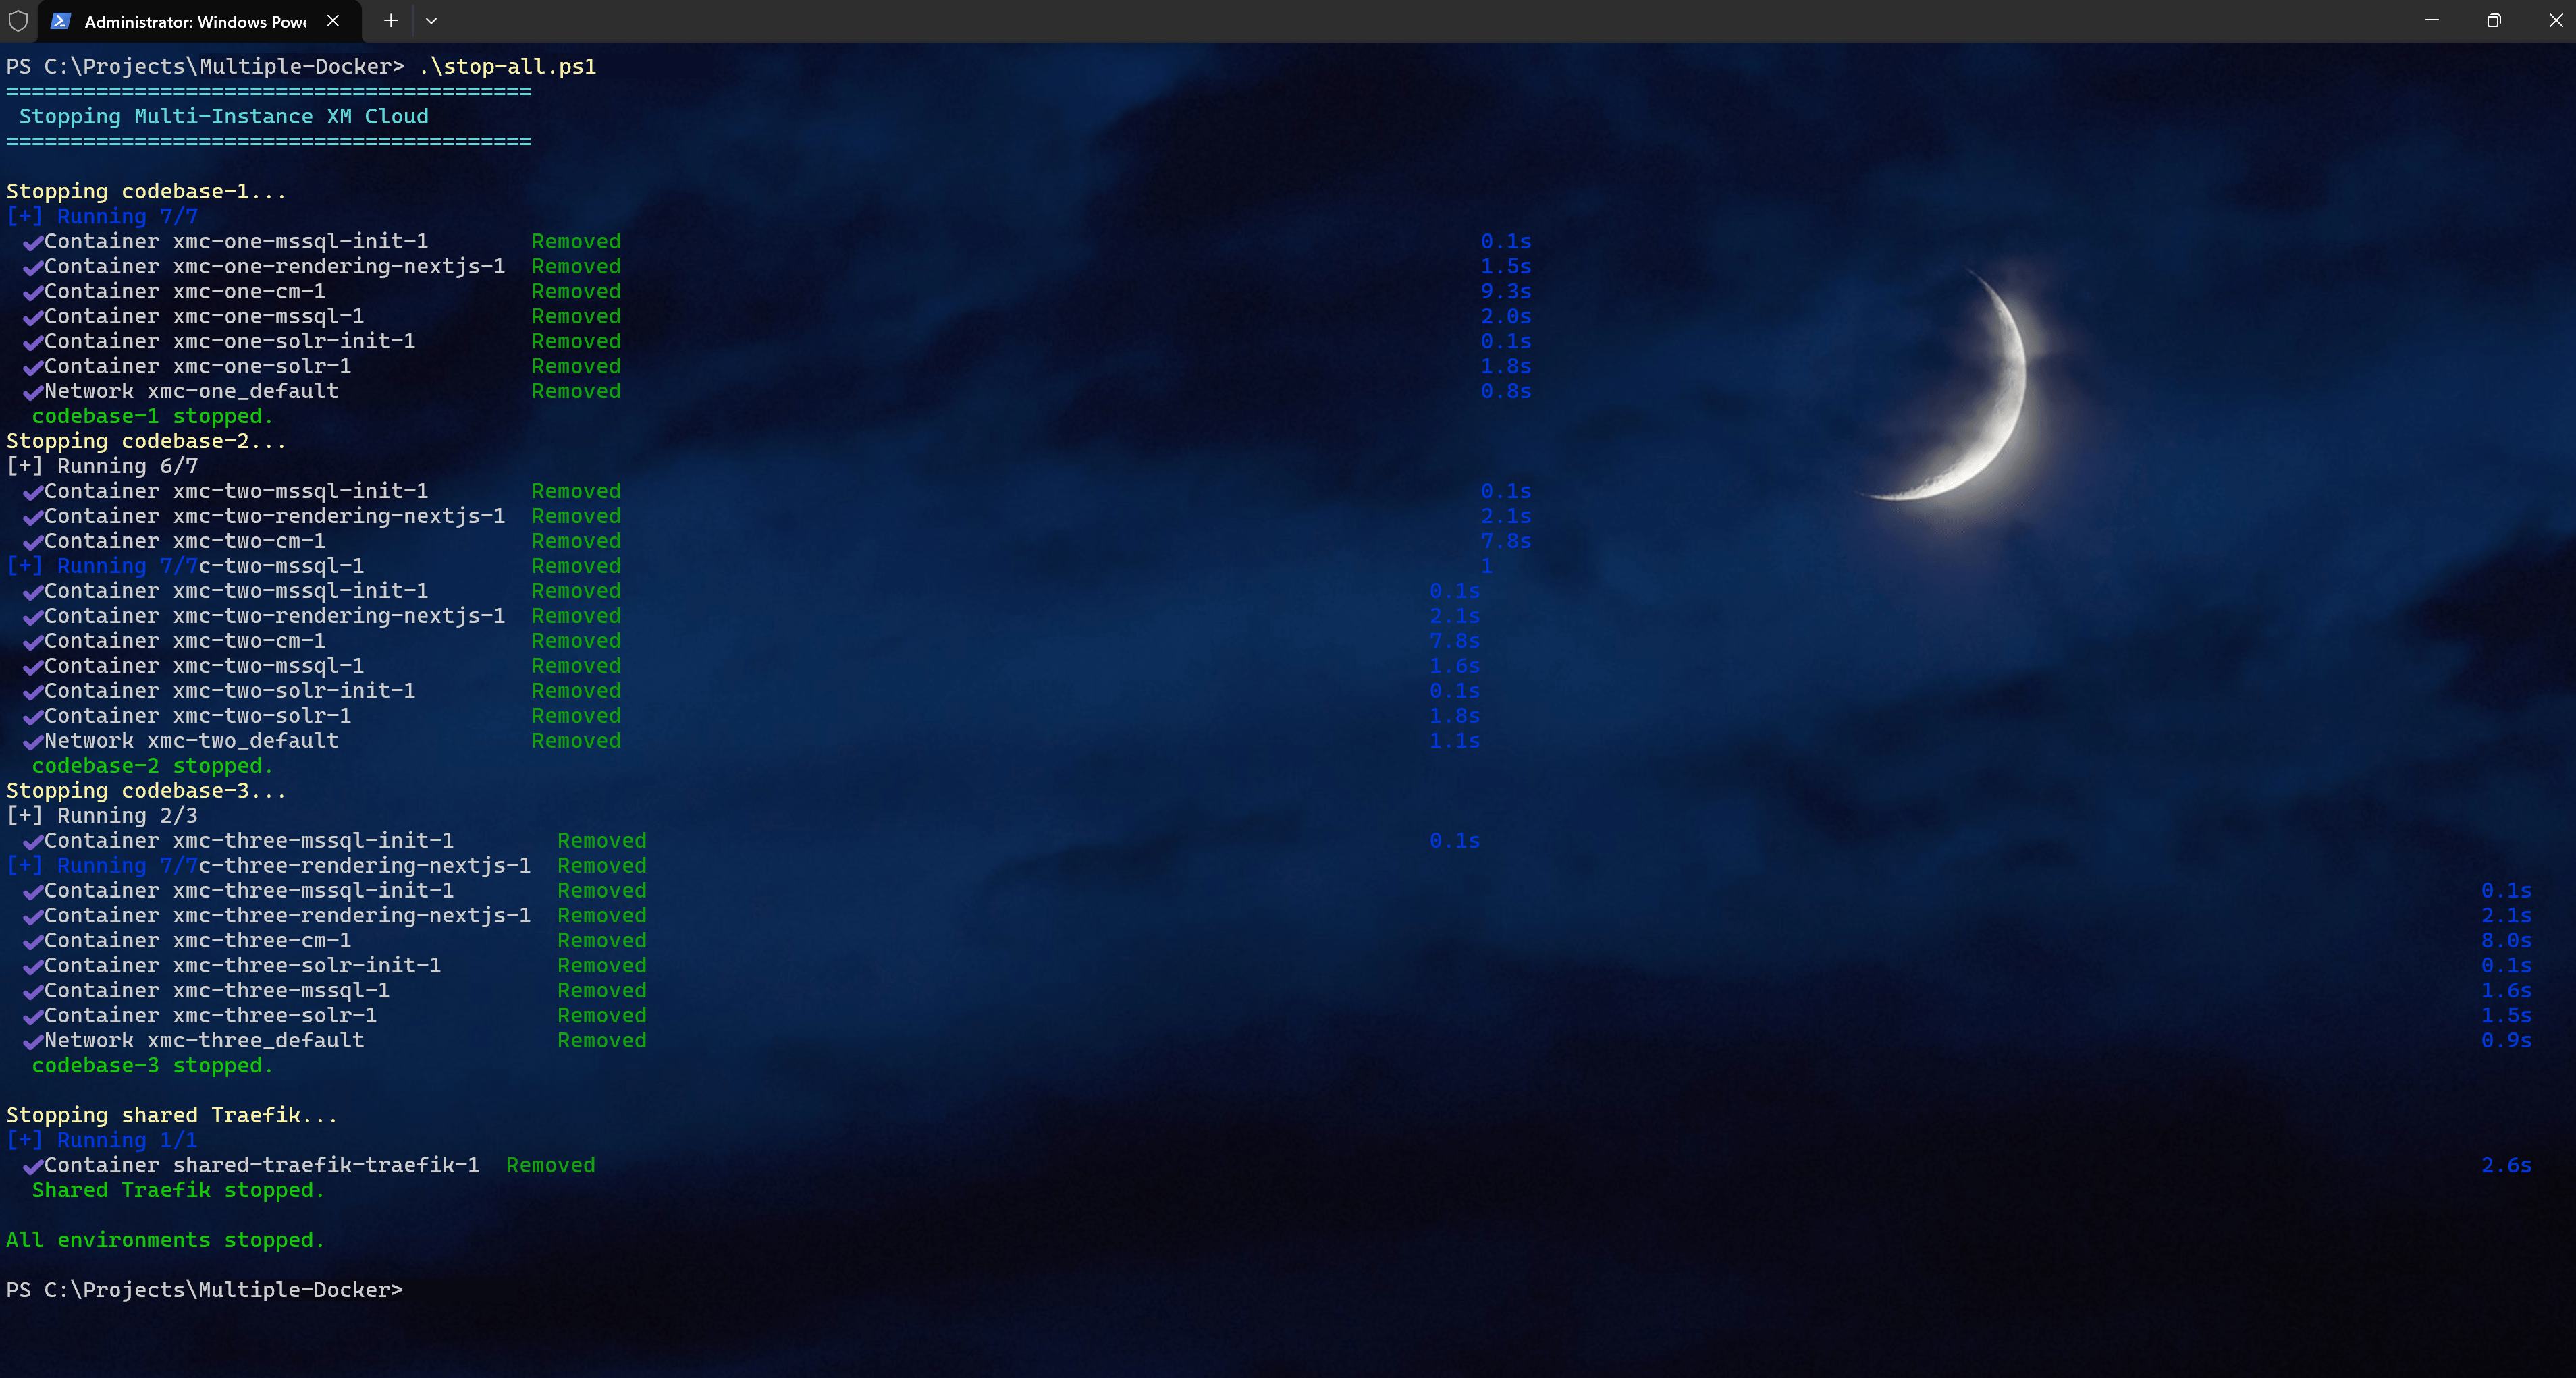
# Stop everything
.\stop-all.ps1

# Stop codebases but keep Traefik running (faster restarts)
.\stop-all.ps1 -KeepTraefik

Post-Startup: Register API Keys and Create Sites

After the CMs are healthy, you need to register the API keys and create sites with hostname bindings (see the sections above). This is a one-time step per codebase.

Verifying It Works

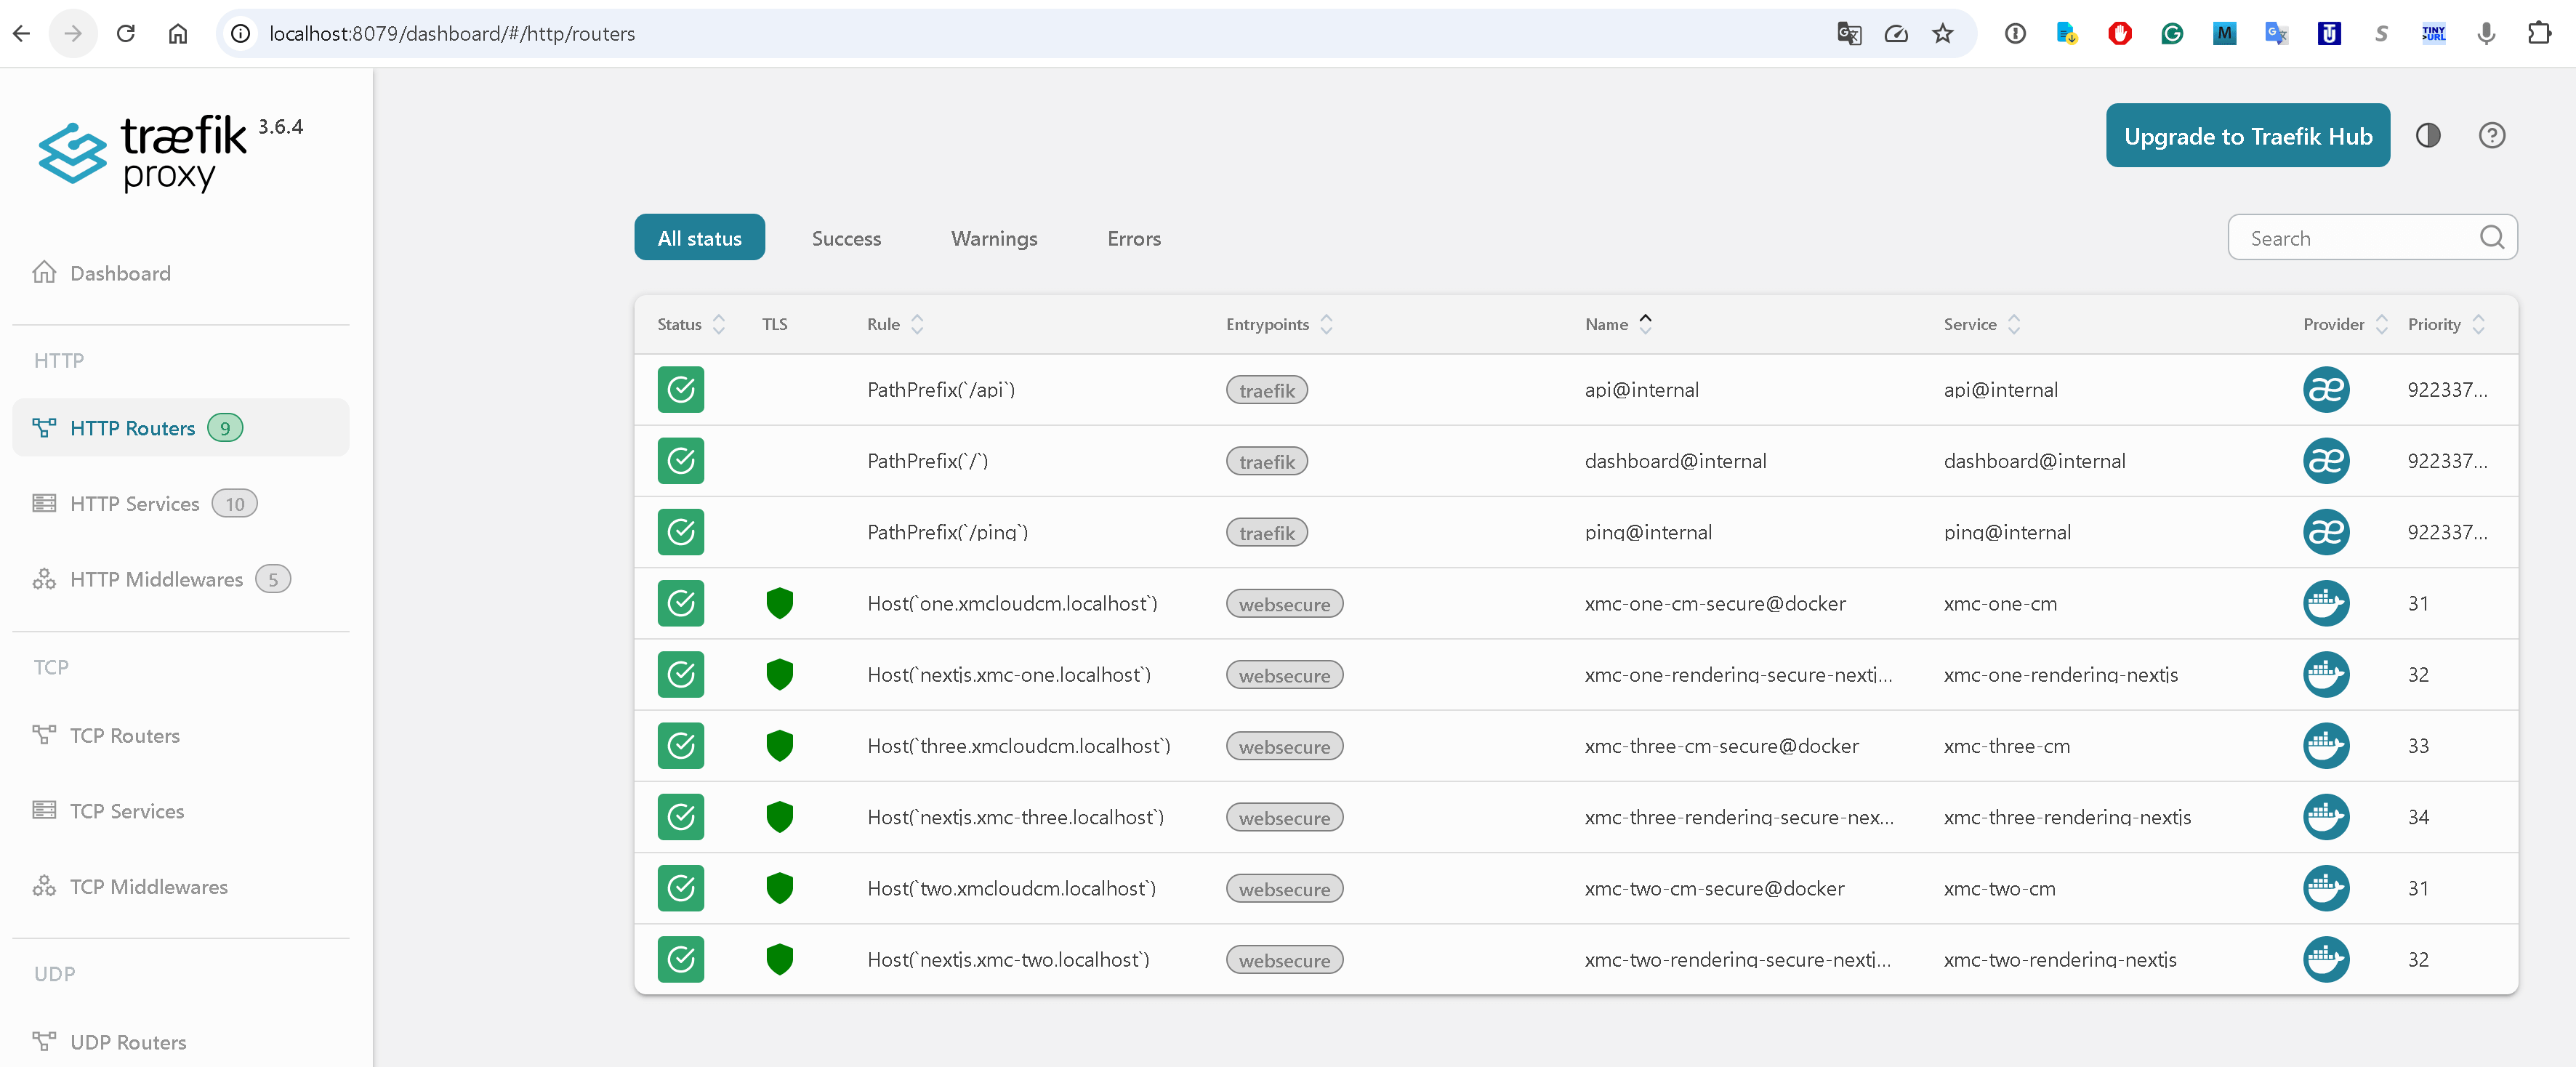
Check the Traefik Dashboard

Open http://localhost:8079/dashboard/. You should see six routers - two per codebase (CM + rendering), each with its unique name prefix.

Hit Each CM Instance

  • https://one.xmcloudcm.localhost/sitecore/ -> Auth0 login redirect
  • https://two.xmcloudcm.localhost/sitecore/ -> Auth0 login redirect
  • https://three.xmcloudcm.localhost/sitecore/ -> Auth0 login redirect

Hit Each Rendering Host

  • https://nextjs.xmc-one.localhost/ -> Site home page (HTTP 200)
  • https://nextjs.xmc-two.localhost/ -> Site home page (HTTP 200)
  • https://nextjs.xmc-three.localhost/ -> Site home page (HTTP 200)

All three should serve their respective Sitecore site content, each powered by an independent CM, MSSQL, and Solr instance.

Lessons Learned

Windows Docker networking has its own rules. Networks must use nat. A container can't reliably join multiple nat networks. I originally designed three separate Traefik networks for strict isolation but had to collapse them into one shared nat network. In practice, only CM and rendering containers join the shared network - MSSQL and Solr stay isolated on their project-default networks.

COMPOSE_FILE uses semicolons on Windows. The Linux docs show COMPOSE_FILE=a.yml:b.yml:c.yml. On Windows, it's a.yml;b.yml;c.yml. Using colons produces a cryptic CreateFile ... volume label syntax error that doesn't immediately suggest a separator issue.

Traefik label naming is global. This was the non-obvious gotcha. When Traefik uses the Docker provider, router names are global across all containers it discovers. Two containers defining the same router name creates a conflict that Traefik resolves silently (and wrongly). Prefixing with ${COMPOSE_PROJECT_NAME} is a pattern I'll use in every multi-project Docker setup from now on.

Docker Compose labels merge, they don't replace. When you override a service in a compose override file, labels from the base file persist. You can add new labels but can't remove old ones. This is why the parameterization approach (changing the base file) is cleaner than trying to override labels.

sitecore.config.ts needs explicit local API config. The stock defineConfig({{}}) assumes Edge mode. For local Docker development, you must specify api.local.apiKey and api.local.apiHost. The Content SDK's build tools (sitecore-tools project build) fail at startup without them.

defaultSite prevents the //en path mismatch. Without it, the multisite and locale middlewares can't agree on path resolution, producing //en instead of /en. This manifests as every page returning 404 even though the CM has valid content. Setting defaultSite in the config and passing NEXT_PUBLIC_DEFAULT_SITE_NAME as an environment variable resolved this instantly.

API keys must be registered in Sitecore, not just in .env. Having a GUID in SITECORE_API_KEY_APP_STARTER is necessary but not sufficient. The GUID must exist as a Sitecore item under /sitecore/system/Settings/Services/API Keys/. The import-templates.ps1 script + dotnet sitecore ser push handles this.

Sitecore sites need hostname bindings. Even with correct API keys and config, the rendering host gets 404 until the site's Hostname field in Sitecore matches the rendering host's domain. The CM's layout service uses this to resolve which site a request belongs to.


What Could Be Simplified Further

  • Template-driven .env generation: A script that generates .env files for N codebases, not just three.
  • Compose profiles: Instead of deploy.replicas: 0, use Docker Compose profiles to toggle between standalone and multi-instance modes.
  • Single-codebase fallback: Remove the COMPOSE_FILE line from .env to revert any codebase to standalone mode instantly.
  • Automated API key registration: A script that generates, registers, and configures the API key for each codebase in one step.

The total delta is about 10 lines changed per codebase in the Docker compose files, a sitecore.config.ts update, and a handful of new infrastructure files at the root. Not bad for what felt like an impossible requirement.

If you've been juggling multiple XM Cloud projects and constantly stopping and starting Docker environments, I hope this saves you some time and frustration. Drop a comment if you've found other approaches or run into edge cases - I'd love to hear about them.


GitHub (not fully operable, must be fine-tuned in some way)

Deploy SitecoreAI like a pro

This post is merely a cheatsheet focused on XM Cloud DevOps and deployment, which I left for myself to have all the important Sitecore CLI commands in one place.

SitecoreAI gives teams three paths for managing deployments: the DeployApp web UI in the Cloud Portal, the Deploy API REST endpoints, and the Sitecore CLI with the SitecoreAI plugin. This post focuses exclusively on the CLI path. Whether you are wiring up a GitHub Actions workflow, an Azure DevOps pipeline, or scripting a repeatable release process, the commands below are your complete reference.

Content

Authentication

Before any CLI command can talk to Sitecore Cloud, you need an authenticated session. There are two modes.

Interactive login (developer workstations)

Opens a browser-based login flow, ideal for local development:

dotnet sitecore cloud login

Non-interactive login (CI/CD pipelines)

Pass client credentials directly with no browser prompt. This is the right option for automated pipeline steps:

dotnet sitecore cloud login   --client-credentials   --client-id <your-client-id>   --client-secret <your-client-secret>

Permission requirement: The authenticating identity must hold the Organization Admin or Organization Owner role in the Sitecore Cloud Portal. Without it, project and environment creation commands will be rejected.

Project and Environment Hierarchy

SitecoreAI organizes resources in a three-level hierarchy: Project, Environment, and Deployment. Each level must exist before you can create the next.

Create a project

dotnet sitecore cloud project create -n <projectname>

The command returns the project-id you will need for the next step.

Create an environment

# Non-production environment
dotnet sitecore cloud environment create   --name <environment-name>   --project-id <project-id>   --cm-only

# Production environment - add --prod for SLA coverage
dotnet sitecore cloud environment create   --name <environment-name>   --project-id <project-id>   --cm-only   --prod

Note on --cm-only: This flag signals a CM-only authoring environment topology. Deployment architecture options have evolved with the January 2026 decoupled model, so always verify the exact flag behaviour against the CLI plugin version in your project, as options may differ across releases.

Key Deployment Commands

Authoring environment (CM) deployment

This is the primary command to deploy your XM Cloud authoring environment. The --upload flag packages and uploads your repository directly from the CLI:

dotnet sitecore cloud deployment create   --environment-id <environment-id>   --upload

Editing host deployment

From January 2026 onward, the editing host is deployed as a separate unit. This command targets the editing host component independently:

dotnet sitecore cloud editinghost deploy   --environment-id <environment-id>   --upload

Repository size limit: The maximum repository size for --upload deployments is 500 MB. Plan your build pipeline to stay under this threshold, or use the Deploy API with a pre-built artifact URL for larger repositories.

Retrieving logs

There are two separate log surfaces worth knowing about: runtime environment logs and deployment-specific logs. Both are accessible via the CLI without touching the portal.

To list available log files for an environment:

Since the decoupled model produces independent logs per component, you will want to check environment logs for CM runtime issues and deployment logs for build or provisioning failures separately.list -id <environment-id> --latest

To print a runtime-specific log file directly to the console:

dotnet sitecore cloud environment log view -id <environment-id> --log <log-file-name>

You can also download a log file to a local path instead, which may be helpful for the cases oа implementing a "log drain" feature:

dotnet sitecore cloud environment log download -id <environment-id> --log <log-file-name> -o <output-path>

For deployment-specific logs (useful when diagnosing a failed or stuck deployment), use the deployment log command:

dotnet sitecore cloud deployment log -id <deployment-id> -o <output-path>

Note: Since the decoupled model produces independent logs per component, you will want to check environment logs for CM runtime issues and deployment logs for build or provisioning failures separately.

Decoupled Deployments Explained

The recommended deployment model since January 2026 separates the CM authoring environment from the Editing Host. Each component is deployed independently using its own CLI command:

  • Authoring (CM): cloud deployment create --upload
  • Editing Host (EH): cloud editinghost deploy --upload

The practical benefits of this approach:

  • Faster release cycles - deploy the CM without rebuilding the EH, and vice versa
  • Independent rollback - revert one layer without touching the other
  • Granular observability - each component produces its own deployment logs, making root-cause analysis faster
  • Pipeline flexibility - CI/CD stages can be parallelised or gated independently per component

Serialization and Publishing Workflow

Code deployment covers the application layer. Content serialization and Edge publishing are separate steps that run after the environment is live.

Step 1: Push serialized content to the CM

Sync your Sitecore Content Serialization items into the target environment:

dotnet sitecore serialization push -n <environmentName>

Step 2: Publish to Experience Edge

Once content is in the CM, publish it to Experience Edge so your head application can consume the updated data:

dotnet sitecore publish --pt Edge -n <environmentName>

Important Notes

  • Repository size limit: 500 MB maximum for CLI uploads via --upload.
  • Auto-deploy option: DeployApp offers a "Trigger deployment on commit to branch" setting. For pure CLI pipelines, replicate this by calling deployment create from a git webhook or pipeline trigger.
  • Required role: Organization Admin or Organization Owner in the Sitecore Cloud Portal is required for creating projects and environments.
  • Decoupled model: CM and EH deployed separately is the recommended approach since January 2026. Favour this for all new projects.
  • Plugin version: Always run dotnet sitecore --version to confirm your XM Cloud plugin is current. Flag behaviour such as --cm-only may differ across plugin releases.

Are you using CLI or DeployApp for your CI/CD pipeline? Share your setup in the comments below!

The Layout Container component - a missing puzzle piece hidden in plain sight

When a GitHub Repository Stops You in Your Tracks

There are moments in a developer's life when you stumble across something on GitHub and your immediate, instinctive reaction is: "Wait - this should already exist everywhere." That was precisely my reaction when I landed on the official Sitecore Labs repository for the Layout Container component for XM Cloud.

If you work with Sitecore XM Cloud and Headless SXA, you will recognize the pain almost instantly. Your content authors want freedom, they want to build rich, multi-column, responsive page layouts without raising a development ticket. Your developers want to deliver clean, maintainable frontend code without copy-pasting bespoke wrapper <div> hierarchies all over the codebase. Your architects want a composable, reusable structural primitive that the entire team can rally around. And yet, out of the box, the XM Cloud Starter Kit leaves you to solve all of that yourself.

Enter the Layout Container - a deceptively simple name for a component that carries enormous potential. Built and published by the Sitecore Labs team (the same group that maintains the xmcloud-foundation-head starter kit and other first-party accelerators), this single component quietly addresses one of the most common friction points in any Headless SXA project: how do you give content authors meaningful layout control without handing them a blank canvas and a prayer?

What makes it truly exciting is what I'd call its universality. Unlike a "Hero" or a "Promo" component - which solves one specific presentational problem - the Layout Container is infrastructure. It is the scaffolding upon which every other component lives. Its scope is not a feature; it is a fundamental authoring primitive, and discovering it tucked away in a labs repository rather than shipped as a platform default is both a delight and, as we'll discuss, a genuine head-scratcher.

Let's dig into what this component actually does and why it matters so much.

Inside the Codebase - What Makes the Layout Container "Universal"

The repository is refreshingly lean. Its footprint consists of a LayoutContainer.tsx React/TypeScript component, a dedicated SCSS stylesheet folder, and a set of Sitecore-serialized content items that wire everything together on the Content Management side. That austerity is intentional - this is a utility component, and utility components should not carry unnecessary weight. But don't let the simplicity fool you: the architectural thinking behind it is substantial.

The Sitecore Item Architecture

The Sitecore side of the component is serialized using the Sitecore CLI (dotnet sitecore ser push) and lives under the familiar Headless Experience Accelerator rendering path: /sitecore/layout/Renderings/Feature/Headless Experience Accelerator/Layout Container.

This placement is deliberate and telling. By living under the Feature layer of the HEA namespace, right alongside the out-of-the-box Page Content components - the Layout Container is explicitly designed to behave as a peer to first-party SXA components, not a bolted-on afterthought. It is enabled through the site's Available Renderings configuration under the Page Structure group, which is exactly where structural components belong. This tells content authors unambiguously: "This component organizes other components. It is not content itself."

The module definition (layoutcontainer.module.json) follows the standard Sitecore CLI module pattern, meaning it integrates cleanly with existing serialization workflows. There is no custom build step, no exotic dependency, and no configuration magic required - just a clean dotnet sitecore ser push -i LayoutContainer and you are live.

The React Component: Flexibility Through Parameters

The heart of the component is LayoutContainer.tsx, a Next.js/React component following the canonical Headless SXA pattern that every XM Cloud developer will recognize:

type LayoutContainerProps = {
  params: { [key: string]: string };
  fields?: { [key: string]: Field };
};

This signature is significant. The heavy lifting in this component happens through params - the rendering parameters, rather than through datasource fields. This is the correct architectural choice for a structural component. Layout decisions (column count, spacing, background color, alignment) are rendering concerns, not content concerns. Using params instead of a datasource means the Layout Container does not pollute the content tree with structural data items, keeping the authoring experience clean and the content model honest.

The component dynamically assembles its CSS class list by composing values from its rendering parameters - including the built-in GridParameters that Headless SXA passes to every component. This means it inherits the full grid vocabulary of the SXA grid system right out of the box, without needing to reinvent it.

SCSS Architecture - Responsive by Design

The SCSS module (layout-container/) follows the same BEM-influenced, SCSS-variable-driven conventions used in the XM Cloud Starter Kit, making it trivially easy to integrate with an existing project's design token system. Rather than hardcoding breakpoint values or pixel measurements, the styles are structured to compose with the host project's existing _variables.scss and _mixins.scss infrastructure.

More importantly, the CSS is structured around CSS Grid and Flexbox semantics, giving it the full power of the modern layout cascade. This means:

  • Column configurations (halves, thirds, quarters, asymmetric splits) are expressed as CSS Grid template columns, which adapt naturally to content reflow.
  • Vertical stacking on mobile is handled via media query breakpoints that collapse multi-column grids to a single-column layout - no JavaScript required, no layout shift.
  • Gap/spacing control maps to CSS gap properties, keeping spacing consistent with the browser's natural rendering model.

The upshot is a component whose visual output is responsive, accessible, and performant - not because of clever JavaScript, but because it leans on what CSS is already brilliant at.

Component Nesting: The Real Superpower

If you've been reading this and thinking "okay, it's a grid wrapper - so what?" - this is the part that should change your mind.

The Layout Container is designed to be infinitely nestable, both with itself and with any other Sitecore component. In XM Cloud Pages, because it appears in the Page Structure available renderings group, it can be dropped onto a page as a top-level structural element. But critically, it can also be placed inside another Layout Container, creating a recursive composition model that is genuinely rare in out-of-the-box Sitecore experiences.

Consider some concrete scenarios where this nesting capability becomes indispensable:

Scenario A: The Marketing Landing Page. A content author building a campaign page might want a full-width hero at the top, then a three-column content row (icons + text), then a two-column row (image left, rich text right), then a full-width CTA strip. Without the Layout Container, this requires a developer to hardcode multiple distinct page template zones or create bespoke wrapper components. With it, the author drops Layout Containers like building blocks - no development ticket required.

Scenario B: The Card Grid Within a Tab. A developer has built a Tabs component. Inside each tab, a content author wants to place a 2×3 grid of Card components. Without a nestable layout primitive, the developer either has to bake the grid logic into the Tabs component (coupling concerns that should be separate) or accept that the tab body is a single linear column. With the Layout Container nested inside the tab's placeholder, the author gets the grid; the developer keeps a clean separation of concerns.

Scenario C: Asymmetric Editorial Layouts. A content team building a magazine-style article page wants a wide left column for body text and a narrow right column for a related-links sidebar, with the sidebar itself containing a small two-column author bio grid. This is a nested grid - a layout inside a layout inside a layout. Without a universal container, you either write it in code (slow, inflexible) or you don't do it at all (bad for editors). With the Layout Container, the author assembles it themselves in Pages, live, without a deployment.

This nesting behavior is not merely a developer convenience - it is a fundamental empowerment of the content author role, and it is one of the clearest indicators that whoever designed this component understood the day-to-day reality of editorial workflows.

Configuration Options - What Authors Can Control

Based on the component's architecture and the Headless SXA rendering parameters pattern, the Layout Container exposes a meaningful set of authoring controls in XM Cloud Pages:

Grid Parameters inherit from the SXA grid system, allowing authors to choose how the container spans the page grid (full width, contained, offset columns). This is the same parameter available on every SXA component, so authors already know how to use it.

Custom CSS Classes / Styles can be passed as additional rendering parameters, enabling developers to pre-define named variants (e.g., "layout--highlight-band", "layout--dark-bg") that authors can select without touching code. This is the Headless SXA variant pattern applied at the structural level.

Column Count and Layout Mode parameters map to specific CSS Grid configurations in the SCSS module, letting authors switch between common layouts (equal columns, sidebar-left, sidebar-right, masonry-ready) through a simple dropdown in Pages - no CSS knowledge required.

Spacing Controls allow authors to add or remove padding between the container and its children, supporting the common design system requirement of consistent whitespace tokens (e.g., spacing-sm, spacing-md, spacing-lg).

The beauty of the params-based approach is that developers define the vocabulary (which class names and configurations are valid) while authors make the choices within that vocabulary. It strikes the precise balance between control and guardrails that every enterprise DXP project demands.

Reusability, Extensibility, and the Development Workflow

From a developer's perspective, the Layout Container represents a philosophy shift in how Headless SXA projects should be structured. Instead of building N bespoke two-column, three-column, or asymmetric-layout components - each with its own rendering definition, datasource template, and SCSS file - you build one structural primitive and compose everything else on top of it.

This has a profound effect on the development lifecycle:

  • Onboarding time drops. New developers on the project only need to learn one layout abstraction, not a proliferating zoo of structural wrapper components.
  • QA scope shrinks. One well-tested Layout Container component, rather than a dozen layout variants, means fewer regression paths when the design system updates.
  • Extending it is trivial. Want to add a new layout variant (say, a five-column grid for a data dashboard)? Add a CSS class to the SCSS module, add the parameter value to the rendering parameters template in Sitecore, and the new layout is immediately available to content authors. The component code itself does not change.
  • Designers and developers speak the same language. When the layout vocabulary is codified in a single component's parameter schema, design token changes and grid system updates have a single, clear, authoritative integration point.

Content authors, meanwhile, gain something that is often underestimated in its value: the confidence to experiment. When a layout is a drag-and-drop combination of Layout Containers and components rather than a hardcoded template, authors can try different page structures, get feedback from stakeholders, and iterate - all without waiting for a sprint cycle.

The Big Question - Why Isn't This Already in the Base Image?

Let's step back and state what should, by now, be obvious: the Layout Container component solves a universal problem. Not a vertical-specific problem. Not a "large enterprise only" problem. Not a "nice to have for power users" problem. Every single Headless SXA project built on XM Cloud needs a way for content authors to compose multi-column, responsive page layouts without developer intervention. Every. Single. One.

Which makes the central question of this post genuinely difficult to dismiss: Why is this component not shipped as a standard part of the XM Cloud Headless SXA base image?

The Starter Kit (xmcloud-foundation-head) ships with a solid collection of baseline components - Rich Text, Image, Promo, Navigation, Container, and others. These give teams a running start with content-level components. But the Layout Container - a structural primitive that sits one level of abstraction above all of those - is absent. Teams that don't discover this Labs repository must either build their own (reinventing the wheel, probably with less polish) or ship projects where content authors are constrained to the column structures that developers hardcoded during the initial build.

Consider the cumulative cost of that gap across the Sitecore partner and customer ecosystem. Every implementation team that has ever built a bespoke "TwoColumnLayout.tsx" or "SidebarWrapper.tsx" component - which is almost certainly every implementation team - has spent time solving a problem that this component already solves cleanly and correctly. That is not just redundant effort; it is inconsistent effort, producing different quality levels, different authoring experiences, and different maintenance burdens across the ecosystem.

There is also an onboarding and adoption story to consider. XM Cloud's pitch to new customers and partners includes the power of XM Cloud Pages and the visual, drag-and-drop composability of Headless SXA. But that pitch rings hollow if the first thing an author discovers is that they cannot create a two-column layout without filing a ticket. Including the Layout Container in the base image would make the out-of-the-box authoring experience substantially more compelling - not just for power users, but for day-one evaluators.

To be clear: the Sitecore Labs team deserves real credit for building this and publishing it openly. Making it available as a discoverable Labs component is genuinely better than not having it at all, and the quality of the implementation reflects careful thinking about how it should work within the Sitecore ecosystem. The installation guide is clear, the integration path is clean, and the component follows all the right conventions.

But "discoverable if you know to look for it" is a fundamentally different value proposition than "available by default." The former relies on developers reading the right blog posts (like this one, perhaps!), attending the right community sessions, or being lucky enough to have a colleague who found it first. The latter means every XM Cloud customer gets the benefit from day one - regardless of their implementation partner's GitHub browsing habits.

If the hesitation is about keeping the base image lean and avoiding "bloat," that concern is understandable but worth challenging. The Layout Container is not an opinionated business component - it carries no brand, no domain logic, and no content model assumptions. It is as unopinionated as a <div>. It is infrastructure. And infrastructure belongs in the foundation, not in a labs addendum.

If the hesitation is about support scope - that adding more components to the base increases the surface area Sitecore must maintain - then perhaps the answer is a tiered model: a curated "recommended additions" bundle that partners and customers can opt into during project setup, with the Layout Container as its flagship entry.

Whatever the path, the status quo is leaving value on the table. Every XM Cloud project that ships without this component, or ships with a lesser hand-rolled substitute, is a reminder of a gap that Sitecore Labs has already, quietly, filled. It's time to bring it in from the cold.

Have you considered integrating the Layout Container into your SitecoreAI project? Drop a comment below or reach out on the Sitecore Community Slack - I'd love to hear how your team has extended it, what rendering parameter configurations you've found most useful, and whether you've hit any edge cases with deep nesting in XM Cloud Pages. And if you haven't explored it yet, the GitHub repository is the place to start - your content authors will thank you for it.

Merry Christmas and happy New Year!

Every year I create a special Christmas postcard to congratulate my readers on a new oncoming year, full of changes and opportunities. Wish you all the best in 2026!

My artwork for the past years (click the label to expand)
2025


2024


2023


2022


2021


2020


2019


2018


2017


2016


Reviewing my 2025 Sitecore MVP contributions

Sitecore Technology MVP 2025

Sitecore Technology MVP 2024 Sitecore Technology MVP 2023 Sitecore Technology MVP 2022 Sitecore Technology MVP 2021

Sitecore Technology MVP 2020 Sitecore Technology MVP 2019 Sitecore Technology MVP 2018 Sitecore Technology MVP 2017


The Sitecore MVP program recognizes individuals who have demonstrated advanced knowledge of the Sitecore platform and a commitment to sharing knowledge and technical expertise with community partners, customers, and prospects over the past year. The program is open to anyone passionate about Sitecore and eager to contribute to the community.

Over the past application year, starting from December 1st, 2024, I have been actively involved in the Sitecore community, contributing in a number of ways.


Sitecore Symposium 2025 Presentation

Together with Vasiliy Fomichev, we led a very insightful 50-minute workshop on building agentic copilots for Sitecore, during which Vasiliy provided the full theoretical foundation for the topic. I took it from there with a practical, hands-on demo of what it takes to make one from zero to the actual work, essentially giving the step-by-step instructions one could reproduce to get this done in under an hour. 

My demo showcased the effort and key decisions required to build a Microsoft Teams copilot, enabling marketers to perform specific operations (mass rebranding in our case, but could be anything) in the fastest, safest way. 

The whole chain looks as follows:

    Ms Teams ==> Teams Bot ==> LLM ==> Custom MCP Server ==> PowerShell ==> SPE (and the same reverse way back)

Recordings are available:

Agentic AI Challenge

Thrilled to be recognized as a Top 2nd Finalist in the Sitecore AI Challenge out of 150 submissions globally!

The AI Visibility app I've built will help SitecoreAI XM Cloud clients optimize their websites for AI within minutes. Like Michelle Boockoff-Bajdek mentioned, it's sometimes surprising to learn the fundamental questions people ask about your brand. Our app takes the guesswork out of AI optimization and helps Sitecore users gain a competitive advantage in digital. 

The app is now being reworked (implementing all the recent changes released after Sym) for review to join the public SitecoreAI Marketplace.

Awarding ceremony recording.

Sitecore Blogs 

This year, I have written 24 blog posts on various topics related to Sitecore, top-notch findings about XM Cloud and other composable products, best practices, tips and tricks, and case studies:

YouTube Videos

I occasionally create video recordings/walkthroughs and upload them to my YouTube channel. Some of them are very valuable, while some others are not much. I don't treat YouTube as a primary channel; instead, I see it as a supporting medium for sharing knowledge. For example, I upload all my user group recordings, public presentations, and other significant footage.

Sitecore User Groups

  1. Last fall, I established and organized the most wanted user group of the year – Sitecore Headless Development UserGroup, educating its ~500 members. This one is very special, since headless development has become the new normal for delivering sites with Sitecore. At the same time, so many professionals feel left behind, unable to keep up with the fast-emerging tech. I put it as my personal goal to run it monthly, helping the community learn and grow “headlessly,” and that is one of my commitments to it. It became the most run and most attended/reviewed event among Sitecore user groups, with eight events organized this year (#11, #12, #13, #14#15#16#17, and #18). All sessions are recorded and publicly available on YouTube, and they are also referenced on the individual event pages.
  2. Organized two Los Angeles Sitecore User Groups (#22 and #23). This user group also has ~500 members.
  3. Presented at several user groups.

GitHub

  • There are plenty of repositories among my contributions that are still meaningful and helpful.
  • Not just repositories I share on GitHub, but also plenty of useful gists.
  • I keep the Awesome Sitecore project up-to-date. This repository has plenty of stars on GitHub and is an integral part of the big Awesome Lists family. If you haven’t heard of Awesome Lists and its significance, I highly recommend reading these articles - first and second.

Support Tickets

  • CS543626, which relates to a broken search in XM Cloud.

MVP Program

  • I participate in most (if not all) of the webinars and MVP Lunches (often in both time zones per event).
  • I think MVP Summit is the best perk of the MVP Program, so never miss it. This year, I’ve learned a lot and also provided feedback to the product teams, as I usually do.
  • I participate in several streams of the Early Access Program, sharing insights with the product team ahead of GA dates.
  • In the past, I have participated in a very honorable activity: reviewing first-time applicants for the MVP Program, which is the first line of evaluation, and carefully matching each first-time applicant against high Sitecore MVP standards. This year, I am also taking part in reviewing.

Sitecore Learning

I have collaborated with the Sitecore Learning team for the past 3-4 years, and this year was no exception: they invited me to work on the XM Cloud Certification Exam version 2025. Unfortunately, I cannot publicly disclose this activity due to the NDA signed. This piece of work was successfully completed in the assigned timeframes.

Sitecore Telegram

  • I am making Telegram a premium-level channel for delivering Sitecore news and materials. Telegram offers a unique set of features that no other software can, and I am leveraging these advantages to provide greater convenience to my subscribers.
  • Started in 2017 as a single channel, it has expanded rapidly and reached 1,100 subscribers!
  • Growth did not stop; it escalated further beyond Sitecore, becoming composable with a dedicated channel for almost any composable product.

    Here they all are:

XM Cloud Daily series

With my dedication to Sitecore's new flagship product, XM Cloud, it was no surprise that I just launched a new XM Cloud Daily series of tips and tricks on social media, which has since evolved into SitecoreAI Daily.

Every day, I post useful tips and tricks about new Sitecore cloud offerings on Twitter/X and LinkedIn. This is what it looks like (a few recent postings):

In general, I am very active on LinkedIn (with ~10K+ followers) and Twitter/X (with almost ~1.3K subscribers), posting multiple times per week, often a few a day. 

Out of curiosity, I used the AI-powered browser Comet to count my posts, and it found 330 LinkedIn Sitecore-related posts since 1 December 2024.

Popularizing AI with Sitecore

In January 2025, I joined Zont Digital - an AI-first Sitecore partner, where all our thinking and operations are driven by this philosophy. Thus, I invented and developed Shift AI, which automates ~80% of the migration from legacy Sitecore XP to the new Sitecore AI XM Cloud.

That wasn't the only effort to make Sitecore an AI-first organization. I can name numerous activities, such as developing (non-official) Sitecore MCP server, Symposium Demo, and multiple PoCs.


... and ironically, AI pays my love back:


Hope that is not a hallucination, haha!

Sitecore PowerShell as a SitecoreAI Marketplace app

I have reverse-engineered the Sitecore PowerShell Extension and reassembled it into a SitecoreAI Marketplace app!

This PoC is essentially a blueprint app. On its own, it is a universally working example. Still, its real benefit comes from this app providing a ready-to-use boilerplate that can be reused to build a variety of specialized SitecoreAI Marketplace apps on top of the SPE approach.

The most awesome feature is that all of your Marketplace context values could be easily passed into a remotely executed PowerShell script as a script parameter: there is a convenient Script Parameters mapping with maramater token preview (so that you never miss the right value!)

Here's what it looks like:

To enable SPE with Remoting:

  1. From SitecoreAI Deploy, add SPE_REMOTING_SECRET environmental CM secret, then re-deploy.
  2. Install a package, which will enable SPE with Remoting: SPE_with_Remoting.zip (3.93 kb)
  3. This package also adds a disabled sitecore\speremoting user with admin rights, which you must enable manually from User Manager

Once this setup is complete, the environment is fully prepared to use the app. The Marketplace app supports multitenancy; however, SPE Remoting must be enabled individually for every environment you intend to work with.


Case Study: Search Solutions Comparison for Sitecore XM Cloud Migration

1. Introduction

This case study presents a high-level comparison of four leading search solutions - CoveoSitecore Search, Algolia, and SearchStax - for a Benelux-based financial organization considering a migration to Sitecore AI. The analysis focuses on licensing costs, implementation effort, potential hidden fees, technical limitations, and the availability of React-based frontend SDKs for each platform. The goal is to provide the necessary information to enable an informed decision on whether to migrate from Sitecore XP and to determine which solution best suits the organization's needs and budget.

The website has the following traffic characteristics, taken into consideration:

  • Annual Traffic: ~700K sessions in 2024 and ~850K sessions in 2023.
  • Components: ~160 unique components.
  • Budget Expectations: under to €10K for a “composable” (external) search provider

Section 4 of this document contains the conclusion and the considered recommendation based on the balance of individual organizations’ parameters.

2. Executive Summary

The following table provides a high-level comparison of the four search solutions:

Feature

Coveo

Sitecore Search

Algolia

SearchStax

Licensing Cost

High (Enterprise-focused)

Medium (Bundled with Sitecore)

Low (Pay-as-you-go)

Medium-High

Implementation Effort   

High

Low to Medium

Medium-High (Custom Integration)

Medium

Ideal Use Case

Complex, personalized search

Native Sitecore experiences + AI

Fast, real-time search

Managed Solr for Sitecore

React SDK

Yes (Atomic React)

Yes (Native SDK)

Yes (InstantSearch)

Yes (UI Kits)

Financial Services Fit

Excellent (Strong security & compliance)

Good (Native integration benefits)

Good (Flexible and secure)

Good (Managed Solr security)

3. Detailed Analysis

3.1. Coveo

Coveo is a powerful, AI-driven enterprise search platform that offers advanced personalization and relevance tuning capabilities. It is a mature product with a strong presence in the Sitecore ecosystem, well-suited for large organizations with complex search requirements.

Licensing and Cost

Coveo's pricing is geared towards enterprise clients and is generally the highest of the four options. The pricing model is based on a combination of query volume and the number of indexed items, with subscriptions typically sold on an annual or multi-year basis.

  • Coveo for Sitecore Plans: The Pro+ plan starts at 200,000 queries per month, while the Enterprise+ plan starts at 300,000 queries per month and offers volume-based pricing. Given the client's traffic, they would likely fall into the lower tiers of these plans.
  • Implementation Cost: A typical enterprise-level deployment, including licensing and professional services, can range from $50,000 to over $100,000 USD. This does not include ongoing maintenance or support costs.
  • Hidden Fees: Additional costs can arise from add-on features such as Generative AI, advanced security, and dedicated technical support. Overages on query limits are handled through a discussion with a customer manager rather than automatic charges, providing some flexibility but also potential for unexpected cost increases.

Implementation Effort

Coveo's integration with Sitecore is well-documented and mature, but it is not a simple plug-and-play solution. The platform's power and flexibility come at the cost of increased complexity.

  • Complexity: Coveo has a steep learning curve and often requires dedicated developer time to configure even moderately complex use cases.
  • Expertise: Successful implementation typically requires specialized knowledge of the Coveo platform, and many organizations opt for professional services from Coveo or a certified partner.
  • Time to Value: The complexity of configuration and optimization can lead to a longer implementation timeline compared to other solutions.

React SDK and Frontend Components

Coveo provides a comprehensive set of tools for building modern search UIs with React.

  • Coveo Atomic React (@coveo/atomic-react): A React wrapper around the core atomic web component library, providing a rich set of components for building search interfaces.
  • Plasma Design System: A React-based design system used in the Coveo Cloud Administration Console, which can be leveraged for a consistent look and feel.

Technical Limitations

While powerful, Coveo does have its limitations.

  • File Size: The maximum size for a single indexed item is approximately 256 MB, which includes metadata and permissions.
  • Configuration Complexity: The platform's extensive features can be difficult to manage, and the documentation is sometimes considered vague or incomplete.
  • Cost at Scale: Although the client's current traffic is low, a significant increase in search queries or indexed content could result in substantial cost increases.

3.2. Sitecore Search

Sitecore Search is the native search solution for the Sitecore ecosystem, designed to provide a seamless and integrated experience. It is an AI-powered, headless platform that focuses on delivering personalized and predictive search results.

Licensing and Cost

Detailed pricing for Sitecore Search is not publicly available and requires a direct quote from Sitecore. However, it is often bundled as part of the unified SitecoreAI (ex. XM Cloud) offering, which can make it a cost-effective option for organizations already invested in the Sitecore ecosystem.

  • Pricing Model: The cost is likely tied to the overall Sitecore contract and may not be broken down as a separate line item. This can simplify budgeting, but also makes it difficult to compare directly with other solutions.
  • Implementation Cost: As a native solution, the initial setup is generally more straightforward than third-party integrations. However, customization and optimization will still require development effort.
  • Hidden Fees: Potential hidden costs could arise if the bundled search capacity is exceeded.

Implementation Effort

Sitecore Search is designed for seamless integration with XM Cloud, which should reduce the initial implementation effort compared to third-party solutions.

  • Native Integration: The platform is designed to seamlessly integrate with Sitecore's content models and personalization features, streamlining the integration process.
  • Developer Expertise: Implementation can typically be handled by developers with standard Sitecore expertise, without requiring specialized third-party knowledge.
  • Time to Value: Native integration and a familiar development environment can lead to a faster time to value for most projects.

React SDK and Frontend Components

Sitecore provides a native and well-supported React SDK for building search experiences.

  • Sitecore Search JS SDK for React: A dedicated SDK that allows developers to quickly integrate search experiences into React applications. It includes a full set of UI components and a starter kit to accelerate development.

Technical Limitations

As a relatively new product, Sitecore Search has some limitations and operational challenges that need to be considered.

  • Indexing Delays: Crawling content from multiple sites with a single source can lead to prolonged indexing times, sometimes exceeding an hour. This can be a significant issue for time-sensitive content.
  • Scalability: For large, multi-site implementations, it is recommended to create separate sources for each site to improve indexing efficiency. This adds a layer of management complexity.
  • Real-Time Updates: The platform currently relies on full crawls for index updates, and there is a lack of a "Push API" for immediate, incremental updates. This can result in a delay of several minutes for new content to appear in search results.

3.3. Algolia

Algolia is a developer-focused search-as-a-service platform known for its speed and real-time capabilities. It provides a flexible and powerful set of APIs that enable the creation of fast and responsive search experiences.

Licensing and Cost

Algolia's pricing is transparent and based on a pay-as-you-go model, making it very cost-effective for organizations with low to moderate search traffic. For the client's current traffic levels, the costs would be minimal.

  • Pricing Model: The Grow and Grow Plus plans offer a free tier of 10,000 search requests per month, with additional requests billed at a low rate of $1,000 per 1,000 requests. The number of records (~350 pages) is well within the free tier of 100,000 records.
  • Cost Estimate: Based on the client's average annual traffic of ~775,000 sessions, the estimated annual licensing cost for Algolia would be between $17 and $197 USD, depending on the plan and the actual search rate.
  • Hidden Fees: The primary "hidden" cost with Algolia is the implementation effort, as there is no native Sitecore connector. While the licensing is inexpensive at this scale, a significant increase in traffic or a move to the enterprise Elevate plan could result in substantial cost increases, with average enterprise plans costing around $350,000 annually.

Implementation Effort

While Algolia is known for its developer-friendly APIs, the lack of a native Sitecore connector means that integration requires custom development.

  • Custom Integration: Implementing Algolia with Sitecore requires building a custom integration to index content and create the search interface. This can be a time-consuming and expensive process.
  • Third-Party Connectors: Third-party connectors are available, such as the "Algolia Index Builder for Sitecore" by Brimit, which can simplify the integration process. However, these connectors may come with their own licensing costs and support limitations.
  • Developer Expertise: The implementation requires developers with experience in both Sitecore and API-based integrations.

React SDK and Frontend Components

Algolia offers an actively maintained open-source React library.

  • React InstantSearch (react-instantsearch): A comprehensive library that lets developers create an instant search result experience with a rich set of pre-built widgets. It is highly performant and customizable.

Technical Limitations

Algolia's focus on speed and simplicity comes with some trade-offs.

  • Manual Tuning: Achieving high search relevance often requires manual tuning and configuration of the search algorithm.
  • eCommerce Features: While it can be used for e-commerce, it has limited specialized features compared to platforms like Coveo.
  • Indexation Time: Some users have reported that indexation time can be a factor that impacts user experience, particularly for large and complex datasets.

3.4. SearchStax

SearchStax offers both a fully managed site search solution (Site Search) and a managed Apache Solr hosting service (Managed Search). For a Sitecore XM Cloud implementation, the Site Search product is the most relevant, as it is designed to integrate directly with modern, headless architectures.

Licensing and Cost

SearchStax Site Search pricing is based on a tiered subscription model, with the entry-level Essential plan starting at $799 per month (billed annually).

  • Pricing Model: The plans scale based on the number of indexed items, monthly searches, and advanced features. The Advanced and Premium plans require a custom quote.
  • Implementation Cost: The cost of implementation is moderate, as SearchStax provides a dedicated Sitecore module and UI kits to accelerate development.
  • Hidden Fees: Additional costs could arise from overages on search requests or indexed items, or from the need for advanced security and support add-ons available with the Managed Search product.

Implementation Effort

SearchStax has invested in creating a smooth integration experience for Sitecore users, including those on XM Cloud.

  • Sitecore Integration: SearchStax offers a dedicated module for Sitecore, which connects directly to the Site Search solution, as well as connectors for their Managed Search product.
  • Developer Expertise: The availability of UI kits and pre-built components reduces the required level of specialized expertise, allowing developers with standard React and Sitecore knowledge to implement the solution effectively.
  • Time to Value: The combination of a dedicated Sitecore module and React UI kits can significantly accelerate the development process and reduce the time to value.

React SDK and Frontend Components

SearchStax provides a comprehensive set of tools for building search interfaces with React.

  • Search UI Kits: SearchStax offers UI kits for JavaScript, Vue, Angular, and React/Next.js, which include pre-built components to streamline the development of the search UI.

Technical Limitations

SearchStax has some service limits in place to ensure stability and performance.

  • API and Document Limits: There are limits on API requests per second (20+), document size (100KB), and payload size (10MB).
  • Feature Limits: There are also limits on the number of facet values (50), promoted items (10), and other features.
  • User-Reported Issues: Some users have reported that the platform can be expensive and that there are limitations on the number of search results that can be displayed per category.

4. Conclusion and Recommendations

Each of the four search solutions offers a viable path for a Sitecore XM Cloud migration, but they cater to different priorities and budgets. The availability of React-based SDKs and component libraries from all four vendors is a significant advantage, as it simplifies the development of the front-end search experience.

  1. Coveo remains the top-tier enterprise solution, offering the most advanced AI and personalization features. Its high cost is justified by its power and its proven track record in the financial services industry.
  2. Sitecore Search provides the tightest integration with the SitecoreAI ecosystem, which can lead to a more streamlined implementation and a unified user experience.
  3. Algolia is the most budget-friendly option for the client's current traffic, but the lack of a native Sitecore connector and some basic features introduces significant implementation risk and long-term maintenance overhead.
  4. SearchStax presents a compelling middle ground. It offers a robust, AI-powered search solution with a clear integration path for Sitecore XM Cloud and a more accessible price point than Coveo. Its managed Solr foundation provides a high degree of security and reliability.

Recommendations

  1. Primary Recommendation: Sitecore Search.It should be considered a seamless, all-in-one solution from a single vendor, thus natively fits in the product space. A thorough proof of concept is essential to validate that its performance and scalability meet the client's needs. Native integration and the presence of the best-breed front-end components make this choice the best balance among these platforms. It totally fits the aligned budget. Additionally, it features AI personalization capabilities and operates within the newly created Unified Data, alongside XM Cloud (for tracking, analytics, personalization, and more).
  2. For a financial institution that prioritizes a premium, secure, and highly personalized user experience, Coveo could be a recommended solution. Its enterprise-grade features and strong compliance posture are well-suited to the needs of the financial services industry. However, due to budget concerns, Coveo is not a suitable option. Coveo's minimal tier times exceed the organization’s desired budget range.
  3. Strong Alternative: SearchStax.If the cost of Coveo is a significant barrier, SearchStax is a strong alternative. It provides a powerful, AI-driven search experience with a supported integration path for Sitecore XM Cloud. Its balance of features, cost, and ease of implementation makes it a very attractive option. However, despite being a budget option, the total cost of ownership can often be higher compared with Sitecore Search and Algolia.
  4. Budget-Constrained Option: Algolia.Algolia should only be considered if the budget is the primary driver, and the organization has a strong in-house development team to manage custom integration. The long-term total cost of ownership may be higher than the initial licensing fees suggest.

The choice between Sitecore Search and SearchStax will likely come down to a trade-off between the advanced, integrated features of the native Sitecore product and yet still powerful solution offered by SearchStax.

5. References