If you ask anyone in the Sitecore community what was the biggest hype of 2022 – there wouldn’t be any other opinion than mentioning XM Cloud. Let’s take a look at this latest and shiny SaaS offering!
Sitecore XM Cloud is a cloud-based platform that provides tools and features for managing and optimizing digital customer experiences. The platform is a headless SaaS solution initially designed to resolve certain points of pain XP platform previously suffered from, including
That results in a drastically improved development process, velocity, and reliability; not to mention saved budgets. Clients can mostly focus on building the sites for visitors, where the platform itself gets care from the vendor.
Before talking about licensing, it is important to understand how this SaaS offering is structured.
XM Cloud hosting platform includes the concepts of organizations, projects, and environments. An organization is the equivalent of an XM Cloud subscription. To initially access the XM Cloud portal, you must be a member of an “Organization” admin account at Sitecore. Once you have access to this account, you can manage your users, give them the required access or even set them as admins, create projects, set up environments for those projects, and promote your code through these environments. In old XP terminology, each environment is a Sitecore instance.
There are three environments per project: one production and two non-prod – typically for development, staging, testing, or other purposes. With the XM Cloud portal, you can easily manage and access all of your Sitecore instances in the cloud.
Coming back to the licensing model, it is similar to a subscription license from Sitecore platforms and its cost model was simplified very much to be based on traffic and consumption.
Each XM Cloud license includes a certain number of projects and environments, and you can use these to manage your different Sitecore instances. Depending on your specific requirements, you may be able to use different projects to handle different instances. You can use environments to set up and configure your development, staging, testing, and production environments, as well as any other environments you may need. If you have any questions about how to best use projects and environments, or if you have any other licensing questions, it is recommended that you speak with your Account Manager, who will be able to provide more information and guidance to meet your specific needs.
Interestingly, in order to run local docker containers with XM Cloud, one requires to have a valid Sitecore license. I cannot say if your existing partner’s license file will work with local containers development, as being a Sitecore MVP I was given a universal Sitecore license file which worked well. For building and deploying a source code with a built-in Deploy App you don’t need to provide a license file – it is assumed from your organization (subscription).
In very simplified terms, the architecture could be explained by the below diagram provided by Sitecore:
One of the most important features of XM Cloud is Webhook Framework. It is built into XM Cloud in the same as is for 10.3 platforms. In a composable world of decoupled SaaS products webhooks are used to notify external services about changes in XM Cloud, for example, to validate and even cancel Workflow state transitions.
For example, in the old good XP platform, we used events to notify that publishing to CD has been completed. One of the possible scenarios was using Core database to pass the remote events as that was an architectural feature of a monolith platform. In a composable world that cannot be the case, as systems cannot share resources in that way and can only communicate through APIs. You don’t have CDs and publish to Edge which reasonably also has its own webhooks. You could also utilize webhooks on git repository or at Vercel side for example.
With some obvious architectural limitations, it is possible to customize XM Cloud in a similar way as we did it with XP by applying patches, but there is an expectation is that developers would customize less and less with time and platform growth. From the functionality point of view, these customizations would focus on data and synchronization rather than patching system features.
Speaking about the drawbacks of XM Cloud I could state single region geolocation, which you must specify initially.
It is a visual dashboard of your Organization. Here you can get all your tools in the same place, based on what you have in your subscription. In addition – there are shortcuts to Documentation and you can access Support from the Portal as well.
You can create projects and environments right from this portal. Choose between a starter template or setting up your GitHub repository and if the latter has been chosen – once you grant access to XM Cloud Deploy App to your account and choose the desired repository – it will perform the deployment in the background.
Is GitHub the only way to provide source code for build and deployment? The answer is both yes and no: from GUI it indeed currently only supports GitHub, with later plans to add support for other popular version control hosting providers, such as Azure DevOps, GitLab, Bitbucket, etc. But from CLI one can have more configuring options.
And not just that – almost everything you can do on the portal with GUI you can do remotely with CLI, for example. However, many of the Cloud Portal tools are not available for local development: Pages, Components, Explorer, Deploy App, and Dashboard itself all run exclusively in the cloud and are not available to run locally.
So, how would I develop it at my local rendering host and test it then with Pages or Experience Editor running in the cloud? Currently, there’s a workaround to configure tunneling for the local Rendering Host with a reverse proxy like ngrok or localtunnel, so that your local rendering host server becomes available outside.
If using default GitHub is not an option or you want to customize the automation and/or set your own CI/CD pipeline, there’s another feature of Cloud Portal named Authentication Clients available – an access token generator for XM Cloud.
So, that is an effective tool for creating tokens for approving custom tools for the automation and/or setting your own CI/CD pipeline.
With the XP platform, we used to have an Identity Server however the one is no longer useful in a genuine composable world. Sitecore had to re-think the authentication approach and implemented a new Unified Identity system so that it offers SSO across all applications of the Composable DXP family.
How XM Cloud integrates with Content Hub DAM and CMP out-of-box and reference to the CMP/DAM connector now in the base image.
GraphQL schema used by Experience Edge in XM Cloud is the same as used for 10.3 platforms (with a minor difference in temporal query complexity limits). However, XM Cloud schema is different from those used in Content Hub and Content Hub One as they implement different underlying data structures.
Speaking about security, previously on XP when we dealt with “protected” pages, security data went along with published content to CD servers, where Sitecore platform implemented it in the correct way. With XM Cloud we don’t have a CD server any longer, we publish to Edge Content gets published to Edge regardless of that permissions. Of course, it is not immediately available to the outer world – without a valid API key, it is not possible to access it. But instead of a fully compliant Sitecore CD server we now got a “head” which is a totally detached piece of technology. Having API Key, head may, or may not respect the security rules – Edge will give it out anyway. So, you should extra care and test these things while developing head application on your rendering host.
Since we do not have xDB and xConnect within XM Cloud architecture, many features from XP did not find their way to the new composable world. We have to say goodbye to:
In addition, because of the exclusively headless architecture of XM Cloud, not having CD servers, and operating through Edge these features also went off this SaaS platform:
Sitecore Forms have gone simply because there is nowhere to submit the data back to. It is expected that Sitecore comes up with a sort of SaaS forms component to be used with a composable family of products. Meanwhile, you can consider using something like Jotforms, Marketo, Hubspot Forms, etc.
As for implementing search functionality – despite Solr still being a part of this platform for supporting XM needs (same as does it for XP), however, without having CD servers there is no more reason to have custom search indexes. Implementing a search feature for your website now requires a composable search component. I will talk through it in more detail below.
As said above, custom search indexes are no longer available and one has to select from a choice of composable options: Sitecore Search, Coveo, or Algolia – those first come into my mind. All these products are platform agnostic and will integrate seamlessly with any site regardless of underlying CMS or web engine.
There might be several approaches for implementing external search with XM Cloud:
The headless part of SXA is provided with Sitecore XM Cloud, a cloud-based CMS platform. It allows developers to build and deploy headless websites using XM Cloud, taking advantage of all the known existing SXA features, such as Page Layout, Partial Layout and especially Rendering Variants.
What I found really great was the out-of-box implementation of SEO-related things, such as:
This version of SXA supports Next.js as a first-class citizen and therefore has a revised list of components, leaving only those most basic to work (here they are all). With years of SXA practices, it became a default way of doing things to clone components and add rendering variants to existing ones. Assuming the same, Rendering Variants remain with us in a headless world, however, Scriban is no longer there, replaced with Next.js. Here is an example of how Rendering Variants are defined within a single promo.tsx file with Next.js implementation – there are two of them named Default and WithText. It’s really simple and similar to Scriban.
There is a content tab that shows item properties similar to what it was before in Content Editor.
Almost everything that can be done through the Cloud portal can be also done through the Sitecore CLI. The latest version of CLI allows the creation of Projects, New Environments and Deployments, and much more.
Sitecore CLI allows you to take existing serialized content and move it directly into XM Cloud. Since serialization is done in YAML format, it stays the same as with XP and also is compatible with Unicorn, therefore correctly formatted content is easily portable to XM Cloud. I want to emphasize that it is only about serialized content, Unicorn itself is an XP module and cannot be installed on XM Coud.
New Tools and Interfaces
Old good Content Editor and Experience Editor still remain with us and that’s good news for those who habitually stick to the interfaces. they used to. Nevertheless, this blog post will familiarize you with the totally new apps and interfaces coming with XM Cloud.
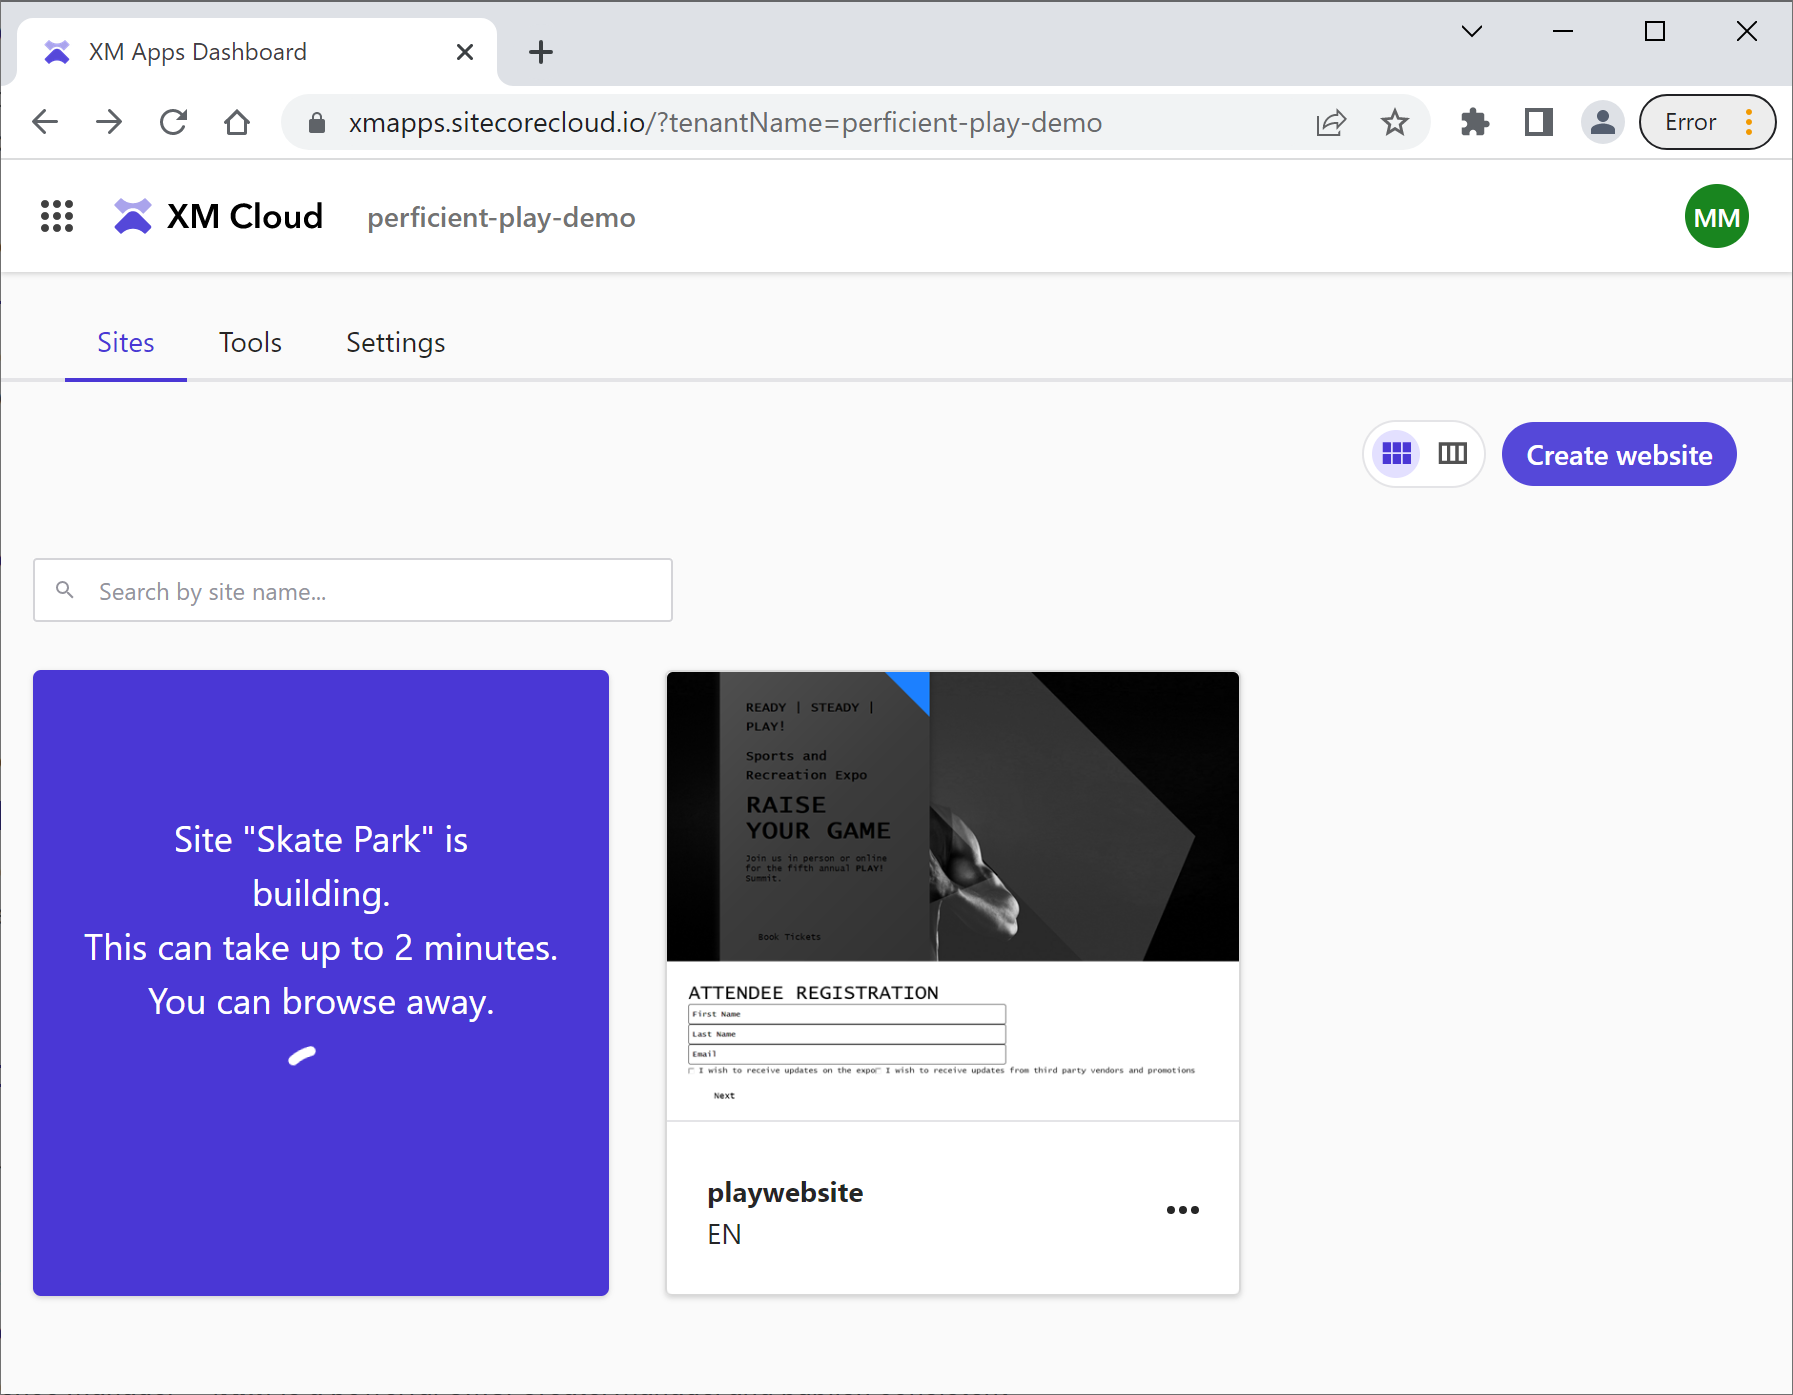
Sites
This application opens by default. It shows up all of the websites available in the system with the predictive typing search bar to filter them out. Clicking any of the sites opens them up in a Pages app, as expected.
What is more interesting is the ability to create websites directly from this interface by clicking the “Create website” button.
Pages
If you played around Horizon in the latest versions of XP such as 10.2, you will immediately recognize this user interface. Pages are built on the foundation of Horizon:
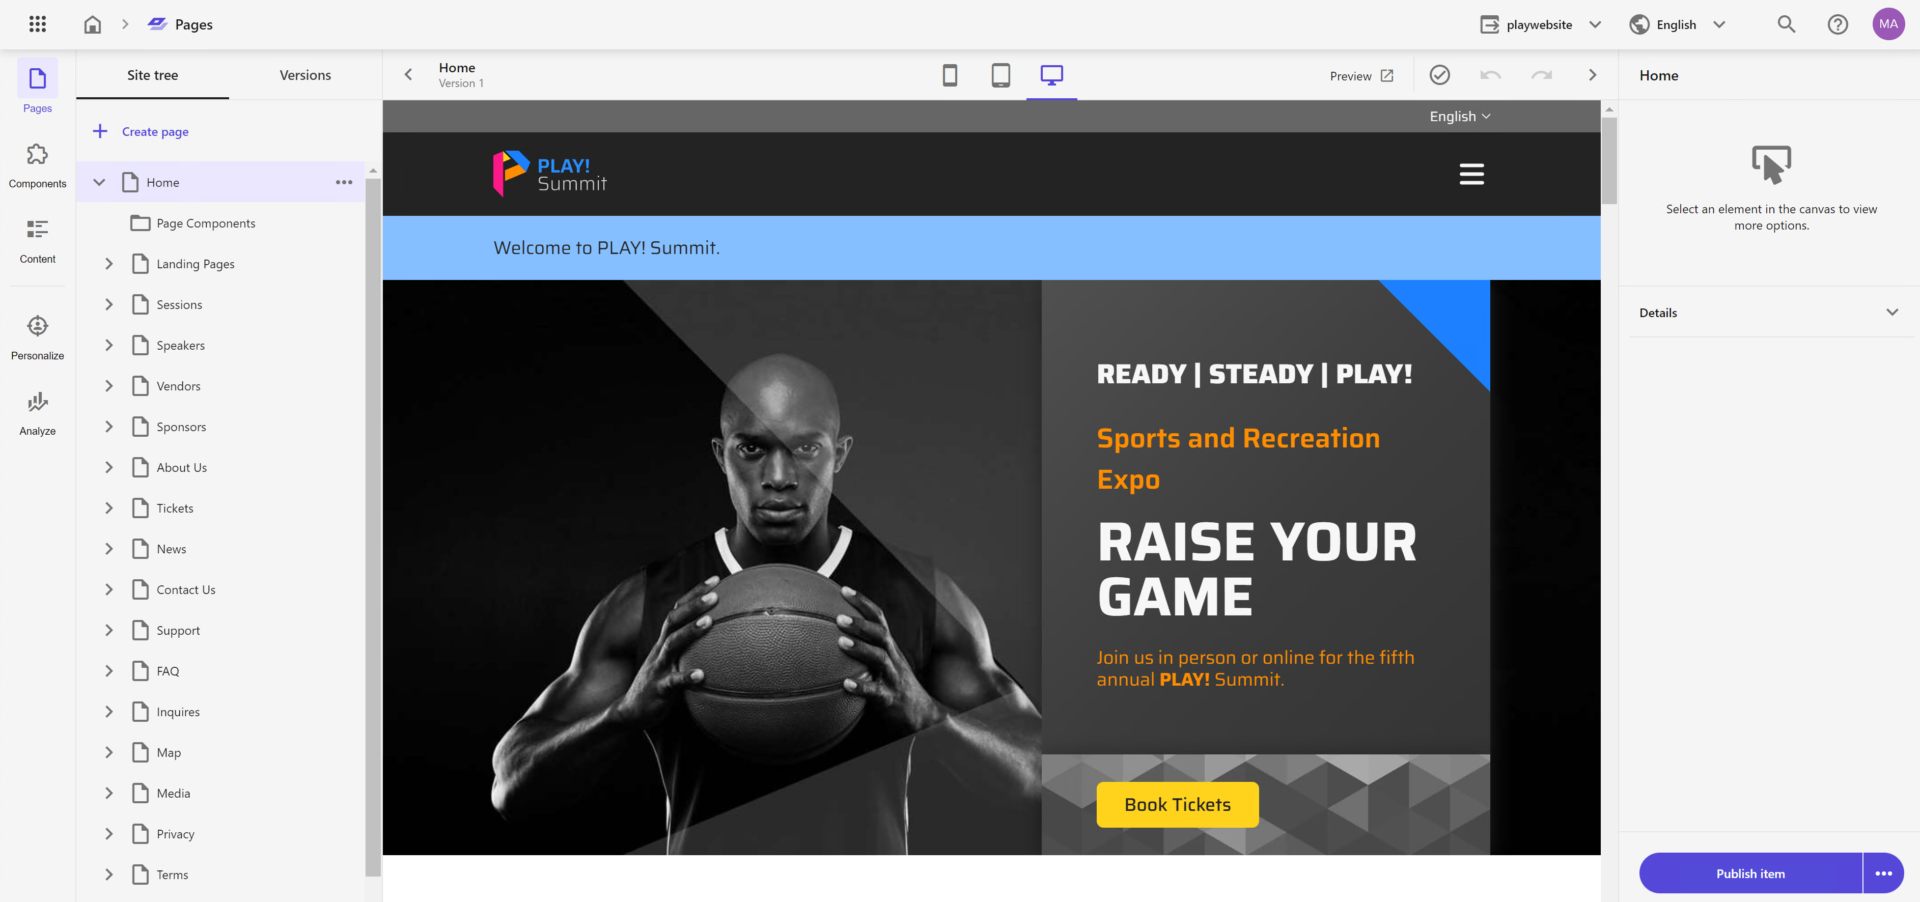
The Pages application has 5 views which you select from the left navigation stripe:
- Pages
- Components
- Content
- Personalize
- Analyze
I personally find it a little confusing, that some views have the same names and apps. For example, by clicking the Components view of the above Pages app from the left bar navigation, you will see a component selector which you can drag and drop to the editable page. However, this is totally different from the Components application which is a turbocharged tool for creating components to be used on a page, which you later choose by the mentioned component selector of Pages application.
I want to highlight that Pages was done with attention to minor details. It has very pleasant animation effects for many transitions, leaving you with a premium experience feelings. There is no “Save” button anywhere as Pages application autosaves your changes.
It also has support for multiple websites selected from a dropdown. Preview, Devices Experience, Navigation Tree – all these features are located at the same interface you would expect in order to have a productive editing experience.
Components
The tool is still in its early stages, but it has a lot of potentials. Its purpose is to enable content creators and marketers to create components without the need for a developer to start from scratch.
There are lots of styling options to specify custom types, and custom fonts, at least it looks advanced.
Here we create the component and publish it, so that component becomes available in the component library of the Pages app. The intention is for us to be able to put components together and create them together from basic page elements, images, links, and so forth. Starting with a grid, then you simply start adding columns, set alignment, and apply other UI-related things.
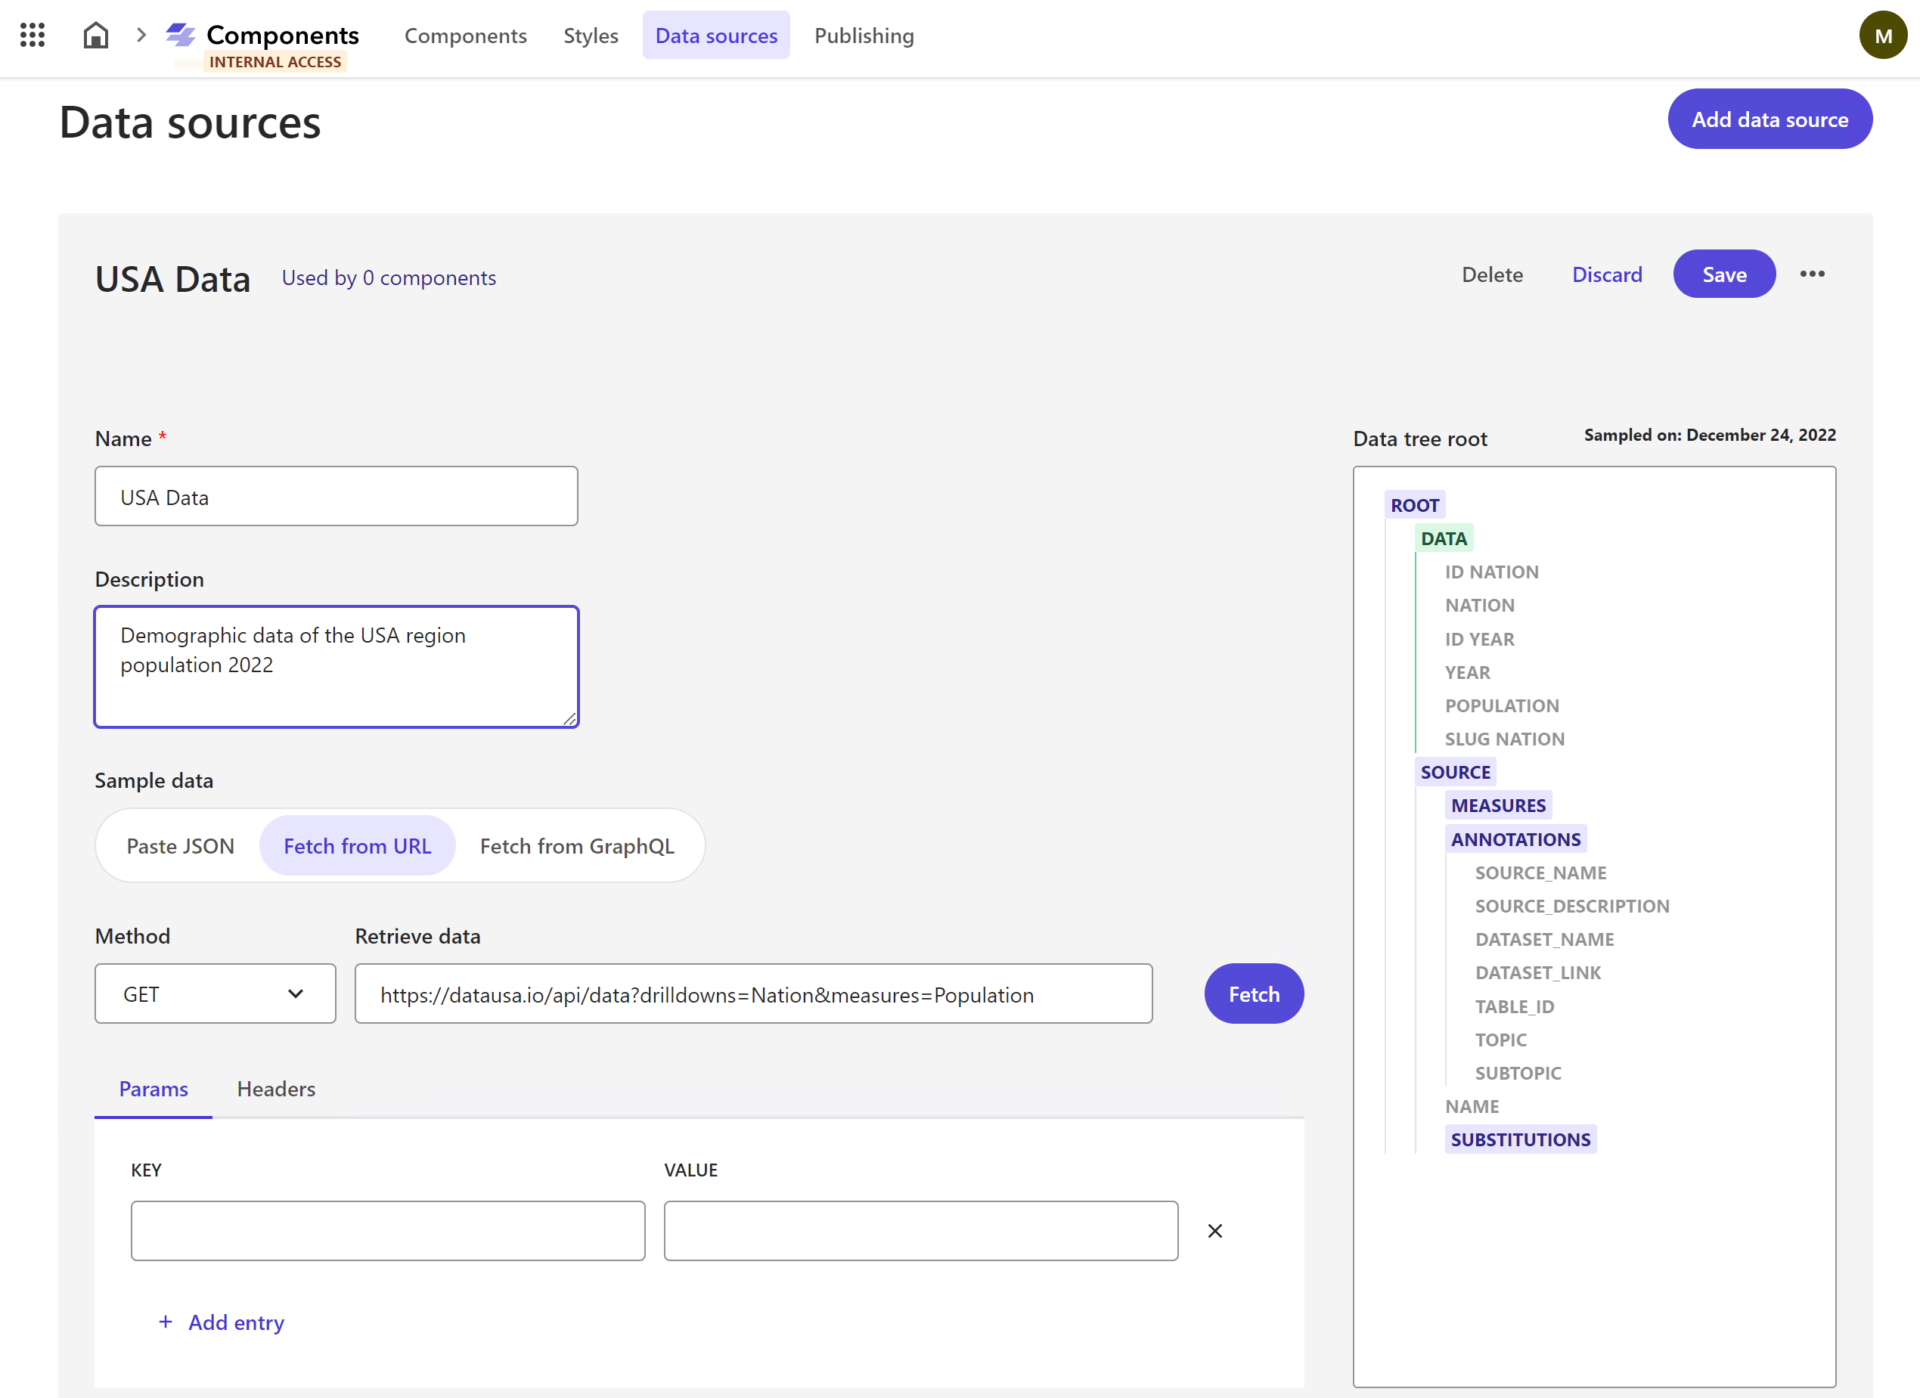
But what is the most impressive feature of Components app is – we not only create and customize individual components similar to the way we do it in SXA, but now we create entire components completely from scratch, we can style them and can hydrate them with data from an external data source. By saying external I mean really external: one of many 3rd party content providers and headless CMSs, like Content Hub One, Contentful, Kontent.ai, etc., and all that with zero code!
All you need to do is to provide an API endpoint and use a mouse to select what fields from the source you want to map. For those who are behind a tough firewall or strict corporate policies, there is an option to directly paste in a sample JSON snippet to map against it. They don’t ever have to hit the live API when creating a datasource.
What is even more mind-breaking is that you can feed the same single component from various external systems at the same time. Image a Promo Block component that you can easily drag and drop to a page that consists of:
- Heading title that sits natively at Sitecore XM Cloud
- Image taken from Content Hub DAM
- Localized promo content taken from Contentful CMS
- Call to action button that is wired up to CDP
In my opinion, that is a superpower of XM Cloud editing capabilities! I very much recommend watching this short video demonstrating the whole power of the new Components app.
How the data is updated and invalidated with Components? It seems that the data is pulled in at the moment when the connection is established, and not get refreshed at the moment of publication.
Personalize
A cut version of Sitecore Personalize comes built into Pages interface of XM Cloud to allow for basic view event personalization. Therefore there isn’t a one-to-one match of old XP rulesets to the new ones, so a deeper analysis and re-evaluation of your personalization strategy is needed.
With XM Cloud there’s a new way of doing personalization coming out of the box: we have a limited set of rules available to us and those are primarily rules based on the current session, such as day of the week, a visitor’s country, to an operating system of visitor’s current device. However, there’s no way you can manage the built-in Personalize tenant directly from the XM Cloud interface.
Checking carefully, you can still find some rules based on historical data: an example of a history-based rule is the number of page views a visitor has visited pages within the past (max) 30 days. Of course, once you enable full Sitecore Personalize a set of tools will expand the functionality to a wider range of options.
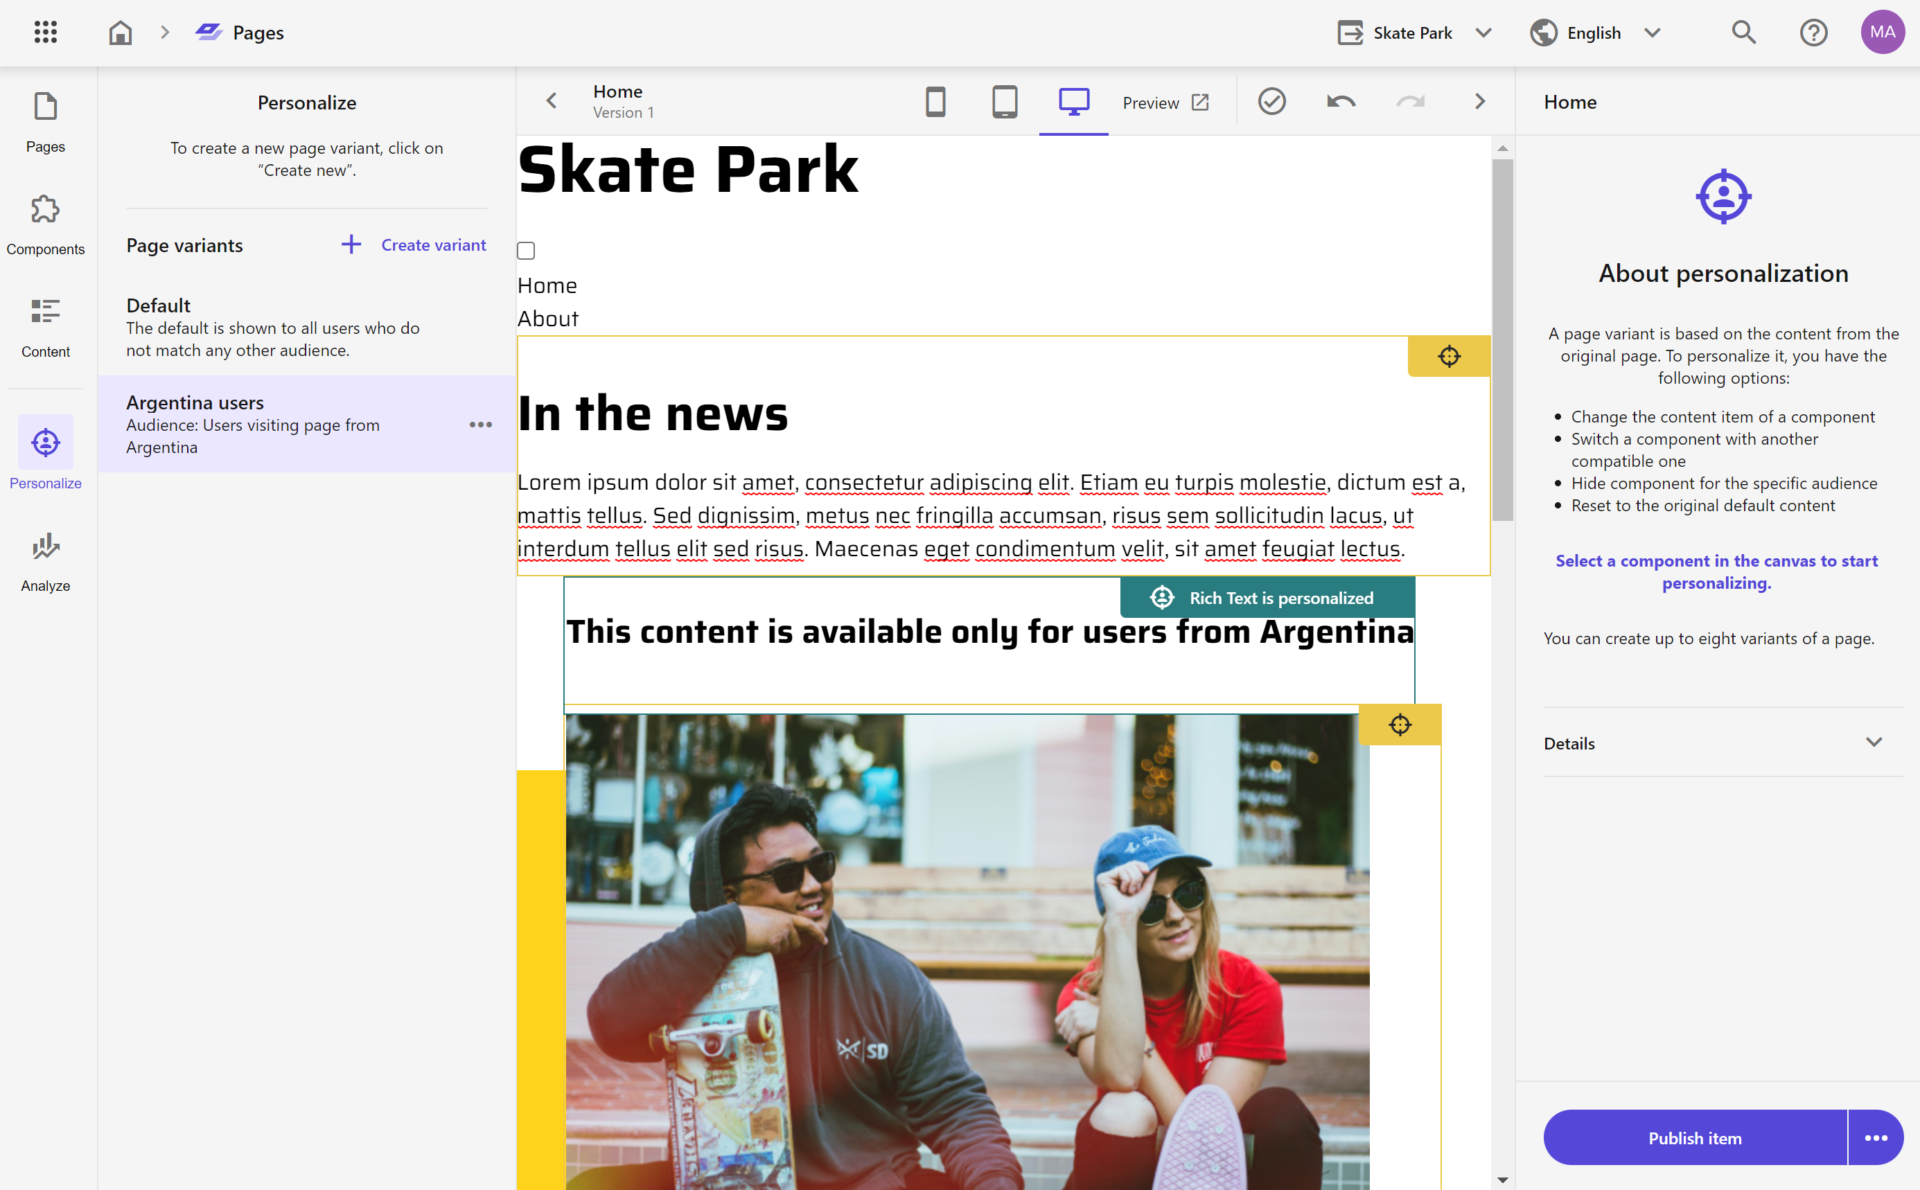
Unlike XP where we would personalize each component individually, in XM cloud we create page variants to achieve that so that we can define the audience that will be exposed to that page variant.
Configuring the audience, you see the default set of rules, I counted 14:
- Point of sale: The visit is to point(s) of sale
- Region: The visitor is in region(s) during the current visit
- Country: The visitor is in country(s) during the current visit
- Visit day of the month: The visit is on a day of the month that compares to number based on your organization’s time zone
- Day of the week: The visit is on a day(s) of the week, based on your organization’s time zone
- Month of visit: The visit is in month(s), based on your organization’s time zone
- First referrer: The visitor comes from a URL that compares to referrer in the current visit
- UTM value: The visit includes a UTM type that compares to UTM value
- Operating system: The visitor is using operating system(s) during the current visit
- Device: The visitor is using a device type(s) device during the current visit
- Number of page views: The visitor has visited page within the past x days and the total number of page views compares to a number of views
- First page: The visit has started on a page that compares to page during the current visit
- Page view: The visitor has visited page name(s) during the current visit
- New or returning visitor: The visitor is a specific type to your site
After specifying the audience, you then process customizing components for that page variant.
That is implemented in a very similar manner as it was back in the XP: specify the data source item with the desired content, choose a different component to replace the default one, or simply choose to hide the component as another option.
The bigger question comes about how personalization works with Edge, without having CD servers previously responsible for executing personalization. It is important to understand that the personalization logic is now happening at the Vercel/Next.js middleware level.
A middleware package intercept browser request at Vercel in order to do audience matching with Personalize, and then serves the relevant content from the Edge, for example by substituting personalized Edge content from one to another. The above approach does not imply any performance penalties at all since all the parts of this chain are super-fast at CDN/Jamstack level at Vercel and also because the content is already cached at Experience Edge. I would recommend spending some time reading through more details about the built-in personalization in XM Cloud by this link.
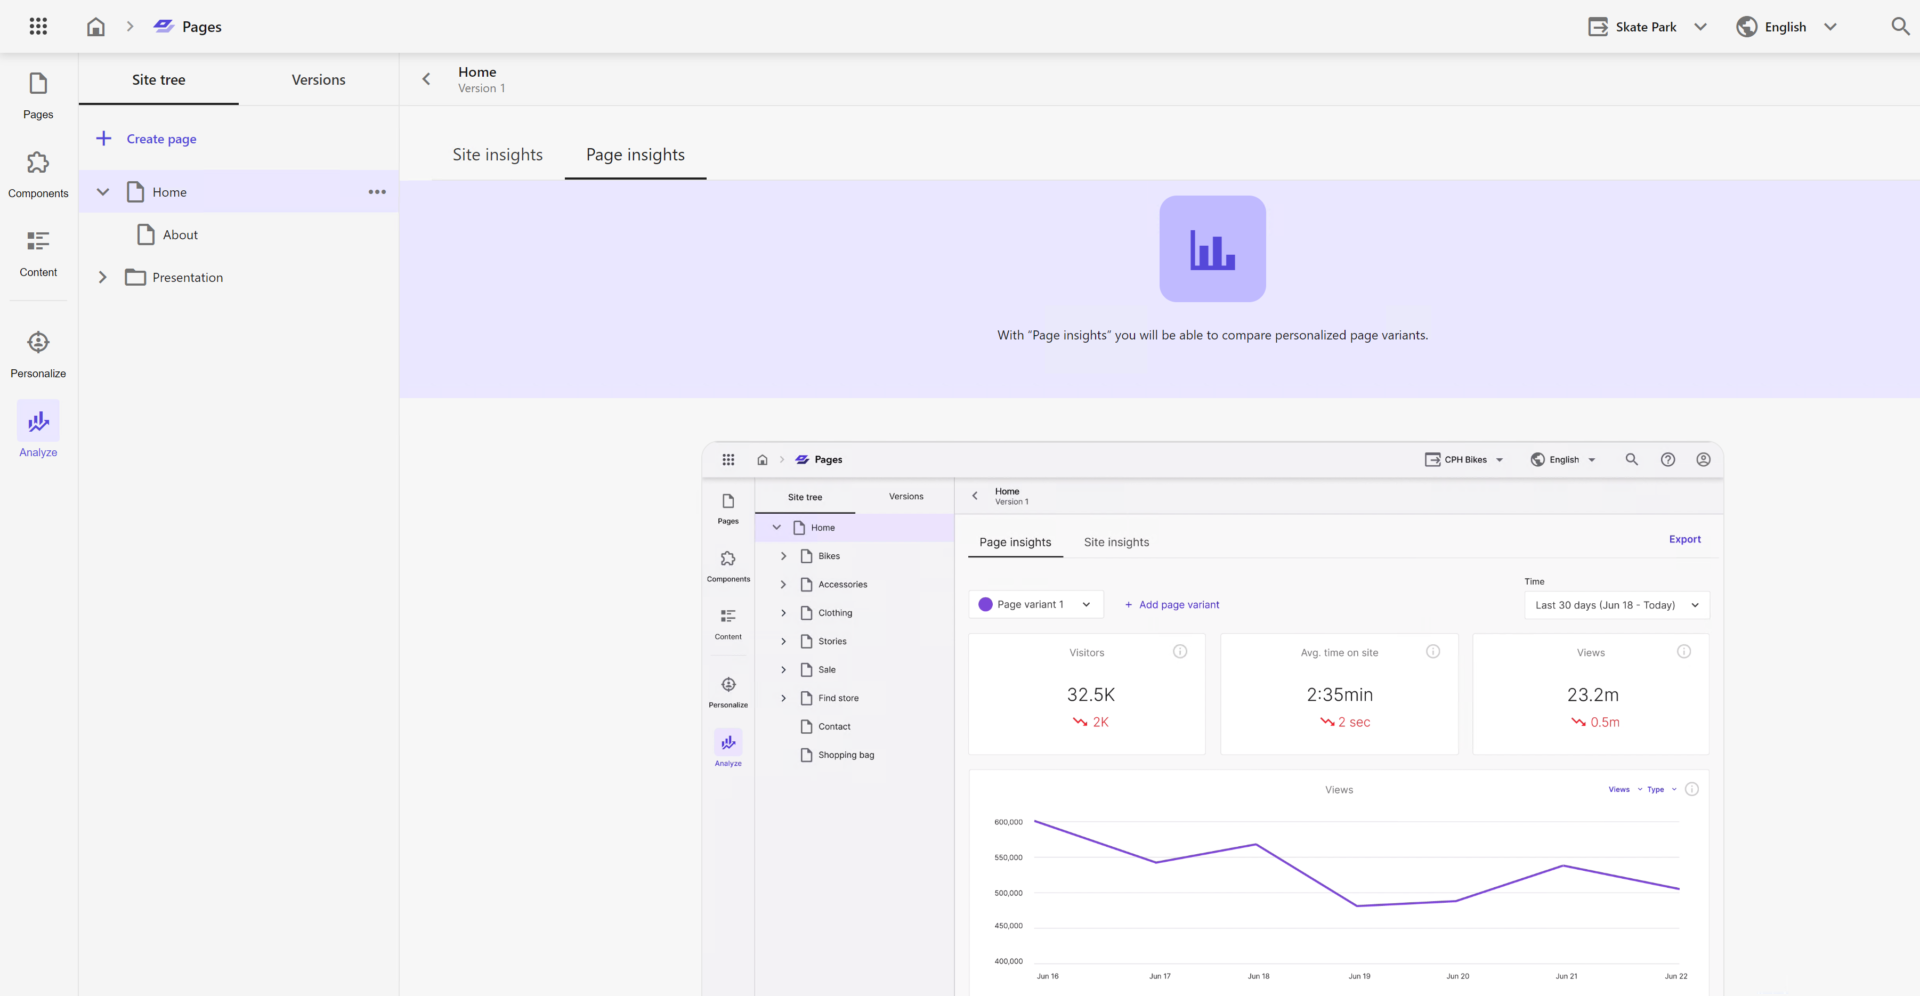
Analyze
Another excellent embedded tool powered by Boxever page-level analytics: pages built-in with Pages have embedded tracking tag therefore analytics become auto-available. Just out of the box it will empower you to see:
- the browsers the operating system
- the source where they came from
- the pages: first page, entry page, top pages
- visited top countries
- by source visits
- by time of the day
Analytics presents data with a heat map for the time of the day with most traffic shown by darker rectangles.
Similar to the previous example of Personalize, this analytics system is now built on top of the Sitecore CDP. Previously all the analytics was taken out from Sitecore XDB, and without having that in SaaS cloud offerings the only option for providing built-in analytics and personalization was to rely on CDP and Personalize in some way.
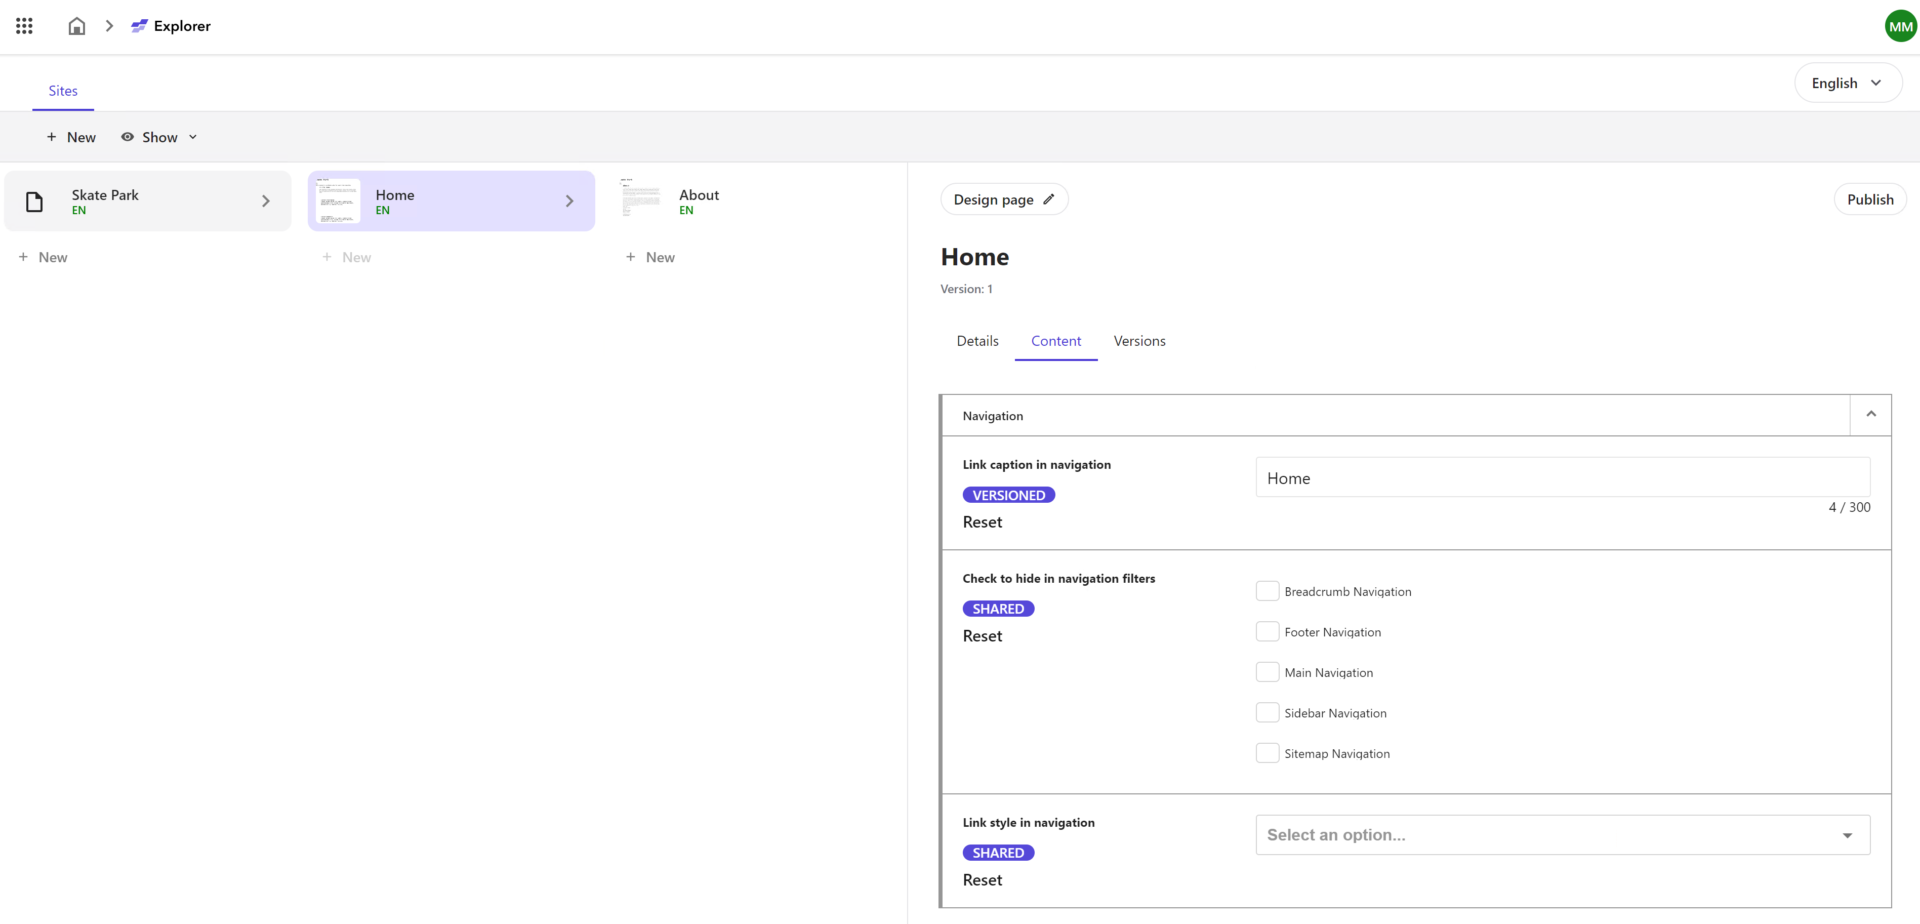
Explorer
In addition to Pages you can use Explorer for editing content. I think the main idea of this interface was to give editors the ability to switch rapidly between visual and filled editing interfaces.
Explorer presents you the content with some similarity to Horizon performing on XP: kind of a Content Editor with navigation and the ability to publish and edit items at the fields level. You can do many expected content operations here like modify, copy, upload download media assets, etc.
Interestingly that Sitecore decided to walk away from a tree-based style of presenting content structure to a drill-into way of navigation. It definitely makes things clear, and when we need to take a look at the entire structure of the content tree – there is still old good Content Editor to our help.
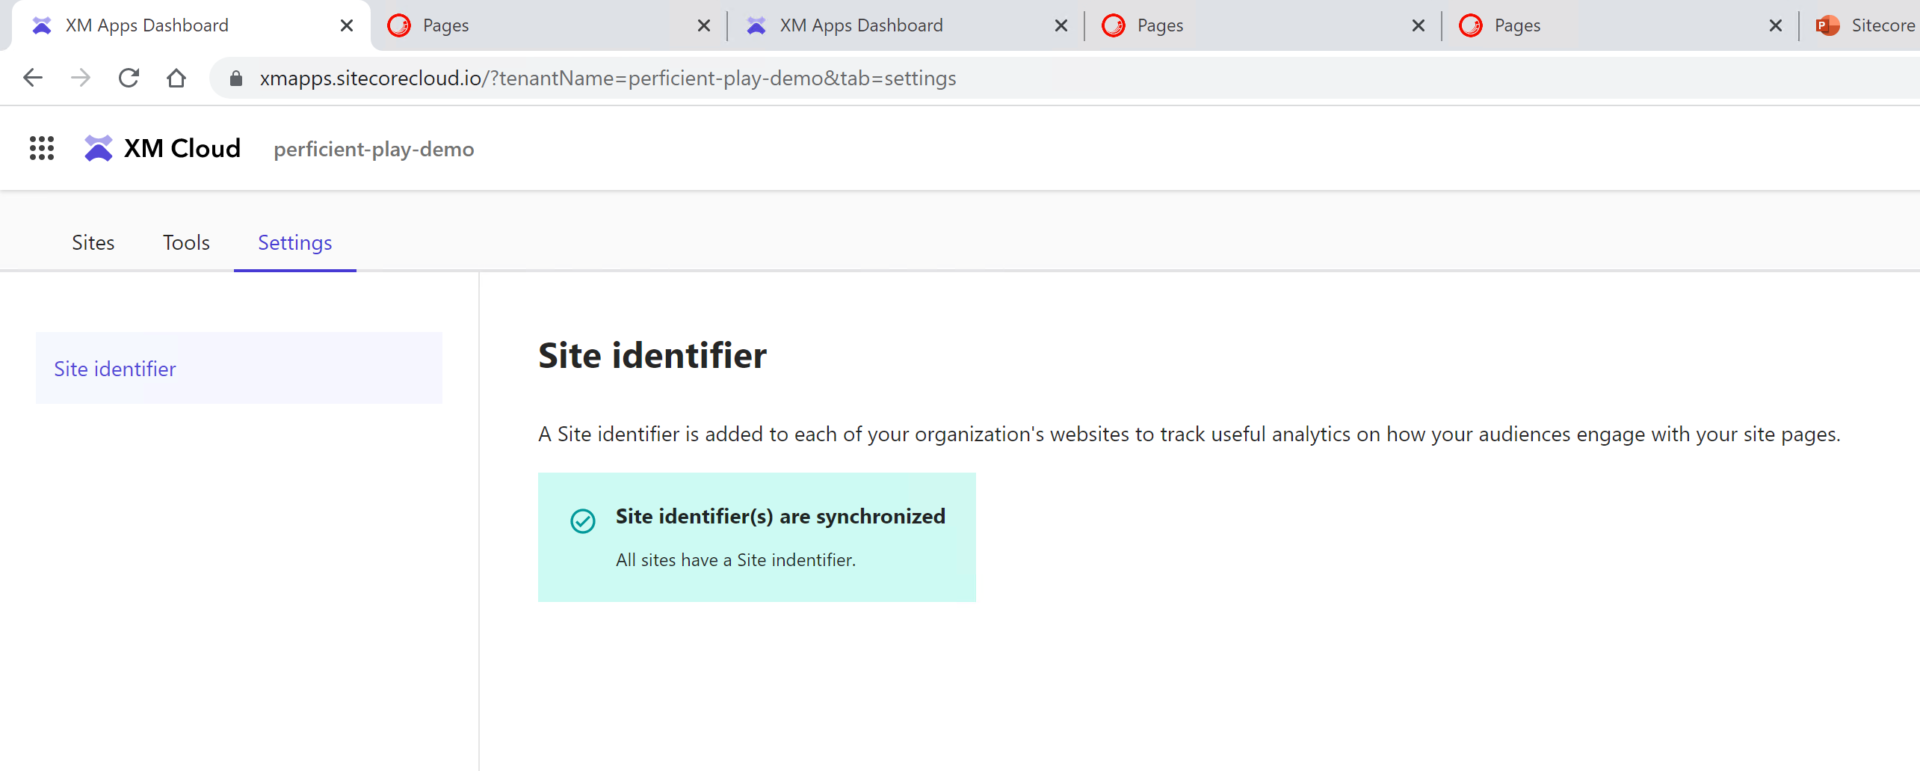
Site Identifier
This is an interface to add a tracker to your websites if they are missing so that they become trackable with Analyze section of Pages app.
That was an overview of the most important new applications and interfaces coming with XM Cloud. The part of this post will take you through the development experience with XM Cloud.
Development with XM Cloud
In the final post of the XM Cloud series, we’ll talk about the development process with XM Cloud and its nuances. I assume you’re either familiar with the traditional way of Sitecore development or at least get some basic understanding of the process.
In order to identify the difference in the development, let’s quickly recap architectural features of XM Cloud that affect:
- there are no more Content Delivery (CD) servers available
- therefore content gets published to Sitecore Edge
- that, in turn, enforces headless development only
Sitecore Next.js SDK
That means we now have a “head” web application running on a Rendering Host. That would be most likely built with Sitecore Next.js SDK – using Next.js on top of React with TypeScript running on a Node-powered server. Next.js is a framework created by Vercel that is built on top of the React library, designed to help developers build production-ready applications with little need for configuration and boilerplate code.
Of course, as a natively headless platform Sitecore allows using any other framework or technology, like Vue, Angular, or .NET Renderings, however, if React is your choice then Next.js SDK will offer you lots of features available out of the box, including
- Powerful routing mechanism
- Layout Service fetching and mapping
- Placeholder Resolver
- Multi-language support
- Field Helper components
- Components Factory
- Experience Editor support
- Sitecore Analytics support
I would recommend going deeply through the relevant documentation, as it covers it all in the detail.
Moving logic to the “Head”
A headless architecture consists of a back end with a layer of services and APIs and a front-end/client/user-facing application. The front-end application, or presentation layer, retrieves data from the CMS using API endpoints and uses that data to populate or hydrate the markup it generates.
Without having CD servers any longer, there is no place to execute HTTP request pipeline extensions. Experience Edge provides just raw published data in a headless way, there is no place to apply any logic. But what if you need to modify a request, for example?
In that case, all that logic gets moved to a “head” application, since changes will need to be made in the hosting environment for the client application.
If the Next.js application is hosted on Vercel, a Vercel Serverless Function can be set up to process incoming HTTP requests and generate a response. For Cloudflare Pages, one can choose Cloudflare Worker for the same purpose, and so on.
Similarly, any other integrations or personalization previously taken place on a CD server should be refactored to work with the “head” application at the Rendering Host. It is recommended to use out-of-process API-based integration as much as possible to maintain loose coupling.
Development Modes
There are two approaches for developers to interact with XM Cloud and implement customer requirements: Edge Mode and Fully Local.
With Edge Mode, you developed a classical JavaScript-based rendering app on a local node server. This app connects to which will connect to the GraphQL endpoint of the Experience Edge which XM Cloud publishes to. This option does not require a license, as Edge relates to your Cloud Subscription which is aware of your license. Therefore you can scale and outsource the development as much as you desire. You can also develop on Mac or Linux, as soon as the OS can run a Node server.
Fully Local development requires containers running on a Windows-based environment and you need to have a valid license file to run it. If running on a client version of Windows (say, 10 or 11) make sure to reference 1809-based images in your .env file.
SOLUTION_BASE_IMAGE=mcr.microsoft.com/windows/nanoserver:1809
NETCORE_BUILD_IMAGE=mcr.microsoft.com/dotnet/sdk:6.0-nanoserver-1809
NETCORE_RELEASE_IMAGE=mcr.microsoft.com/dotnet/aspnet:6.0-nanoserver-1809
Once you run it, you may see a list of containers – it is pretty similar to what you can find with the classical XM platform:
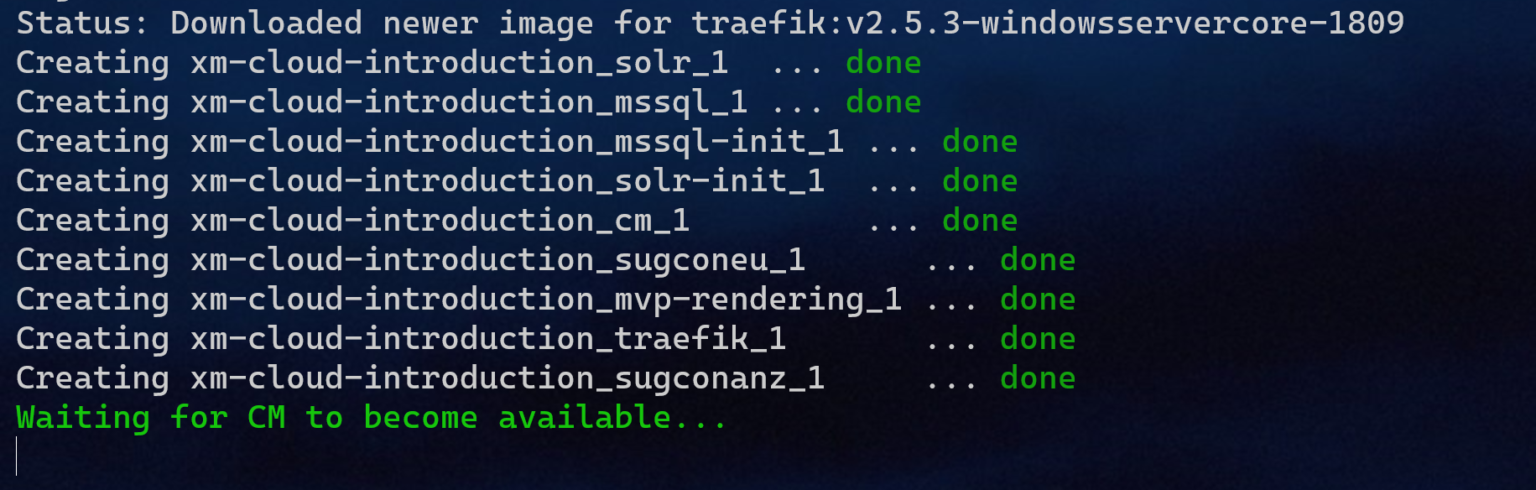
There is a Solr container used for internal purposes, a container with a SQL server, and init containers for both of them. The main container is called CM, but please be aware (mainly for patching purposes) that the role name is not CM any longer but is XMCloud instead – here’s its definition:
<add key="role:define" value="XMCloud" />
Another important container here is Traefik – the one that accepts and distributes external traffic. One of the most frequent errors occurring while trying to set up local containers is that developers often already have a running web server (for example IIS) that occupies port 80, preventing Traefik running in a container from exposing its own port 80, so that it errors out.
The rest of the containers are providing rendering hosts with “head” applications.
The principal difference of local container development is that instead of using Edge from XM CLoud, your rendering host will connect to the GraphQL endpoint of the CM instance which features the same API as cloud-based Experience Edge (if you’re using Headless SXA then Edge endpoint is configured in the site settings item).
What can a developer control?
You can apply config patches for configuring CM instance, the same as you did before with XP (here's an example). There’s also a guide on deploying customizations to the XM Cloud environment.
That means it is possible to turn things on and off, like overriding pipeline processors. Of course, there is no longer request manipulation with XM Cloud as request processing shifts to the rendering host while httpRequestBegin and httpRequestEnd pipelines relate only to the CM instance itself. Nevertheless, there are lots of other familiar pipelines to deal with.
For your custom code Sitecore NuGet Feed will support relevant packages. All the packages follow up the name pattern starting with Sitecore.XMCloud.* so that one cannot mess them up with the packages for XP/XM platforms. For example, the top-level package is called Sitecore.XMCloud.Platform. Versioning of these packages follows up SemVer version of XMCloud.
Sitecore has an expectation that developers customize it less and less with time, with most of the customization happening around data synchronization rather than the altering system itself.
One of the good news is that you still have the PowerShell Extensions, but that is disabled by default. Enabling it requires setting SITECORE_SPE_ELEVATION environment variable to either Confirm or Allow with new deployment to take effect. Once complete – you get full power, including direct database access. I recorded a short video showing how to enable SPE for your XM Cloud environment, if you also need SPE remoting - read this post for additional instructions.
Sitecore Connect for Content Hub: CMP or DAM connector provided by XM Cloud, is also included in the base container image. There is a promise of adding connectors to other popular systems and DXPs with time.
Unfortunately, installing familiar modules is no longer available in the easy way of package installation we used to.
Build configuration
There is a new important configuration file with XM Cloud – xmcloud.build.json. It configures build targets, editing hosts, XDT transforms, if any, serialization modules to deploy to the XM instance for that environment, etc. Its structure looks as below:
{
  "deployItems": {
    "modules": []
  },
  "buildTargets": [],
  "renderingHosts": {
    "<key>": <value>
  },
  "transforms": [],
  "postActions": {
    "actions": {
      "<key>": <value>
    }
  }
}
For example, the default build pipeline of XM Cloud is configured to look at a single *.sln file at the root of your repository to process, but with xmcloud.build.json a developer can override this behavior and specify what exactly to build.
Read more about configuring build configuration with XM Cloud.
Sitecore CLI
With Sitecore XP most of you likely used CLI for serialization purposes, with some rare developers experimenting with itemres plugin for creating items as resources from serialization modules. With XM Cloud Sitecore CLI becomes much more useful – lots of management could (and should) be done using it, like creating the projects and environments, performing initial deployments using CLI, etc.
In order to install it you must have .NET 6 already installed on your machine. The tool consists of two parts – Sitecore Management Services running on CM and the command line tool itself. Management Services comes already preinstalled for XM Cloud (in both development container and cloud instance), so it only comes to installing CLI from the project folder:
dotnet nuget add source -n Sitecore https://sitecore.myget.org/F/sc-packages/api/v3/index.json
dotnet tool install Sitecore.CLI
Here’s an example of using CLI to list projects running against my XM Cloud organization (subscription).

 In the XM Cloud terminology, a project is a set of environments. Each environment is in fact its own XM Cloud CM instance. Therefore, we can list a set of its environments and can take actions towards each individual environment, let’s say publish its content to Experience edge:
dotnet sitecore publish --pt Edge -n <environment-name>
Old good serialization also works well with CLI in order to synchronize items between remote and local XM Cloud instances:
dotnet sitecore serialization pull -n development
dotnet sitecore serialization push -n development
Similarly to 10.x platforms, you may benefit from a Sitecore for Visual Studio if you prefer using GUI for Sitecore Content Serialization. It is not free to use and requires purchasing a TDS license (notably, TDS itself does not support XM Cloud).
One of its greatest features in my opinion is Sitecore Module Explorer for you you to navigate, create and modify Sitecore Content Serialization configuration files as items in a tree structure.
Head Application
Configuring front-end applications mainly comes to these 3 settings:
JSS_APP_NAME – the name of a siteGRAPH_QL_ENDPOINT should be pointing to Edge GraphQLSITECORE_API_KEY for Edge Token, typically found under /sitecore/system/Settings/Services/API Keys
I would recommend watching this video for the front-end developer setup for XM Cloud.
The really impressive productivity feature is running npm run start:connected where you set up a watch mode against the source code so that changes get immediately updated in the browser.
You can also configure an external editing host for XM Cloud instances so that you could also benefit from editing experiences in Pages.
Edge and GraphQL
There is a common misunderstanding about content published to Experience Edge becoming unprotected. It comes from the official documentation, saying: “Experience Edge for XM does not enforce security constraints on Sitecore content. You must apply publishing restrictions to avoid publishing content that you do not want to be publicly accessible“. In fact, publishing to Edge is not equal to making content publically exposed – no one can access it without providing a valid Edge Token you typically configure as SITECORE_API_KEY parameter for your environment. API Key should never be shared publicly – each time you need to pull the data out of Edge you should delegate that task to your head application in order to obscure API Keys rather than making such calls directly from JavaScript code running in the client’s browser, thus exposing your secrets.
Previously with XP/XM it was possible to extend the GraphQL Preview endpoint for additional features like comparison for integers and dates, coordinates, multifield searches, faceting, etc. It is worth mentioning that now you cannot perform any changes around GraphQL endpoints via pipelines with XM Cloud, because it uses Edge. You can still do the following operators in addition to searching fields by a value: compare with EQ / NEQ, CONTAINS / NCONTAINS, order by field names both ways, do pagination, logical AND, and OR.
You can read more about Edge Schema at this link. Also, it is worth mentioning that Edge has its own webhooks. This can be helpful for notifying a caller when publishing is complete.
Use New-EdgeToken.ps1 script to create one for any desired environment. Upon completion, this script opens up GraphQL IDE automatically as well as returns X-GQL-Token for you to use with IDE straight away.
Note that you can use the GraphQL IDE only if you have installed Experience Edge. However, Edge tenant and edge connecter are created automatically upon the creation of an environment with XM Cloud.
Another thing to keep in mind is that despite you're empowered to use Media Library, there's a GraphQL limitation of 50Mb per resource. For larger files (likely videos), consider using DAMs, given they typically allow wider management options.
XM Cloud Play! Summit Demo
This is an exceptional gift from Sitecore Demo Team to us! It allows you to experiment working with XM Cloud and its features, and editing capabilities in both local containers and by deploying it to your XM Cloud environment.
The demo solution features many of the latest tech working together for us to play with:
- Sitecore XM Cloud
- Content Hub DAM and CMP
- Headless SXA
- JavaScript Services (JSS)
- Next.js
- Vercel
- Tailwind CSS
Since the demo is available in the GitHub repository which means it is easily deployable with Deploy App in a few clicks, as demonstrated below.
Headless SXA
XM Cloud comes with a built-in headless SXA as well as it is included in the base XM Cloud container image, so the question comes up – should I go with it or without it?
Of course, it is possible to build a headless app on XM Cloud without using SXA, but it is not recommended. SXA provides many benefits and is included by default with Sitecore XM Cloud, so it is generally a better option for building a new site. If you are in a migration scenario, you may not have the option to use SXA, but other than that, it is recommended to use SXA and headless services for the best results.
There is an XM Cloud Starter Kit with Next JS for your faster journey to XM Cloud development.
Rendering Variants was always one of the most powerful features of SXA and it took its own evolution from NVelocity templates to scriban, now became powered with Next.js – here’s an example of a Promo component having two rendering variants – Default and WithText. You can have as many variants other than Default as you want within a *.tsx file following this syntax:
export const Default = (props: PromoProps): JSX.Element => {
  if (props.fields) {
    return (
    // ... markup merged with props
    );
  }
  return <PromoDefaultComponent {...props} />;
};
SXA is perfect for multi-site implementations as it comes with cross-site capabilities for sharing page and partial designs, renderings, content, and cross-linking. In a previous post, I already mentioned a new feature – Page Branches – that allow setting standard values for layout on a per-website basis. Site-specific standard values feature is another example of managing default on a per-site basis. The development team is also working on implementing Site Templates – the idea comes about blueprinting the entire sites from pre-defined templates.
Speaking about the UI – by default, SXA comes with the grid system Bootstrap 5, but that is configurable. Default renderings respect both grid and styles through parameter templates, you must care of that once creating your own custom renderings unless, of course, you clone existing ones.
I remember a while ago when I only started working with SXA there was a lack of proper solutions around renderings having a background image set – we had to invent our own approaches to that. Slightly later SXA got that feature, but today I was glad to find support for a decent number of stretch modes with it: parallax, stretch, vertical and horizontal tiles, fixed. And all that works in headlessly!
Deploy App
Sitecore XM Cloud comes with an integrated Deploy App that performs exactly what is called for – deploying your solution using existing source code to XM Cloud from a friendly GUI as an alternative to using CLI. You can also create a project using a starter template.
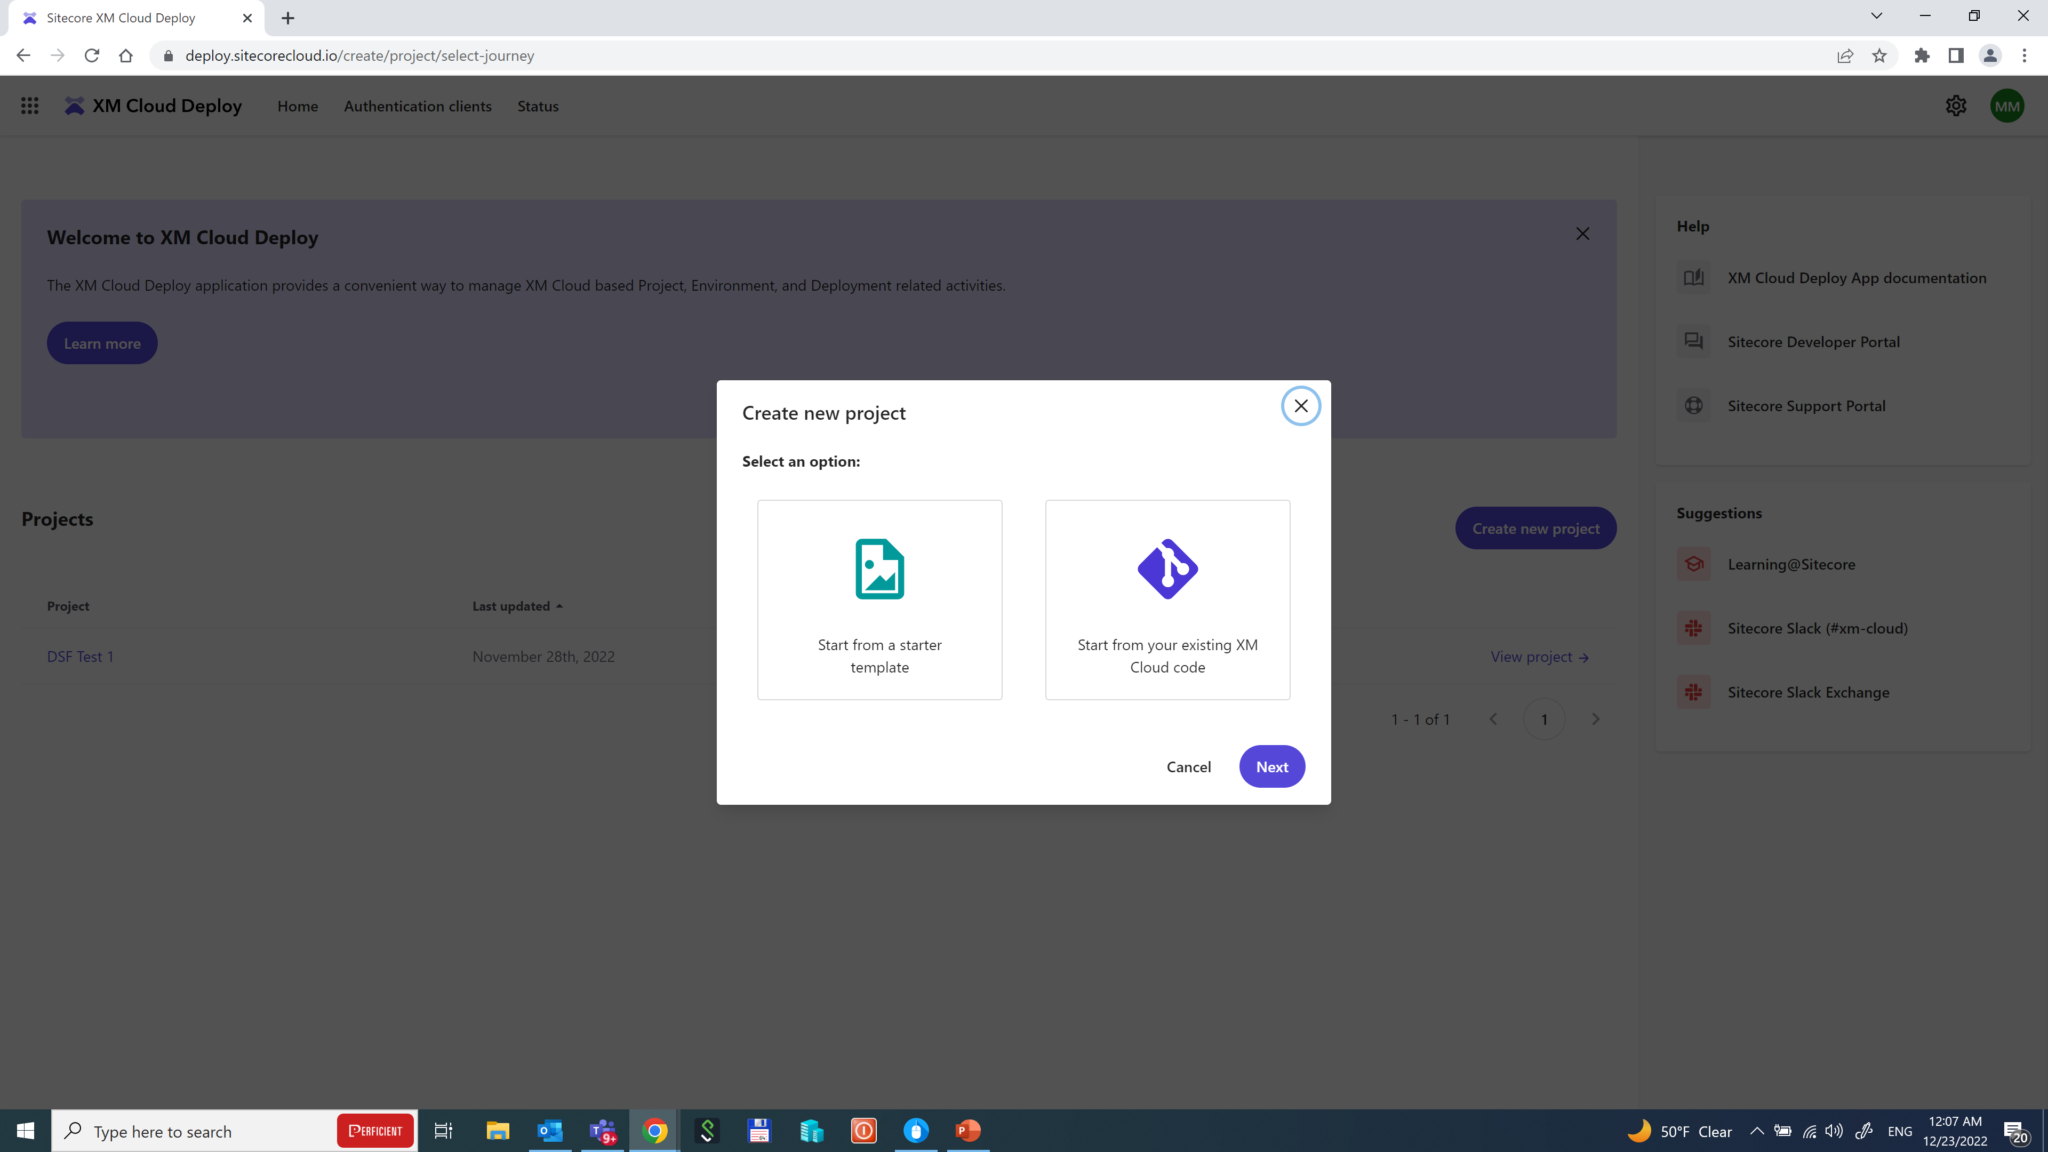
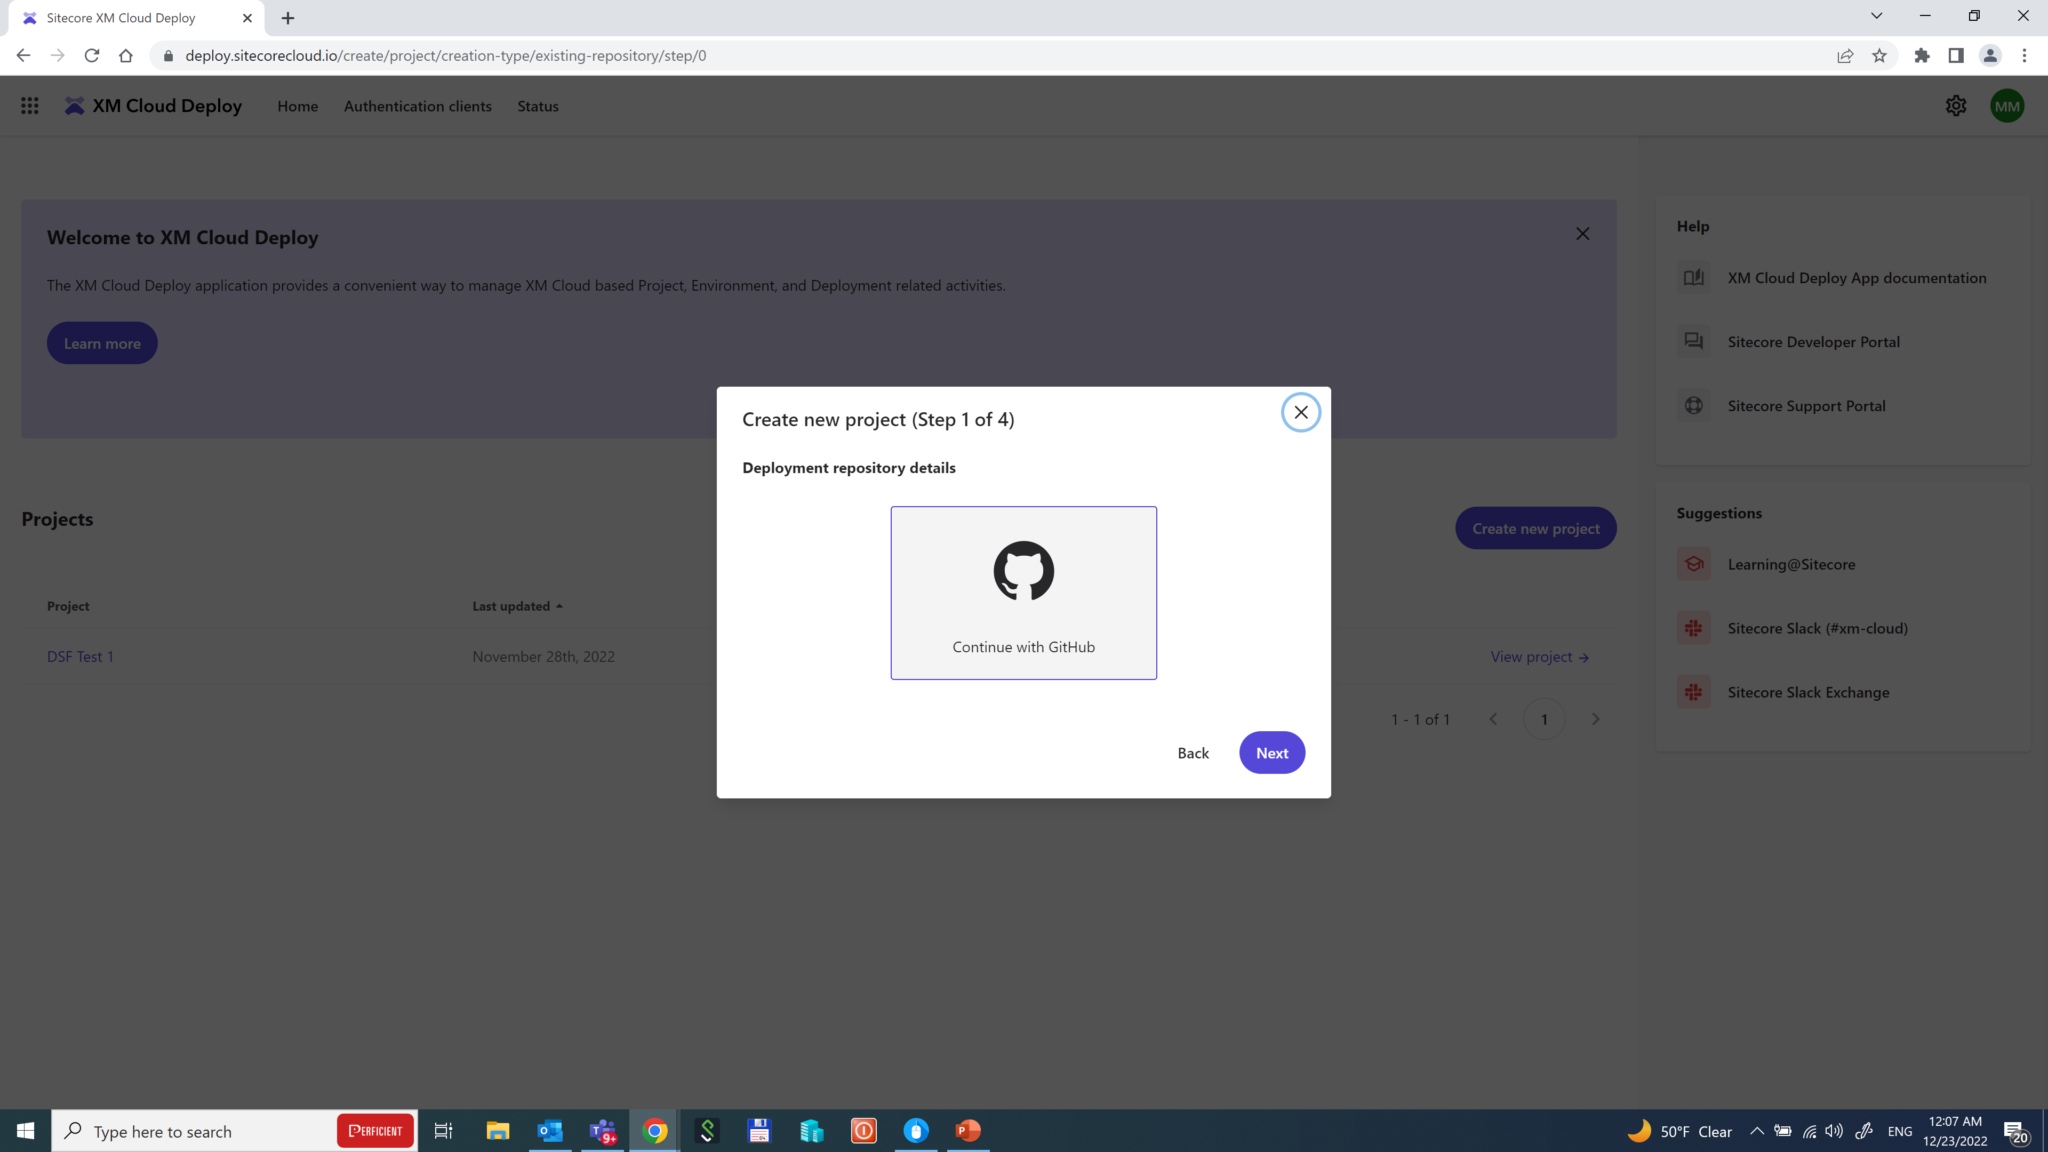
In order to demonstrate its capabilities, let’s Start from your existing XM Cloud code, using Play! Summit demo mentioned earlier. Currently, the only provider to work with Deploy App is GitHub. So let’s go ahead with it.
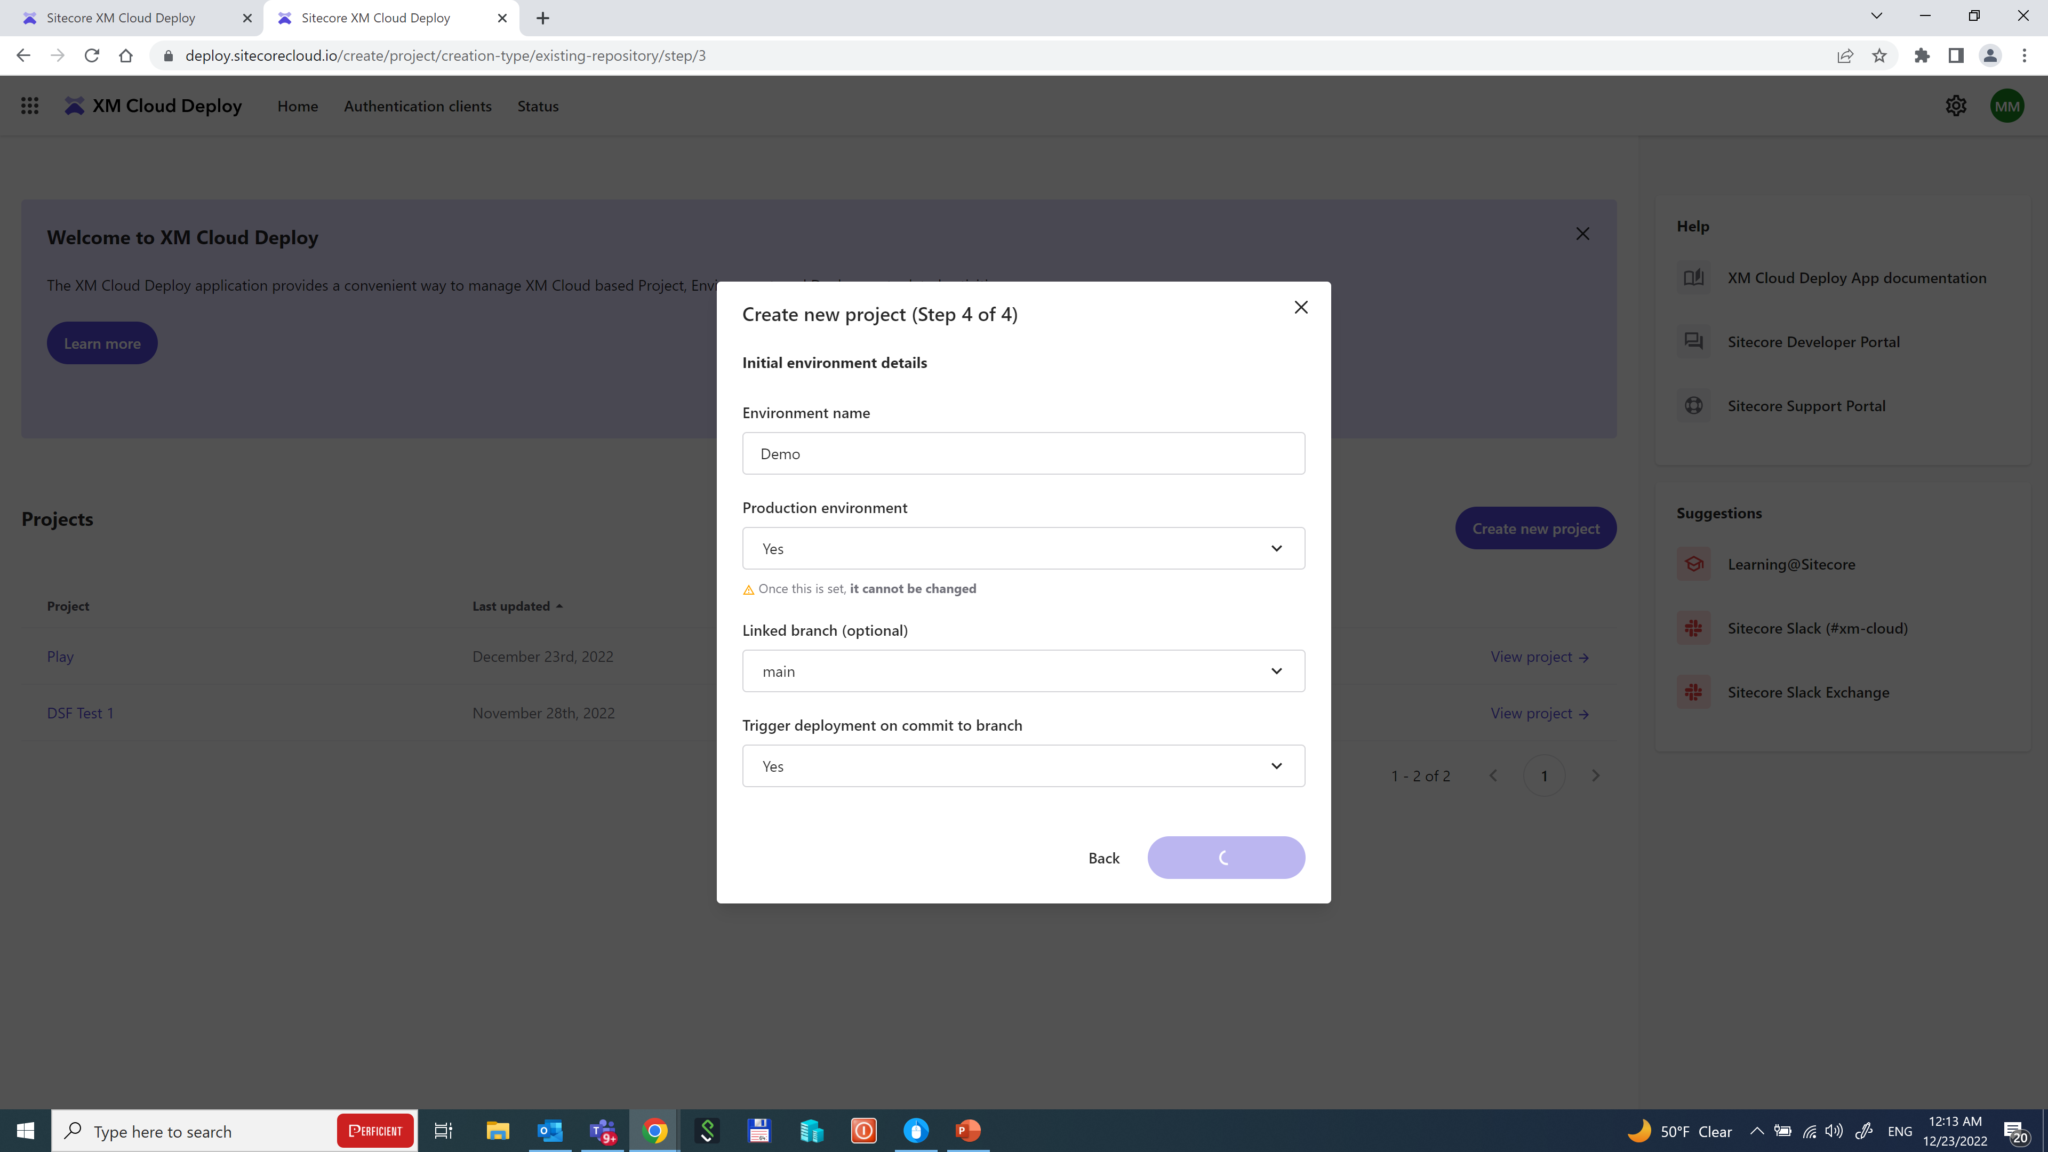
After providing access to your GitHub account, you configure and choose the branch and the specific environment it deploys to if it is production or not. There is an option to trigger a deployment on commit to that branch to trigger an automatic deployment each time someone makes a push to the specified repository branch.
That’s it! The deployment starts and makes things done automatically: provisioning tenants and environments, configuring Edge, pulling and building the codebase, deploying the artifacts, and eventually running post-build actions, if any.
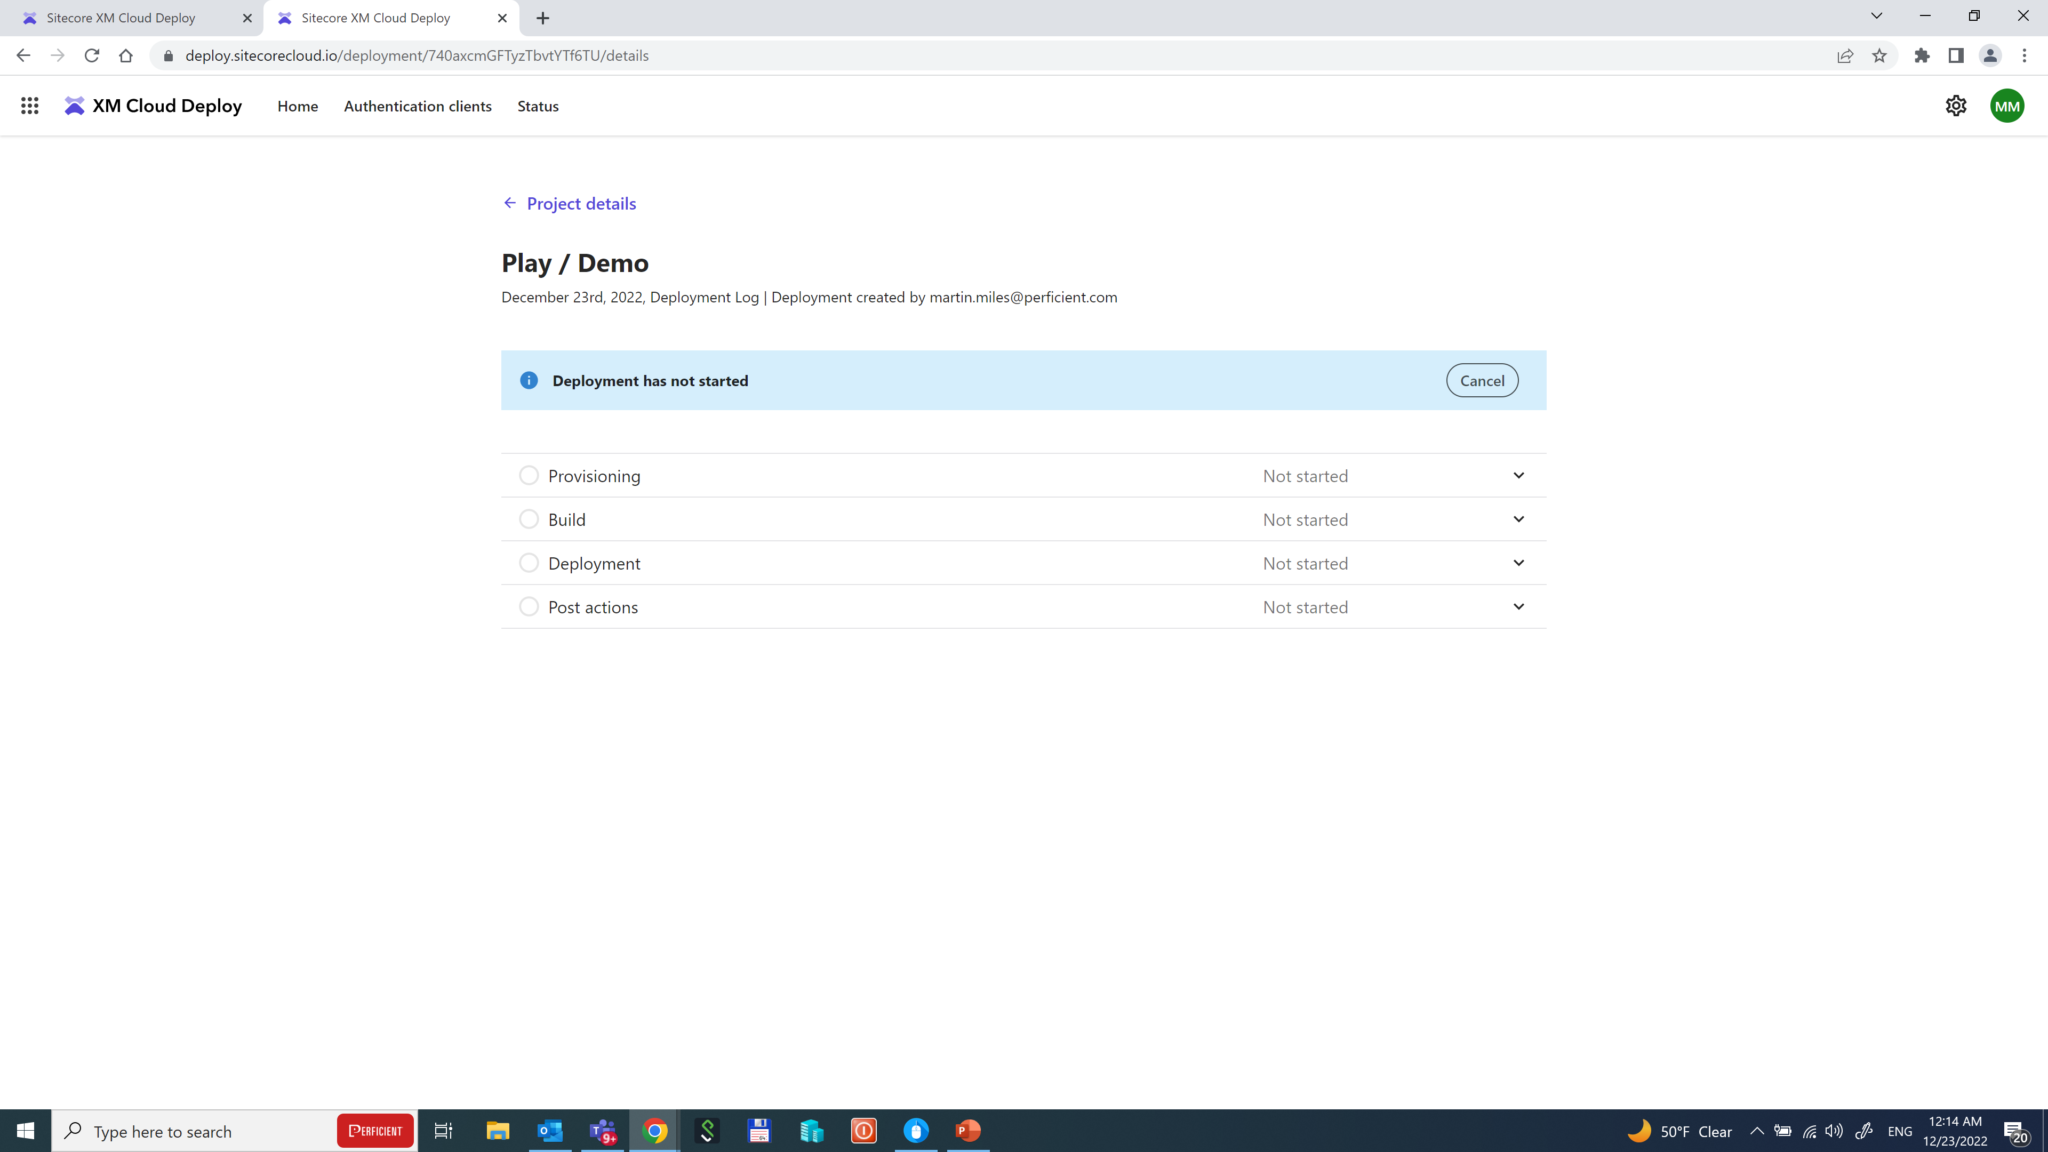
The whole process takes around 15 minutes and is impressive – the whole CI/CD pipeline comes out of the box, preconfigured. However, there’s one more thing left to do.
Deploying to Vercel
Since our head application is decoupled from Sitecore, we also need to deploy and reference it to Experience Edge. There are various options but the best would be using Vercel hosting. Vercel is the company that invented and maintains Next.js which is why their powerful hosting platform ideally fits solutions built with it.
Vercel is an all-in-one development platform that combines the best developer experience with an obsessive focus on end-user performance. As a developer-centric stack, Vercel is accessible to developers of all skill sets and removes a historical lock-in to .NET. Vercel provides a scalable solution to the largest of organizations with the newest best practices in content delivery while helping to reduce infrastructure/deployment overhead previously required to deploy Sitecore applications.
Deployment is pretty simple. Upon creating an account and project, you link your GitHub account and use the same repository used for XM Cloud deployment previously. Vercel is smart enough to autosuggest a folder with your next.js application highlighting it with an icon. After providing three familiar environmental parameters (App name, Edge endpoint, and API key for Edge token) deployment takes place quickly and then you’re all set!
Tip: do not modify .env file directly, instead - create an "override" file called .env.local. The difference is that in starterkits that file by default is excluded from source control with .gitignore, plus in addition to preventing mess with other developers, you can easily maintain your specific environmental setting in the same place.
XM Cloud also allows you to set up a Vercel hosting directly from its interface and add integration.
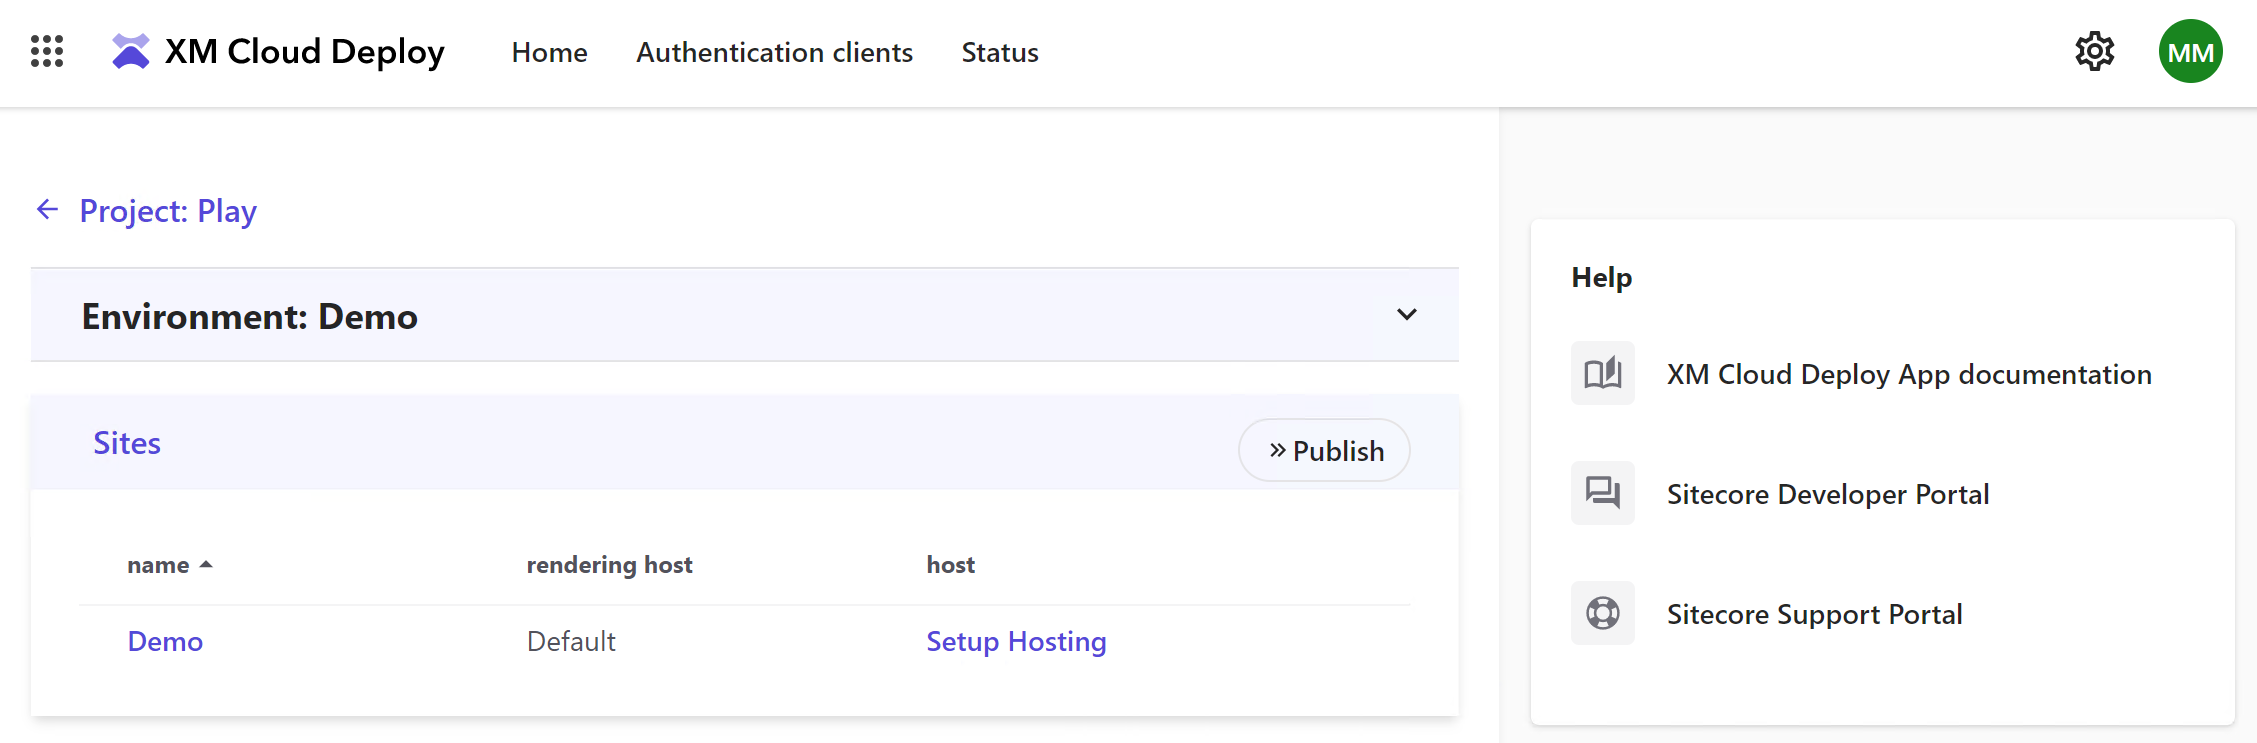
If you do not have an account - you'll also be able to create one with quickly and easily, currently, there's only support for Personal Account types. Also, make sure you choose All Project access.
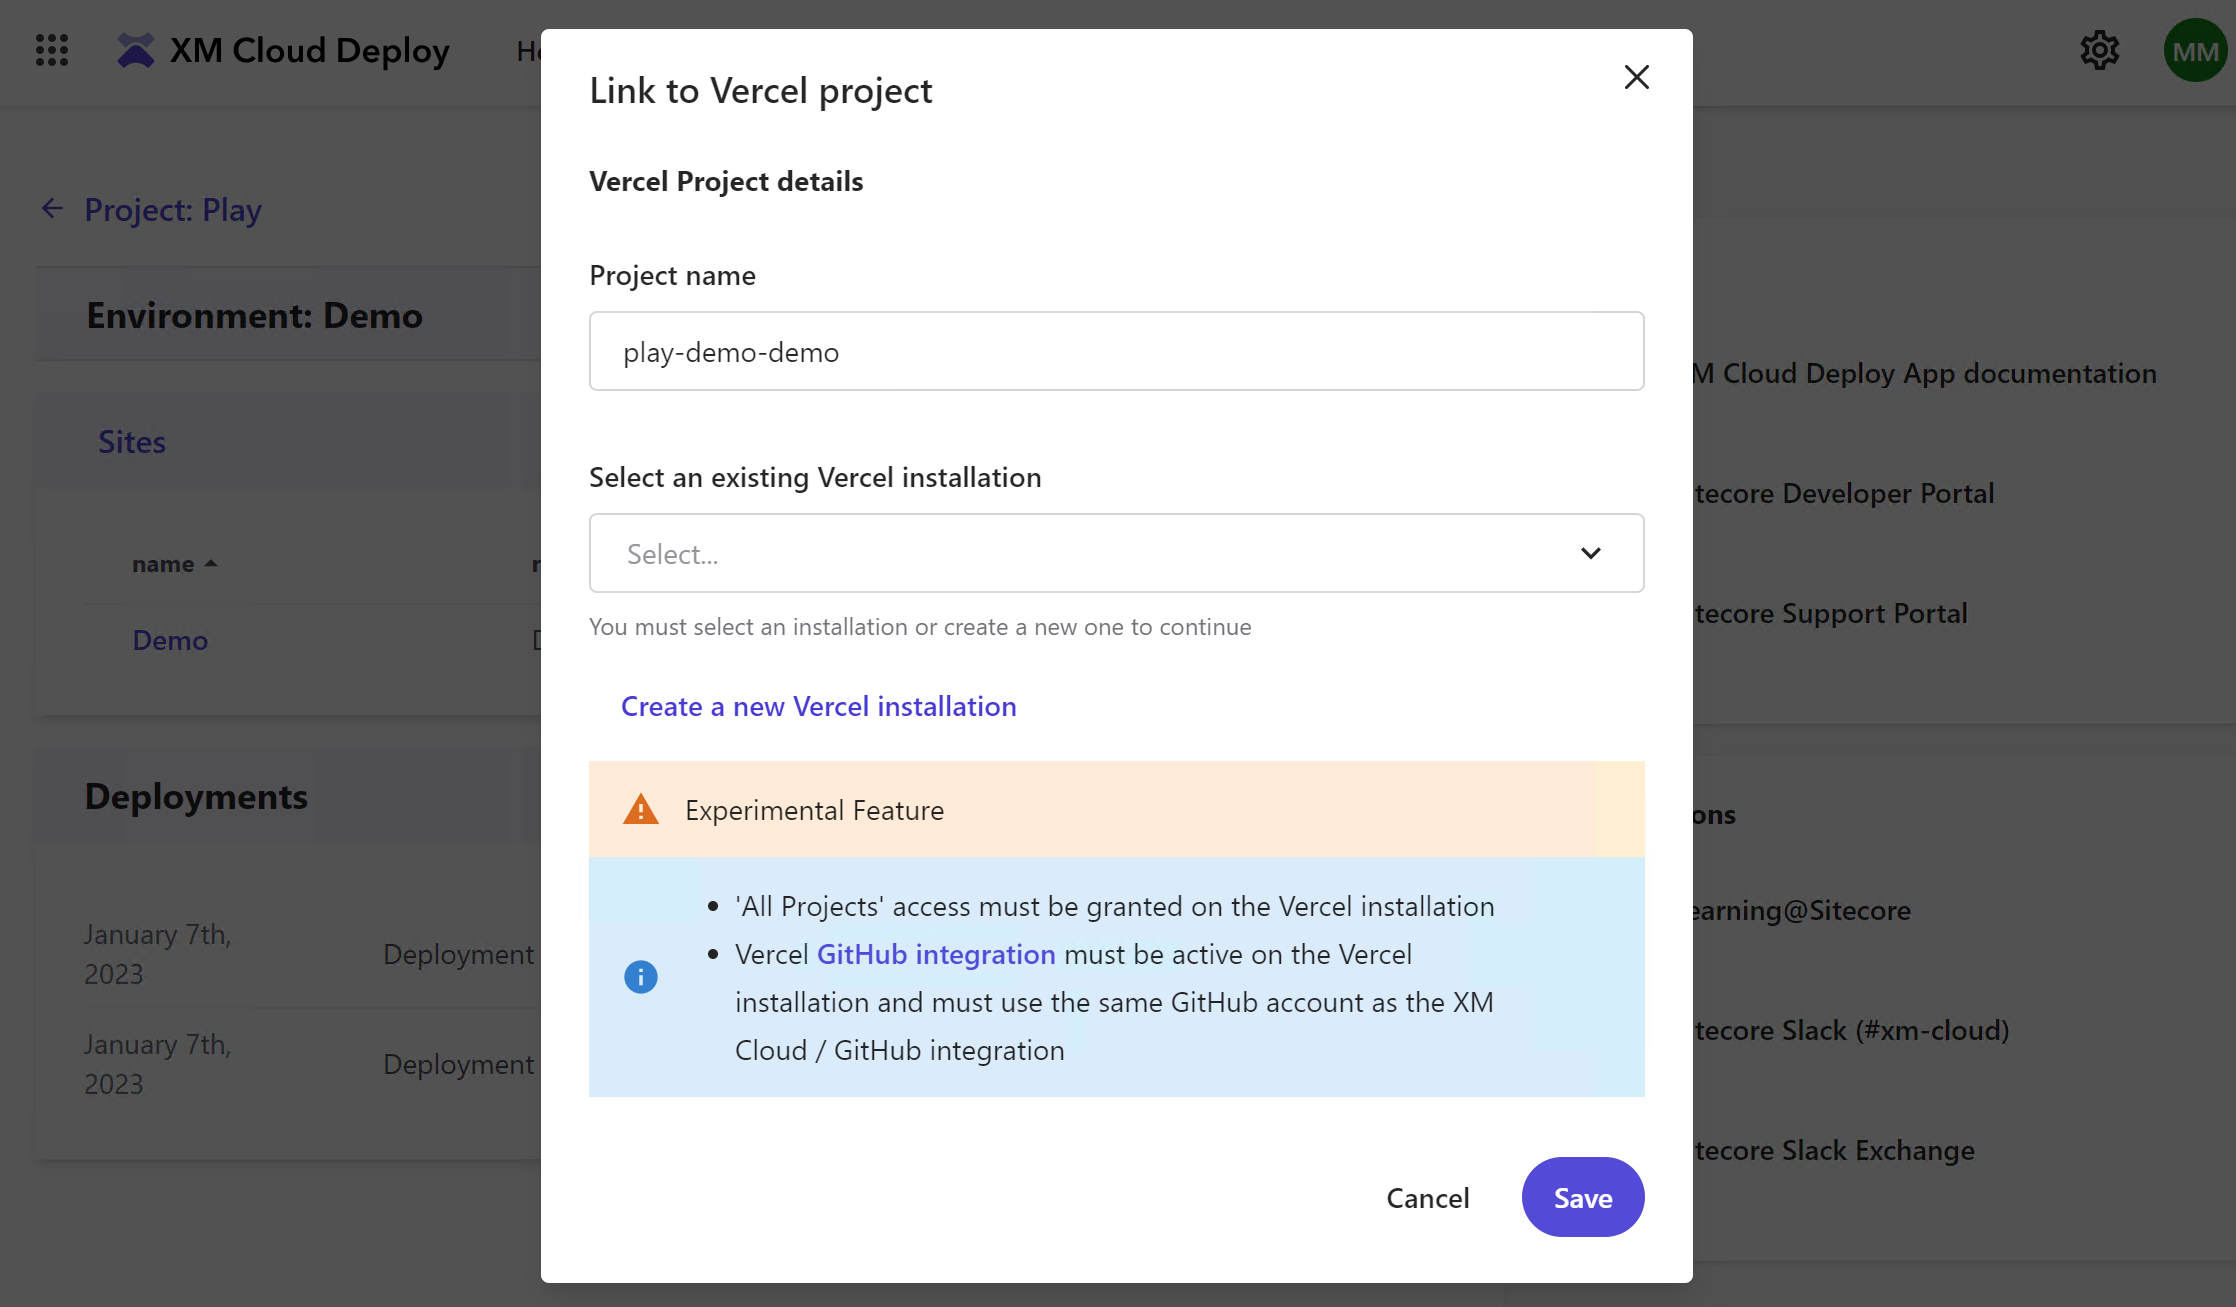
You will still need to log in to Vercel and manually add GitHub integration to the same repository and branch, add a few more parameters, and at least 3 above environmental variables. Once done you can immediately trigger the deployment.
I hope this overview helps you familiarize XM Cloud development options and encourages you to try it earlier rather than later. Would you have any questions – please feel free reaching me!