Experience Sitecore ! | All posts tagged 'PowerShell'

Experience Sitecore !

More than 200 articles about the best DXP by Martin Miles

Welcome Sifon - a must-have tool for any Sitecore developer,to simplify most of you day-today DevOps activities

UPDATE 23/12/2019: There has much been done since this post originally, Sifon is now working on remote machines as well as it supports Sitecore Commerce. The main news, however, is that it now got a website with documentation, demos, roadmap, and other project-related items. Thus, it would be best to refer to it - https://Sifon.UK.


Do you love PowerShell as much as I do?

Along the time, Sitecore gains more and more new features, its architecture obtains some existing features split out into microservices. Maintenance becomes even more complicated and time-consuming. Just as an example, a few years back in time we had only 3 databases coming with the platform, while now there are more than 15. 

Luckily, PowerShell as a scripting technology comes us with assistance, providing the console-based API to most of the OS and platform management features. Now it becomes possible to automate quite complex procedures just by scripting them out. Take a look at Sitecore XP installer for example, or at even depicting the complexity - an installer script for Sitecore Commerce with almost a hundred steps. How long did it take you to run it all? That confirms the statement on how PowerShell became an inevitable part of developers' lives.

But here we come to another problem. The number of scripts we have grows quite quickly, as the number of standard tasks grows. And at some moment I start noticing that something goes wrong with it. Those who read my blog from time to time may have noticed, that I am kind of a productivity maniac, and being such a person, I start thinking and analyzing where the productivity bottlenecks are while working with PowerShell. What do you think they are?

Firstly, scripting means typing. Typing means typos. Typing means forgetting the syntax. Regardless of how one is perfect as a typist, interaction with a keyboard has its own expenses. The good news is that PowerShell addresses these issues by providing interactive help and autocompletion. But it still consumes your time, compared to the UI operations (of course, those with proper UX and well-designed).

Secondly, we have more ready-to-use scripts and we need them all to be stored somewhere. Somewhere on a filesystem, of course. Those smart and best use GitHub gists (they can be also secret, not only public), and since recent ones can have also private GitHub accounts, so what I know few people do is just create private repositories of their entire scripts libraries. The benefits are clear - if these libraries are well organized and properly structured - it gives immediate access to some specific script one may need to find and access. The principal criteria here is time-to-access and the GitHub repo provides that for sure, of course, you may use any other version control hosting providers, subject to velocity.

Thirdly, sensitive information. Scripts call, other scripts, that in turn call another script (modules) that in turn call APIs - that similar nesting we typically have with our OOP languages. The issue comes from those outer-level scripts that contain some sensitive parameters, such as usernames, passwords, secrets, tokens, and similar. You don't store all of the above at external source control hostings, even if that's a private repo, do you? If you do, I can recommend you a few really worthy courses on information security. Of course, a developer can parametrize all sensitive information and bubble it up to an external script, so that it comes to input parameters. But then we face a bottleneck issue I described first. Not just one has to provide parameters but need to type them manually and to store the values somewhere, which turns in a payload of accessing those values. Still not good. 

In any case, the reality is that plenty of such scripts are bloated across the hard drive, which still comes to all the issues described above.

Finally, when it comes to sharing those puter scripts, we meet the same story of separating sensitive data and environmental-specific values from pure business logic.

Of course, developers do value their time and try to find compromises. I am not exclusive and decided to go my own developer's way, which you may guess means developing something bespoke. So please welcome Sifon - a must-have tool for any Sitecore developer, to simplify most of your day-to-day DevOps activities.

But before going ahead - a bit of intro. Without a deep understanding of all the requirements, I still made an early prototype of a given tool to address some of my problems somewhere back in November 2018. Greatly impressed by Sitecore Instance Manager (also known as SIM) I decided to return a graphical installer to Sitecore, which was missing out by those days. That of course was achieved, however, the most valuable feature was the ability to back up the entire Sitecore instance state, clean up the web folder and databases and restore it back from a folder. All that in just a minute time, which seemed to be nothing comparing even to installation with SIF. Something extremely helpful, when you develop with Helix principles and often need to create rollback points before trying some complicated PoCs or for example to a clean just installed version of Sitecore, in order to perform deployment on a clean instance.

That software start saving my time significantly, right from the moment of its creation! Later I added a few more frequently used functions into it, such as installing modules, Solr, rebuilding indexes and full republish, adding HTTP bindings to an instance, and moving its SSL certificates into trusted storage. I shared this PoC with a few of my colleagues working on the same project saving their time as well. 

But I could not share it with the entire Sitecore community, to my regret. Firstly, due to unstable code coming out of PoC sitting on top of another PoC and so on, turning Proof of Concept into the Proof of Hell. Secondly not just a project architecture was put under a big question mark, but also the whole concept should be revised. 

I wanted it not just to be well maintainable, but extendable. Saying that I mean the ability of each individual working with this program to easily create their own plugins and extensions, addressing some specific task that is shareable or publically open-sourced. Multiplied by Sitecore community efforts that may become an unprecedently helpful tool for all of us, I know you folks are very creative!

So once again, please welcome Sifon. But first of all, what the word Sifon means? 


Sifon is a simplified casual term for a whipping siphon that is used to create carbonated water, often with some fancy tastes. It requires cartridges of gas, also known as chargers, to pressurize the chamber holding the liquid. That very roughly explains the architecture of Sifon tool I am presenting to you today.

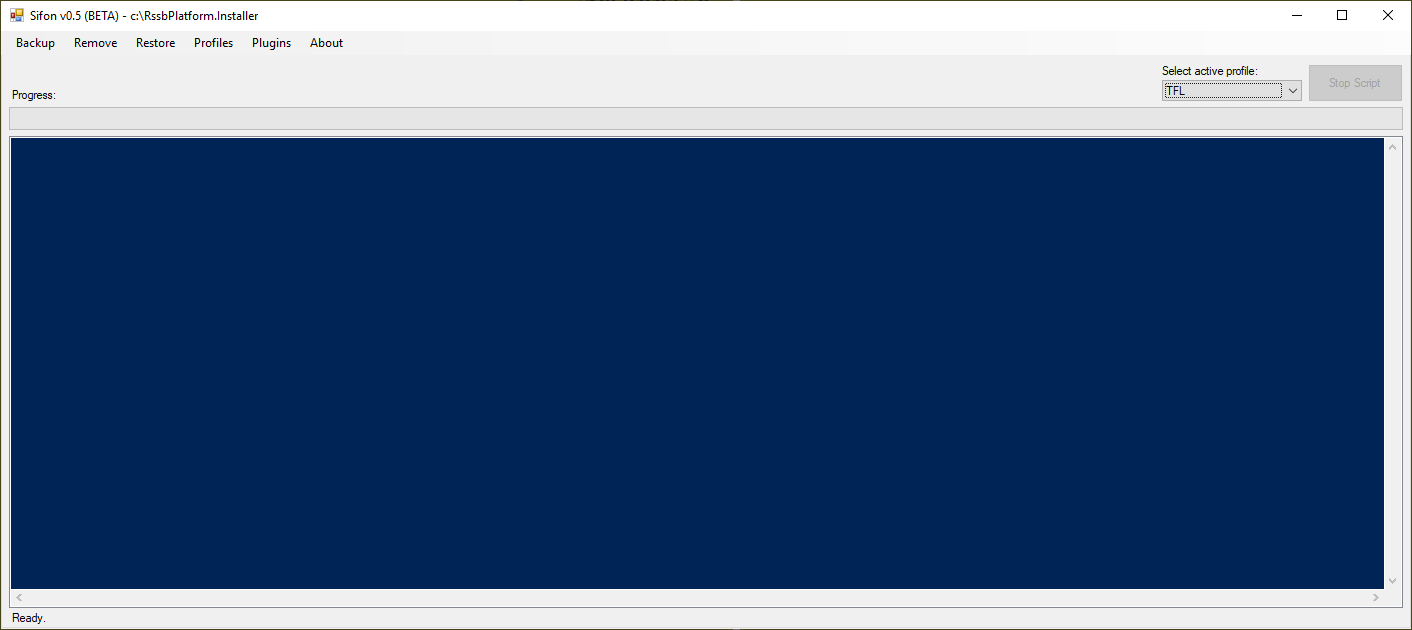
In my case, Sifon is a nicely developed PowerShell host with numerous features that allow "playing" any custom PowerShell or C# code in form of plugins. That comes as a curious metaphor - the host itself serves as a siphon body, where plugins stand as an analog for charger cartridges. The main screen looks quite minimalistic:


Features:

  • stores credentials and environmental parameters in one place called profile, passing them as the parameters into the code
  • supports multiple profiles for many environments with immediate switching between them by one click
  • "backup-remove-restore" routine comes as built-in and is available immediately after setting up the first profile 
  • profile editor allows the testing connection few basic parameters auto detections but will be extended with more features
  • runs in multithread, responsively updating the progress along with the rest of the corresponding feedback


From the feature list, as for a user, it offers these benefits:

  • keep all your frequently used scripts at the same place, organizing them by nested folders as preferred
  • separate scripts from sensitive parameters, allowing sharing and publishing them open source
  • because of the above, one may create own repository and clone scripts directly into Sifon's plugins directory 


NOTE! Before going ahead, please keep in mind that currently that is just a demo beta, so everything may be subject to changes, especially when it comes to UI. Also, the entire validation layer is disconnected, so please submit data responsibly!

The first thing one needs to do after installation is to set up a profile. As I mentioned above, a profile is an easy-to-switch-between set of parameters applicable to a specific environment. As simple, these parameters from a currently selected profile will be passed over to any script executed, regardless of whether that passed into a built-in feature, PowerShell script, or DLL plugin. It is expected that both mentioned are accepting these parameters, so please refer to the provided example in order to build your own plugins. 

Important! In order for Sifon to function, you must create at least one profile that has a SQL Server connection set up. Otherwise, most of its functions will be greyed out, until required profile data is submitted.

Now, let's take a look at Sifon's built-in "backup - remove - restore" routine. Making backup comes as easy as:


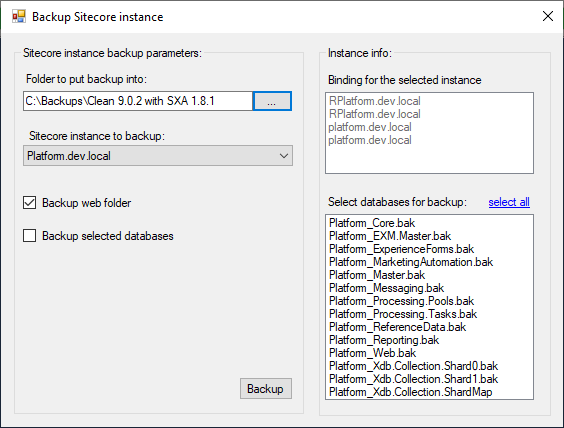
All you need to do is specify the folder to put the backups into, select which instance to backup (you may have many) and decide whether you want to backup databases (select which exactly), web folder, or both.

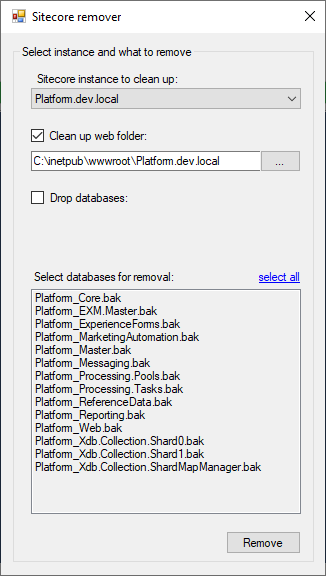
As you might know, it is always better to deploy Helix-based solutions into a clean environment, so you may want to clean the existing webroot before restoring it into that folder. It is done in a similar manner - from dropdown select which instance to remove and it will prompt you with a webroot folder and installed databases. You just need to check/uncheck what you'd like to remove. Please note that databases can be deleted individually, and by selecting "manual entry" you can list all the databases from all the instances to be selected for removal.


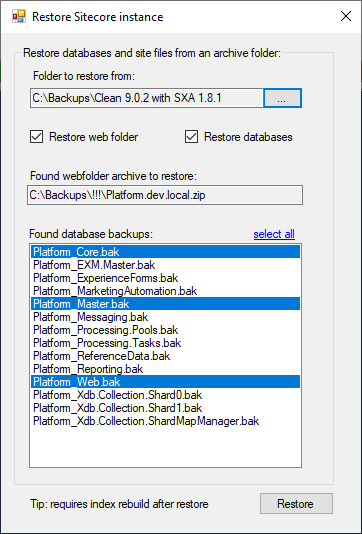
Not to say that restoring looks and also works similar to mentioned above. Simply select a folder with a corresponding backup and select what to restore. If the folder contains only webroot or just databases, you'll be able to restore only what you've got. 


Creating a capsule plugin requires you to write PowerShell in a specific manner, but the two important points to mention are:

1. accepting parameters. Just attach this to the top of your script, and you'll get these parameters auto-provided

param(
    #Comes from profile
    [string]$ServerInstance,
    [string]$Username,
    [string]$Password,
    [string]$instanceName,
    [string]$instanceFolder,
)

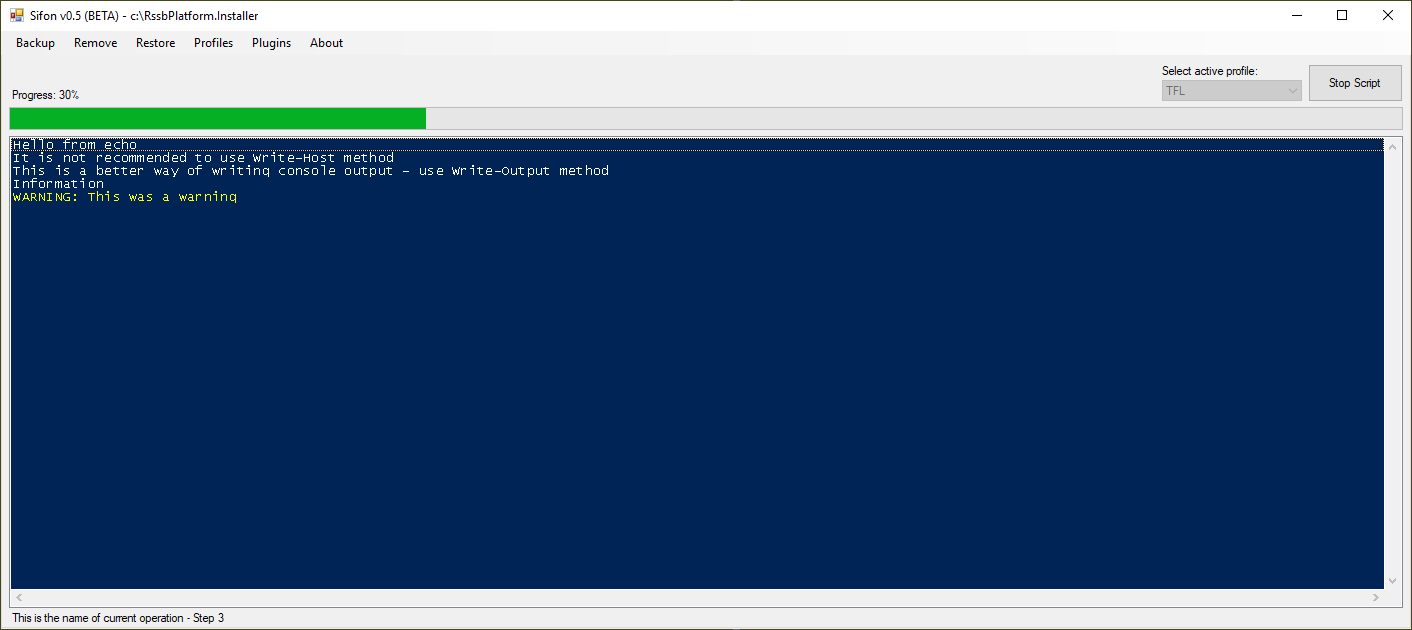
2. reporting the progress by write-progress. This is done by the following syntax

Write-Progress -Activity "This is the name of current operation" -CurrentOperation "Step 1" -PercentComplete 10
start-sleep -milli 500
Write-Progress -Activity "This is the name of current operation" -CurrentOperation "Step 2" -PercentComplete 20

You may run test-progress.ps1 script and review its code as it demonstrates how progress output works with PowerShell


Have you ever noticed a light-blue progress bar when installing Sitecore with SIF (as below)?


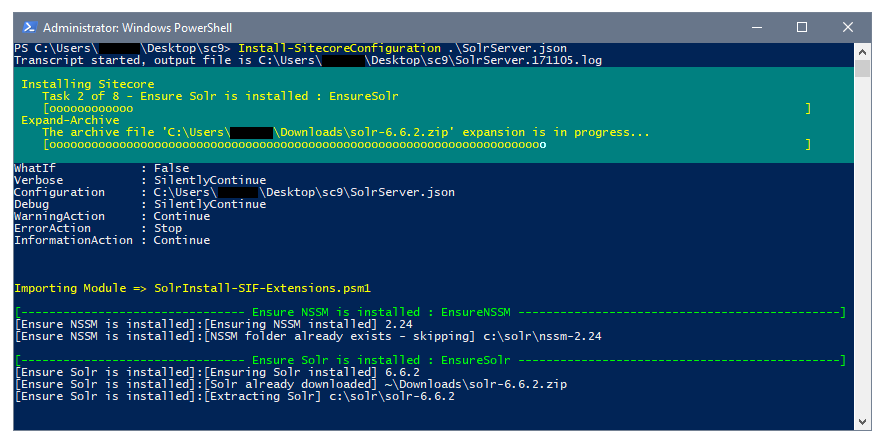
That's it! It also means plenty of SIF functions can be converted to work with Sifon and will support displaying progress natively. Few of them will be provided upon the release.


List of plugins (capsules) that will be provided upon release through GitHub:

  • all types of package installation: traditional, update-packages and web deploy WDP modules
  • creating an SSL certificate and adding it to the trusted storage
  • enable SPE remoting for a selected instance and further execution of plugins in their context
  • install Solr service, both as single and in-parallel running to already existing service (ie. various versions)


This is the first publically released beta and it is downloadable from this blog post. In the future, it will be distributed from own website along with the documentation, but there will be an easier way of installing it:

choco install sifon


Future plans

  • execute PowerShell scripts in the context of a remote machine by WSMAN (that's already supported, but no UI for it yet)
  • add support microservices of Sitecore, such as xConnect, Identity Server, and Publishing Service
  • in addition to the above, add full support for Commerce, its microservices, and databases
  • be fully compliant with Sitecore 9.2, including official installer script (SIF script coming out of the box)
  • extend custom OutputFormatters to plugins, allowing presenting more friendly console output (currently works at Sifon itself)
  • community plugins available through the GitHub repository
  • once becomes matured, releasing Sifon itself open source


You can download the beta by clicking this link (please download from Sifon website instead). It will already be able to do backups and restore your instances. The samples of capsule plugins are also available through this GitHub. Just compile DLL or drop PowerShell into Scripts folder to get them available via the menu.

Hope you enjoy that and looking forward to your feedback.


Uploading scheduled auto-backups of editors content for your Helix / SXA website into Azure Blob storage

INTRODUCTION

I assume you are following good practices and develop Helix-powered websites (or SXA, that follows Helix by definition). In that case, you do separate actual user-generated content items from definition items, normally shipped along with each release and created by developers (if not, then please refer to an article I've previously written on that), so you end up having a Unicorn configuration that stores all of your author-edited content:

Will are going to split the process into 3 major steps

  1. Re-serialize Unicorn configuration for content items
  2. Archive serialized content
  3. Upload an archive into Azure Blob Storage

IMPLEMENTATION

1. Re-serialize Unicorn configuration for content items. Luckily, Unicorn provides us with MicroCHAP.dll library helping to automate the sync process as a part of your deployment process (note that the DLL and corresponding PowerShell module Unicorn.psm1  should be referenced from your code). The good news is that any verb can be passed to it, not just sync, so one can use 'Reserialize'. That call will look like:

$ErrorActionPreference = 'Stop'
$ScriptPath = Split-Path $MyInvocation.MyCommand.Path

Import-Module $ScriptPath\Unicorn.psm1
Sync-Unicorn -Verb 'Reserialize' -Configurations @('Platform.Website.Content') -ControlPanelUrl 'https://platform.dev.local/unicorn.aspx' -SharedSecret '$ecReT!'

2. Archiving serialized content would be the next step. If you click Show Config button for Platform.Website.Content configuration in Unicorn configuration page, you may find all the relevant information about it, including the physical folder where items are serialized. We need this folder to be archived. The step comes as:

$resource = "Content_$(get-date -f yyyy.MM.dd)"
$archiveFile = "d:\$resource.7z"
$contentFolder = "C:\inetpub\wwwroot\Platform.dev.local\App_Data\serialization\Project\serialization\Content"

7z a -t7z -m0=lzma -mx=9 -mfb=64 -md=32m -ms=on $archiveFile $contentFolder
I am using 7zip as an archiver, as my content is slightly more than 4GBs and traditional zip cannot handle that. As a hidden bonus, I am getting the best compression ratio coming with 7zip. Also, It would be worth checking if a file with such name exists at target and deleting it before archiving, especially if you run the script more often than daily.

3. Uploading to Azure Blob Storage concludes given routine. To make this happen you should have a subscription, and ideally a connection string to your Storage account. Then you may use the following code to achieve the result:
$containerName = "qa-serialization"
$ctx = New-AzureStorageContext -ConnectionString "DefaultEndpointsProtocol=https;AccountName=lab1234;AccountKey=y9CFAKE6PQYYf/vVDSFAKEzxOgl/RFv03PwAgcj8K80mSfQFDojdnKfakeaLMva0S9DbrQTzNjDMdGCp7rseRw==;EndpointSuffix=core.windows.net"

Set-AzureStorageBlobContent -File $archiveFile -Container $containerName -Blob $resource -Force -Context $ctx

Also, it is assumed you already have blob container created, if not you need to create it upfront:
New-AzureStorageContainer -Name $containerName -Context $ctx -Permission blob
Optionally, you may want to delete the temporal archive, once it's uploaded to blob storage.


RUNNING

Here's an entire code that works for me:
# Step 1: re-serialize user-generated content
$ErrorActionPreference = 'Stop'
$ScriptPath = Split-Path $MyInvocation.MyCommand.Path

Import-Module $ScriptPath\Unicorn.psm1
Sync-Unicorn -ControlPanelUrl 'https://platform.dev.local/unicorn.aspx' -Configurations @('Platform.Website.Content') -Verb 'Reserialize' -SharedSecret '$ecReT!'
# Step 2: archive serialized user-generated content with 7zip using best compression $resource = "Content_$(get-date -f yyyy.MM.dd)" $archiveFile = "d:\$resource.7z" $contentFolder = "C:\inetpub\wwwroot\Platform.dev.local\App_Data\serialization\Project\serialization\Content" 7z a -t7z -m0=lzma -mx=9 -mfb=64 -md=32m -ms=on $archiveFile $contentFolder # Step 3: upload generated content into Azure Blob Storage $containerName = "qa-serialization" $ctx = New-AzureStorageContext -ConnectionString "DefaultEndpointsProtocol=https;AccountName=lab1234;AccountKey=y9CFAKE6PQYYf/vVDSFAKEzxOgl/RFv03PwAgcj8K80mSfQFDojdnKfakeaLMva0S9DbrQTzNjDMdGCp7rseRw==;EndpointSuffix=core.windows.net"
Set-AzureStorageBlobContent -File $archiveFile -Container $containerName -Blob $resource -Force -Context $ctx #Step 4: clean-up after yourself Remove-Item $archiveFile -Force
I run it on a daily basis by Windows Task Scheduler in order to get a daily snapshot of editors' activity. The script produces the following output:


As a result of running script, I get an archive appearing in the Azure Blob Storage:


RESTORING

There's no sense in making backups unless you confirm restoring the data out of it works well. For content items, download an archive, restore and substitute content serialization folder with what you've extracted, then sync content configuration. As simple as that!

Note that your content should be aligned with the definition items, or it may not work well!

Hope this post helps!

Staying productive on Sitecore development

Always having productivity and effectiveness as the major criteria of measuring my work, I have identified most of the time-wasters and came up with the list of things that slow down my development process. It is important to differ productivity from performance - the first applies to your personal bottlenecks while the second - to your solution or configuration. Performance tuning has been covered by numerous blog posts so far so I will be mentioning only those affecting my personal productivity. I am also not going to cover things like CI / CD and Application Insights / KUDOs at this post, while all of the mentioned is the proven great tools, they are not related to pure development productivity adn more tend to be DevOps.

I am sharing this list with you also accompanied by some improvements, tips & tricks that can help to decrease time to market for your products. Despite it is Sitecore-focused, there are more-less generic recommendations at the bottom as well.

Content

  1. Sitecore Productivity
  2. Software
  3. Hardware
  4. Organizational


1. SITECORE PRODUCTIVITY

If you are on Sitecore 9.1 and onwards - use XM topology for starting up, prototyping and coming up with an early PoC or MVP. XM topology is now shipped with all analytics configs, DLLs and the rest of unused stuff physically cut out of the provisioned system, resulting in quicker operational times. I am assuming you very unlikely need analytics features at early development stages. however, please be aware of personalization limitations.


If you are using XP - you may disable EXM unless you develop for it:

<appSettings>
    <add key="exmEnabled:define" value="no"/>
</appSettings>


Use the trick with cutting out unwanted languages from core database. Do you really need all these languages for Sitecore interface? The way Sitecore is built is that it uses Sitecore items for translating itself. That create unwanted loops and leads to unwanted performance losses. The items for deletion are:

/sitecore/system/Languages/da
/sitecore/system/Languages/de-DE
/sitecore/system/Languages/ja-JP
/sitecore/system/Languages/zh-CN

Be careful to avoid deletion of English by mistake as you'll then have to reinstall your Sitecore instance. By default these language items are greyed-out and the message says "You cannot edit this item because it is protected" so you need to "Unprotect it" firstly. You'll be double-asked for confirmation:

Agree OK and that's it! Of course, you can do things quicker and unobtrusively from Sitecore PowerShell:

cd core:/
Get-Item "/sitecore/system/Languages/da" | remove-item


Get rid of Notification table. This table is known for supporting clones, but you don't need it unless you're actually using this functionality. In that case, you can at least remove it from if from web database, as clones only work at CM helping editors with managing numerous clones of the specific item being modified, before getting published. Also, there was an alternative solution coming from Sitecore KnowledgeBase.

Anyway, disabling clones is as simple as the setting:

<setting name="ItemCloning.Enabled" value="false"/>


Disable Links Database (it's a table, in fact) on CD database. It is normally used for identifying links between items, but there's no need of it on web database where items turn into URLs.


Publishing productivity tips:

  • May sound obvious but publish only what you've changed and rebuild only what you need.
  • Consider using Publishing Service - that's really quick and saves batches directly into the database.
  • Or even better - build it encapsulated in Docker or at least VM so that you can just have it referenced from any of your dev-environment.
  • Running Sitecore in Live Mode vs. default publishing mode may successfully save some time on publishing for you. For those lucky who are developing with SXA it is way more simple to switch for using both master database and index: just select master from Database field of /sitecore/content/Tenant/Site/Settings/Site Grouping/Site item - no rebuild, restart or "re-whatever" is required.


Use Virtual Machines with snapshots and/or Docker. You may consider a nice triple-combo of Hyper-V - Vagrant - Boxstarter. Wisely configuring and using allows save plenty of time on switching between VMs, restoring, experimenting the code - in other words changing the state, which in Sitecore world is an expensive operation. You may also run an entire farm of VMs configured together, and also (partly or entirely) remotely. Microsoft even gives totally free Hyper-V Server to manage your VMs.

As for Docker, нou may use it as a non-production-unit-of-deployment - it can save plenty of time for some cases for example when working Sitecore-agnostic but very good front-end developers on non-JSS website; I want them, however, be able to have their copy temp of Sitecore instance without all the mess of setup and which they "cannot break".


Fight instance cold starts that happen after you change config or DLLs! There are several things you may do in order to improve your development environment:

  • Consider switching <compilation optimizeCompilations="true"> but before make sure you understand what is dynamic ASP.NET compilation and how it works. This is the biggest save for cold starts.
  • Tune up your prefetch cache for master database to the minimum
  • Disable content testing Sitecore.ContentTesting.config as
  • Not a silver bullet, but when starting a new project, why not consider working with SXA or even better - with JSS? While the first several times reduces the number of cold starts, the second eliminates them entirely!
  • Reduce time ListManagement agent to run every hour rather than every 10 seconds, used for EXM mostly:
    <scheduling>
        <agent type="Sitecore.ListManagement.Operations.UpdateListOperationsAgent, Sitecore.ListManagement">
            <patch:attribute name="interval">01:00:00</patch:attribute>
        </agent>
    </scheduling>
  • Do the same frequency change for IndexingStateSwitcher - from 10 seconds to, let's say, 1 hour:
    <scheduling>
        <agent type="Sitecore.ContentSearch.SolrProvider.Agents.IndexingStateSwitcher, Sitecore.ContentSearch.SolrProvider">
            <patch:attribute name="interval">01:00:00</patch:attribute>
        </agent>
    </scheduling>
  • Also, turn off rebuilding indexes automatically:
    <scheduling>
        <agent name="Core_Database_Agent">
            <patch:attribute name="interval">00:00:00</patch:attribute>
        </agent>
        <agent name="Master_Database_Agent">
            <patch:attribute name="interval">00:00:00</patch:attribute>
        </agent>
    </scheduling>
  • Processors that aren't used while in development, you can remove them too:
    <pipelines>
        <initialize>
            <processor type="Sitecore.Pipelines.Loader.ShowVersion, Sitecore.Kernel"><patch:delete /></processor>
            <processor type="Sitecore.Pipelines.Loader.ShowHistory, Sitecore.Kernel"><patch:delete /></processor>
            <processor type="Sitecore.Analytics.Pipelines.Initialize.ShowXdbInfo, Sitecore.Analytics"><patch:delete /></processor>
            <processor type="Sitecore.Pipelines.Loader.DumpConfigurationFiles, Sitecore.Kernel"><patch:delete /></processor>
        </initialize>
    </pipelines>
  • Last but not the least, since cold starts are inevitable, I still spend this time with use looking the emails, planning, scoping out or ... just attending kitchen for a fresh cup of green tea.

Content Editor

  • Favourites tab under Navigate menu allows you adding some items for quick access. Once added, it will be stored under /sitecore/content/Documents and settings/<domain>_<username>/Favorites in core database.
  • Similarly to the previous one, did you know that you may create Sitecore Desktop shortcuts - the same way as you do on Windows desktop? Use this feature in order to speed you accessing your frequent items.
  • For LaunchPad, you can set some tools seen by admin only there, like Unicorn, ShowConfig, File Manager etc. (package).
  • Pre-load tabs in Content editor. Seriously, I noticed that plenty, if not the majority of folks work in Content Editor in just one windows! Navigating tree structure аor me is an insane loss of productivity while switching between opened windows in Sitecore desktop has zero overhead. For example, working on SXA website I have the following for opened and pre-loaded:
    1. Home page
    2. Data folder 
    3. Partial designs (if I currently work with page structure)
    4. Rendering variants
    5. Renderings
    6. Media Library
    7. Templates
    8. PowerShell ISE
    Once again, these points (except the last one) are site-related items that sit normally deeper in SXA (ie: /sitecore/templates/Project/Tenant/Site vs. /sitecore/templates). This trick saves me seconds, but does that constantly! So normally it looks for me like that:

    You can even automate that, I blogged out automation approach in this post.
  • Expand Collapse buttons are especially helpful when working on large Helix-based solutions so that you can quickly collapse all sections and open only the desired one.
  • Remove unused Content Editor stuff from Application Options (under hamburger menu), also unchecking View -> Standard fields will improve Content Editor performance up to twice faster.
  • Limit number of versions to 10
  • Setting Field Section Sort order will also help saving time by having the most important sections at the top 


2. SOFTWARE

Visual Studio, VS Code and most useful Visual Studio extensions, I can mention a few of them:

  • ReSharper is the king of all the extensions and worth of every dollar spent. VS 2019 takes some of its features but is still far from ReSharper functionality
  • Attach to IIS extension, that adds Attach to IIS into VS Debug menu, so that you also can assign hotkeys to debug you Sitecore
  • Use snippets instead of manually typing the code (one, two, three - plenty of them) or make your own.
  • T4 templates code generator (use them in conjunction with Glass Mapper)

It's important to have some sort of master productivity tool. For example, I am using Total Commander, that far more than just a great two-panel file manager - I made it as a power pack so it includes:

  • Diff tool (I configured to use Beyond Compare with Total Commander) but it comes with a free and fair built-in tool as well
  • Built-in FTP client with encrypted password storage
  • Hotkeys on almost everything you can do.
  • Rapid access to the most important folder you define (and yes - hotkeys for that)
  • true and reliable search by content, regex, ... and also in archives (ex compare with windows)
  • Ooverride system file associations and assign your tool of choice, with parameters
  • I integrated TeraCopy into Commander, so that I have the best and fastest copying tool as well
  • I also integrated PowerShell console into TC so helps a lot save much time opening it in the right context
  • plenty of plugins and much more useful stuff that I struggle to remember at the moment
That's why I feel quite surprised seeing majority developers still using classical Windows Explorer - it is such a bottleneck (in my humble opinion). This tool alone saves me about an hour daily!

Since I've just mentioned PowerShell, nowadays it helps you automating almost everything. This includes:

  • managing Windows server, all its dependencies, all types of activities on a filesystem, registry, MMC, etc.
  • installing, modifying, deploying Sitecore and all the dependencies
  • building images, starting, stopping, deploying containers
  • do all that same with Hyper-V virtual machines (and I assume, that also should be possible with VMs from other vendors)
  • all the type of management and configuration with IIS and SQL
It is probably more difficult to imagine what is not doable with PowerShell. And of course, investing time in mastering PowerShell brings you more benefits when using Sitecore PowerShell Extensions. Combining both you can benefit from Sitecore PowerShell Remoting accessing Sitecore assets and resource from outside of your instance.

Other tools that significantly save my day-to-day life:

  • Chocolatey. I put it to the first place intentionally - that is a console package manager for Windows, that allows you installing almost any software from a Windows console (not even PowerShell!)
  • LockHunter helps me to find out what process lockout folders/files and force releasing them. Biggest abusers typically are IIS, console windows left open and of course our beloved Visual Studio.
  • Slack became the most used tool for the self-organized team, especially nowadays - with the growth of Agile-based approaches. With an ability to create channels on any aspect and having great mobile clients - it helps thousands of distributed teams globally. When setting up CI / CD pipelines I usually configure sending build notifications to a dedicated channel. Slack is also a proven solution to replace boring meetings.
  • dotPeek .NET decompiler should be made mandatory for each Sitecore developer since that's the most genuine way to how it all works internally in Sitecore
  • Synergy helps me to unite few laptops (2 having Windows and 1 Mac OS) into one large multi-screen environment with keyboard, mouse and even clipboard shared across the different OS.
  • Postman and Fiddler are tools for creating RESTful web requests and intercepting others, even those coming by HTTPS
  • smtp4dev becomes inevitable when you start developing emailing functionality. It intercepts your email sending attempts, grabs these email messages and even puts them into your mail app. You don't need to have SMTP server anymore!
  • PCloud - expensive cloud storage but worth of every penny spent and brings true Swiss quality. I got lifetime subscription with them, including crypto folder (which is truly crypto!). Currently trying to entirely replace Dropbox with PCloud
  • Telegram messenger (I give more explanation about it below)
  • Jing screenshot creator tool that comes far beyond Alt + PrnScr built-in Windows functionality
  • Instance backup/restore tool
  • Yet one more triple-combo of Evernote + Dropbox + 1Password - save me plenty of time on a daily basis.

Source control

Won't be unique saying that I prefer using git along with Git Flow approach. Master branch is used only to keep primary releases, develop branch is all developers' cumulative snapshot that is always deployable and used for CI / CD. Further down we got functional (feature and integration) branches. Its approach also allows my teams to avoid serialization conflicts when doing large structural refactorings on Sitecore items.

For git I use three tools in parallel:

  • SourceTree is an excellent free tool for history visualization, branches tracking, etc. Unfortunately, it still has buggy UI especially after it was re-written with WPF - sometimes it struggles to reappear from the minimized state, errors out on some repos with a long history and plenty of branches, it is also quite slow in starting up.
  • Tortoise GIT - I use for commit, historical comparison, repo browser and few more, mostly due to my legacy habits of using SVN 10-15 years ago (Tortoise SVN of course). It also comes free of charge.
  • Console - for everything else.
The simplest to get them is as usually from Chocolatey:
cinst sourcetree
cinst tortoisegit
cinst git.install

One of the positive habits that I want to share is making last-minute check all the items and the code immediately before committing it. When writing a code, you're a deeply focused into some functionality you're building, while pre-commit check merely shows you overall picture. I also check for something stupid, like potential null references, badly named variables, and other high level but important stuff.

Another productivity improvement I am using working with git is creating aliases. This allows assigning short and easy to remember aliases to long-to-remember commands with parameters. This is how I am assigning an alias:
git config --global alias.lga "log --decorate --graph --oneline --all"
Now I can call git lga and it will give me that same result a calling long version git log --decorate --graph --oneline --all:


Browser today is still our primary target application, so it's also a point of tuning the productivity:

  • organize your bookmarks properly into folders and subfolders. Once done, it will sync across all your machines where you've logged into.
  • User scrips with Greasemonkey (Firefox) or Tampermonkey (Chrome) allow improving the functionality of many websites, where authors have intentionally or occasionally forgotten to improve UI / UX. Plenty ready-to-use of scripts are available through GitHub and custom repositories.
  • Invest time in mastering DevTools - this is the first-class tool for any web developer and will start saving your time and efforts quite shortly, if not immediately. Pluralsight has few useful courses for that (one, two)
  • Use some other helpful Chrome extensions: Sitecore Developer Tool, Sitecore Extensions, Grammarly, EditThis Cookie, AdBlock, OneClick URL Shortener.
  • Browsers hotkeys are nowadays mostly crossbrowserly universal. I promice you'll come across at least one big finding after going through the list of keyboard shortcuts, and it is not the full one. For the full list please refere to your specific cbrowser documentation.


3. HARDWARE

Hardware is very crucial for productivity. For my productive setup I use:
  • Dell XPS 15" with 32 Gb RAM and fastest Samsung PM961 SSD. I got 1 TB of storage but even that volume is hard enough due to numerous VMs and snapshots. That is an expensive laptop, but you get what you pay for - frameless 4K touch screen and top spec: as for 2019, you can get a version with i9-8950HK processor and 2TB SSD.
  • Craft Keyboard and MX Anywhere 2S mouse - both top-spec input devices from Logitech work perfectly together in conjunction through the same receiver (but can hot-switch between three of them) and are configured through the same software.
  • I normally use 3 monitors (one of which is the laptop itself). If a monitor has Pivot Function (as on an image below) - that's an excellent bonus to productivity. Such a vertical layout is excellent for code. The left-hand side monitor is usually used for browser with Sitecore always and/or running live website under development. Laptop's monitor is for everything else - file manager, configuration, notes, Slack, etc.
This is how it works all together:


4. ORGANISATIONAL

Approaching technical debt

Technical debt is a deliberate decision to implement a not-the-best solution or write not-the-best code to release software faster. Taking on some technical debt is inevitable and can increase speed in software development in the short run. However, in the long run, it contributes to system complexity, which slows the developers down. Non-programmers often underestimate the loss of productivity and are tempted to always move forward, and that becomes an issue. But if refactoring is never part of the priorities, it will not only impact productivity but also product quality. 

Someone wise identified an approach to managerial stuff regarding managing technical debt - an image below show how is correctly explain technical debt to managers:


General productivity thoughts

In general, productivity is a combination of 3 parameters: time, energy spent on achieving a goal and level of concentration. These pieces of advice are disclosed below:

  • Try staying in The Flow - for the developers it is the state when they feel the most focused and productive. Most of their work is done during this state. For most developers productivity follows Pareto's Law with 20% of time delivering 80% of the result, and the rest 80% of time bringing the rest 20% of the result.
  • Minimize distractions from open space, headphones on! BTW, can recommend Rainy Mood which is my recent finding. Every distraction switches you out of context, and switching contexts is an expensive activity in terms of time and efforts.
  • Avoid meetings where it makes sense to. Only 30-40 percent of meetings are important, the rest invite you to participate "just in case" (they may need to ask something from you and sometimes they do). But at which cost? A single meeting can blow a whole afternoon by breaking it into two pieces, each too small to do anything hard in, again due to switching contexts.
  • In addition, it highly demotivates when management spending your time so loosely, especially when the timeframes are tight and you have to work overtime in order to meet the deadlines. Just to highlight my point - some meetings are useful and very important, especially in the planning stage, but unfortunately, people overuse meetings.
  • Because of the above, a working week of 4 days x 10 hours is way more productive than 5 x 8, despite the same hours worked. The first case has hidden costs of switching the context, plus it also adds me one roundtrip of commute (3 hours for in average).
  • The general approach would be identifying what your actual biggest bottlenecks. Theory of constraints is something that may come to your help. Also, anything outside of job description (along with learning new stuff) should be by definition treated as a non-productive waste of your time.
  • Organize your own notes / knowledge base/ todo lists / planners with the quickest access for both read and write. These can be any tools of your choice, if they give you immediate (and offline as well) access to your important information. Surprisingly, Telegram became such a tool for me despite being primarily a messenger, due to its built-in cloud, offline access, cross-platform sync, and immediate access.
  • Everything you come across which is worth of further checking (and not at the moment,) should be recorded in your "hot" operational notes in order to avoid switching context. and making sure that your brain’s capacity is not consumed by "remembering stuff" rather than focusing on the most important.
  • Identify all you most frequent actions across the system, IDE and most used software and find keyboard shortcut combinations for them, or assign your own.
  • Finally, I'd recommend reading this hacks list of tactics - likely you'll pick something out of there.


That's what came into my head, as for now. And what productivity tips do you have?

Extracting package installation functionality out of Sitecore Commerce 9 SIF

In one of my previous posts, I've explained how Install-SitecoreConfiguration works in SIF and how to use it for package installation.

As time passed, more and more functionality got natively embedded into SIF, that included some useful things such as config transformations, publishing, rebuilding indexes, and of course, packages/modules installation. I decided to inspect what actually went into the platform and extracted this functionality out of Commerce product for those who want to benefit from package installations with SIF bit does not want to bother with XC9.

So, actually, there is not a big change compared with my previous post. On the lower level, there is still a temporal folder being exposed and *.aspx page placed for actual job to be done. The good thing is that plenty of that functionality now supported out of the box

For legal reasons I cannot include downloadable ready to use package, since the code and scripts belong to Sitecore who only can share it. Instead I will tell you how you can make it on your own copy of Sitecore Commerce 9.0 update 2.

You'll need three parts - Configuration, Modules and SiteUtilityPages, all carefully from within SIF.Sitecore.Commerce.1.2.14 folder:

  • Configurations (json files) taken out of Configuration\Commerce\Master_SingleServer.json and Configuration\SitecoreUtilities\InstallModule.json
  • Then you'll need three modules from Modules folder: InstallSitecoreConfiguration, ManageCommerceService, SitecoreUtilityTasks
  • Also you need SiteUtilityPages folder with InstallModules.aspx file within

If you do not keep a structure as from Commerce Installer (as didn't I) - please make adjust paths of dependencies correspondingly.

Last but not the least, you need to modify main Deploy-Sitecore-Commerce.ps1 PowerShell script, removing everything apart from package installation out of it. I renamed it into Install.ps1 and here is what I end up with:

param(
		[string]$SiteName = "habitat91.dev.local",	           # your sitecore instance name
		[string]$ModulePath = "p:\PowerShell Extensions-5.0.zip"   # path to the module to be installed
)

$global:DEPLOYMENT_DIRECTORY=Split-Path $MyInvocation.MyCommand.Path
$modulesPath=( Join-Path -Path $DEPLOYMENT_DIRECTORY -ChildPath "Modules" )
if ($env:PSModulePath -notlike "*$modulesPath*")
{
    $p = $env:PSModulePath + ";" + $modulesPath
    [Environment]::SetEnvironmentVariable("PSModulePath",$p)
}

$params = @{
		Path = Resolve-Path '.\Configuration\Master.json'	
		SiteName = $SiteName
		InstallDir = "$($Env:SYSTEMDRIVE)\inetpub\wwwroot\$SiteName"		
		SiteUtilitiesSrc = ( Join-Path -Path $DEPLOYMENT_DIRECTORY -ChildPath "SiteUtilityPages" )	

		ModuleFullPath = Resolve-Path -Path  $ModulePath
    }

Install-SitecoreConfiguration @params

and below there is my tree structure:


There are two parameters to be configured for Install.ps1 script to run:


In case you are working outside of inetpub\wwwroot folder, please also adjust the path for InstallDir variable.

Hope this helps your DevOps!


Amazing Sitecore PowerShell Extension Remoting - quick start to make it work


Introduction. Most of you are already familiar with Sitecore PowerShell Extensions (SPE). This is a genius module written by Adam Najmanowicz and Michael West, that not just brings the power of console into Sitecore, allowing to maintain and automate almost everything, but also integrates that into Sitecore UI so that one may have pretty nice reports on virtually anything in their system. But today I am going to tell you about one underestimated part of SPE - Remoting,

What is Remoting? Old school developers remember this term from the first version of .NET where it used to name the technology of building distributed applications with purely means of the framework in pre-RESTful years. Not a nice term for not the best technology! But in SPE Remoting got more adequate meaning - executing scripts remotely. The idea is to allow running SPE script from the standarв Windows PowerShell console - in that case, a script is serialized and send for the remote execution to Sitecore server. That means it will be executed in the standard Sitecore context, same as normal SPE script you run in Sitecore PowerShell Console within your Sitecore instance. Then the results will be returned back to original you original system PowerShell window as if you ran them locally.

Why do I need that? Well, you may not realise you need that straight away, but being able to expose the power of SPE outside gives you an ultimate power of maintaining your instances internally. What firstly comes into my head is Continuous Integration - now you have the tool for managing content and precise fine-tuning everything within your instances. Not limited to - you also have access to servers filesystem, can download and upload files, same for media library, manipulate users and permissions. For example, you may automate regular downloading logs from all of your servers or whatever you may decide.

Great, I'm interested. How do I make it work? This article is all about setting up SPE Remoting for your instance and getting first results. So, here we go.


Firstly download Sitecore Powershell Extensions module itself (if you don't yet have) and install as you normally install the packages. The module is relatively large and it may take a while until it gets done. Then SPE becomes present in your Sitecore start menu:


SPE module comes already with remoting built-in however it requires few more steps to enable and configure it.

There is a new security role that becomes available upon SPE installation: sitecore\PowerShell Extensions Remoting. You must make your credentials user for external remoting connection (applies to users and/or other roles) to be a member of this role, even (and especially) if that is sitecore\admin. If you don't do that you will see following error:


Secondly, download SPE Remoting module for the same version you may find it there along with regular SPE on Marketplace:


Note - that is not a Sitecore module and it's not for Package Installer. The term "module" is too meaningful here and in current context it deals with PowerShell module. Instead, extract archive content into you PowerShell modules root folder - for example <YOUR_USER_FOLDER>\Documents\WindowsPowerShell\Modules\SPE folder


You may need to import that module first in order to use it from within Windows PowerShell console. Make sure you set the execution policy to:

Set-ExecutionPolicy RemoteSigned

and the import command:

Import-Module -Name SPE

Before writing a basic actual script, we also need to adjust configuration - module authors treat security seriously. The configuration file is located at: <INSTANCE_ROOT>\App_Config\Include\Cognifide.PowerShell.config and the article on how-to can be found here.

Since you are likely experimenting on your local machine and are more relaxed regarding security - you may get things sorted easier by applying a patch file to weaken security. Make sure you use if only for local dev and never in higher environments. As a bonus - the patch won't be overwritten when reinstalling the SPE module.

Finally, we can create and execute the script. As the very bare minimum, I suggest the very simple script for you to test. Create PS.ps1 and copy the below content into it:

Set-ExecutionPolicy RemoteSigned
Import-Module -Name SPE

$session = New-ScriptSession -Username admin -Password b -ConnectionUri https://platform.dev.local

Invoke-RemoteScript -ScriptBlock {
    Get-Item -Path "master:\content\Home"
} -Session $session 

Now execute that:


And voila! Although visually it is not as impressive, what actually happens on this screenshot is getting a simple query sent to Sitecore instance, executed remotely with the results returned back to Windows PowerShell, all transparently for the caller.

The reason for me to write the article was the number of efforts I spent on getting things understood, downloaded and setup, configured and executed. Some pieces of documentation are not available, while others not a descriptive. Once again, thanks to Michael West for his support, and hope this article will encourage you at least to try that!

Sitecore PowerShell Extension snippets collection

A collection of Sitecore PowerShell snippets from various sources to have them in one place easy to copy, adjust and execute. Credits to Adam Najmanowicz and Michael West - you guys did a great job!

  1. Write to CSV
  2. Using link fields
  3. Update item presentation final layout
  4. Traverse tree with query
  5. Read from CSV
  6. Output all object properties
  7. Move item
  8. List cms users
  9. Get and edit an item
  10. Generate google sitemap XML
  11. Exclude template
  12. Create users from CSV
  13. Create an item
  14. Convert datetime field value to DateTime object
  15. Change item template
  16. Add base template
  17. Parse a Rich Text to replace elements
  18. Generate a hash of a media file
  19. Exporting the username and custom properties
  20. Show List View with all users' properties
  21. Set workflow for all items
  22. Unlock items of a template recursively
  23. Zip and download sitecore media library folder
  24. Zip and download logs
  25. Updating renderings properties to enable VaryByData
  26. New media item
  27. Update media item
  28. List Roles for User
  29. Remove unused media items
  30. Get items modified in last 7 days

1. Write to csv
More description - normal font
$everythingUnderHome = Get-Item master: -Query "/sitecore/content/Home//*"
$outputFilePath = "C:\temp\my-csv-file.csv"
$results = @();

$everythingUnderHome | ForEach-Object {

  $properties = @{
        Name = $_.Name
        Template = $_.TemplateName
        Path = $_.ItemPath
  }

  $results += New-Object psobject -Property $properties
}

$Results | Select-Object Name,Template,Path | Export-Csv -notypeinformation -Path $outputFilePath

2. Using link fields
More description - normal font
#Get an alias
$alias = = Get-Item -Path "master:/sitecore/system/Aliases/test"

#Get the link field
[Sitecore.Data.Fields.LinkField]$field = $_.Fields["Linked item"]

# the path to the target item
$field.InternalPath

# The guid if internal. Otherwise this is an Empty GUID
$field.TargetID

# 'internal' or 'external'
$field.LinkType

# Other proporties include MediaPath, QueryString and Target

3. Update item presentation final layout
$items = Get-Item master:/content/home//* | Where-Object { $_.Fields["__Final Renderings"] -like "*col-huge*" }

$items | ForEach-Object {    
    Write-Host $_.Fields["__Final Renderings"]
    
    $_.Editing.BeginEdit()
    
    $_["__Final Renderings"] = $_.Fields["__Final Renderings"].toString().replace("col-huge", "col-wide-1");
    
    $_.Editing.EndEdit();
    
    Write-Host $_.Fields["__Final Renderings"]

4. Traverse tree with query
$everythingUnderHome = Get-Item master: -Query "/sitecore/content/Home//*"

$everythingUnderHome | ForEach-Object {

  Write-Host "Item name: " + $_.Name
}

5. Read from CSV
$csv = Import-Csv "C:\temp\my-csv-file.csv"

foreach($row in $csv)
{
    if ($row -eq $csv[0])
    {
        #Skip the first row as it contains the column headings in your CSV
        continue;
    }
    
    #Output value for Column1 and Column2
    Write-Host $row."Column1";
    Write-Host $row."Column2";
}

6. Output all object properties
[Sitecore.Data.Fields.LinkField]$field = $_.Fields["Linked item"]
Write-Host ($field | Format-Table | Out-String)

7. Move item
$item = Get-Item master:/content/home/old/item

#Will move and place this item under the target new
Move-Item -Path $item.ItemPath "master:\sitecore\content\Home\new";

8. List cms users
$allSitecoreUsers = Get-User -Filter "sitecore\*" 

$allSitecoreUsers | ForEach-Object {
    Write-Host $_.Name
}

9. Get and edit an item
$item = Get-Item master:/content/home

$item.Editing.BeginEdit();

$item["Title"] = "New title for the home item!";

$item.Editing.EndEdit();

10. Generate google sitemap XML
$xmlWriter = New-Object System.XMl.XmlTextWriter('c:\temp\sitemap.xml',$Null)
$xmlWriter.Formatting = 'Indented'
$xmlWriter.Indentation = 1
$XmlWriter.IndentChar = "`t"

$xmlWriter.WriteStartDocument()
$xmlWriter.WriteStartElement('urlset')
$XmlWriter.WriteAttributeString('xmlns', 'http://www.sitemaps.org/schemas/sitemap/0.9')

$everythingUnderHome = Get-Item master: -Query "/sitecore/content/Home//*"
$baseUrl = "https://example.com"

$everythingUnderHome | ForEach-Object {

    $url = $baseUrl + [Sitecore.Links.LinkManager]::GetItemUrl($_)

    $xmlWriter.WriteStartElement('url')
    $xmlWriter.WriteElementString('loc',$url)
    $xmlWriter.WriteEndElement()
}

$xmlWriter.WriteEndElement()
$xmlWriter.WriteEndDocument()
$xmlWriter.Flush()
$xmlWriter.Close()

11. Exclude template
$item = Get-Item -Path master: -Query "/sitecore/content//*[@@templatename !='Sample Item']"

#Or

$item = Get-Item -Path master: -Query "/sitecore/content//*" | Where-Object { $_.TemplateName -ne "Sample Item" -and $_.TemplateName -ne "Local Datasource

12. Create users from CSV
$csv = Import-Csv "C:\temp\my-csv-file.csv"

foreach($row in $csv)
{
    if ($row -eq $csv[0])
    {
        #Skip the first row as it contains the column headings in your CSV
        continue;
    }
    
    #New-User docs: https://doc.sitecorepowershell.com/appendix/commands/New-User.html
    #Include domain in username to specify the target domain (e.g extranet\adam)
    New-User -Identity $row."Username" -Enabled -Password $row."Password" -Email $row."Email" -FullName $row."FullName"
}

13. Create an item
$item = New-Item "master:/content/home/my new sample item" -type "Sample/Sample Item"

14. Convert datetime field value to DateTime object
$dateTime = ([sitecore.dateutil]::IsoDateToDateTime($item["My Date Field"])

Write-Host $dateTime.ToString("dd MMMM yyyy")

#Output 10 September 2016

15. Change item template
$item = Get-Item master:/content/home

$newTemplate = [Sitecore.Configuration.Factory]::GetDatabase("master").Templates["Sample/Sample Item"];

$item.ChangeTemplate($newTemplate)

16. Add base template
$targetTemplate    = Get-item 'master:/sitecore/templates/User Defined/Common/Data';
$templateFilter    = Get-Item "master:/sitecore/templates/System/Templates/Template";
$templateToBeAddAsBaseTemplate     = Get-Item 'master:/sitecore/templates/User Defined/Common/Data/Carousel'
 
 
Get-ChildItem $targetTemplate.FullPath -recurse | Where-Object { $_.TemplateName -eq $templateFilter.Name -and $_.Name -eq "promo"} | ForEach-Object {
    if(-not ($_."__Base template" -match "$($templateToBeAddAsBaseTemplate.Id)")){
           #If not exist then add
         $_."__Base template" = "$( $_."__Base template")|$($templateToBeAddAsBaseTemplate.Id)"
    }
}

17. Parse a Rich Text to replace elements
The easiest solution is probably to find and replace characters rather than parse all of the html:
# Home Item
$rootId = "{110D559F-DEA5-42EA-9C1C-8A5DF7E70EF9}"

# Get only the immediate children
$items = @((Get-ChildItem -Path "master:" -ID $rootId))
foreach($item in $items) {
    $html = $item.Text
    if([String]::IsNullOrEmpty($html)) { continue }
    $newText = $html.Replace("
    ", "
      ").Replace("
", "") $item.Text = $newText }

18. Generate a hash of a media file
#Generate MD5 Hash of item
function To-Byte-Array
        {
            param (
            [CmdletBinding()]
            [Parameter(Mandatory = $true)]
            [AllowEmptyString()]
            [AllowEmptyCollection()]
            [AllowNull()]
            [Object]
            $InputStream)
             
            $InputStream.Position = 0
            $buffer = New-Object byte[] $InputStream.Length
            $i = 0
            For ($totalBytesCopied=0; $totalBytesCopied -lt $InputStream.Length; $i++) {
                $totalBytesCopied += $InputStream.Read($buffer, $totalBytesCopied, $InputStream.Length - $totalBytesCopied)
            }
             
            $buffer
        }
 
$item = Get-Item master: -ID "{20AA9D26-F1D6-43DB-B8A8-21EC04A5A4CB}" -Language de-DE
    $mediaItem = New-Object Sitecore.Data.Items.MediaItem($item)
    $media = [Sitecore.Resources.Media.MediaManager]::GetMedia($mediaItem)
    $stream = $media.GetStream().Stream
    try {
        $bytes = To-Byte-Array $stream
    }
    finally
    {
        if ($null -ne $stream -and $stream -is [System.IDisposable])
        {
            $stream.Dispose()
        }
    }
     
    $md5 = new-object -TypeName System.Security.Cryptography.MD5CryptoServiceProvider
    $hash = [System.BitConverter]::ToString($md5.ComputeHash($bytes))
     
    Write-Host $hash

19. Exporting the username and custom properties
$property = @(
"Name",
@{Name='Email';Expression={ $PSItem.Profile.GetCustomProperty('Email') }},
@{Name='FirstName';Expression={ $PSItem.Profile.GetCustomProperty('FirstName') }},
@{Name='LastName';Expression={ $PSItem.Profile.GetCustomProperty('LastName') }},
@{Name='Title';Expression={ $PSItem.Profile.GetCustomProperty('Title') }},
@{Name='Company';Expression={ $PSItem.Profile.GetCustomProperty('Company') }},
@{Name='Country';Expression={ $PSItem.Profile.GetCustomProperty('Country') }},
@{Name='ZipCode';Expression={ $PSItem.Profile.GetCustomProperty('ZipCode') }},
@{Name='Department';Expression={ $PSItem.Profile.GetCustomProperty('Department') }},
@{Name='Street';Expression={ $PSItem.Profile.GetCustomProperty('Street') }},
@{Name='City';Expression={ $PSItem.Profile.GetCustomProperty('City') }},
@{Name='Phone';Expression={ $PSItem.Profile.GetCustomProperty('Phone') }},
@{Name='Username';Expression={ $PSItem.Profile.GetCustomProperty('Username') }},
)

# Gets not disabled extranet users, next select all customer properties and save all properties to CSV file
Get-User -Filter 'extranet\*'  `
    | Where-Object { $_.Profile.State -ne 'Disabled' } `
        |  Select-Object -Property $property `
            | Export-CSV -Path "$apppath\extranet-enabled-uc.csv" -notype -encoding "unicode"
        
Download-File  "$apppath\extranet-enabled-uc.csv"

20. Show List View with all users' properties
[System.Web.Security.Membership]::GetAllUsers() |

Show-ListView -Property @{Label="User"; Expression={ $_.UserName} },
    @{Label="Is Online"; Expression={ $_.IsOnline} },
    @{Label="Creation Date"; Expression={ $_.CreationDate} },
    @{Label="Last Login Date"; Expression={ $_.LastLoginDate} },
    @{Label="Last Activity Date"; Expression={ $_.LastActivityDate } }

21. Set workflow for all items
## 1. Set default workflow state in template’s standard value ##
## 2. Before running script, must set correct Context Item ##
##################################################################

function SetWorkflow($item)
{
## Update only items assigned __Default workflow
if ($item.”__Default workflow” -eq “{A5BC37E7-ED96-4C1E-8590-A26E64DB55EA}”) {
$item.__Workflow = “{A5BC37E7-ED96-4C1E-8590-A26E64DB55EA}”;
$item.”__Workflow state” = “{190B1C84-F1BE-47ED-AA41-F42193D9C8FC}”;
}
}

## Update correct workflow information.
## Uncomment below two lines if you are ready to go for updating
#get-item . -Language * | foreach-object { SetWorkFlow($_) }
#get-childitem . -recurse -Language * | foreach-object { SetWorkFlow($_) }

## Show Updated Result
get-item . -Language * | Format-Table Id, Name, Language, __Workflow, “__Workflow state”, “__Default workflow”
get-childitem . -recurse -Language * | Format-Table Id, Name, Language, __Workflow, “__Workflow state”, “__Default workflow”

22. Unlock items of a template recursively
Get-ChildItem -Path master:\content\home -Recurse | 
    Where-Object { $_.TemplateId -eq "{ENTER_YOUR_TEMPLATE_GUID}"} | 
    Unlock-Item -PassThru

23. Zip and download sitecore media library folder
  
#
# The ZipFiles function is based on noam's answer
# on the following Stack Overflow's page: http://bit.ly/PsZip
#
function ZipItems( $zipArchive, $sourcedir )
{
  Set-Location $sourcedir
  [System.Reflection.Assembly]::Load("WindowsBase,Version=3.0.0.0, `
      Culture=neutral, PublicKeyToken=31bf3856ad364e35") | Out-Null
  $ZipPackage=[System.IO.Packaging.ZipPackage]::Open($zipArchive, `
      [System.IO.FileMode]::OpenOrCreate, [System.IO.FileAccess]::ReadWrite)
  $items = gci -recurse $sourceDir
  [byte[]]$buff = new-object byte[] 40960
  $i = 0;
  ForEach ($item In $items) {
    $i++
    if([Sitecore.Resources.Media.MediaManager]::HasMediaContent($item)){
      $mediaItem = New-Object "Sitecore.Data.Items.MediaItem" $item;
      $mediaStream = $mediaItem.GetMediaStream();
      $fileName = Resolve-Path -Path $item.ProviderPath -Relative
      $fileName = "$fileName.$($item.Extension)" `
        -replace "\\","/" -replace "./", "/"
      # Print out the file - the list will show up once the file is downloaded
      "Added: $fileName"
      # Show progress for the operation
      Write-Progress -Activity "Zipping Files " `
        -CurrentOperation "Adding $fileName" `
        -Status "$i out of $($items.Length)" `
        -PercentComplete ($i *100 / $items.Length)
      $partUri = New-Object System.Uri($fileName, [System.UriKind]::Relative)
      $partUri = [System.IO.Packaging.PackUriHelper]::CreatePartUri($partUri);
      $part = $ZipPackage.CreatePart($partUri, `
        "application/zip",  `
        [System.IO.Packaging.CompressionOption]::Maximum)
      $stream=$part.GetStream();
      do {
        $count = $mediaStream.Read($buff, 0, $buff.Length)
        $stream.Write($buff, 0, $count)
      } while ($count -gt 0)
      $stream.Close()
      $mediaStream.Close()
    }
  }
  $ZipPackage.Close()
}
 
#the location will be set by PowerShell automatically based on which item was clicked
$location = get-location
$dateTime = Get-Date -format "yyyy-MM-d_hhmmss"
$zipName = Split-Path -leaf $location | % { $_ -replace " ", ""}
$dataFolder = [Sitecore.Configuration.Settings]::DataFolder
$zipPath = "$dataFolder\$zipName-$datetime.zip"
 
# Call the Zipping function
ZipItems $zipPath $location
 
#Send user the file, add -NoDialog if you want to skip the download dialogue 
Download-File -FullName $zipPath | Out-Null
 
# Clean up after yourself
Remove-Item $zipPath
 
# Close the results window - we don't really need to see the results
Close-Window

24. Zip and download logs
#
# The ZipFiles function is based on noam's answer
# on the following Stack Overflow's page: http://bit.ly/PsZip
#
function ZipFiles( $zipArchive, $sourcedir )
{
    [System.Reflection.Assembly]::Load("WindowsBase,Version=3.0.0.0, `
        Culture=neutral, PublicKeyToken=31bf3856ad364e35") | Out-Null
    $ZipPackage=[System.IO.Packaging.ZipPackage]::Open($zipArchive, `
        [System.IO.FileMode]::OpenOrCreate, [System.IO.FileAccess]::ReadWrite)
    $in = gci $sourceDir | select -expand fullName
    [array]$files = $in -replace "C:","" -replace "\\","/"
    ForEach ($file In $files) {
        $fileName = [System.IO.Path]::GetFileName($file);
            $partName=New-Object System.Uri($file, [System.UriKind]::Relative)
            $part=$ZipPackage.CreatePart("/$fileName", "application/zip", `
                [System.IO.Packaging.CompressionOption]::Maximum)
            Try{
                $bytes=[System.IO.File]::ReadAllBytes($file)
            }Catch{
                $_.Exception.ErrorRecord.Exception
            }
            $stream=$part.GetStream()
            $stream.Write($bytes, 0, $bytes.Length)
            $stream.Close()
    }
    $ZipPackage.Close()
}
 
# Get Sitecore folders and format the zip file name
$dateTime = Get-Date -format "yyyy-MM-d_hhmmss"
$dataFolder = [Sitecore.Configuration.Settings]::DataFolder
$logsFolder = [Sitecore.Configuration.Settings]::LogFolder
$myZipFile = "$dataFolder\logs-$datetime.zip"
 
# Warn that the user log files will fail to zip
Write-Host -f Yellow "Zipping files locked by Sitecore will fail." -n
Write-Host -f Yellow "Files listed below were used."
 
# Zip the log files
ZipFiles $myZipFile $LogsFolder
 
#Download the zipped logs
Get-File -FullName $myZipFile | Out-Null
 
#Delete the zipped logs from t

25. Updating renderings properties to enable VaryByData
$items = Get-ChildItem -Recurse | Where-Object {$_.TemplateID -match “{79A0F7AB-17C8-422C-B927-82A1EC666ABC}”} | ForEach-Object {

$renderingInstance = Get-Rendering -Item $_ -Rendering $rendering
if($renderingInstance){
$renderingInstance.VaryByData = 1
Set-Rendering -Item $_ -Instance $renderingInstance
}
}

26. New media item
function New-MediaItem{
    [CmdletBinding()]
    param(
        [Parameter(Position=0, Mandatory=$true, ValueFromPipeline=$true)]
        [ValidateNotNullOrEmpty()]
        [string]$filePath,

        [Parameter(Position=1, Mandatory=$true)]
        [ValidateNotNullOrEmpty()]
        [string]$mediaPath)

$mco = New-Object Sitecore.Resources.Media.MediaCreatorOptions
$mco.Database = [Sitecore.Configuration.Factory]::GetDatabase("master");
$mco.Language = [Sitecore.Globalization.Language]::Parse("en");
$mco.Versioned = [Sitecore.Configuration.Settings+Media]::UploadAsVersionableByDefault;
$mco.Destination = "$($mediaPath)/$([System.IO.Path]::GetFileNameWithoutExtension($filePath))";

$mc = New-Object Sitecore.Resources.Media.MediaCreator
$mc.CreateFromFile($filepath, $mco);
}

# Usage example
New-MediaItem "C:\Users\Adam\Desktop\Accelerators.jpg" "$([Sitecore.Constants]::MediaLibraryPath)/Images"

27. Update media item
function Update-MediaItem{
    [CmdletBinding()]
    param(
        [Parameter(Position=0, Mandatory=$true, ValueFromPipeline=$true)]
        [ValidateNotNullOrEmpty()]
        [string]$filePath,

        [Parameter(Position=1, Mandatory=$true)]
        [ValidateNotNullOrEmpty()]
        [string]$mediaPath)

[Sitecore.Data.Items.MediaItem]$item = gi $mediaPath
[Sitecore.Resources.Media.Media] $media = [Sitecore.Resources.Media.MediaManager]::GetMedia($item);
$extension = [System.IO.Path]::GetExtension($filePath);
$stream = New-Object -TypeName System.IO.FileStream -ArgumentList $filePath, "Open", "Read"
$media.SetStream($stream, $extension);
$stream.Close();
}

# Usage example - overwrite the image created with previous cmdlet with new image
Update-MediaItem "$SitecoreDataFolder\Tchotchkeys.jpg" "$([Sitecore.Constants]::MediaLibraryPath)/Images/Accelerators"

28. List Roles for User
function Get-UserRoles{
    [CmdletBinding()]
    param(
        [Parameter(Mandatory=$true, Position=0)]
        [string]$Identity
    )
  $user = Get-User $Identity
  return Get-Role -Filter * | Where-Object { $_.IsMember($user,$true,$true) } 
}

Write-Host "Roles for ServicesAPI" -ForegroundColor Green
Get-UserRoles "sitecore\ServicesAPI"

Write-Host "Roles for Admin" -ForegroundColor Green
Get-UserRoles "sitecore\admin"

29. Remove unused media items
#Include all paths you do not want to analyse below 
$protectedPaths = @(
    "/sitecore/media library/System/", 
    "/sitecore/media library/Experience Explorer"
    "/sitecore/media library/Images/Social"
    );
    
#Include all item templates you want to ignore in the array below
$protectedTemplates = @(
    [Sitecore.TemplateIDs]::MediaFolder
    );

$itemsToDelete = 
    Get-ChildItem -Path "master:\sitecore\media library" -Recurse |

        # filter out items of templates you do not want to touch
        Where-Object { $_.TemplateID -notin $protectedTemplates } |

        # do not allow items in the protected paths
        Where-Object { 
            $item = $_; 
            $protected = $protectedPaths | Where-Object { ($item.Paths.Path) -match $_ };
            $protected.Count -lt 1;
        } | 

        # and only items that are not used
        Where-Object { [Sitecore.Globals]::LinkDatabase.GetReferrerCount($_) -eq 0 }

#List the items
$itemsToDelete | ft ProviderPath

#If the list above looks like what you want to delete you can uncomment the following line
#$itemsToDelete | Remove-Item

30. Get items modified in last 7 days
$days = 7;
Read-Variable -Parameters @{ Name="days"; Title="Number of days"} -Title "Pointy haired report" | Out-Null

Get-ChildItem master:\content\home -Recurse | 
    ? { $_."__updated" -gt (Get-Date).AddDays(-$days) } | 
    Show-ListView -Property ID, Name, "__updated", "__updated by"

How to use Install-SitecoreConfiguration from SIF with your custom configuration on example of installing SPE and SXA along with Sitecore

This is an exercise resulting from a blog post by Rob Ahnemann and I will cover Install-SitecoreConfiguration in more details on an example of installing Sitecore modules SPE and SXA as a part of a Sitecore installation by SIF.

Install-SitecoreConfiguration is one of the most what actually SIF is. In my Sitecore installation script I have created a step called Install-Packages. Let's look at how it works:

function Install-Packages {
    Unblock-File .\build\PostInstall\Invoke-InstallPackageTask.psm1 
    Install-SitecoreConfiguration -Path .\build\PostInstall\install-sitecore-package.json -SiteName "$SolutionPrefix.$SitePostFix"
}

This installs a configuration called install-sitecore-package.json Opening it looks like below:

{
    "Parameters": {
         "SiteName": {
            "Type": "string",
            "DefaultValue": "Sitecore",
            "Description": "The name of the site to be deployed."
        },
        "InstallDirectory": {
            "Type": "string",
            "DefaultValue": "c:\\inetpub\\wwwroot",
            "Description": "Base folder to where website is deployed."
        }
    },
    "Variables": {
        // The sites full path on disk
        "Site.PhysicalPath": "[joinpath(parameter('InstallDirectory'), parameter('SiteName'))]",
		"Site.Url": "[concat('http://', parameter('SiteName'))]"

    },
    "Tasks": {
		"InstallPackages":{
			"Type": "InstallPackage",
            "Params": [
                {
                    "SiteFolder": "[variable('Site.PhysicalPath')]",
                    "SiteUrl": "[variable('Site.Url')]",
                    "PackagePath": ".\\build\\assets\\Modules\\Sitecore PowerShell Extensions-4.7.2 for Sitecore 8.zip"
                },
                {
                    "SiteFolder": "[variable('Site.PhysicalPath')]",
                    "SiteUrl": "[variable('Site.Url')]",
                    "PackagePath": ".\\build\\assets\\Modules\\Sitecore Experience Accelerator 1.6 rev. 180103 for 9.0.zip"
                }
            ]
		}
    },
	"Modules":[
		".\\build\\PostInstall\\Invoke-InstallPackageTask.psm1"
	]
}

Parameters are values that may be passed when Install-SitecoreConfiguration is called. Parameters must declare a Type and may declare a DefaultValue and Description. Parameters with no DefaultValue are required when Install-SitecoreConfiguration is called.

Variables are values calculated in a configuration. They can reference Parameters, other Variables, and config functions.

Tasks are separate units of work in a configuration. Each task is an action that will be completed when Install-SitecoreConfiguration is called. By default, tasks are applied in the order they are declared. Tasks may reference Parameters, Variables, and config functions.

Finally, the last line is actually referencing the actual task - a PowerShell module script (Invoke-InstallPackageTask.psm1) that will be run with given parameters:

Set-StrictMode -Version 2.0

Function Invoke-InstallPackageTask {
    [CmdletBinding(SupportsShouldProcess=$true)]
    param(
        [Parameter(Mandatory=$true)]
        [string]$SiteFolder,
		[Parameter(Mandatory=$true)]
        [string]$SiteUrl,
		[Parameter(Mandatory=$true)]
        [string]$PackagePath
    )

    Write-TaskInfo "Installing Package $PackagePath" -Tag 'PackageInstall'

    #Generate a random 10 digit folder name. For security 
	$folderKey = -join ((97..122) | Get-Random -Count 10 | % {[char]$_})
	
	#Generate a Access Key (hi there TDS)
	$accessKey = New-Guid
	
	Write-TaskInfo "Folder Key = $folderKey" -Tag 'PackageInstall'
	Write-TaskInfo "Access Guid = $accessKey" -Tag 'PackageInstall'

	#The path to the source Agent.  Should be in the same folder as I'm running
	$sourceAgentPath = Resolve-Path "PackageInstaller.asmx"
	
	#The folder on the Server where the Sitecore PackageInstaller folder is to be created
	$packageInstallPath = [IO.Path]::Combine($SiteFolder, 'sitecore', 'PackageInstaller')
	
	#The folder where the actuall install happens
	$destPath = [IO.Path]::Combine($SiteFolder, 'sitecore', 'PackageInstaller', $folderKey)

	#Full path including the installer name
	$fullFileDestPath = Join-Path $destPath "PackageInstaller.asmx"
	
	Write-TaskInfo "Source Agent [$sourceAgentPath]" -Tag 'PackageInstall'
	Write-TaskInfo "Dest AgentPath [$destPath]" -Tag 'PackageInstall'

	#Forcibly cread the folder 
	New-Item -ItemType Directory -Force -Path $destPath

	#Read contents of the file, and embed the security token
	(Get-Content $sourceAgentPath).replace('[TOKEN]', $accessKey) | Set-Content $fullFileDestPath

	#How do we get to Sitecore? This URL!
	$webURI= "$siteURL/sitecore/PackageInstaller/$folderKey/packageinstaller.asmx?WSDL"
	 
	Write-TaskInfo "Url $webURI" -Tag 'PackageInstall'
	
	#Do the install here
	$proxy = New-WebServiceProxy -uri $webURI
	$proxy.Timeout = 1800000

	#Invoke our proxy
	$proxy.InstallZipPackage($PackagePath, $accessKey)

	#Remove the folderKey
	Remove-Item $packageInstallPath -Recurse
}
Register-SitecoreInstallExtension -Command Invoke-InstallPackageTask -As InstallPackage -Type Task

What this task does is locates ASMX file, which is an actual handler and copies it into temp random folder within your Sitecore instance allowing you to execute package installer APIs that itself does require Sitecore context. 

Obviously, before running .\install-xp0.ps1 please make sure you have both installers for modules by their paths as per configuration parameters in PackagePath (from example above, they are):
    .\build\assets\Modules\Sitecore PowerShell Extensions-4.7.2 for Sitecore 8.zip
    .\build\assets\Modules\Sitecore Experience Accelerator 1.6 rev. 180103 for 9.0.zip

So, that's how we added new SitecoreConfiguration in order to achieve automated package installation of SPE and SXA by SIF. Since now new locally installed Sitecore instance already has both SPE and SXA pre-installed and ready to use. This approach also allows installing any other modules as you may need them pre-installed.

Finally, would highly recommend watching a great video by Thomas Eldblom about using SIF configurations:

UPDATE: there is another way of doing this by new built-in SIF functionality, please read the blog post here.


Some useful batch and PowerShell snippents helping Sitecore automation

From time to time working with Sitecore I have to rely on automation (especially when working with CI / CD) so just decided to store some snippets for myself that use occasionally. This list will update with time.

  1. Run MsBuild from a console
  2. Config transform
  3. Test SQL connectivity from PowerShell
  4. Archive a folder and place it into a specific location using PowerShell only
  5. Unzip a folder from an archive using PowerShell only
  6. Install a NuGet package using CLI
  7. Run xUnit tests
  8. Push a NuGet package into a repository on example of Ocopus with API secret
  9. Upload a file to FTP using WebClient via PowerShell
  10. Transform of webconfig setting Sitecore 9 "role" and "localenv" variables
  11. Deserialize Unicorn from a PowerShell
  12. Create new IIS hostname winding for existing website

1. Run MsBuild from a console
Building solution outside of Visual Studio or alternative IDE requires a manual call of MsBuild. In the very simple call you need to pass just two parameters - a solution itself and target, that can be Clean, Build etc.:
"c:\Program Files (x86)\Microsoft Visual Studio\2017\Enterprise\MSBuild\15.0\Bin\MSBuild.exe" c:\Projects\Platform\Platform.sln  /t:Build

2. Config transform
Calling config transform described in more details by this link, so there is just a snippet below: 
"C:\Program Files (x86)\Microsoft Visual Studio\2017\Enterprise\MSBuild\15.0\Bin\amd64\MSBuild.exe" 
/nologo /maxcpucount 
/nodeReuse:False 
/property:Configuration=Debug 
/property:Platform="Any CPU" 
/property:WebConfigToTransform=C:\inetpub\wwwroot\Platform.dev.local\ 
/property:TransformFile=C:\Projects\Platform\src\Project\YourWebsite\code\web.config.xdt 
/property:FileToTransform=web.config 
/target:ApplyTransform 
/toolsversion:15.0 
/verbosity:minimal 
C:\Projects\Platform\scripts\applytransform.targets

3. Test SQL connectivity from PowerShell
The easiest way to test connectivity between a custom machine running PowerShell and the desired SQL Server instance:
Invoke-Sqlcmd -ServerInstance 'hostname-and-instance-and-optionally-port' `
                      -Username 'sa' `
                      -Password 'Pa55W0rd!' `
                      -Query 'SELECT GETDATE() AS TimeOfQuery'

4. Archive a folder a place it into a specific location using PowerShell only
When you need to archive a folder you need to rely on an external tool such as zip, which brings another dependency into your pipeline. But that is not a case anymore when using PowerShell as it has entire power of .NET and that in turn has zip support within the namespaceSystem.Net.Compression. So why not to rely on PowerShell and .NET to do the entire job?
IF EXIST output.zip DEL /F output.zip
powershell.exe -nologo -noprofile -command "& { Add-Type -A 'System.IO.Compression.FileSystem'; [IO.Compression.ZipFile]::CreateFromDirectory('c:\Projects\Platform\build\output\', 'output.zip'); }"

5. Unzip a folder from an archive using PowerShell only
The reverse procedure of unzipping an archive into a folder can also be performed with .NET and PowerShell in the same manner:
powershell.exe -nologo -noprofile -command "& { Add-Type -A 'System.IO.Compression.FileSystem'; [IO.Compression.ZipFile]::ExtractToDirectory('c:\Projects\SomeArchive.zip', 'c:\inetpub\wwwroot\TargetFolder'); }"

6. Install a NuGet package using CLI
When you need to use NuGet from a console, you will be likely using NuGet CL. An example below shows installing a NuGet package into a folder passed as a parameter. Please keep in mind that package repositories should be mentioned in the accompanying configuration for nuget.exe:
nuget install xunit.runner.console -OutputDirectory c:\Projects\!\NuGet\

7 Run xUnit tests
After installing xUnit running unit tests from a console, the rest is easy as than simply passing a library containing tests as a parameter:
c:\Projects\!\NuGet\xunit.runner.console.2.3.1\tools\net452\xunit.console.exe c:\Projects\Platform\src\Foundation\Dictionary\tests\bin\Debug\Sitecore.Foundation.Dictionary.Tests.dll

8. Push a NuGet package into a repository on an example of Octopus with API secret key
When you create a versioned package and may want to push that into NuGet repository, you will rely on nuget push command. A snippet shown below demonstrates that on the example of Octopus Deploy, passing it API key. A code below use to substitute current site context, pretty easy:
NuGet.exe push Platform.68.0.0.nupkg -ApiKey API-UZYKODSIIRJZQF25QP2T7WFWG -Source http://winbuildserver.local:8080/nuget/packages

9. Upload a file to FTP using WebClient via PowerShell
One more trick to avoid using system dependencies by calling .NET commands via PowerShell. This time it is for sending a file over FTP to the remote server. Quite a disadvantage is storing the details open-text, including a password. That should be parametrised, of course:
$File = "c:\Projects\archive.zip"
$ftp = "ftp://hostname-and-port\username:Pa55w0rd@domain/path/more-folder/archive.zip"

"ftp url: $ftp"

$webclient = New-Object System.Net.WebClient
#$uri = New-Object System.Uri($ftp)

$uri = [uri]::EscapeUriString($ftp)

"Uploading $File..."

$webclient.UploadFile($uri, $File)

10. Transform of web.config settings for "role" and "localenv" variables
In Sitecore 9, one can set up an instance into a specific role that also takes predefined configurations. Further ahead, you may keep your numerous custom configurations next to each other targeting different 'roles' - that avoids clumsy config pathing and keeps settings functionally together in order to simplify maintenance. There is also localenv setting that helps you to distinguish various groups of servers from the same role, but residing in the different environments. 
I have a separate blog post dedicated to this task.

11. Deserialize Unicorn from a PowerShell
If you are using Unicorn in a Continuous Delivery pipeline, you need to make unicorn deserialise (sync) items into Sitecore from a console. Luckily, Unicorn has support for doing that by calling sync.ps1 that uses MicroCHAP.dll and supporting script Unicorn.psm1, passing Unicorn URL and a secret key as a parameter. That secret key can be configured at Unicorn.SharedSecret.config. Make sure there is unrestricted execution policy. Usage is pretty easy: 
sync.ps1 -secret 749CABBC85EAD20CE55E2C6066F1BE375D2115696C8A8B24DB6ED1FD60613086 -url http://platform.dev.local/unicorn.aspx

12. Create new IIS hostname winding for existing website
When installing Sitecore with SIF, it makes sense also to add all your additional custom domain names bindings into IIS website, that has been just created by SIF, ideally should be done for both HTTP on port 80 and HTTPS on 443. The last one also requires creating a self-signed certificate for given hostname. So you may create a step having this command at the very end of installation PowerShell script:
	$Hostname = "YourSiteCustomHostname.dev.local" 
	$SiteNameHere = "$SolutionPrefix.$SitePostFix" # "Platform.dev.local"
	
        write-host "Adding IIS Hostname Binding for website (HTTP and HTTPS)"
        write-host "Site name: $SiteNameHere"
        write-host "Hostname: $Hostname"

	$cert=(Get-ChildItem cert:\LocalMachine\My | where-object { $_.Subject -match "CN=$Hostname" } | Select-Object -First 1) 
	if ($cert  -eq $null) { 
		$cert = New-SelfSignedCertificate -DnsName $Hostname -CertStoreLocation "Cert:\LocalMachine\My" 
	} 
	$binding = (Get-WebBinding -Name $SiteNameHere | where-object {$_.protocol -eq "https"})
	if($binding -ne $null) {
		try{
	     	Remove-WebBinding -Name $SiteNameHere -Port 80 -Protocol "http" -HostHeader $Hostname
	     	Remove-WebBinding -Name $SiteNameHere -Port 443 -Protocol "https" -HostHeader $Hostname
		}
		catch{
		     	write-host "$SiteNameHere yet does not have a binding for $Hostname"
		}
	} 
	
	New-WebBinding -Name $SiteNameHere -IPAddress "*" -Port 80 -HostHeader $Hostname
New-WebBinding -Name $SiteNameHere -Port 443 -Protocol https -HostHeader $Hostname (Get-WebBinding -Name $SiteNameHere -Port 443 -Protocol "https" -HostHeader $Hostname).AddSslCertificate($cert.Thumbprint, "my")

Configuring role and localenv variables in Sitecore 9 - PowerShell way

In Sitecore 9, one can set up an instance into a specific 'role' that also takes predefined configurations. Further ahead, you may keep your numerous custom configurations next to each other targeting different 'roles' - that avoids clumsy config pathing and keeps settings functionally together in order to simplify maintenance. There is also 'localenv' setting that helps you to distinguish various groups of servers from the same role, but residing in the different environments. Not a nice way of changing role and adding environment by simply replacing a string occurrence:
(Get-Content Web.config).replace('    <add key="role:define" value="Standalone" />', '<add key="role:define" value="ContentManagement" /><add key="localenv:define" value="UAT" />') | Set-Content Web.config

Just a string replacement? Errrghh.... Not a nice solution! Let's make it better, by relying on XML namespace (thanks, Neil):
#$webConfigPath = "С:\path\to\your\Web.config"
#$localEnvName = "UAT"

$RptKeyFound=0;
$xml = (get-content $webConfigPath) -as [Xml];              # Create the XML Object and open the web.config file 
$root = $xml.get_DocumentElement();                         # Get the root element of the file

foreach($item in $root.appSettings.add)                     # loop through the child items in appsettings 
{ 
  if($item.key -eq "localenv:define")                       # If the desired element already exists 
    { 
      $RptKeyFound=1;                                       # Set the found flag 
    } 
}

if($RptKeyFound -eq 0)                                      # If the desired element does not exist 
{ 
    $newEl=$xml.CreateElement("add");                       # Create a new Element 
    $nameAtt1=$xml.CreateAttribute("key");                  # Create a new attribute "key" 
    $nameAtt1.psbase.value="localenv:define";               # Set the value of "key" attribute 
    $newEl.SetAttributeNode($nameAtt1);                     # Attach the "key" attribute 
    $nameAtt2=$xml.CreateAttribute("value");                # Create "value" attribute  
    $nameAtt2.psbase.value="$localEnvName";                 # Set the value of "value" attribute 
    $newEl.SetAttributeNode($nameAtt2);                     # Attach the "value" attribute 
    $xml.configuration["appSettings"].AppendChild($newEl);  # Add the newly created element to the right position
}

$xml.Save($webConfigPath)                                   # Save the web.config file
This same approach can be taken for any other XML-based transforms and replacements.

Fixing: Sitecore 9 installer unable to connect to Solr server, while it is available

Recently tried to reinstall Sitecore 9.0 update 1 and got the following message:

"Request failed: Unable to connect to remote server" (and the URL which is default https://localhost:8389/solr)


Opening Solr in browser went well, and there were no existing cores that could prevent the installation. Weird...


After experiments, I found out that was an antivirus preventing such requests. Disabling it allowed cores to be installed well and thу rest of install script succeeded.