Sitecore XM Cloud supports multiple redirect strategies, from content-authored redirects via Sitecore items to headless app configuration and middleware logic.
In XM Cloud implementations, there are three typical patterns for performing redirects:
- they can be defined at the CMS as Redirect Items or Redirect Maps, or
- handled by Next.js middleware at runtime, or
- baked into the front-end hosting, for example, in
next.config.js or platform rules.
Each approach has tradeoffs in flexibility, performance, and author control. In addition, hosting platforms like Vercel, Netlify also allow static redirects via their config files or APIs, but that is outside of scope for XM Cloud, which already provides built-in mechanisms so marketers can manage redirects without code deployments
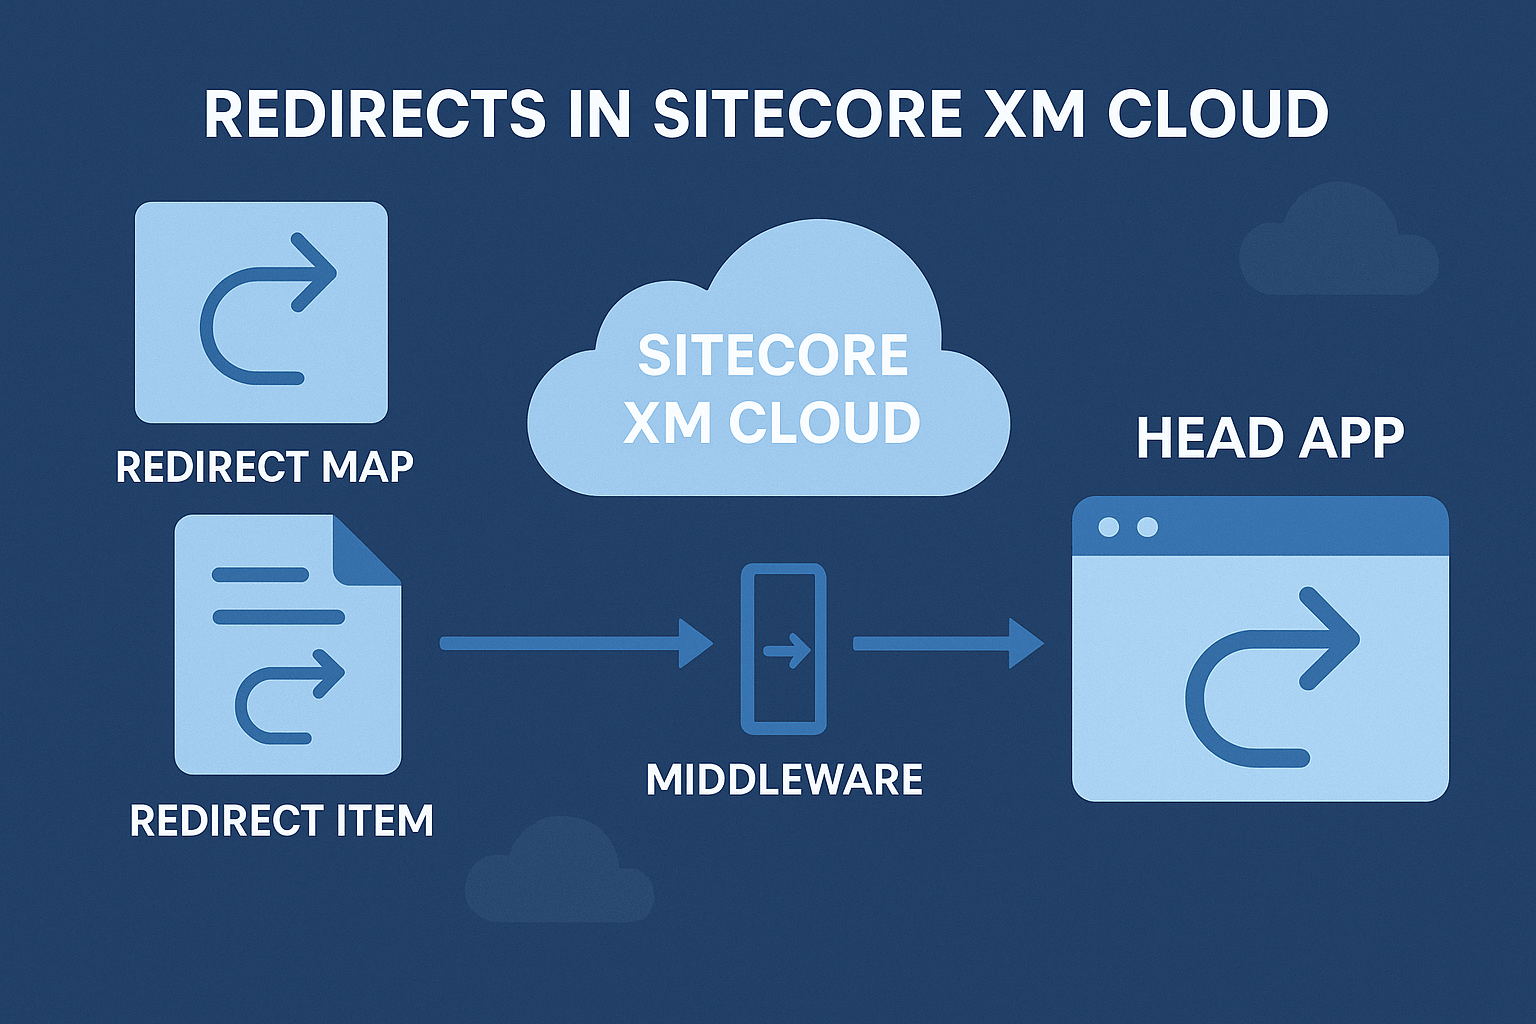
Content-Authored Redirects: Items vs. Maps
XM Cloud’s built-in Redirect Item and Redirect Map features let content authors define redirects in the Content Editor.
A Redirect Item is created under a page node (right-click, Insert → Redirect) and simply points to a target URL. When a request hits that item’s path, the configured redirect is issued.
Redirect Maps live in the site’s Redirects settings and can contain many rules; each map item can define multiple source-to-target path mappings, with support for 301/302 and even server transfer redirects. Maps allow regex patterns and grouping, so a handful of regex rules can replace dozens of single-item redirects. For example, a mapping rule like ^/products/(.*)/(.*)$ -> /groceries/$1/$2 applies to many URLs, whereas a Redirect Item only covers one exact path.
Redirect Items are simplest for one-off cases, but managing many items can be cumbersome. Redirect Maps centralize rules (groups/folders, regex) for better visibility and maintainability. In practice, use Redirect Items for a few simple vanity URLs or moved pages, and Redirect Maps when you have multiple or patterned redirects. Always plan the scope: XM Cloud documentation even recommends limiting a map to ~200 entries for performance and manageability.
In either case, after creating or changing redirects, you must publish the site item (root) to push the updates to Experience Edge. XM Cloud caches redirect data at the edge with a typical ~4-hour TTL, so republishing the site clears that cache and makes new rules active immediately.
Developer-Controlled Redirects (via Head App)
For larger redirect sets or developer-controlled routing, it’s common to handle redirects on the front-end app instead of via XM Cloud. Next.js lets you define static redirects in next.config.js, which Vercel and other hosts apply at build time. For example:
module.exports = {
  async redirects() {
    return [
      { source: '/old-page', destination: '/new-page', permanent: true },
      { source: '/old-blog/:slug*', destination: '/blog/:slug*', permanent: true },
      // ... up to 1024 entries
    ]
  }
};
This redirects() array can include regex and wildcard matching. Because these rules are generated at build time and handled on the CDN edge, they execute before any JS or middleware, which means faster, low-overhead redirects. In fact, Next.js processes next.config.js redirects at the edge like at. Vercel’s network, so users are redirected without even involving server-side code. The trade-off is that such redirects only update when you rebuild the site – they cannot be changed dynamically by content authors.
Most static hosting providers also offer redirect files. For example, Netlify will process a plain-text _redirects file in CSV or _redirects format, and Vercel imposes a 1024-entry limit on static redirects. The Sitecore Accelerate docs note that beyond ~1024 redirects you should migrate to an Edge Function or JSON-driven middleware approach. Indeed, if you hit the limit, one can place a JSON of rules (.sitecore/redirects.json) and a custom middleware plugin to read it, avoiding XM Cloud entirely.
Middleware-Based Redirects (Dynamic)
In a pure headless scenario, XM Cloud content-managed redirects are usually handled by Next.js middleware at runtime. The standard XM Cloud starter kit includes a Redirects middleware plugin: on each request, it queries Experience Edge for any matching Redirect Item or Map and issues a redirect if found. This means redirects are always up-to-date without rebuilding the site. However, it also means every request incurs a check and often a GraphQL call against Edge.
User Request → Next.js Middleware:
   - Load Redirects via GraphQL (from XM Cloud)
   - If a rule matches the path, return redirect response; otherwise continue
Because the middleware runs on every request unless specifically filtered outhaving many redirects can hurt performance. Sitecore’s docs warn that “the redirect middleware needs to process the list by hitting Experience Edge, which can cause performance issues” when redirects are numerous. The middleware can also be tuned: for instance, you can narrow its scope by adjusting the matcher so it only runs on certain paths, not on APIs, static assets, etc. If a site isn’t using content-managed redirects at all, you can disable or remove the redirect middleware plugin entirely.
In short, dynamic middleware redirects offer real-time flexibility where authors change in CMS and immediately get it effective after publishing, but at the cost of per-request overhead. In scenarios like user-specific or geolocation-based redirects, dynamic middleware is useful. If you anticipate a large number of static redirects with no runtime logic, it’s generally better to move them into a build-time config or use regex grouping to reduce count.
Hybrid Build-Time Redirects
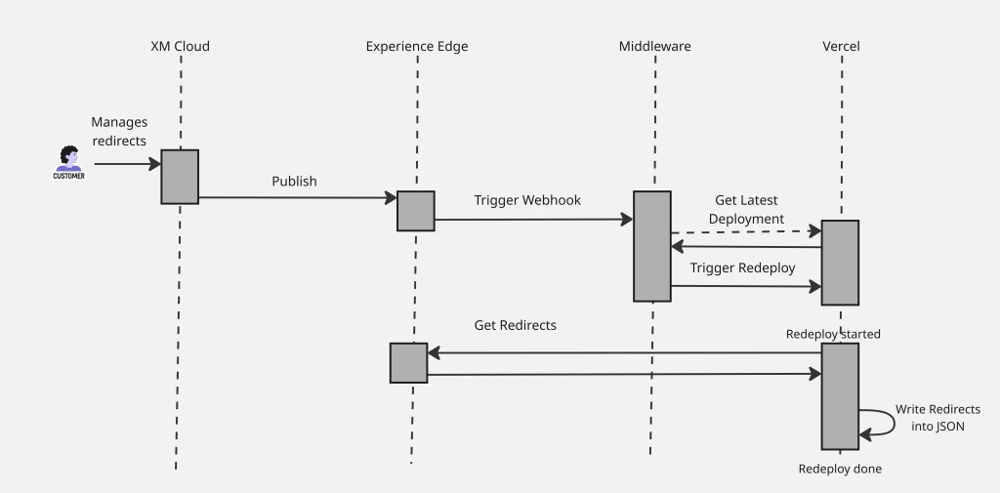
An emerging approach combines the strengths of both worlds: content-managed redirects in XM Cloud, but applied via a build/redeploy, so that no middleware query is needed at request time. In this hybrid strategy, editors still create Redirect Items/Maps in XM Cloud, but a hook triggers a site rebuild. For example, you can use an Experience Edge webhook on the site to notify a custom service when redirects change. The service or another automation tool listens for that update, then calls the Vercel REST API to redeploy the site.
During the build, a custom script runs. This script invokes the Edge GraphQL API to retrieve all Redirect Maps and Items, transforms them into Next.js redirect objects, and writes them into a JSON or directly into next.config.js format. The build output then includes a static list of redirects (for example, in .sitecore/redirects.json) that Next.js will apply at the CDN edge. As a result, end users see the updated redirects immediately after the deploy, and the runtime Next.js middleware is bypassed entirely, improving performance.
This hybrid pattern requires some initial setup, but it keeps redirect management user-friendly: editors still work in XM Cloud as usual, but developers configure the rebuild pipeline. Key steps include: configuring the Edge webhook via the XM Cloud Admin API, setting up a middleware or serverless listener to call the Vercel "Redeploy" endpoint, and adding a build-time function like generateRedirects or similar in the Next.js app that populates the redirect list. The result is a form of hybrid static redirects that are always in sync with the CMS without incurring request-time lookup costs
Performance Considerations & Best Practices
-
Publish the Site: Remember to publish the headless site item whenever redirect items or maps change. XM Cloud’s Edge caches redirect data (about 4 hours by default), so failing to republish can cause old redirect rules to linger. In practice, always include the site node in your publish steps after editing redirects.
-
Use Regex Judiciously: Redirect Maps support full regex, which is powerful but costly to evaluate. Prefer direct path matches when possible, and group common patterns into a single regex rule. This reduces the total count and keeps matching fast.
-
Limit Redirect Count: If you have hundreds of redirects, especially distinct ones, consider moving them out of the CMS and into the front-end config. Next.js has a 1024-entry limit on static redirects, and thousands of CMS-managed redirects can strain middleware performance. The accelerate docs even suggest: “if you have a large number of redirects, you need to use the hosting provider features”, for example, Next.js config or Edge Functions.
-
Optimize Middleware: If using middleware, narrow its scope. In Next.js 13+, use the matcher option in middleware.ts to skip API routes, static assets (/_next/), or health checks. Also, XM Cloud starter kits allow disabling the redirect plugin if not needed. Excessive link prefetching or personalization features can inadvertently invoke the middleware multiple times, so configure prefetch settings appropriately.
-
Head-App Redirects First: As a rule of thumb, use static head-app redirects whenever feasible. These execute at the CDN edge and avoid server work. Reserve middleware redirects for cases where you truly need runtime logic - either user-based or geo-based, or maybe A/B testing.
-
Test Redirect Order: In Next.js, the order of plugins or configuration can matter. If a redirect isn’t firing, check that the Redirects plugin/middleware has higher priority than others, for example, than any catch-all pages.
-
Environment Nuances: Be aware of hosting specifics. For example, Netlify automatically sorts query parameters, which can affect regex matches. And ensure your targetHostname setting in XM Cloud site definitions includes your domains, so redirects use the correct host.
By combining these techniques - CMS-managed maps for author edits, static redirects in the head app for scale, and judicious middleware use for dynamic cases -you can build a robust redirect strategy in XM Cloud. The key is to balance flexibility (author editing, regex) with performance (pre-calculated redirects, minimizing per-request work). With careful planning and the new hybrid approach, XM Cloud sites can seamlessly redirect users and preserve SEO even as content or site structure changes.
References: