Experience Sitecore ! | All posts tagged '82'

Experience Sitecore !

More than 200 articles about the best DXP by Martin Miles

Media Aliases in Sitecore 8.2 Update 1

With recent release of Sitecore 8.2 Update 1 we have got a really much fun on Azure and getting closer to PaaS. it was so much buzz about it at #Sitecore Twitter, so that another handy feature has been overlooked. I am now talking about Media Aliases in Sitecore. One would probably ask few questions about that;

- Haven't we had it previously in Sitecore, wasn't that doable in principle?
- It wasn't, at least not out of the box. Previously if you wanted to achieve that functionality you had to implement your own ItemResolver pipeline processor and combine that with MediaProvider so that the links to media items were generated using aliases. That required custom code being built and re-deployed, that was especially painful for solutions already live. Of course such an approach couldn't be called an easy way.

- But why at all do I need Media aliases?
- Good question. Why would you use normal aliases with Sitecore then? You may find yourself working with the platform for few years so far without even thinking about that functionality. However otherwise like me, you may have a SEO Maniac as your manager (in good sense of word "maniac", for sure) who constantly generates optimization tasks for you. In my case I also had a Marketing Department who wanted to have nice and simple URLs for certain features, so that they can easily tell that over the phone.

- Still didn't get that. Would it be better just to demonstrate an example of very obvious use case?
- Without any problems. For the sake of this experiment, I have installed clean vanilla Sitecore 8.2 update 1. With that instance, I want to host my professional CV and easily tell that URL to numerous employment agents so that they could get that URL straight away or even remember it. I also want to make it as simple and minimal as possible. So that people type an URL and immediately get the PDF document downloaded. And of course, I don't want to have any file extension in URL or anything that complicates.
That is an ideal scenario for implementing Media Alias. It is indeed very easy, below are few steps how to make it work:

  1. Navigate to /Sitecore/System/Aliases and create a new child item of type Alias. Give the item simplest name you can, but avoid that name matching any of existing pages, as in that case alias would take a priority and a page becomes unreachable.
  2. While editing alias item, click Insert media link in order to open Insert media link dialog box.
  3. Select (or upload if required) correspondent Media Item that will be processed.
  4. Hit Insert button. That's it - your new Media Alias is ready
  5. Do not forget to publish your alias (and media item) so that it becomes available from Content Delivery database(s).


As soon as I completed these 5 steps, I can now able to download my CV in one click with nice and clean URL: http://sandbox/cv Also, I want to warn that Media Aliases have the same limitations as the normal ones.


That's it - nice, clean and simple.
I hope Media Aliases will help you to deliver even more user-friendly solution!

Helix project, MVC routing and the form posting back to controller. Part 3 - Adding validation

In previous post we have created an MVC form, that submits to a feature controller and set up the routing to make it all work. In this part we'll add validation to that form. This part does not differ from traditional MVC approach, however let's make our form smooth and complete.

1. Add validation controls into a page for each of inputs:

@using (Html.BeginRouteForm(MvcSettings.SitecoreRouteName, FormMethod.Post))
{
    @Html.LabelFor(x => x.FirstName)
    @Html.TextBoxFor(x => x.FirstName)
    @Html.ValidationMessageFor(x => x.FirstName)

    @Html.LabelFor(x => x.LastName)
    @Html.TextBoxFor(x => x.LastName)
    @Html.ValidationMessageFor(x => x.LastName)

    @Html.LabelFor(x => x.Email)
    @Html.TextBoxFor(x => x.Email)
    @Html.ValidationMessageFor(x => x.Email)


}
2. Model needs to be updated with validation action filter attributes, provided by DataAnnotations:
using System.ComponentModel.DataAnnotations;

namespace YourSolution.Feature.Test.Models
{
    public class TestModel
    {
        [Display(Name = nameof(FirstNameLabel), ResourceType = typeof(TestModel))]
        [Required(ErrorMessageResourceName = nameof(Required), ErrorMessageResourceType = typeof(TestModel))]
        [MinLength(3, ErrorMessageResourceName = nameof(MinimumLength), ErrorMessageResourceType = typeof(TestModel))]
        public string FirstName { get; set; }

        [Display(Name = nameof(LastNameLabel), ResourceType = typeof(TestModel))]
        [Required(ErrorMessageResourceName = nameof(Required), ErrorMessageResourceType = typeof(TestModel))]
        [MinLength(3, ErrorMessageResourceName = nameof(MinimumLength), ErrorMessageResourceType = typeof(TestModel))]
        public string LastName { get; set; }

        [Display(Name = nameof(EmailLabel), ResourceType = typeof(TestModel))]
        [EmailAddress(ErrorMessageResourceName = nameof(InvalidEmailAddress), ErrorMessageResourceType = typeof(TestModel))]
        [Required(ErrorMessageResourceName = nameof(Required), ErrorMessageResourceType = typeof(TestModel))]
        public string Email { get; set; }

        // Labels and validation messages: instead of hardcoded you may take it from Dictionary
        public static string FirstNameLabel => "First name";
        public static string LastNameLabel => "Last name";
        public static string EmailLabel => "E-mail";
        public static string Required => "Please enter a value";
        public static string MinimumLength => "Should be at east 3 characters";
        public static string InvalidEmailAddress => "please enter valid email address";
    }
}
3. Last but not the least, need to decorate POST action with validation action filter attribute, that runs validation prior to executing controller and returns validated view model on failure or runs into controller action if there no errors. So, updated controller action:
        [HttpPost]
        [ValidateModel]
        public ActionResult Test(TestModel loginInfo)
        {
            // do something on successful form submission
            return new RedirectResult("/SuccessfulResultPage");
        }
4. And of course, the ValidateModelAttribute class itself:
using System.Web.Mvc;

namespace YourSolution.Feature.Test.Attributes
{
    public class ValidateModelAttribute : ActionFilterAttribute
    {
        public override void OnActionExecuting(ActionExecutingContext filterContext)
        {
            var viewData = filterContext.Controller.ViewData;

            if (!viewData.ModelState.IsValid)
            {
                filterContext.Result = new ViewResult
                {
                    ViewData = viewData,
                    TempData = filterContext.Controller.TempData
                };
            }
        }
    }
}

5. After running gulp commands for updating views and DLL libraries, an updated page would do validation similar to:


That's it! Finally, our feature project named Test would have the following structure in Solution Explorer:


Thanks for reading!

Helix project, MVC routing and the form posting back to controller. Part 2 - Creating a form

In previous part, we created a test feature, as a part of a Helix-based solution. We also created a page and rendering and wired it together. So, now it's time to create a form.

As a start, let's create a controller, as it is referenced from rendering definition item:

namespace YourSolution.Feature.Test.Controllers
{
    public class TestController : Controller
    {
        public ActionResult Test()
        {
            return View();
        }
    }
}

Then create corresponding Razor view..

@using Sitecore.Mvc.Configuration
@model YourSolution.Feature.Test.Models.TestModel

@using (Html.BeginRouteForm(MvcSettings.SitecoreRouteName, FormMethod.Post))
{
    @Html.LabelFor(x => x.FirstName)
    @Html.TextBoxFor(x => x.FirstName)
    
    @Html.LabelFor(x => x.LastName)
    @Html.TextBoxFor(x => x.LastName)

    @Html.LabelFor(x => x.Email)
    @Html.TextBoxFor(x => x.Email)
}


.. and model that represents our form, to be passed between controller and view:

namespace YourSolution.Feature.Test.Models
{
    public class TestModel
    {
        public string FirstName { get; set; }
        public string LastName { get; set; }
        public string Email { get; set; }
    }
}

As we are working with a project outside of webroot, we need to use gulp in order to copy this view into corresponding folder on the website (or you may copy that manually), same for the feature DLL.

After refreshing browser you will see the view. Obviously, when trying to hit "Submit" button - nothing happens as there's no POST controller action method. So let's add the one:

namespace YourSolution.Feature.Test.Controllers
{
    public class TestController : Controller
    {
        public ActionResult Test()
        {
            return View();
        }

        [HttpPost]
        public ActionResult Test(TestModel loginInfo)
        {
            // do something
        }
    }
}

Still not there... why? Let's troubleshoot that. First thing to do is to find out where form does POST to. In webinspector, it shows:

  <form action="/test" method="post"> ... </form>

So far so good - that looks correct (form POSTs to itself). But how /test URL corresponds to YourSolution.Feature.Test.Controllers.Test() method of YourSolution.Feature.Test feature project?

That's where routing comes into a play. As you know, feature is just a single project that is built into individual DLL and is deployed into /bin folder of project webroot along with other libraries. So how do we wire up /test with that particular method?

We apply config patch Feature.Test.config in order to add a pipeline processor right before the one that initializes MVC routes.


After running gulp configuration task this patch will be put into YourSolution/Website/App_Config/Include/Features folder along with custom configuration include file patches for other feature modules. Corresponding processor will be the following:

using System.Web.Mvc;
using System.Web.Routing;
using Sitecore.Pipelines;

namespace YourSolution.Feature.Test.Pipelines
{
    public class RegisterWebApiRoutes
    {
        public void Process(PipelineArgs args)
        {
            RouteTable.Routes.MapRoute("Feature.Test.Api", "api/test/{action}", new { controller = "Test" });
        }
    }
}

Finally the last bit to make routing work - modify _ViewStart.schtml view file on the project level. Here is it:

@{
    Layout = (this.ViewContext.IsChildAction) || (this.ViewContext.RouteData.Values.ContainsKey("scIsFallThrough") && 
        Convert.ToBoolean(this.ViewContext.RouteData.Values["scIsFallThrough"])) ? null : "~/Views/Shared/_Layout.cshtml";
}

If you have done everything correctly, after gulp'ing your assets into web folder and refreshing the page in browser, you'll see a form similar to the one below:
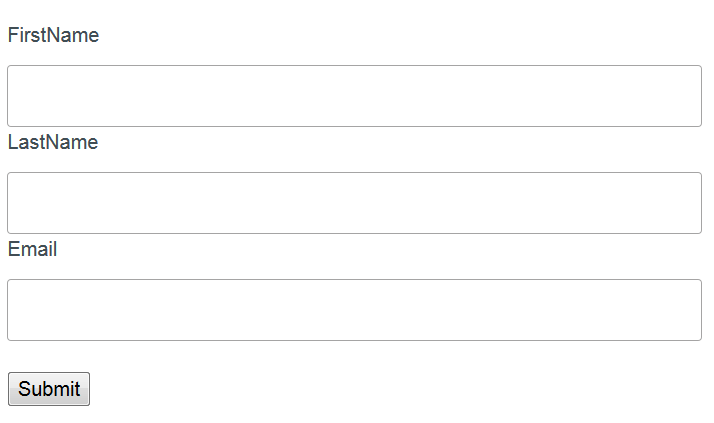

That's it! Now the form is fully functional and POSTs to a controller, however in order to make things even better - let's apply form validation.

References:

Sitecore Helix Documentation


Helix project, MVC routing and the form posting back to controller. Part 1 - Prerequisites

At the moment I am working on challenging project that is powered by Sitecore 8.2and follows Helix principles.

Last week I implemented a Feature, that has an MVC form posting back to its controller (here I mean native MVC, not Web Forms for Marketers) module. "Not a big deal" - I thought initially... and spent more time that positively expected until finally got it implemented.

The difference between Helix project and more traditional Sitecore MVC application is that in Helix your assets - controllers, views, statics etc. are kept within an individual project for a particular Feature (or Foundation, or Project - depending on what functionality you're implementing).

Prerequisites.

I assume you already have your Helix solution ready (you may use Habitat, as an "instance" of Helix). So let's start with Sitecore.

I create a page called Test under website root using one of page templates. Next, a rendering is required to be assigned into a placeholder on a page. I create a controller rendering named Test and put it under this feature folder (also called Test). Please notice, that I have to specify controller with fully qualified name with a name of assembly where this controller resides.


Tip: do not forget to publish your items, unless you're working in a live mode from Master DB directly.


Next, let's create a project structure in Solution Explorer. As we're building a Feature, create a solution folder under Feature folder in Visual Studio and name it Test (as a feature name). Create a class library project within that folder following Helix naming conventions YourSolution.Feature.Test with the same namespace and assembly name. The easiest probably would be simply to copy project folder from an existing feature and change namespace / types there.


You need to have Web config to the project root. Please ensure you are referencing the same .NET version as set in Target Framework of the project, in my example it is 4.5.2:


Also you need to have web.config within the /Views folder to make IntelliSense work properly


Below is the minimum references you'll need to have. DataAnnotations library is not essential, for sure, but is included because it'll be needed at step 3):


At this stage we're set. Let's mote to the next step - creating and wiring up a MVC form on a rendering.

References:

Sitecore Helix Documentation