Experience Sitecore ! | All posts tagged 'URL-Rewrite'

Experience Sitecore !

More than 200 articles about the best DXP by Martin Miles

Troubleshooting Sitecore Commerce 9 installation

While installing Sitecore Commerce I came across several blockers I had to sort out in:

  1. SIF
  2. Business Tools
  3. Storefront

1. You are getting 500.19 error during SIF. Other people who came across advice that you are to install ASP.NET Core 2. That's correct, as Commerce micro-services utilize .NET core, but not everything. There was a strong assumption of something missing from IIS or being mis-configured, so in my case it was this component unchecked:


Also, keep in mind you must have URL-Rewrite module installed (the easiest way is: choco install urlrewrite).

Another non-critical error I am getting from time to time is "The service cannot accept control messages at this time". IIS does respond at the moment - you may run iisreset and try warm it up by hitting URL manually in browser. Then repeat SIF deploy.

If SIF is complaining about duplicate certificates, you may need to delete those from Microsoft Management Console (MMC). In order to do that, click Start button, then type in mmc and hit enter. Once there, File - Add/Remove Snap-ins and select Certificates, as on screenshot below:


One more error from SIF: "Error: Unable to add user SITECOREDEV\WindowsUserName. Details: Database 'sc902com_Core' does not exist. Make sure that the name is entered correctly." In that case, ensure you're referencing correct database name for SitecoreCoreDbName variable (line 29 of default deploy script)


2. Running Business Tools may bring an error. In some previous versions Business Tools desktop icon was referencing invalid port, so make sure it is 4200 (by default). You can do that by changing Link field for Business Tools launchpad icon, as you usually do in corŅƒ database (item path: /sitecore/client/Applications/Launchpad/PageSettings/Buttons/Commerce/BusinessTools)

While running Business Tools, if you may see to following error:


The error means your browser needs a security exception for self-signed certificate, no worries - that's only for localhost and needs to be done once. Just open a new browser tab and follow to localhost:5000, confirming security exception, as prompted.

3. Once you have successfully installed Sitecore Commerce, you try to access storefront. So you hit URL in browser (sxa.storefront.com) and ... see default Sitecore home page. Why?

The first assumption coming into one's mind is that since storefront is running on top of SXA - you should configure the hostname at HostName field of /sitecore/content/Sitecore/Storefront/Settings/Site Grouping/Storefront item. But wait! sxa.storefront.com is the default value and already presents there. Does it work now? Nope ...

Firstly, try open storefront in Experience Editor (from master database). If you see the right storefront - just re-publish site, and update indexes - it will work from web database then. But if not - the answer is different: it appeared that my current partner's license does not include SXA. Not obvious, but when you're out of license - storefront default to Home page rather than notify you re. that error.

Remember, that you may apply for a developer trial license valid for two month that will include all the features of Sitecore, including SXA and JSS.

Sitecore Personalization based on URL query string parameters

Once I was asked to personalize Sitecore component depending on custom URL query string parameter, to identify users coming by a promo campaign in order to display them slightly modified component reflecting campaign presentation. Easy, I thought, but in next couple minutes struggled to find that condition in Rules Engine. It is not in Sitecore, what a surprise!..

So, let's go through and see what conditions are in Sitecore and how you can create any custom condition you would ever imagine.


First of all, all stuff for Rules Engine is specified as Sitecore items underneath /sitecore/system/Settings/Rules folder. So let's create an item named Query String Value Presents of /sitecore/templates/System/Rules/Condition template within /sitecore/system/Settings/Rules/Conditional Renderings/Conditions/URL Query String Conditions folder. There are just two important fields we are going to set. Type field, as it is very common to Sitecore, specifies fully qualified class and assembly names, where business logic is implemented. Another, Text field, is more interesting on that stage - it shows wordings that would be presented to user when using his condition with Rules Engine. Here is what we set there:

Where the User [QueryStringName,,,QueryString Name] has a value that [operatorid,StringOperator,,compares to] [QueryStringValue,,,QueryString Value].

Pay attention to parameters in square brackets - they would be replaced by Rules Enging to selectors.

Now let's look at the code. Fom the item we ahave referenced the class.

public class QueryStringCondition<T> : StringOperatorCondition<T> where T : RuleContext

All derived condition classes should have same definition and derive from base StringOperatorCondition class. As the absolute minimal, we are to override just one Execute(T ruleContext) method. Additionally we must create public string properties named exactly the same as in parameters above from Text field from condition definition item in Sitecore.

public string QueryStringName { get; set; }
public string QueryStringValue { get; set; }
protected override bool Execute(T ruleContext)
{
    // process QueryStringName and QueryStringValue properties here
    // return true if personlization parameters falls within the condition 
}

QueryStringName and QueryStringValue would be auto-populated by Rules Engine.

With our next example we are trying to display an additional promo component when user access our website by URL with sourceId=campaign as parameters.


Full implementation of QueryStringCondition<T> class can be found on GitHub by this link.

Hope you find this helpful!

Sitecore with SEO: overview and compare ways for managing duplicate content

In this blog post I decided to cover all ways of managing duplicate content in Sitecore and overview possible ways of dealing with that with emphasis on SEO. So, we have the following options to consider:

  1. Duplicates
  2. Clones
  3. Proxies
  4. Aliases
  5. IIS URL Rewrite module
  6. Sitecore Redirect Module
  7. External Reverse Proxy

1. Duplicates are commonly known and most straightforward way of creating duplicates (clones) of the items. The easiest way to perform that operation is to right click the item you'd want to copy, select Duplicate from context menu and specify new item's name.
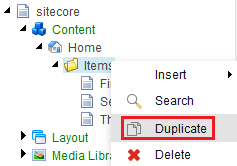

This ends up with an entirely independent new item (and all its ancestors) located at the same level, including all field values, presentation details, permissions etc. Beware the locks and workflows - those also would be exact match of those original items have. After that, new item lives it own life and is no way synchronized to its original prototype (except Standard Values, for sure, as both new and duplicate items share the same template).

Also it's worth of mentioning Copy To - this brings similar behavior, but allows to create duplicates keeping same name but at other paths rather than original item. Copy To is available from the same context menu.


2. Clones are sort of similar to duplicates with the difference that no new item is created when using clones. To create a clone for a highlighted item from a Sitecore tree, select Configure tab, hit Clone and specify where you'd want to locate your clone.
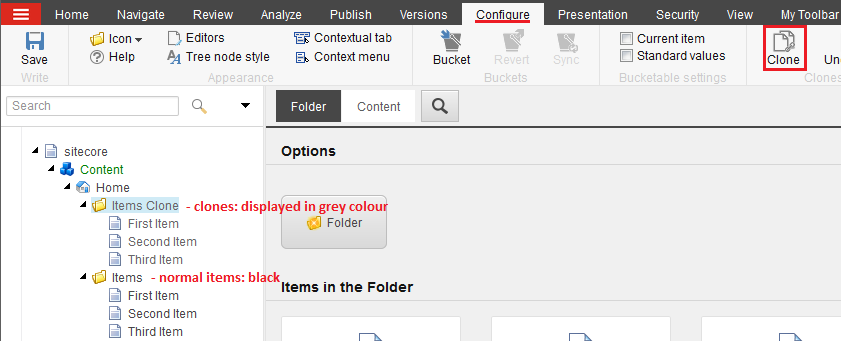

Notice, that clones are displayed in content tree in a slightly light font color, I personally think that may create some future issues when business users may perform some actions on item without realizing that item is a clone. Why is that important to know? Let's view the way clones function on a lower level.

When you create a clone the item and the values are not physically copied. Instead, the inheritance similar to the one between Standard Values (that is sort of prototype item for a template) and real template item, is created (clone inherits not from s.v. but from original item). When you modify a filed value of original item, that would affect same field of cloned item. However the reverse process, when you modify a field value on cloned item, overrides that individual field value and it is no more tied to original item's field. Other fields of the same item will still keep the reference to their originals. Clones use the __Source field of the Advanced section from standard template to specify the cloned item:


Unlike duplicates, clones do not clone most of standard fields (those coming from standard template) like locks / workflows and statistics (created, updated, revision). But they do clone security settings, which, again, can be overridden for a clone item.

If you want to get rid of clone item - there are 2 ways to do that: just delete the clone (obvious) and unclone it. Uncloning turns cloned item into a normal item and copies field values from originals. Clones exist only in master database, when you perform publishing to CD servers - uncloning takes place there.

You also can do some crazy things like creating clones of clones - inheritances chain take place in this case; each field at each level can be overridden, for sure.

To get even more understanding on how clones work in Sitecore I recommend reading Cloning What Ifs article.


3. Proxies is another mechanism of creating and managing duplicate content in Sitecore. The are frequently used in cases similar when you have an item that you may want to be a child of multiple parent items. In order to use them you must ensure a config file setting called proxiesEnabled is true; then you create proxy items at /Sitecore/System/Proxies based on /System/Proxy template. However, proxies considered to be outdated in favor of Clones. Please do not use Proxies!


4. Aliases are the different beast. They are perfectly good for promos and campaigns as the normally specify a quick URL for campaign landing page. Aliases have out-of-box limitation that they are set only per root level and not multisite-friendly (however there is a link that explains how to implement that feature on your own).

Aliases are defined under /sitecore/system/Aliases based on the System/Alias template.

There is just one field in alias template that allows to select target item.

There are two more overheads when working with aliases - sometimes you may need to identify if an item is alias:

bool isAlias = Context.Database.Aliases.Exists(path);

Also you may need to set canonical URLs on them to improve SEO. Good way of doing that is:

public class AliasResolver : Sitecore.Pipelines.HttpRequest.AliasResolver
{
    public override void Process(HttpRequestArgs args)
    {
        base.Process(args);

        if (Context.Item != null)
        {
            args.Context.Items["CanonicalUrl"] = Context.Item.GetFullUrl(args.Context.Request.Url);
        }
    }
}

Also, do not forget to publish your aliases to content delivery databases, as they won't work until published.


5. IIS URL Rewrite module is probably most functional option, it is external to Sitecore, that means it happens before routing and before pipelines.

For the drawbacks of using IIS URL Rewrite I would mention that you'd need to have access to IIS Manager or web.config write permission on each of content delivery servers. I previously wrote a blog post IIS URL Rewrite module - few SEO tricks that can demonstrate how powerful it is.

Also I would beware you of some specific Sitecore URLs and create appropriate extensions (ex. for WebResource.axd - take from real code).


6. Sitecore Redirect Module is another good choice as it does perfect server side 301 redirect for both URLs and items. It is almost as powerful as IIS URL Rewrite, but because it is configured in Sitecore - you do not need to have CD environments access at all - just create and publish redirect rules (as you normally do with generic content) - they will take effect immediately! Module is transparent to multi-site configuration, it can do redirects from one site's URL or item to another.

One more advantage of the module - availability of source code, so functionality can be extended to any bespoke requirement, also it becomes compatible with new Sitecore versions by just rebuilding it with appropriate Sitecore.Kernel.dll and replacing updated module DLL in webroot bin folder.

The only drawback, probably, is that in default state it performs only 301 redirects (however you may implement whatever you require). Please remember, that 301 requests are cached by browser -so you you are testing it intensively - you may need to purge browser cache from time to time.


7. External Reverse Proxy can be another option. It can do not only rewrites to external websites, but also rewrite some requests to alternative internal URL and pass that to IIS as "given" and further down to Sitecore. I met such scenarios several times on projects I took part. By the way, did you know that IIS can also serve as reverse proxy?

Performing rewrites and URL resolving logic outside of Sitecore can be both advantageous and disadvantageous. What traps does it bring?

Well, imagine you are new developer who start working on a new working copy of source code. When you run locally you may have different URL patterns compared to those on production environment. Business users usually deal with external production URLs and do not know internal structure, so that is how they form tasks and change requests. If you are not enough lucky to have comprehensive documentation or senior colleagues who can explain how is that configured - you may end up in multiple puzzling hours of attempting to find and match URLs from different environments.

Also, SEO much relies on sitemaps, so if you are using dynamic sitemaps - you need to implement that custom URL resolving logic that you have on reverse proxy. Also Sitemap Module from the Market would not work for you in that case.


I hope this article helped you to understand you options are with their pros and cons and to pick up a proper implementation depending on exact scenario.

IIS URL Rewrite module - as reverse proxy with links rewrite

Not many people know that IIS itself can serve as Reverse Proxy, with rewriting URLs on-the-fly. We are going to take a look on how to configure that feature. Let's assume we have 2 websites - primary website that has URL http://test2/ and is a hosted by IIS, moreover there is an instance of Sitecore installed; and another external static website that has URL http://external/ and it has few static pages and resources. For this experiment I got external website hosted at the same IIS instance, while in reality it can be literary anything and anywhere.


Apart from having IIS, you will need the following prerequisite:

- URL Rewrite Module installed, version 2.0

- Application Request Routing version 2.0


The easiest way to get all the prerequisites is to install them through Web Platform Installer. It will install all of them so you'll just need to have IIS refreshed and get ready to start.


External website contains static.html file with the following code

<div>
    img/sitecore.png<br>
    <img src="img/sitecore.png" alt="sitecore" width="230" height="106">
</div>
<div>
    /img/sitecore.png<br>
    <img src="/img/sitecore.png" alt="sitecore" width="230" height="106">
</div>
<div>
    http://external/img/sitecore.png<br>
    <img src="http://external/img/sitecore.png" alt="sitecore" width="230" height="106">
</div>
<p>
    <a href="sitecore.zip">sitecore.zip</a><br>
    <a href="/sitecore.zip">/sitecore.zip</a><br>
    <a href="http://external/sitecore.zip">http://external/sitecore.zip</a><br>
</p>

This code has 3 images and 3 links to an archive file, each of them is either relative link (from the doc level, for sure) or absolute link (from web root) or fully qualified link including domain name and protocol. This HTML renders renders into the following screenshot:


Our objective is to have a "virtual" "folder" called ext on the test2 website so that it "mapped" to external website and also correctly "maps" and rewrites all the resources of external website on resulting page.

Example:

When we hit http://test2/ in browser - we get default Sitecore page as it is provided by Test2 website, as normally.

When we hit http://test/ext/static.html - we get the page at that URL but with the content of external/static.html page with all links and references rewritten to be test2/ext/*.* instead of external/*.*

So, to make IIS Rewrite work as reverse Proxy, let's do the following steps:


Make sure "Enable proxy"is checked, otherwise nothing will work.


In URL Rewrite section, click "Add Rule(s)" link, then from popup screen select "Reverse Proxy" and specify the rule. Also check outbound rules as the are rules that factually rewrite internal links. Please note that this function may add some overhead to your website performance.


After you specify the rules - one inbound and 2 outbound (they are shown below) - reverse proxy now functions and you may verify that by requesting the following ULR (as on the screenshot below):


Notice, that all links and images look correct, as the were before. To ensure they were rewritten correctly, let's view the source file of resulting page. Here is it:

<div>
    img/sitecore.png<br>
    <img src="img/sitecore.png" alt="sitecore" width="230" height="106">
</div>
<div>
    /img/sitecore.png<br>
    <img src="http://test2/ext/img/sitecore.png" alt="sitecore" width="230" height="106">
</div>
<div>
    http://external/img/sitecore.png<br>
    <img src="http://test2/ext/img/sitecore.png" alt="sitecore" width="230" height="106">
</div>
<p>
    <a href="sitecore.zip">sitecore.zip</a><br>
    <a href="http://test2/ext/sitecore.zip">/sitecore.zip</a><br>
    <a href="http://test2/ext/sitecore.zip">http://external/sitecore.zip</a><br>
</p>

As there were no need to rewrite relative URLs - they remain untouched. However root-folder URL and full URL were rewritten to satisfy new domain name and desired folder-path.

And finally, here is resulting configuration that makes it all work. Whatever we have previously configured is stored in the configuration file within system.webserver node in rewrite section:

<rewrite>
      <rules>
        <clear></clear>
          <rule name="ReverseProxyInboundRule2" stopprocessing="true">
            <match url="(ext)/(.*)?"></match>  
              <conditions>
                  <add input="{CACHE_URL}" pattern="^(https?)://"></add>
              </conditions>
              <action type="Rewrite" url="{C:1}://external/{R:2}"></action>
          </rule>
      </rules>
      <outboundrules>
        <rule name="ReverseProxyOutboundRule2" precondition="ResponseIsHtml1">
          <match filterbytags="A, Form, Img" pattern="^/(.*)" negate="false"></match>
          <action type="Rewrite" value="http://test2/ext/{R:1}"></action>
        </rule>
        <rule name="ReverseProxyOutboundRule1" precondition="ResponseIsHtml1">
          <match filterbytags="A, Form, Img" pattern="^http://external/(.*)?" negate="false"></match>
          <action type="Rewrite" value="http://test2/ext/{R:1}"></action>
        </rule>
        <preconditions>
              <precondition name="ResponseIsHtml1">
                  <add input="{RESPONSE_CONTENT_TYPE}" pattern="^text/html"></add>
              </precondition>
          </preconditions>
      </outboundrules>
    </rewrite>

There is no need to use visual configurer at all, you may just drop this snippet on web.config into appropriate section and it will start working straight away!


IIS URL Rewrite module - few SEO tricks


1. Canonicals - do 301 permanent redirect (this also works with HTTPS).


2. Rewrite URL lowercase - one more rewrite rule aiming SEO improvement.


3. Append trailing slash - this is another SEO (sometimes arguable) improvement. It is believed that having trailing slash on your URLs (except when it deals with file names for sure) will improve search engines ranking.


4. Query string rewrite - the example of extracting query string parameters and rewriting it in your own manner


5. Redirect to HTTPS - forcely redirect all non-secure request to HTTPS


6. Prevent image hot-linking - disallow strangers of reusing images hosted on your website in order to protect them and traffic.