Experience Sitecore ! | All posts by martin

Experience Sitecore !

More than 200 articles about the best DXP by Martin Miles

Know your tools: The easiest way to install Habitat - Habitat Solution Installer

Working with Helix often encourages you to perform quick look-ups into the live-standard-implementation - Habitat project. That's why you have to have it installed. I remember the first time I installed Sitecore Habitat in October 2015 and how complicated that seemed at glance.

Luckily we now got a nice tool, that does exactly what it is named for - Habitat Solution Installer written by Neil Shack. So, let's go ahead and install Habitat into a new non-traditional destination using that tool.

Firs of all, let's grab Habitat Solution Installer itself from Sitecore Marketplace. Once downloaded, run HabitatInstaller.exe.


First screen takes three most important Habitat setting that we usually need to change as well as asks for the solution root folder where it will install the code. Once Install is clicked - it will download an archive of master branch from Habitat GitHub repository.


Then it will extract downloaded archive into temporal folder. By the way, you may alternate both path to master archive and your temporal files folder by clicking Settings button on the first (main) screen.


After extracting files, it will run npm install so you need to have node installed as a prerequisite.


Once finished, Habitat Solution Installer will display confirmation box.


So, what it has done - it installed and configured project code folder. But what hasn't it done?

1. It does not install Sitecore. You need to have it installed as another prerequisite, so that you provide Sitecore web folder and hostname to installer as shown on first screenshot. The best way would be to install using SIM (marketplace link). While installing Sitecore, make sure you're installing the right version corresponding to to codebase at Habitat master branch, you may look it up at Habitat Wiki page.

2. Not just to say you need to install Sitecore itself, you also need to install Web Forms for Marketers of the version corresponding to you Sitecore instance. And to ensure WFFM installation not failing, you need to install MongoDB prior to. Luckily that can be done in one click using SIM:


Finally, when all above is done, you may run gulp tasks from Task (View => Other Windows => Task Runner Explorer in Visual Studio 2015). Since npm install was already done for you - tasks are loaded as normal:


That's it! After Sitecore items are deserialised into your Sitecore instance, you'll be able to run Habitat website (however do not forget to publish from master to web unless you run it in live mode). The final result comes in you browser:


Know your tools: The easiest way to add a new project into your Helix solution

UPDATE: just came across a better solution from kamsar, that generates code, serialization and tests for the module. Please use that one instead of described below, however, the principle described below is exactly the same so you may refer for the sake of understanding.

---------------------------- original text below ----------------------------

I have found a great solution that makes adding a new project into existing Helix / Habitat solution so transparent and painless - Prodigious Helix Generator.

The guidance is well done and describes all thee steps. Is is soooo easy, and removes pain of fixing some forgotten references / namespaces / etc after you accidentally found out. It also optionally creates TDS project skeleton for your module, once you need to serialise items (why not to add Unicorn in addition to?).

So, to make it work you need to install yeoman first and afterwards the generator tool itself:

npm install -g yo
npm install -g generator-prodigious-helix

One important thing to mention is that not to mess with the paths and to get new module generated under the right path - run it at the root of your solution / repo.

You are at a choice of 3 options. In order to add a foundation, type in:

yo prodigious-helix:foundation

to make a feature:

yo prodigious-helix:feature

and for project even simpler:

yo prodigious-helix

As for example, below I am creating a new foundation module called AdminTools for the solution named HelixSolution. That will result in creating me a project called HelixSolution.Foundation.AdminTools within a same name folder (created) at the right path under Foundation folder. All the namespaces, references, settings and naming conventions would be auto-generated and correct!


After answering those 3 questions, you'll get your stuff generated:


That's it!

The only thing I noticed it that it appends solution name under App_config folder: App_Config\Include\HelixSolution\Feature\Feature.AdminTools.config so depending on your setup you may need to move Feature\Feature.AdminTools.config one level up into Include folder.

Hope it will start saving your time as much as it saves mine.

Migrating existing code to Helix. Fixing invalid dynamic placeholders

Recently I have inherited a project that utilised dynamic placeholder in a weird way:

public static HtmlString DynamicPlaceholder(this SitecoreHelper helper, string placeholderKey)
{
    if (string.IsNullOrEmpty(RenderingContext.Current.Rendering?.DataSource))
        return helper.Placeholder(placeholderKey);

    var currentRenderingId = Guid.Parse(RenderingContext.Current.Rendering.DataSource);
    return helper.Placeholder($"{placeholderKey}_{currentRenderingId}");
}

instead of more commonly used way suggested by Jason Bert:

namespace DynamicPlaceholders.Mvc.Extensions
{
	public static class SitecoreHelperExtensions
	{
		public static HtmlString DynamicPlaceholder(this SitecoreHelper helper, string placeholderName)
		{
			string text = PlaceholdersContext.Add(placeholderName, RenderingContext.Current.Rendering.UniqueId);
			return helper.Placeholder(text);
		}
	}
}

In two words, the first approach generates placeholder name using an ID of datasource item. The second approach is more traditional and is default for Helix. It was suggested by Jason Bert and also utilised by sitecore - that relies on rendering's UniqueID. In both cases, dynamic placeholders look like: /content/name-of-placeholder_017c3643-0fef-475c-95d2-bb1107beb664.

So I need to update it across entire solution. Let's iterate our items.

First of all, I do not need to go through all of item, but only those that are pages and have presentation configured, as I am going to adjust it. Secondly, those items are located under /sitecore/content folder. As many of you should know, presentation details (or deltas) for a page are kept within two fields of Standard Template - Renderings and Final Renderings that correspond to configuration you see at Shared Layout and Final Layout tabs. These thoughts resulted in using following Sitecore query to identify those items:

/sitecore/content//*[@__Renderings != '' or @__Final Renderings != '']

So far, so good. Also need to mention that I will perform the operation for master database only and for Default device:

private const string DatabaseName = "master";
private const string DefaultDeviceId = "{FE5D7FDF-89C0-4D99-9AA3-B5FBD009C9F3}";

I am using Sitecore presentation API in order to achieve my goal. Below is my Iterate() method:

public Dictionary<Item, List<KeyValuePair<string, string>>> Iterate()
{
    var result = new Dictionary<Item, List<KeyValuePair<string, string>>>();

    var master = Factory.GetDatabase(DatabaseName);
    var items = master.SelectItems(ItemsWithPresentationDetailsQuery);

    var layoutFields = new[] {FieldIDs.LayoutField, FieldIDs.FinalLayoutField};

    foreach (var item in items)
    {
        foreach (var layoutField in layoutFields)
        {
            var changeResult = ChangeLayoutFieldForItem(item, item.Fields[layoutField]);

            if (changeResult.Any())
            {
                if (!result.ContainsKey(item))
                {
                    result.Add(item, changeResult);
                }
                else
                {
                    result[item].AddRange(changeResult);
                }
            }
        }
    }

    return result;
}

That method iterates through each item from returned from the query and calls ChangeLayoutFieldForItem for that item twice - for both presentation fields Renderings and Final Renderings.

private List<KeyValuePair<string, string>> ChangeLayoutFieldForItem(Item currentItem, Field field)
{
    var result = new List<KeyValuePair<string, string>>();

    string xml = LayoutField.GetFieldValue(field);

    if (!string.IsNullOrWhiteSpace(xml))
    {
        LayoutDefinition details = LayoutDefinition.Parse(xml);

        var device = details.GetDevice(DefaultDeviceId);
        DeviceItem deviceItem = currentItem.Database.Resources.Devices["Default"];

        RenderingReference[] renderings = currentItem.Visualization.GetRenderings(deviceItem, false);

        var datasourceGuidsToRenderingUniqueIdMap = renderings
            .Where(r => !string.IsNullOrWhiteSpace(r.Settings.DataSource))
            .Select(r => new KeyValuePair<string, string>(Guid.Parse(r.Settings.DataSource).ToString(), r.UniqueId));

        if (device?.Renderings != null)
        {
            foreach (RenderingDefinition rendering in device.Renderings)
            {
                if (!string.IsNullOrWhiteSpace(rendering.Placeholder))
                {
                    var verifiedPlaceholderKey = FixPlaceholderKey(rendering.Placeholder, datasourceGuidsToRenderingUniqueIdMap);
                    result.Add(new KeyValuePair<string, string>(rendering.Placeholder, verifiedPlaceholderKey));
                    rendering.Placeholder = verifiedPlaceholderKey;
                }
            }

            string newXml = details.ToXml();

            using (new EditContext(currentItem))
            {
                LayoutField.SetFieldValue(field, newXml);
            }
        }
    }

    return result;
}

Further down it creates a list of matches for all the renderings within current presentation field of that particular item - datasource GUIDs matching to unique rendering IDs to go through it and do a replacement - that is done in FixPlaceholderKey method. Once everything is replaced, save the field by calling LayoutField.SetFieldValue() of course wrapping that call with EditContext as we are modifying item's field value.

FixPlaceholderKey is a simple method that just does case insensitive replacement by using Regex:

private string FixPlaceholderKey(string renderingInstancePlaceholder, IEnumerable<KeyValuePair<string, string>> map)
{
    var value = renderingInstancePlaceholder;

    foreach (var oldValue in map)
    {
        value = Regex.Replace(value, oldValue.Key, Guid.Parse(oldValue.Value).ToString(), RegexOptions.IgnoreCase);
    }

    return value;
}

That is pretty everything about the dynamic placeholder fixing logic.

But as for my case - I was aware that I'll need to run this dynamic placeholder replacements few more times in future and will likely need to implement some other similar small tools. So I decided that it would be great to place it under /sitecore/admin folder along with other admin tools - exact location by purpose! And since we're now going Helix, I decided to follow good principles and created a foundation module called AdminTools, where I will be adding similar admin folder tools. So here's how it looks for me in the Solution Explorer:
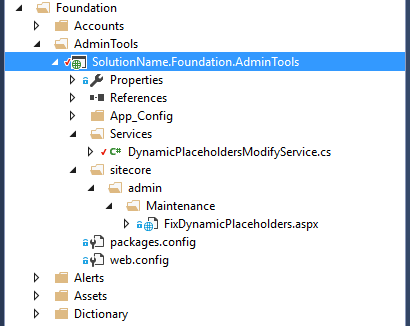

FixDynamicPlaceholders.aspx is a classical ASP.NET WebForm with one line markup (ah-h, I was so lucky not to deal with Webforms for couple past years till the moment)

<%@ Page Language="C#" AutoEventWireup="true" CodeBehind="FixDynamicPlaceholders.aspx.cs" Inherits="HomeServeUsa.Foundation.AdminTools.sitecore.admin.Maintenance.FixDynamicPlaceholders" %>

and the codebehind. Since FixDynamicPlaceholders.aspx is admin tool page - codebehind is inherited from Sitecore.sitecore.admin.AdminPage:

public partial class FixDynamicPlaceholders : AdminPage
{
    protected void Page_Load(object sender, EventArgs e)
    {
        var fixRenderings = new DynamicPlaceholdersModifyService();
        var result = fixRenderings.Iterate();

        OutputResult(result);
    }

    private void OutputResult(Dictionary<Item, List<KeyValuePair<string, string>>> result)
    {
        Response.ContentType = "text/html";

        Response.Write($"<h1>{result.Count} items processed</h1>");
        foreach (var pair in result)
        {
            Response.Write($"<h3>{pair.Key.Paths.FullPath}</h3>");

            foreach (var kvp in pair.Value)
            {
                if (kvp.Key != kvp.Value)
                {
                    Response.Write($"<div>{kvp.Key} ==> {kvp.Value}</div>");
                }
            }
        }
    }
}

Finally, it is complete. Hope this helps someone!

P.S. of course, that would be easier (and more elegant) to perform with Sitecore PowerShell extension. But unfortunately I am the only person in the organisation who uses it regardless of my promotional activity.

How to make Content Editor search by plain GUIDs without braces and dashes? (part 2)

In the first part of this story I demonstrated how to create an extra search pipeline processor to search by plain GUIDs (those without dashes and curly braces). Now it a good time to achieve the same functionality by another approach.

So, how actually values are coming into search pipeline? While debugging I came across the method TreeSearch_Click - the one was top method from backend call stack (Sitecore.Client.dll) so I tried to find where on frontend it is being called from.

It was called from <WEB_ROOT>/sitecore/shell/Applications/Content Manager/default.aspx file, right by inline script:

javascript:if(event.keyCode==13){var result = scForm.postEvent(this,event,'TreeSearch_Click',true);scContent.fixSearchPanelLayout();return result;}

That code runs by hitting enter on search textbox, there's also similar handler for clicking magnifier icon:

javascript:var result = scForm.postEvent(this,event,'TreeSearch_Click',true);scContent.fixSearchPanelLayout();return result;

In both cases we are POST-ing javascript this that refer to a calling element. So, obviously, if somehow intercept that value - it will be possible to do manipulation on it right on the DOM, and changes would be reflected by UI immediately. That is something missing at part one of this story. Doing that before call to postEvent will post already updated value.

So I ended up with modifying default.aspx by adding a pre-post function to check whether the value is a plain GUID and format it appropriately in that case (I admit I am not the best frontend developer in the world so that implementation could be way better):

onkeydown="javascript:if(event.keyCode==13){ verifyPlainGuid(this); var result = scForm.postEvent(this,event,'TreeSearch_Click',true);scContent.fixSearchPanelLayout();return result;}"

and for icon handler

onclick="javascript:verifyPlainGuid(this); var result = scForm.postEvent(this,event,'TreeSearch_Click',true);scContent.fixSearchPanelLayout();return result;

calling the following javascript function as defined:

function verifyPlainGuid(parameter)
{

    if (parameter & amp; & parameter.className == "scSearchButton") {

        var input = parameter.parentElement.parentElement.parentElement.parentElement.children[0].children[0];
        substituteRegexIfMatches(input);
    }

    if (parameter.id == "TreeSearch")
    {
        substituteRegexIfMatches(parameter);
    }

    function substituteRegexIfMatches(inputElement) {

        var shortGuidRegexPatterns = '[0-9a-fA-F]{8}[0-9a-fA-F]{4}[0-9a-fA-F]{4}[0-9a-fA-F]{4}[0-9a-fA-F]{12}';

        if (inputElement.value.match(shortGuidRegexPatterns))
        {

            var plainGuid = inputElement.value;

            inputElement.value = "{" + plainGuid.substring(0, 8) + "-" + plainGuid.substring(8, 12) + "-" + plainGuid.substring(12, 16)
            + "-" + plainGuid.substring(16, 20) + "-" + plainGuid.substring(20, 32) + "}";
        }
    }
}

That's it - all the changes and it works even better. So, let's compare part 2 against part 1:

Pros:

  • does not modify either \bin folder or configuration, there's no app pool recycle happening
  • no inclines into pipelines, GUID transformation logic runs only when indeed required, not on each run
  • runs at frontend and do not interfere backend
  • modified GUID is reflected at searchbox immediately

Cons:

  • required modification of original sitecore-shipped file (default.aspx)
  • this file tends to changes rather frequently

For all updates (versions) of Sitecore 8.2 - download a package

If you're on Sitecore 8.1, you may need to manually substitute default.aspx located at <WEB_ROOT>/sitecore/shell/Applications/Content Manager folder:

Sitecore 8.1 update 3 - link
Sitecore 8.1 update 2 - link
Sitecore 8.1 update 1 - link
Sitecore 8.1 initial release - link

P.S. What can be done even better? I think, Sitecore should add this functionality to their future versions, as it covers one of the quite frequently used case for us. Ideally, while searching by short GUID it should return Direct Hit result if the item with such ID exists, along with other results from content search.

Sussex Sitecore UserGroup - 22 March 2017


What's on? Finally I have overcome all hardships on arranging with the venue, sponsorship etc. and am proud to announce the first Sussex Sitecore User Group!

When does it happen? It will take place on Wednesday 22nd of March in Brighton - the heart and largest city of Sussex. One of complexities of finding a meeting place was to find an adequate venue in less than 5 minutes walk from Brighton train station as I realised that most of guests will come from either London, or other parts of Sussex but in any case they will arrive at Brighton station.

How to get there? Brighton is only 1 hour of travel from London Bridge or Victoria station. Direct trains also go there from Kings Cross / St. Pancrass, Blackfriars and Farrington. There will be a train at 17.42 from Victoria, 17.20 from Blackfriars and 17.57 from London Bridge. Please see the train times planner to find appropriate option. And the venue itself is less than 5 minutes of walk from station:


Address: 30 Cheapside, Brighton BN1 4GD (main entrance on Blackman Street)

What is agenda? We are planning to have a traditional Sitecore event with complementary drinks and snacks but with what is more important - very interesting topics plus open discussion.

Any contact? Would you like to present - please PM me on Slack @martin_miles or Twitter @SitecoreMartin.

Please RSVP at the event's MeetUp page so that we have a god idea of numbers.

Looking forward to meet you there!

Got a handy new tool for "finding ends" of presentation items - Rendering Chrome for Components

I have recently started working on a new project with a non-transparent structure. By saying non-transparent I mean non trivial locations for the code and non-matching layout and rendering items to their filesystem counterparts. So I was looking for the convenient way to identify matched pairs.

Luckily I remembered JammyKam presenting something similar at London UserGroup in January 2017 and refereed to his blog in order to find Rendering Chrome for Components package (module - ?). So I will briefly go through his solution show how it helped me and what it does:


  1. Install package as normal
  2. Add a namespace into web.config from /Views folder:
    <add namespace="ForwardSlash.SC.RenderingChrome.HtmlHelpers"></add>
    
  3. Append this to a containers element so that it generates an attribute:
    @Html.Sitecore().ContainerChrome()
  4. Now, if you go to Experience Editor and open View tab, you'll see a new checkbox Highlight Renderings clicking which turns all magic on


Here's the result:


    It works not only in Chrome, as you see I run it in firebug.

    Hope it will help you as much as it already has helped me.

    References:

    - original post by Kamruz Jaman

    - sources on GitHub

    - presentation slides from Sitecore User Group London (January 2017) - 3.5MB

    Why am I getting "Item is not a template" error on data items in Content Editor?

    Very simple and even stupid error I have met few times, just want to describe it here to make it google-searchable so that it might help someone.

    Image you're going across you content items , and when clicking by one of your data items, you see similar screen, saying: Item "/sitecore/content/Home/Data/Simple item" is not a template.


    First of all, why does I got yellow screen? Well, the error is quite descriptive, saying that my Simple item is not a template.

    Sure, it isn't, we know that and can prove that by clicking Content tab, that will show us exactly the item's data:


    But why on earth do I see other two tabs, that shouldn't be there for data item?

    The answer can be either of two cases:

    1. Simple silly case - the template of you item is either directly inherited from default Template item (located at /sitecore/templates/System/Templates/Template) rather than Standard template (/sitecore/templates/System/Templates/Standard template).


    In that case simply replace one with Standard template to fix.

    2. More complex case - when you're likely to have a complicated inheritance chain, especially if you are working with Helix or playing around Habitat. It that case your data item is based on a composite template, that is likely to inherit multiple other templates, at least one of which inherits from Template rather than Standard template, exactly as described in a case above. Solution is the same as above - identify the culprit and change inheritance to Standard template.

    Finally your data will be based on correct set of templates and you won't evidence unwanted tabs anymore.

    Hope this post helps someone!

    How to make Content Editor search by plain GUIDs without braces and dashes? (part 1)

    How many times while inspecting the code you've encountered something similar to:


    Of course, you've guessed that A50CC32DAC854E3D9FC3A6BFDE1C577E is nothing else but GUID of an item being modified for URL. And of course, in order to look up what this item is, you've pasted it into search box of Content Editor, as the easiest way to search. Content Editor in turn did not find anything as obviously that value isn't a properly formatted GUID. As a mature Sitecore developer, probably had to append braces and insert dashes in appropriate format, so that items becomes discoverable via search.

    To overcome this, I created animprovement module that will allow you search by both plain and properly formatted GUIDs.

    As for a starting point, I decided to find out what exactly happens after user submits value into a search box. Looking up ajax POST call to the backend suggested me that it should be a pipeline somewhere behind Content Editor application. Decompiling Sitecore.Kernel and Sitecore.Client prompted me to search pipeline, that is located at Sitecore.Pipelines.Search namespace of Sitecore.Kernel.

    The very first step of that pipeline is called IDResolver and does exactly what he is named for: resolves an item for a search term in case it is properly formatted GUID and exists in database. If not - it passed arguments further down the pipeline.

    So the idea is to create an extra processor after IDResolver that will do basically the same business but for search terms that are plain GUIDs. Okay, here's the code:

        public class SearchByPlainGuids
        {
            public void Process(SearchArgs args)
            {
                Assert.ArgumentNotNull((object)args, "args");
    
                if (string.IsNullOrWhiteSpace(args.TextQuery))
                    return;
    
                if (args.Type == SearchType.ContentEditor && IsPlainGuid(args.TextQuery))
                {
                    Item obj = args.Database.GetItem(new ID(MakeGuidQuery(args.TextQuery)));
                    if (obj != null)
                    {
                        SearchResult result = SearchResult.FromItem(obj);
                        args.Result.AddResultToCategory(result, Translate.Text("Direct Hit"));
                    }
                    args.AbortPipeline();
                }
            }
    
            private string MakeGuidQuery(string plainGuid)
            {
                return "{" + plainGuid.Substring(0, 8) + "-" + plainGuid.Substring(8, 4) + "-" + plainGuid.Substring(12, 4)
                       + "-" + plainGuid.Substring(16, 4) + "-" + plainGuid.Substring(20, 12) + "}";
            }
    
            private bool IsPlainGuid(string query)
            {
                string pattern = @"^[0-9a-fA-F]{8}[0-9a-fA-F]{4}[0-9a-fA-F]{4}[0-9a-fA-F]{4}[0-9a-fA-F]{12}$";
    
                Regex regex = new Regex(pattern);
    
                return regex.IsMatch(query);
            }
        }
    

    To make this code function, let's build that into a DLL and reference that DLL from config patch file located within include folder:


    Voila! Now you're able to search by item GUID regardless of its format.


    Please feel free to download ready-to-use package (5.7KB) for Sitecore 8.1 and 8.2 or source code (9.1KB).

    P.S. It all looks and works well, however what can be done better? First of all, we've modifies search pipeline, so our processor is called with every call of given pipeline. Next, we add extra DLL and extra config include file to reference that DLL. Wouldn't it better, if GUIDs were checked and modified right before entering that pipeline, ideally at the front-end? Let's try to make this function at part 2 of this story.

    Happy new year, Sitecore!

    Dear friends,

    Thank you everyone who was reading my blog, who supported me and Sitecore Link project. Thank you, Sitecore Community!
    It was amazing year, you all made an awesome progress - 25% of entire Sitecore content has been generated within past year.

    I hope we all together can make even better progress in 2017 and will enjoy new excellent version of our beloved platform, as usual. Looking forward to meet you all at the evens that we all are anticipating,

    Happy new 2017 year!
    Martin Miles