Cannot use a Hyper-V disk VHDX image you've been shared with? It can be your colleague's shared VM or a disk exported from Azure VM. Below I am going to describe the steps required to managed it properly.
The first thing one is likely to perform is either importing this disk or creating a new VM without disk and attaching it later. Despite it seems absolutely valid, that will end up with:
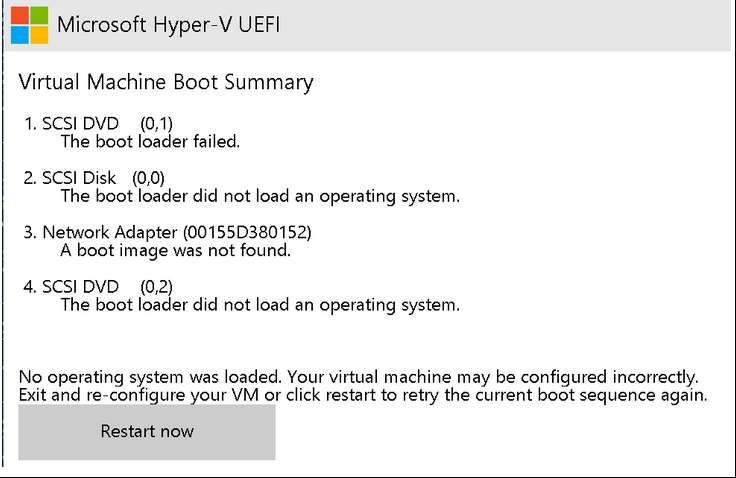
If you see the above error it means you've most likely created a VM of 2-nd Generation of Hyper-V, and attached you drive to it. That won't work, but why?
To answer this question let's define the difference between both generations. The main fact about Generation 1 is that it emulates hardware - all required hardware components must be emulated to make the virtual machine work! Special software that can imitate the behaviour of real hardware is included in Hyper-V, as a result the VM can operate with virtual devices. Emulated hardware (that behaves identical to real hardware) includes drivers to most operating systems in order to provide high compatibility.
Generation 1 the emulation works way less productive compared to native equipment and has numerous limitations. Among those:
- a legacy network adapter
- IDE controllers with only 2 devices could be attached to each
- MBR with max disk size of 2TB and not more than 4 partitions.
The 2-nd Generation uses:
- UEFI BIOS
- GPT support (without size and partitions legacy limit) and Secure Boot
- because of the above - VMs boot (and operate) much faster
- fewer legacy devices and new faster synthetic hardware used instead
- better CPU and RAM consumption
UEFI is not just a replacement of BIOS, UEFI extends support of devices and features, including GPT (GUID Partition Table).
Secure Boot is a feature that allows protection against modifying boot loaders and main system files, done by comparing the digital signatures that must be trusted by the OEM.
The solution is quite simple.
What you need to do is create a 1-st Generation VM (without creating a new disk drive) and reference existing VHDX file. That would work and OS will load (slowly but will do). The laziest person would probably stop at this stage, but we progress ahead with converting it to the 2-nd Generation VM. But, how do we?
All you need to do is convert legacy BIOS to UEFI running the following command executed within a 1-st Generation VM:
mbr2gpt.exe /convert /allowFullOS
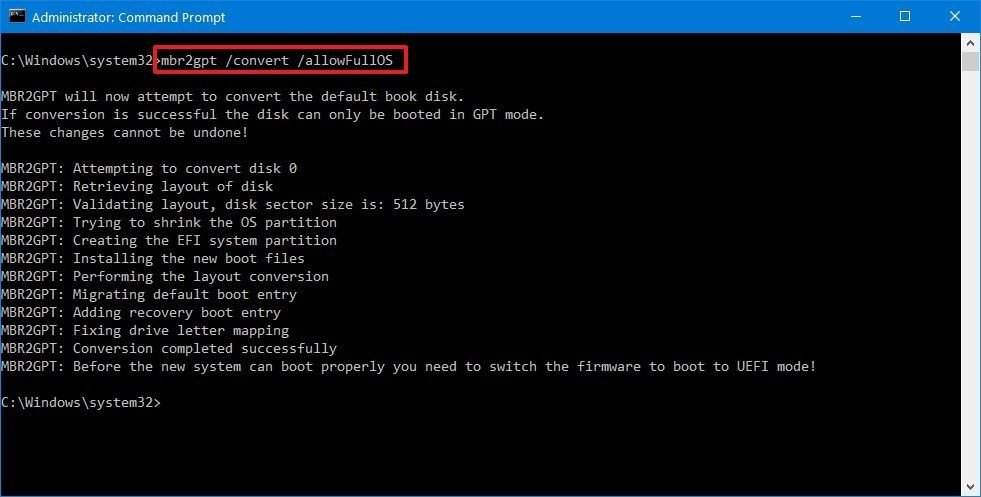
Please pay attention to the warning: since now you need to boot in UEFI mode.
Now you can turn off the Windows VM, delete existing 1-st Generation VS from Hyper-V Manager (but not the disk drive!), and then create a new 2-nd Generation VM referencing the converted VHDX disk image. Also make sure the attached hard Drive stands first for at the boot sequence order (Firmware tab) and also you may want unchecking Enable Secure Boot switch from the Security tab.
Now you may successfully start your received Hard Drive with a fast and reliable 2-nd Generation VM that manages resources of your host machine in a much reliable and savvy way!