brThis trick saves me lo-o-o-ot of time, especially working on large Helix/SXA solution.
Typically you have a treelist that looks like this:
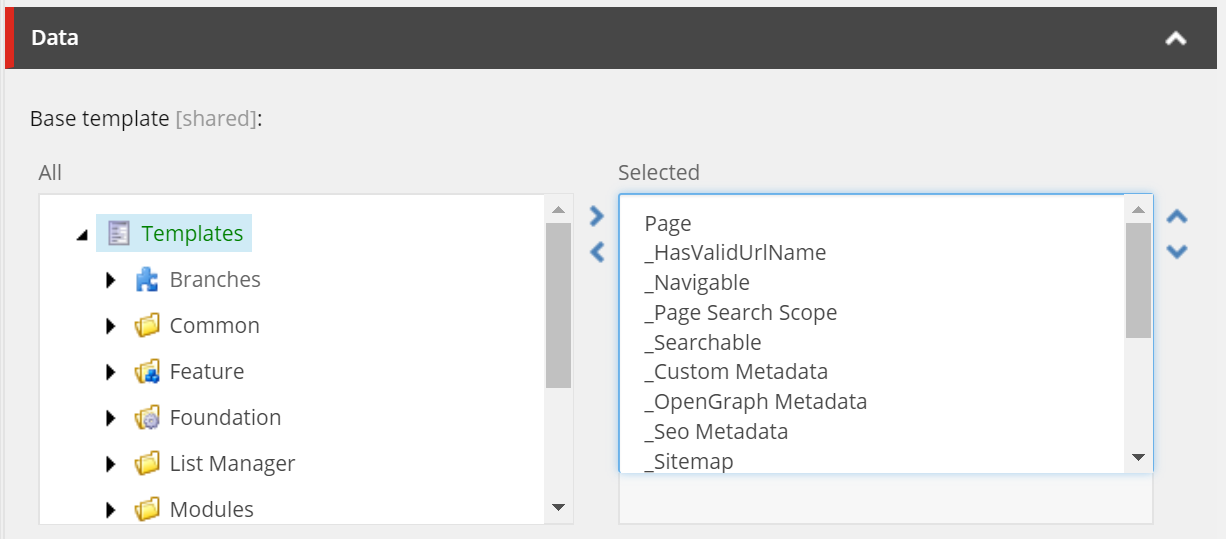
Now tell me what actions do you take when there is a necessity to look up what are one or few of these templates? How you achieve that?
I assume you raw copy GUID, paste into search, inspect and then return back. Clumsy, isn't it?
Objective. My desire was to achieve a popup or new tab window by clicking ENTER hotkey once so that I immediately can look up this template for whatever interests me. I ended up not just achieving the goal but doing that in two opposite ways. Let's consider the pros and cons of each approach (they are almost opposite)
LET'S REVIEW THE OPTIONS
1. Browser user script. I recently wrote about implementing browser user script in order to enhance your productivity while working with Sitecore content management. This approach has
-
Pros:
- leaves server untouched
- user can easily adjust the flow right in the nice code editor provided by the extension
-
Cons:
- applies only on a specific browser on your client machine
- sometimes relies on browser extensions ie. TapmerMonkey
2. Serverside script alteration is an opposite option for achieving the goal. I recently blogged about developing Expand / Collapse all editor sections implementing this approach. In order to do so, I need to modify <web_root>\sitecore\shell\Applications\Content Manager\Content Editor.js file within my sitecore instance.
-
Pros:
- applies to all users with all browsers using your Sitecore instance
-
Cons:
- served by a back-end and risks interfering with other serverside code
- business logic needs to be placed into Sitecore instance, whether by deployment or manually
Anyway, you may pick up either of the solutions depending on your preferences, it's better to have a choice. Let's turn to the implementation.
IMPLEMENTATION
1. Browser user script. The way Sitecore Desktop functions is dynamically loading iframes for specific features, so it is not as easy to use selectors with it due to not just elements but even documents not yet loaded into DOM.
To address this implementation I picked Mutation. It allows you creating handlers for whatever mutation occurs in your DOM, one may also specify what types of events to handle:
// handing a mutation occured
var mutationObserver = new MutationObserver(function(mutations) {
  mutations.forEach(function(mutation) {
    console.log(mutation);
  });
});

// starts listening for changes in the root HTML element of the page.
mutationObserver.observe(document.documentElement, {
  attributes: true,
  characterData: true,
  childList: true,
  subtree: true,
  attributeOldValue: true,
  characterDataOldValue: true
});
I use nested MutationObserver approach where outer observer indirectly handles new documents appearing and once it happens - attaches the nested observer within a given iframe. So below is the entire code:
// ==UserScript==
// @name         Multilist and Treelist values lookup
// @namespace    http://tampermonkey.net/
// @version      0.1
// @description  When working with multilist / treelist items in Sitecore, simply hit ENTER on right-hand side selected item in order to preview it in new tab
// @author       Martin Miles
// @match        */sitecore/shell/default.aspx*
// @grant        none
// ==/UserScript==

(function () {
    'use strict';

    const settings = { mutation: { attributes: true, characterData: true, childList: true, subtree: true, attributeOldValue: true, characterDataOldValue: true } };

    var mutationObserver = new MutationObserver(function (mutations) {
        mutations.forEach(function (mutation) {

            if (mutation.type == "attributes" && mutation.target.id.startsWith("startbar_application_") && mutation.target.className == "scActiveApplication") {
                var iframe = getIframeFromActiveTab(mutation.target);
                if (iframe) {
                    internalMutationObserver(iframe);
                }
            }
        });
    });

    mutationObserver.observe(document.documentElement, settings.mutation);

    function internalMutationObserver(iframe) {
        var innerObserver = new MutationObserver(function (innerMutations) {
            innerMutations.forEach(function (m) {

                var _el = m.target;
                if (_el.className == 'scEditorFieldMarkerBarCell') {

                    var labels = _el.parentElement.querySelectorAll('.scContentControlMultilistCaption');
                    labels.forEach(function (label) {
                        if (label.innerHTML == 'Selected') {
                            label.innerHTML = label.innerHTML + ' (hit ENTER on selected item for preview in a new tab)';
                        }
                    });

                    var selects = _el.parentElement.querySelectorAll('select');
                    selects.forEach(function (select) {
                        select.addEventListener("keypress", keyPressed);
                    });
                }
            });
        });

        // wire up internal mutation
        innerObserver.observe(iframe.contentDocument, settings.mutation);
    }

    function getIframeFromActiveTab(element) {
        let frameName = element.id.replace('startbar_application_', '');
        let iframe = document.querySelectorAll('iframe#' + frameName);
        if (iframe.length > 0) {
            return iframe[0];
        }

        return null;
    }

    function keyPressed(e) {
        if (e.keyCode == 13) {

            var selsectedValue = e.target.options[e.target.selectedIndex].value;

            var url = getUrl(selsectedValue);
            if (url) {
                openInNewTab(url);
            }

            return false;
        }
    }

    function getUrl(selsectedValue) {

        let guid;
        var parts = selsectedValue.split("|");
        if (parts.length === 2) {
            guid = parts[1];
        }
        else if (isGuid(selsectedValue)) {
            guid = selsectedValue;
        }

        return !guid ? guid : '/sitecore/shell/Applications/Content Editor?id='
            + guid + '&vs=1&la=en&sc_content=master&fo='
            + guid + '&ic=People%2f16x16%2fcubes_blue.png&he=Content+Editor&cl=0';
    }

    function isGuid(stringToTest) {
        if (stringToTest[0] === "{") {
            stringToTest = stringToTest.substring(1, stringToTest.length - 1);
        }
        var regexGuid = /^(\{){0,1}[0-9a-fA-F]{8}\-[0-9a-fA-F]{4}\-[0-9a-fA-F]{4}\-[0-9a-fA-F]{4}\-[0-9a-fA-F]{12}(\}){0,1}$/gi;
        return regexGuid.test(stringToTest);
    }

    function openInNewTab(url) {
        var win = window.open(url, '_blank');
        win.focus();
    }
})();
To run this scrup add a new script from TamperMonkey's dashboard, paste the code, save and enable it. After refreshing Sitecore Desktop you'll be able to preview multiselect field values bu hitting ENTER button, just as on a demo below:
Ready-to-use script is available on GitHub:
link
2. The serverside approach considers modifying some serverside component, in a given case, it is quite simple - just modifying <web_root>\sitecore\shell\Applications\Content Manager\Content Editor.js file by adding few functions at the bottom of it:
scContentEditor.prototype.onDomReady = function (evt) {
    this.registerJQueryExtensions(window.jQuery || window.$sc);
    this.addMultilistEnhancer(window.jQuery || window.$sc);
};

scContentEditor.prototype.addMultilistEnhancer = function ($) {
    $ = $ || window.jQuery || window.$sc;
    if (!$) { return; }

    $('#MainPopupIframe').load(function () {
        $(this).show();
        console.log('iframe loaded successfully')
    });

    $(document).on("keypress", "select.scContentControlMultilistBox", function (e) {
        if (e.keyCode == 13) {

            var selsectedValue = e.target.options[e.target.selectedIndex].value;

            var url = getUrl(selsectedValue);
            if (url) {
                openInNewTab(url);
            }

            return false;
        }
    });

    function getUrl(selsectedValue) {

        let guid;
        var parts = selsectedValue.split("|");
        if (parts.length === 2) {
            guid = parts[1];
        }
        else if (isGuid(selsectedValue)) {
            guid = selsectedValue;
        }

        return !guid ? guid : '/sitecore/shell/Applications/Content Editor?id='
            + guid + '&vs=1&la=en&sc_content=master&fo='
            + guid + '&ic=People%2f16x16%2fcubes_blue.png&he=Content+Editor&cl=0';
    }

    function isGuid(stringToTest) {
        if (stringToTest[0] === "{") {
            stringToTest = stringToTest.substring(1, stringToTest.length - 1);
        }
        var regexGuid = /^(\{){0,1}[0-9a-fA-F]{8}\-[0-9a-fA-F]{4}\-[0-9a-fA-F]{4}\-[0-9a-fA-F]{4}\-[0-9a-fA-F]{12}(\}){0,1}$/gi;
        return regexGuid.test(stringToTest);
    }

    function openInNewTab(url) {
        var win = window.open(url, '_blank');
        win.focus();
    }
};
Invalidate browser cache and refresh the page. I am not including a demo record as it works identical to the demo above for the first approach.
Note! if you also have Expand/Collapse script in place from previous blog post, then you need to share once handler for cboth calls since unlike in C# you may not have multi-delegate prototype handler:
// you cannot have multidelegate onDomReady here, so share all calls within one handler
scContentEditor.prototype.onDomReady = function (evt) {
    this.registerJQueryExtensions(window.jQuery || window.$sc);
    this.addMultilistEnhancer(window.jQuery || window.$sc);
    this.addCollapser(window.jQuery || window.$sc);
};
Result. Regardless of the approach taken, now you may look up Treelist selected items by selecting them and hitting the ENTER button. You may include this trick into your own Sitecore productivity pack (you have one already, don't you?) as it indeed helps so much.