Experience Sitecore ! | All posts tagged 'Editing'

Experience Sitecore !

More than 200 articles about the best DXP by Martin Miles

Advanced editing: managing dynamic popups from custom RTE dialog

One day a request came up from the business, they wanted to have a nice "information" icon appearing aside from a text, clicking which opens up a popup modal dialog showing more information related to that line of content. From an UX point of view that works as a decent solution preventing page from bloating with more-specific info.

From page visitor's eyes it looks as below:


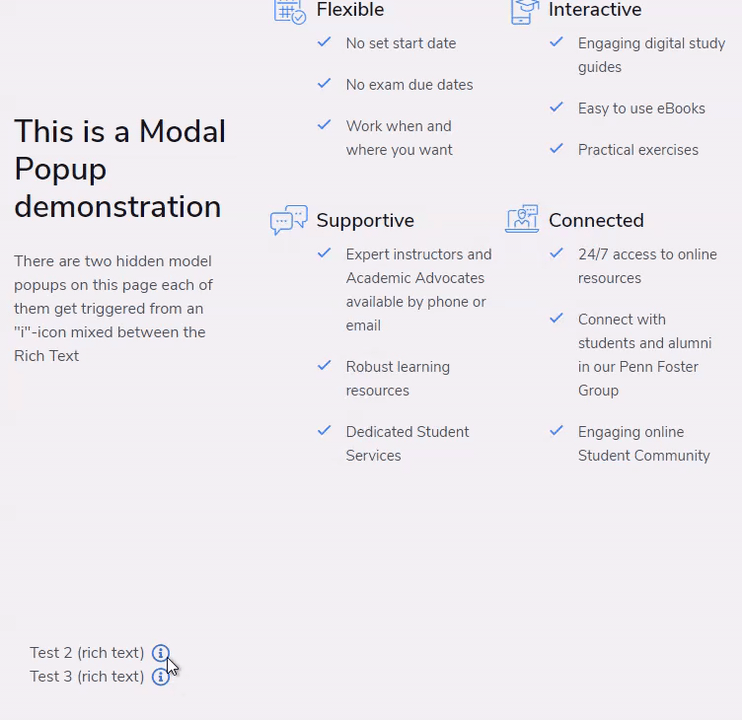
There was a FE code provided that does exactly as described. If I was responsible for Front-End, I'd have chosen using Emoji as they're an official part of Unicode, as therefore gets supported with all browsers. But front-end was handed to me as given and I assume there was a decent reason for using it in a provided way.

An any case, our mission will be implementing that with BE with certain challenges:

  1. You may have multiple popups on the single page, at least more than one.
  2. User needs being able dynamically adding popups to a page (sometimes removing them).
  3. Each popup needs to be editable, while in their normal state they are hidden.
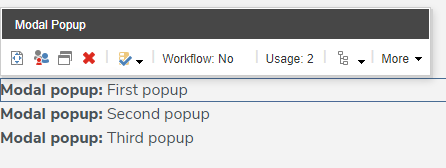
  4. Because of that above, there bight be a user-friendly way of distinguishing popups and giving them individual names.
  5. An information icon should be editable from with Rich Text, mixed along classical RTE interface
  6. Each "i"-icon should get referenced with a specific popup, so that clicking different icons trigger different popups.
  7. Because of that, a clear and nice way of referencing and icon to a popup should be presented.
  8. The BE solution is classical MVC implementation, with no SXA or JSS (unfortunately)
Now, with these requirements in hands, let's implement the whole feature. Below are my..

THOUGHTS


1. Popup code
At the front-end these I was given them implemented as <section>-tag blocks, hidden with styles. Each of these blocks has data-name attribute, that is used for referencing it along with a correspondent "i"-icon:


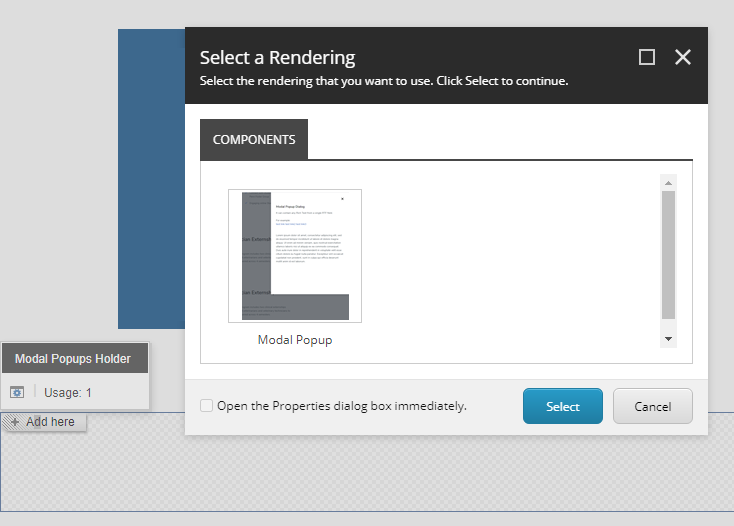
2. Popups aren't visible so need extra care to support editors managing them. On the layout I create a separate placeholder for exclusively adding these popups. Normally, once you add the first popup, placeholder add invitation disappears, as it now has an item already but that item is invisible.
To make it visible I add an additional section that becomes visible only in editing mode (Sitecore MVC Razor view):
@if (Sitecore.Context.PageMode.IsExperienceEditor)
{
    
Modal popup: @name
}

That allows selecting each popup individually, making that possible removing existing or adding a new popup after existing:


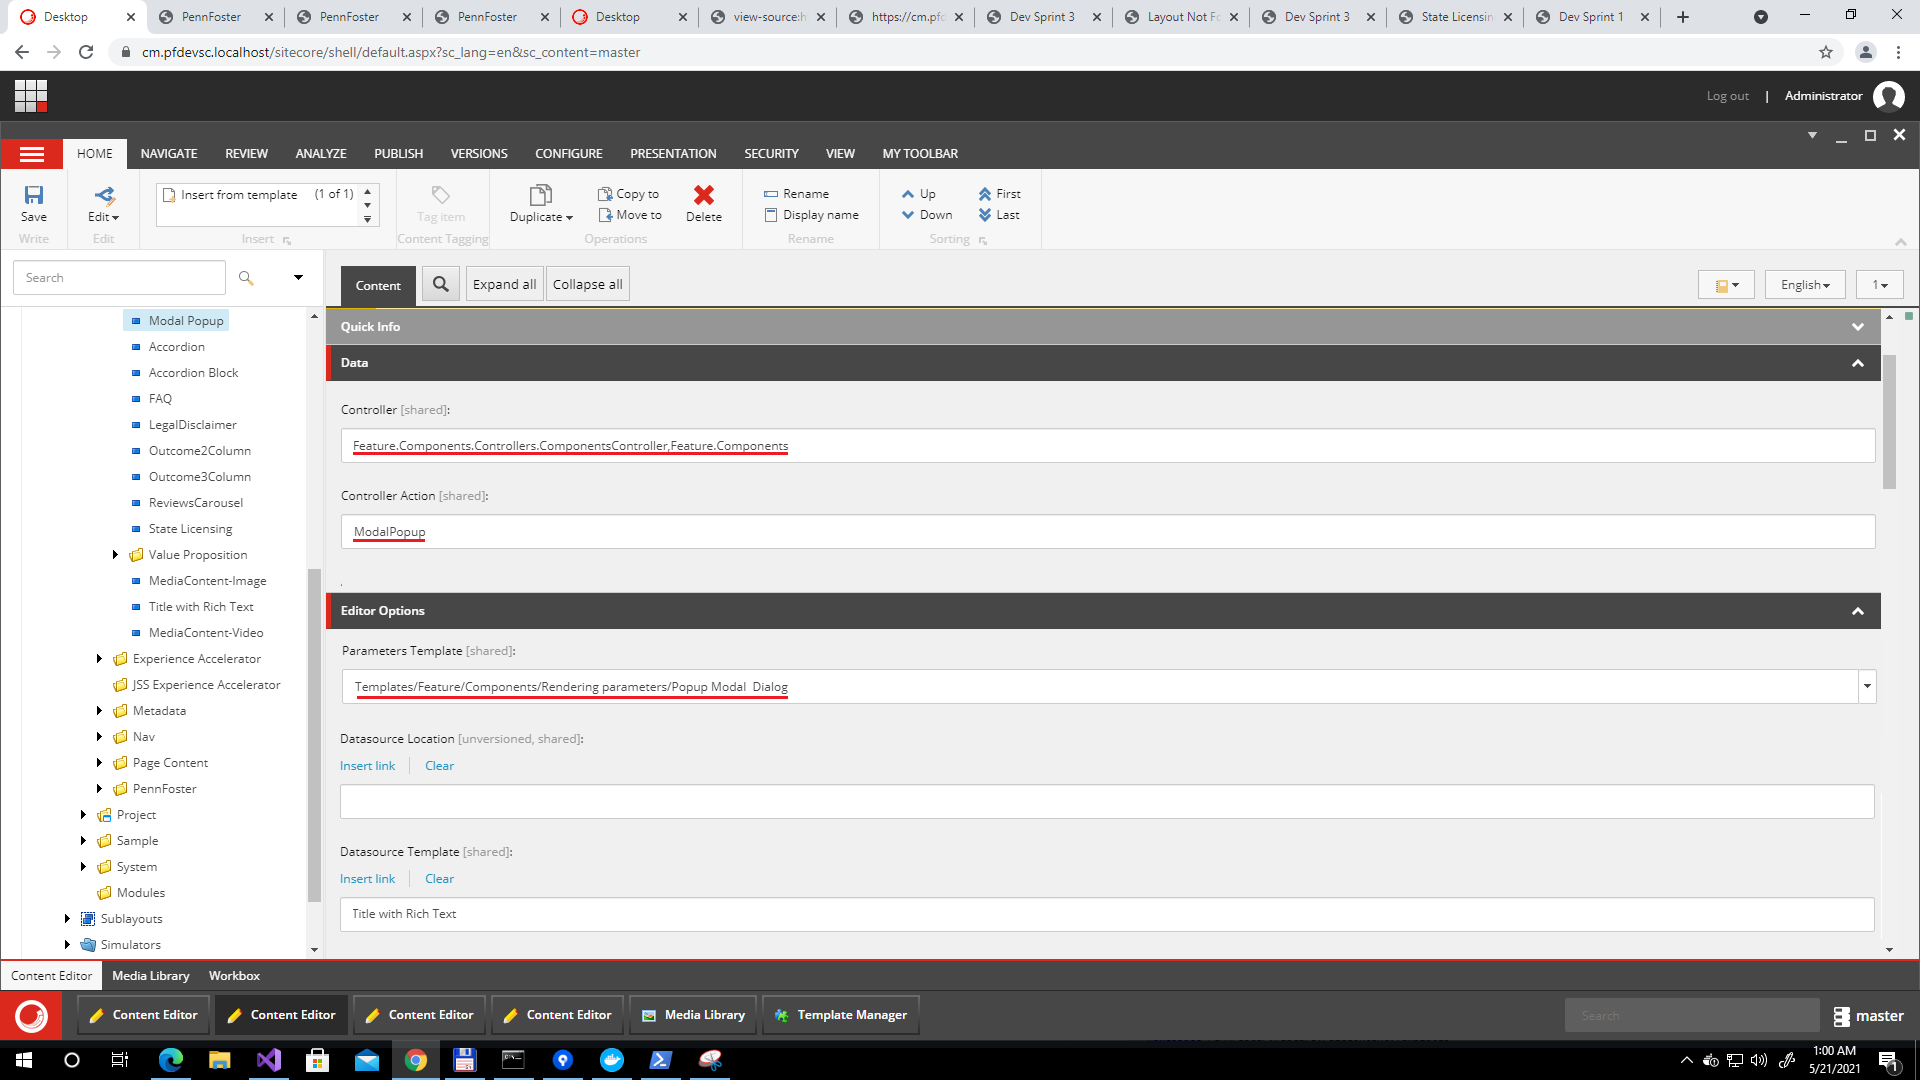
3. Editable Datasource
I use standard Sitecore Controller Rendering with a generic datasource of Title with Rich Text template. A simple code-generated Glass model coming from Leprechaun (but could be anything, i.e. T4 templates) gets passed into a MVC View.


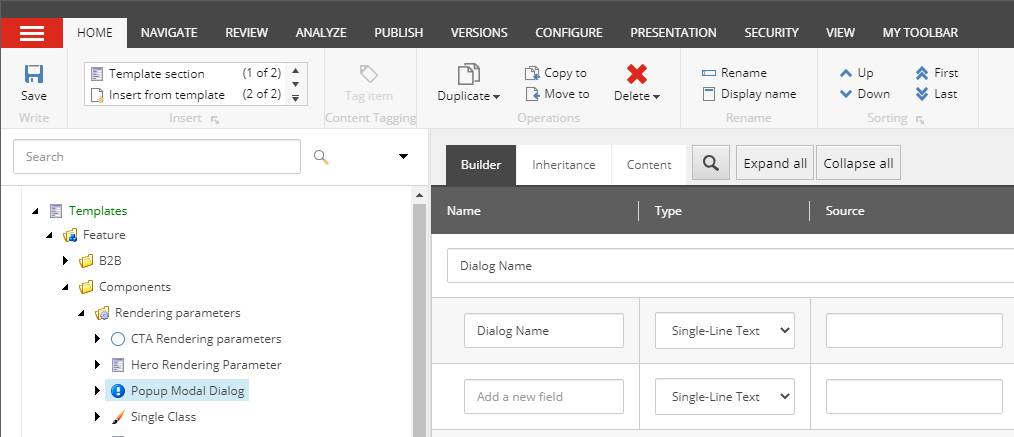
4. Giving Component a unique Name
as you might know, a bunch of additional options (like styling) could be also provided from Rendering Parameters for each individual Popup Rendering. In or case we need giving each individual rendering on a page unique name and Rendering Parameters seem to be the ideal way of doing that.

Why Rendering Parameters?
Obviously, as it comes from their name, Rendering Parameters are stored with a page and are set per each component applied. That's opposed to the datasource items which carry on replaceable sources of data, and could be shared across several components of the same or compatible types.
per page.

I have recently written an article on how easily one could use rendering parameter with Glass Mapper by using strongly typed HTML helpers as I highly recommend reading as the code from this article is using described method.


5. Editing Information icon
Now, the biggest challenge is that "i"-icon is mixed along the rest of RTE content in a single field. Let's look at how FE team has implemented that:
<button data-name="NAME_OF_POPUP" type="button" aria-label="View Info" aria-haspopup="dialog"  class="button--more-info a-icon-info"></button>
It comes as a styled <button> HTML tag, with set of attributes the most important of which is data-name. This attribute sets the relationship with a corresponding modal popup <section> tag to be shown/hidden.


6. Wiring-up icon and modal popup together
An initial though was tokenizing this <button> tag and bringing it to the editor's snippets collection, if not the data-name parameter, which is unique per each icon and point out to that same parameter on a modal popup <section> tag attribute.


7.That mean a more elegant solution should be chosen. Creating a custom editors dialog would solve this, for example asking the name of modal popup to be shown on a click at this icon. The most straightforward way would be asking user to input the name user created at the stage 4, so that upon submission it is being injected into a <button> tag attribute and returned back to the editor.

That would work but is subject to potential mistakes/typos/misunderstandings by a user, so instead I decided to present user with a drop-down already populated with the names of modal popups previously added to the page. User needs typing once, and even he/she typed a total mess as the name of popup, that crazy value should be available for selection/usage without retyping.

Now let's turn to the actual..

IMPLEMENTATION


I will start with Modal Popup rendering itself. First of all need creating a Controller rendering:

With the view action code:
@using Glass.Mapper.Sc.Web.Mvc
@using Feature.Components.Templates
@using Feature.Components.Extensions
@model ITitleWithRichText

@{ var name = Html.GetRenderingParametersString<IPopupModalDialog>(m => m.DialogName); } 


@if (Sitecore.Context.PageMode.IsExperienceEditor)
{
    
Modal popup: @name
}

Controller action method itself will be extremely simple- grab a strongly-typed interface from Glass Mapper and pass it to a view:
public ActionResult ModalPopup()
{
var model = _componentsRepository.GetModel<ITitleWithRichText>();
return View("~/Views/Feature/Components/ModalPopup.cshtml", model);
}

Next, need to add a Sitecore Placeholder for holding modal dialogs. The good practice here also is not to ignore creating placeholder settings for users' choice convenience:


Rich Text Editor

We need creating the button on a Rich Text, these buttons are configured inside of active Rich Text Profile within core database.

Please note: as soon as you need modifying anything from OOB profile, do not change them. Duplicate the whole desired profile node instead, put it under the serialization and then you're welcome to modifying it.

Therefore I duplicate Rich Text Full profile into: 
/sitecore/system/Settings/Html Editor Profiles/Custom
Same as the rest of editing-related stuff, I am keeping it serialized under Foundation.Editing Helix module.

As an option, you could also want this new profile becoming the default, so that there will be no need of explicitly stating the profiles name at the templates' Source column. To achieve that you can create a config patch file (just here, at Foundation.Editing) that sets HtmlEditor.DefaultProfile setting to the one we've just created:


      /sitecore/system/Settings/Html Editor Profiles/Custom


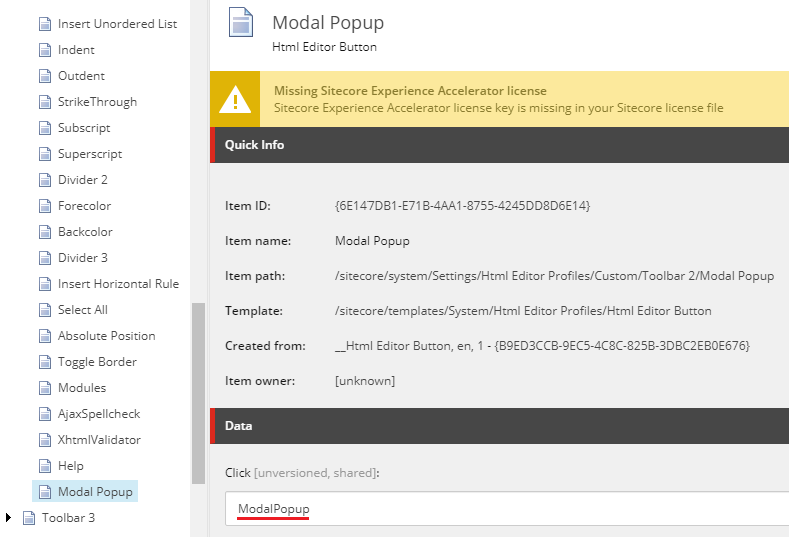
Once we've sorted with Rich Text profile, let's include a new icon for a custom dialog. To do so, I create a new Modal Popup item under /sitecore/system/Settings/Html Editor Profiles/Custom/Toolbar 2.

The most important property here is Click field and it stores the name of modal dialog to serve this:

As for icon itself, that could be chosen from one of sprite images stored at sitecore/shell/Themes/Standard/Images/Editor/WebResource.png by specifying offset in style:
html .ModalPopup { background-position: -6px center }
Here is how the result looks like:


After we created a new button and have associated it with a Click command referencing a new dialog name, there is also a code to be added that handles new button click and triggers new dialog.

Danger zone: to add this code one need modifying existing OOB JavaScript file, so with each version update there is a risk of new vanilla version being overwritten with you custom-modified old version script file. This file rarely changes, but still please keep an eye - if the change occurs you'll need handling the diff.

The customization in my case is simply appending some code to the very end of sitecore\shell\Controls\Rich Text Editor\RichText Commands.js file:
Telerik.Web.UI.Editor.CommandList["ModalPopup"] = function(commandName, editor, args) {
  var html = editor.getSelectionHtml();
  var id;
  
  if (!id) {
    id = GetMediaID(html);
  }

  scEditor = editor;

  editor.showExternalDialog(
    "/sitecore/shell/default.aspx?xmlcontrol=RichText.ModalPopup&la=" + scLanguage + (id ? "&fo=" + id : "") + (scDatabase ? "&databasename=" + scDatabase : "") ,
    null, 400, 260, scModalPopup, null, "Insert Modal Popup Dialog", true, Telerik.Web.UI.WindowBehaviors.Close,false, false 
  );
};

function scModalPopup(sender, returnValue) {
  if (!returnValue) {
      return;
  }

  scEditor.pasteHtml(unescape(returnValue.Text), "DocumentManager");
}
What the above code does is adds the Telerik.Web.UI.Editor.CommandList["ModalPopup"] handling code (note that "ModalPopup" matches the value from Click command we entered into a profile at core database; it also adds scModalPopup handler that actually pastes resulted markup into Rich Text Editor.


Creating the Dialog

That is done with very legacy markup method called SheerUI. A traditional Sheer UI component would consist of 3 pieces:
  1. XML markup that dictates how control layout should be laid
  2. Codebehind similar to old knows ASP.NET WebForms (not to confuse with another deprecated tolset - WFFM)
  3. Related JavaScript code
Here they are, one after another:

1. XML markup for sitecore\shell\Controls\Rich Text Editor\ModalPopup\ModalPopup.xml


This code has <richtext.modalpopup> section that hard-ties to the command from previous steps. It also has <codebeside> section that references C# code doing the rest of its logic behing the markup, here is it below:

2. ModalPopup.cs
using System;
using Sitecore.Web.UI.Pages;
using Sitecore.Diagnostics;
using Sitecore;
using Sitecore.Web;
using Sitecore.Web.UI.Sheer;
 
namespace Foundation.Editing.Dialogs
{
    public class ModalPopup : DialogForm
    {
        protected Sitecore.Web.UI.HtmlControls.Combobox Target;

        string Wrapping = @"";

        protected override void OnLoad(EventArgs e)
        {
            Assert.ArgumentNotNull(e, "e");
            base.OnLoad(e);

            if (!Context.ClientPage.IsEvent)
            {
                Mode = WebUtil.GetQueryString("mo");
               
                Context.ClientPage.ClientScript.RegisterStartupScript(GetType(), "script", "scOnLoad();", true);
            }
        }

        protected override void OnOK(object sender, EventArgs args)
        {
            Assert.ArgumentNotNull(sender, "sender");
            Assert.ArgumentNotNull(args, "args");

            string code = string.Format(Wrapping, Target.Value);      

            if (Mode == "webedit")
            {
                SheerResponse.SetDialogValue(StringUtil.EscapeJavascriptString(code));
                base.OnOK(sender, args);
            }
            else
            {
                SheerResponse.Eval($"scClose({StringUtil.EscapeJavascriptString(code)})");
            }
        }

        protected override void OnCancel(object sender, EventArgs args)
        {
            Assert.ArgumentNotNull(sender, "sender");
            Assert.ArgumentNotNull(args, "args");

            if (Mode == "webedit")
            {
                base.OnCancel(sender, args);
            }
            else
            {
                SheerResponse.Eval("scCancel()");
            }
        }

        protected string Mode
        {
            get
            {
                string str = StringUtil.GetString(base.ServerProperties["Mode"]);
                if (!string.IsNullOrEmpty(str))
                {
                    return str;
                }
                return "shell";
            }
            set
            {
                Assert.ArgumentNotNull(value, "value");
                base.ServerProperties["Mode"] = value;
            }
        }
    }
}

Simply saying, we take an input from user (in a given case by selecting a drop-down item from a list) and wrapping it with <button> tag store at Wrapping string variable:

3. Finally, sitecore\shell\Controls\Rich Text Editor\ModalPopup\ModalPopup.js that handles client-side part for this control:
function scClose(text) {
    var returnValue = {
        Text: text
    };
 
    getRadWindow().close(returnValue);
}
 
function GetDialogArguments() {
    return getRadWindow().ClientParameters;
}
 
function getRadWindow() {

    if (window.radWindow) {
        return window.radWindow;
    }
 
    if (window.frameElement && window.frameElement.radWindow) {
        return window.frameElement.radWindow;
    }
 
    return null;
}
 
var isRadWindow = true;
 
var radWindow = getRadWindow();
 
if (radWindow) {
    if (window.dialogArguments) {
        radWindow.Window = window;
    }
}

function scOnTargetLoad() {    
}

function scOnLoad() {    
    
    let select = document.getElementById("Target");
    let list = parent.parent.parent.document.querySelectorAll('section[data-name]')
    let values = Array.from(list).map(x => x.getAttribute('data-name'));

    for (var i = 0; i < values.length; i++) {
        var opt = document.createElement('option');
        opt.innerHTML = values[i];
        opt.value = values[i];
        select.appendChild(opt);
    }
}

function scCancel() {
 
    getRadWindow().close();
}
 
function scCloseWebEdit(embedTag) {
    window.returnValue = embedTag;
    window.close();
}
 
if (window.focus && Prototype.Browser.Gecko) {
    window.focus();
}
The main trick here you may see inside of scOnLoad() method. I created and referenced this handler to exactly catch the moment the drop-down is actually created on the control - that is not trivial as is instantiated asynchronously far later that holding control itself. Once created, I am crawling the triple-parent iframe for the presence of popup modal windows, and grab their name into a drop-down, if found.

That is probably the main bit of the whole blog post. The user can now select any name of those existing modal popup components he actually dropped into a placeholder on a page, and those are the names entered only once from a Rendering Parameters dialog forced after control was added.

As mentioned above, I place both new custom dialog and modified RichText Commands.js file into Foundation.Editing project as per Helix guidance.That guarantees all these related code, scripts and items get kept together.

DEMO TIME

Thanks for reading and watching!

A nice way of using HTML Helper for accessing Rendering Parameters along with Glass Mapper

I very love Glass Mapper as (once being configured) it takes away from you much of the manual efforts of wiring up your models.

Often working with Rendering Parameters, I decided to simplify their usage by having a strongly-typed HTML Helper powered by Glass Mapper. Here is how the usage looks like:

<div class="@(Html.GetRenderingParametersClassFor<ISingleClass>(m => m.Class))">
   your content here
</div>

It benefits from usage simplicity and also from having IntelliSense. Here's an example of what ISingleClass looks like:

[SitecoreType(TemplateId = ISingleClassConstants.TemplateIdString)]
public partial interface ISingleClass : IGlassBase
{   
    [SitecoreField(ISingleClassConstants.ClassFieldName)]
    Guid Class { get; }
}

In Sitecore items of a given type may look as smth. similar below:


OK, won't make it any longer: here's the code that does all the magic:

public static class HtmlHelperExtensions
{
    public static string GetRenderingParametersClassFor<T>(this HtmlHelper html, Func<T, object> getField, string fieldName = "Class") where T : class
    {
        var selectedItem = GetSelectedRenderingParameter(html, getField);
        return selectedItem?[fieldName] ?? "";
    }


    private static Item GetSelectedRenderingParameter<T>(this HtmlHelper html, Func<T, object> getField) where T : class
    {
        T renderingParameters = GetRenderingParameters<T>(html);

        var selectedItemId = getField(renderingParameters)?.ToString();
        return Context.Database.GetItem(selectedItemId);
    }

    public static T GetRenderingParameters<T>(this HtmlHelper html) where T : class
    {
        //TODO: wire-up ISitecoreService to get resolved via DI of your choise
        var sitecoreService = new SitecoreService(PageContext.Current.Database);

        var parameters = RenderingContext.CurrentOrNull.Rendering["Parameters"];
        var nameValueCollection = WebUtil.ParseUrlParameters(parameters);
        var config = sitecoreService.GlassContext[typeof(T)] as SitecoreTypeConfiguration;

        var renderingParametersModelFactory = new RenderingParametersModelFactory(sitecoreService);
        return renderingParametersModelFactory.CreateModel<T>(nameValueCollection, config.TemplateId);
    }
}


Bonus: in some cases you may also want selecting a HTML tag from rendering parameters, for example your editors could choose between heading tags they want to be on your rendering (like H1, H2, H3, H4 or may be just a generating paragraph P-tag):

In that case you can add one more method into the above HTML helper class:

public static MvcTag TagFrom<T>(this HtmlHelper html, Func<T, object> getField, string className = null) where T : class
{
    var selectedItem = GetSelectedRenderingParameter(html, getField);
    string tag = selectedItem?["Tag"] ?? "";

    html.ViewContext.ViewBag.Tag = tag;

    if (!string.IsNullOrWhiteSpace(tag)) 
    {
        var tagBuilder = new TagBuilder(tag);
    
        if (!string.IsNullOrWhiteSpace(className))
        {
            tagBuilder.Attributes.Add("class", className);
        }
        
        html.ViewContext.Writer.Write(tagBuilder.ToString(TagRenderMode.StartTag));
    }

    return new MvcTag(html.ViewContext);
}

Once compiled, you can then render you tags as below:

@using (Html.TagFrom<ITagRenderingParameter>(m => m.Tag, "tag_class"))
{
    @Html.Glass().Editable(m => m.Title)
}

And choose which HTML tag just from a Rendering Parameters dropdown:

Hope this helps!

Rule missing OOB in Sitecore, where the Experience Editor is in editing mode

I was playing with SXA and wanted to have a custom element within a rendering variant that identifies current control presents on a page, otherwise it is being invisible. Looking for such a rule I suddenly realised it is not there, so had to create my custom one. I am sharing it just in case it might be useful to someone looking for a similar solution.

So, as per Rules Engine Cookbook, you create a tag, custom condition and relevant element for it:


The code is simple.

public class IsExperienceEditorEditing<T> : StringOperatorCondition<T> where T : RuleContext
{
    public int Value { get; set; }
    protected override bool Execute(T ruleContext)
    {
        return Sitecore.Context.PageMode.IsExperienceEditorEditing;
    }
}

Also, working with SXA aligned with Helix principles, it would make sense to create a foundation module for custom rules, drop the above class inside as well as serialization for newly created tag and elements:

<configuration xmlns:patch="http://www.sitecore.net/xmlconfig/" xmlns:role="http://www.sitecore.net/xmlconfig/role/" xmlns:unicorn="http://www.sitecore.net/xmlconfig/unicorn/">
  <sitecore unicorn:require="On">
    <unicorn>
      <configurations>
        <configuration name="Foundation.Rules" description="Foundation Rules" extends="Helix.Foundation">
          <predicate type="Unicorn.Predicates.SerializationPresetPredicate, Unicorn" singleInstance="true">
            <include name="$(layer).$(module).Tags" database="master" path="/sitecore/system/Settings/Rules/Definitions/Tags/Experience Editor" />
            <include name="$(layer).$(module).Elements" database="master" path="/sitecore/system/Settings/Rules/Definitions/Elements/Experience Editor" />
          </predicate>
        </configuration>
      </configurations>
    </unicorn>
  </sitecore>
</configuration>
So now I can have an element withing rendering variant that is shown only when in editing mode:

Hope you find this helpful!

Editing content on a CD server. Part 1. MVC ajax request to controller

Imagine the situation, when you need to have a page with an updatable text, for instance:

This div becomes editable as you click it

Now the next logical step would be to fire on blur client event (it happens when out focus out of div, ending the editing mode) and send changed content somewhere to the back end. Something simple like jQuery snippet below can handle that:


$('#editField').blur(function () {
        
    $.ajax({
        url: 'some/backend/url/to/post',
        data: { name: value },
        type: 'post',
        success: function () {
            // handle success 
        },
        error: function () {
            // handle error
        }
    });
});

So far, so good. The very next question would be - how do I create an endpoint in Sitecore to support that ajax post request and how do I pass the data and handle positive and negative outcomes? I assume, the back end should have some MVC controller action, that does some back end job of storing my data and returning JSON object back to client script.

So in order to make this work we register MVC routes, this is referenced from Application_Start event handler and is usually implemented in App_Start folder.
    public class Application : Sitecore.Web.Application
    {
        protected void Application_Start()
        {
            RouteConfig.RegisterRoutes(RouteTable.Routes);
        }
    }
    public class RouteConfig
    {
        public static void RegisterRoutes(RouteCollection routes)
        {
            routes.MapRoute(
                 name: "ajax",
                 url: "api/Ajax/{action}/{id}",
                 defaults: new { controller = "Ajax", 
                                 action = "DefaultActionMethodName", id = UrlParameter.Optional }
               );
        }
    }

This route binds all the /api/Ajax requests to be served by AjaxController class. But there is one more setting you require to do in order for your request to go the right direction - in config file set up a custom handler that will intercept that types of requests:

  
    ...
    
    ...

Controller action method being called is specified by caller, and will call DefaultActionMethodName as a default fallback if missing, passing id is optional. Here is the controller:

    public class AjaxController : Controller
    {
        [HttpPost]
        public ActionResult PostComment(string id, PostCommentViewModel model)
        {
            // implement backend logic here

            return Json();
        }
    }

 Controller accepts id as a parameter automatically resolved from URL, as specified in route we configured earlier. It also accepts and binds JSON object that we send as data into PostCommentViewModel object that automatically comes into controller as second parameter. Here is its implementation:

    public class PostCommentViewModel
    {
        [AllowHtml]
        public string Comment { get; set; }
    }
So, we can now finalize jQuery snippet that handles blur effect and sends data to controller. I have intentionally simplified it using external JavaScript objects, for clarity of understanding, you would normally avoid using global JavaScript variables in production code. These objects are used to keep state between ajax calls and to call server only when content is modified indeed. 
If there was an error on server, script retains previous value. If request worked out successfully with a status code 200 (OK) the we store updated value into <div> tag.  
var contents = $('#editField').html();
var id = '@Html.Sitecore().CurrentItem.ID';

var data = {};

$('#editField').blur(function () {
    if (contents != $(this).html()) {

        $.ajax({
            url: '/api/Ajax/PostComment/' + id,
            data: { Comment: $('#editField').html().trim() },
            type: 'post',
            success: function () {
                contents = $('#editField').html();
                var k = 0;
            },
            error: function () {
                $(this).html(contents);
            }
        });

        contents = $(this).html();
    }
});

On the server side there is not much to do with it - just save to database and return the result. Here is the final code of PostComment action of AjaxController:

 public class AjaxController : BaseController
    {
        [HttpPost]
        public ActionResult PostComment(string id, PostCommentViewModel model) // change to HtmlString
        {
            //Response.StatusCode = 500; 

            Database database = Sitecore.Context.Database;
            var item = database.GetItem(id);

            using (new Sitecore.SecurityModel.SecurityDisabler())
            {
                item.Editing.BeginEdit();
                try
                {
                    item.Fields["Comment"].Value = model.Comment;
                }
                finally
                {
                    item.Editing.EndEdit();
                }
            }

            item = database.GetItem(id);
            var val = item.Fields["Comment"].Value;

            return Json(id + " |" + model.Comment);
        }
    }

Editing content on a CD server. Part 2. Event Queue to sync data with master

... this blog is a next step after Editing content on a CD server. Part 1. MVC ajax request to controller.

Now we got a question on how to implement server logic to store the value. It may seem pretty straightforward for a moment - get item by its ID, update the field and return result. But in fact it's not, due to Sitecore's architectural principles.


Our page is running on a CD (content delivery server) and the item we're trying to update comes from CD database (traditionally called "web"), so if we edit and update item on "web" database - we'll get into situation when "web" contains updated version, while "master" doesn't. Publishing is one-way process of copying items from CM to CD databases (or simply from "master" to "web") so with next publishing we may overwrite updated item in web with outdated previous version from master. Writing directly to CM database is a violation of architectural principles, while it is technically possible on your developer "default" Sitecore installation, in real world Sitecore CD servers do not keep "master" connection string, making this process impossible. So, what should we do in that case?


Luckily, there are several ways of solving this scenario, each has its own pros and cons, so it is worth of thinking well ahead which (and if) is applicable to your solution.

Solution 1: Allocate a separate database in parallel with web, to store all user editable content. Normal items and non-user content will remain in web database, as normally. Here is the great article describing that approach:

Solution 2: Employ Sitecore Event Queue no notify CM about CD changes, so that as soon CM receives update event, it updates itself with the latest change coming from CD and then re-publishes the change across the rest of CD databases in order to keep them in sync. We describe this approach below.


Sitecore has a mechanism that is called remote events and allows communication between instances. This is implemented via "core" database that has EventQueue table that is monitored by a minor periods of time (like 2 seconds). We always have connection string reference to core database on our CD, at least for authorization / security purpose but also to support Event Queue that servers transport for publishing operations.

So, the process of saving comment on back end now looks fairly complicated - as post request comes - we still save the changes into CD ("web") database, on CM we also add an additional handler to item:saved event that executes custom code with event handler, that updates the same item on master database. And finally, you may programmatically re-publish updated item to other CD instances (if many), that do not have an updated version yet.

Now let's look at the code that implements all described below. AjaxController will include additional code right before returning JSON back to browser:

UpdateCommentEvent evt = new UpdateCommentEvent();
evt.Id = item.ID.ToString();
evt.FieldName = fieldName;
evt.Value = database.GetItem(id).Fields[fieldName].Value;
                 
Sitecore.Eventing.EventManager.QueueEvent<UpdateCommentEvent>(evt); 

What we're doing here is just queueing an event. UpdateCommentEvent is a custom event written by us, it is normal C# class, but please pay attention to DataContract and DataMember attributes. This is required for serialization purposes. Here is how UpdateCommentEvent is defined within the code:

using System;
using System.Collections.Generic;
using System.Linq;
using System.Text;
using System.Runtime.Serialization;

namespace Website.Code.Events
{
    [DataContract]
    public class UpdateCommentEvent
    {
        [DataMember]
        public string Value { get; set; }

        [DataMember]
        public string Id { get; set; }

        [DataMember]
        public string FieldName { get; set; }

        public UpdateCommentEvent(string id, string fieldName, string value)
        {
            Value = value;
            Id = Id;
            FieldName = fieldName;
        }

        public UpdateCommentEvent()
        {
        }
    }
}

And, of course, we define UpdateCommentEventArgs that comes along with our new event:

namespace Website.Code.Events
{
    public class UpdateCommentEventArgs : EventArgs, IPassNativeEventArgs
    {
        private UpdateCommentEvent _evt;

        public UpdateCommentEventArgs(UpdateCommentEvent evt)
        {
            _evt = evt;
        }

        public string Id
        {
            get { return _evt.Id; }
        }

        public string FieldName
        {
            get { return _evt.FieldName; }
        }

        public string Value
        {
            get { return _evt.Value; }
        }
    }
}
Implementation on CM side: first of all we need need to specify a new hook.

    
 ...   

Here's the code referenced by hook specified above. We subscribe to our event and once it arrives - we call Run method that arranges local (for CM environment) event:

using System;
using Sitecore.Events.Hooks;
using Sitecore.Eventing;

namespace Website.Code.Events
{
    public class UpdateCommentHook : IHook
    {
        public void Initialize()
        {
            // and now raise event locally
            EventManager.Subscribe<UpdateCommentEvent>(new Action<UpdateCommentEvent>(UpdateCommentEventHandler.Run));
        }
    }
}

We need to specify new local event called updatecomment:remote in the configuration as associate it with a handler method:


And here is OnUpdateCommentRemote event handler that fires on CM. It gets event arguments, casts them to UpdateCommentEventArgs and extracts data out of arguments. In order to update an item on CM we require 3 parameters: Item ID, field name to be updated and the value to be updated with. All three are stored in event arguments so now we are able to update item on master database.

namespace Website.Code.Events
{
    public class UpdateCommentEventHandler
    {
        /// 
        /// The method is the method that you need to implement as you do normally
        /// 
        public virtual void OnUpdateCommentRemote(object sender, EventArgs e)
        {
            if (e is UpdateCommentEventArgs)
            {
                var args = e as UpdateCommentEventArgs;
                var master = Sitecore.Configuration.Factory.GetDatabase("master");

                using (new SecurityDisabler())
                {
                    var itemOnMaster = master.GetItem(args.Id);

                    using (new EditContext(itemOnMaster))
                    {
                        itemOnMaster[args.FieldName] = args.Value;
                    }
                }

// also do publishing to other CD here, if required
} } // This methos is used to raise the local event public static void Run(UpdateCommentEvent evt) { UpdateCommentEventArgs args = new UpdateCommentEventArgs(evt); Event.RaiseEvent("updatecomment:remote", new object[] { args }); } } }
If there are multiple CD environments (at least one apart from the one where we edit the comment) you will also need to re-publish from CM to those CDs in order to keep them all in sync.

So, in these two blog posts we described how to make an ajax MVC call to controller on back-end server and update user editable content on CD environment keeping it in-sync with other environments. Hope this post helps you to understand Sitecore architecture better.

See also (additional references):

Sitecore.Support.RemoteEventLogging
Tweak to log all item:saved:remote events of EventQueue that were just processed.
https://bitbucket.org/sitecoresupport/sitecore.support.remoteeventlogging/wiki/Home