Experience Sitecore ! | March 2017

Experience Sitecore !

More than 200 articles about the best DXP by Martin Miles

Creating "Change item ID" module. Part 1 - Identifying the requirements

I am working on a bit of unusual solution at he moment and one of the "features" I was surprised to own was and external feed of data that serves me the content in various formats including GUIDs of items existing in my Sitecore database.Since feed is not well flexible, I decided to become flexible myself and one of challenges I rose for myself was changing IDs of existing items in Sitecore.

As you know, ID is read-only property of Item in Sitecore, it is being generated upon item's creation and remains the same for entire lifetime. Driven by curiosity, I started investigating how to achieve that and decided to look up any existing implantation. What can be similar to changing ID? Of course, that would be Rename feature.

Let's take a look at Rename icon in Content Editor context menu, when right clicking on an item. It is located at /sitecore/content/Applications/Content Editor/Context Menues/Default/Rename and sends the following message

item:rename(id=$Target)

that calls rename command. So why not to create one more command right after Rename that will send message:

item:changeid(id=$Target)

Of course, we need to associate that to a corresponding business class that inherits from Command:

<commands>
  <command name="item:changeid" type="ChangeId.ChangeIdCommand,ChangeId" patch:after="command[@name='item:rename']" />
</commands>

Let's follow Sitecore architectural principles and implement our change ID logic in a form of a pipeline, let's call it uiChangeIdForItem. In that case new ChangeIdCommand wil do nothing else but trigger the pipeline:

[Serializable]
public class ChangeIdCommand : Command
{
    public override void Execute(CommandContext context)
    {
        Assert.ArgumentNotNull(context, "context");
        if (context.Items.Length != 1 || context.Items[0] == null)
        {
            return;
        }

        StartPipeline("uiChangeIdForItem", context.Items[0]);
    }

    public override CommandState QueryState(CommandContext context)
    {
        Assert.ArgumentNotNull(context, "context");
        if (context.Items.Length != 1)
        {
            return CommandState.Disabled;
        }

        Item obj = context.Items[0];
        if (obj.Appearance.ReadOnly || !obj.Access.CanRename() || IsLockedByOther(obj))
        {
            return CommandState.Disabled;
        }

        return base.QueryState(context);
    }

    private static void StartPipeline(string pipelineName, Item item)
    {
        Assert.ArgumentNotNullOrEmpty(pipelineName, "pipelineName");
        Assert.ArgumentNotNull(item, "item");

        NameValueCollection parameters = new NameValueCollection();
        parameters.Add("database", item.Database.Name);
        parameters.Add("id", item.ID.ToString());
        parameters.Add("language", item.Language.ToString());
        parameters.Add("version", item.Version.ToString());

        Context.ClientPage.Start(pipelineName, parameters);
    }
}

Okay, but what would processors our pipeline consist from? To answer that we need to understand how it will be renaming an item and what additional -pre and -post processing steps may occur, passing parameters between steps and fallback scenarios. So let's take into consideration the following concerns:

1. Changing ID cannot be done directly in the code by using Sitecore API, that isn't something that is or will be supported in future. But by using API we can serialize and deserialize an item, so changing ID would be a matter of simply changing several bytes in plain text file. So based on that we already have a consequence of three processors: Serialize ==> ChangeId ==> Deserialize.

2. Deserialization of an item with modified ID will create a new item with new ID that would be an absolute clone of original item rather then updating ID of existing item. That means I can end up having two exact items, so I need to delete the one having original ID. That adds RemoveOriginalItem processor somewhere at the end of pipeline, when the rest is done.

3. To obtain new item I would need it to get from somewhere, so let's ask a user to provide that by raising a popup input box from UI. That adds an additional processor, let's call it GetNewName.

4. Changing ID is a dangerous task so a user should clearly realise what he/she is doing and understand consequences, that should be ideally an admin or at least a developer. So we should not allow to perform this operation to everyone but should check whether a user has appropriate permissions. Of course, permissions can be set externally from Security Editor but that's only UI and can be bypassed by sending the same command message from JavaScript or developers tools in browser. That's why it is essential to verify permissions at the backend prior to doing anything else, so that results in CheckPermissions processor in the beginning of pipeline.

5. Items in SItecore are organised hierarchically so if we change ID of an item by deserializing it into a new clone item, children still remain under original item that we are right about to delete that will remove children as well. So to correct that we need to explicitly move all the descendants under a new item. That can become an addtional MoveChildren processor after deserialization process.

6. Also if original item was referenced by any other items, those references will become broken once delete original item will be deleted so need to implement UpdateReferences processor. If there are many references to an item it may take a considerable time to update them all, so in user-friendly manner we need to prompt that and ask whether a user still want to process. Why not a candidate for yet another CheckNumberOfReferences processor?

Combining 10 above processors together in the right order makes will look as below:

<processors>
  <uiChangeIdForItem>
    <processor mode="on" type="ChangeId.ForItem,ChangeId" method="CheckPermissions" />
    <processor mode="on" type="ChangeId.ForItem,ChangeId" method="VerifyUnsupportedTypes" />
    <processor mode="on" type="ChangeId.ForItem,ChangeId" method="GetNewName" />
    <processor mode="on" type="ChangeId.ForItem,ChangeId" method="CheckLinks" />
    <processor mode="on" type="ChangeId.ForItem,ChangeId" method="Serialize" />
    <processor mode="on" type="ChangeId.ForItem,ChangeId" method="ChangeId" />
    <processor mode="on" type="ChangeId.ForItem,ChangeId" method="Deserialize" />
    <processor mode="on" type="ChangeId.ForItem,ChangeId" method="CopyTemplateChildren" />
    <processor mode="on" type="ChangeId.ForItem,ChangeId" method="RepairLinks" />
    <processor mode="on" type="ChangeId.ForItem,ChangeId" method="RemoveSourceItem" />
  </uiChangeIdForItem>
</processors>

So far, so good! Once we mentioned all the requirements and are certain about the steps, let's do the actual implementation in second part of this blog post.

Creating "Change item ID" module. Part 2 - The implementation

In the first part of his blog post we have identified the requirements, designed the consequence of uiChangeIdForItem pipeline processors, as well as created necessary Sitecore plumbing for that. So now let's focus on actual business logic and processors implementation.

The implementation of processors:

  1. CheckPermissions
  2. VerifyUnsupportedTypes
  3. GetNewName
  4. CheckNumberOfReferences
  5. Serialize
  6. ChangeId
  7. Deserialize
  8. MoveChildren
  9. UpdateReferences
  10. RemoveOriginalItem


1. CheckPermissions
Let's check permissions first. I borrowed this processor from uiRename pipeline and slightly modified that.
public virtual void CheckPermissions(ClientPipelineArgs args)
{
    Assert.ArgumentNotNull(args, "args");
    if (!SheerResponse.CheckModified())
    {
        return;
    }

    Item obj = GetItem(args);
    if (obj == null)
    {
        HandleItemNotFound(args);
    }
    else
    {
        if (!obj.Access.CanRename() || obj.Appearance.ReadOnly)
        {
            Context.ClientPage.ClientResponse.Alert(Translate.Text("You do not have permission to change ID \"{0}\".", obj.DisplayName));
            args.AbortPipeline();
        }

        if (Context.IsAdministrator || !obj.Locking.IsLocked() || obj.Locking.HasLock())
        {
            return;
        }

        Context.ClientPage.ClientResponse.Alert(Translate.Text("You cannot edit this item because '{0}' has locked it.", obj.Locking.GetOwnerWithoutDomain()));
        args.AbortPipeline();
    }
}

2. VerifyUnsupportedTypes
At this stage I want to disallow changing IDs for template fields. By that moment I haven't resolved how to change fields accurately, so will avoid that for now,
public virtual void VerifyUnsupportedTypes(ClientPipelineArgs args)
{
    Assert.ArgumentNotNull(args, "args");

    Item item = GetItem(args);
    if (item == null)
    {
        HandleItemNotFound(args);
    }
    else
    {
        if (item.TemplateID == new ID("{455A3E98-A627-4B40-8035-E683A0331AC7}") || item.Template.Name == "Template field")
        {
            Context.ClientPage.ClientResponse.Alert("You cannot modify ID of template field, but you may do that for template itself");
            args.AbortPipeline();
        }
    }
}

3. GetNewName
Asking user to provide new ID in the popup input box and validate that input value.
public virtual void GetNewName(ClientPipelineArgs args)
{
    Assert.ArgumentNotNull(args, "args");

    string header = Translate.Text("Change ID");
    if (args.IsPostBack)
    {
        if (string.IsNullOrEmpty(args.Result) || args.Result == "null" || args.Result == "undefined")
            args.AbortPipeline();

        else if (args.Result.Trim().Length == 0)
        {
            Context.ClientPage.ClientResponse.Alert("The name cannot be blank.");
            Context.ClientPage.ClientResponse.Input("Enter new ID for the item:", string.Empty,
                ID_FORMAT, "'$Input' is not a valid ID.", ID_LENGTH, header);

            args.WaitForPostBack();
        }
        else
        {
            Item obj = GetItem(args);

            if (obj == null)
            {
                HandleItemNotFound(args);
            }
            else
            {
                Context.ClientPage.ServerProperties["NewID"] = args.Result;
                args.IsPostBack = false;
            }
        }
    }
    else
    {
        Item obj = GetItem(args);
        if (obj == null)
        {
            HandleItemNotFound(args);
        }
        else
        {
            Context.ClientPage.ClientResponse.Input("Enter new ID for the item:", obj.ID.ToString(), ID_FORMAT, 
                "'$Input' is not a valid ID.", ID_LENGTH, header);

            args.WaitForPostBack();
        }
    }
}

4. CheckNumberOfReferences
This processor is not mandatory and presents for the sake of user experience. 
public virtual void CheckNumberOfReferences(ClientPipelineArgs args)
{
    Assert.ArgumentNotNull((object)args, "args");
    if (args.IsPostBack)
    {
        if (args.Result == "yes")
        {
            return;
        }

        args.AbortPipeline();
    }
    else
    {
        Item obj = GetItem(args);
        if (obj == null)
        {
            HandleItemNotFound(args);
        }
        else
        {
            string checkLinksMessage = GetCheckLinksMessage(obj);
            if (string.IsNullOrEmpty(checkLinksMessage))
            {
                return;
            }

            SheerResponse.Confirm(checkLinksMessage);
            args.WaitForPostBack();
        }
    }
}
GetCheckLinksMessage is calculating number of references for the item we are changing ID for and prompts that operation may take a longer time once more than 100 references are found,
private static string GetCheckLinksMessage(Item item)
{
    Assert.ArgumentNotNull(item, "item");
    string str = string.Empty;
    if (GetLinks(item) > 100)
    {
        str = Translate.Text("This operation may take a long time to complete.\n\nAre you sure you want to continue?");
    }

    return str;
}

5. Serialize
That is where our main logic begins. Let's serialize original item first using Sitecore API so by default it will write under /Data/serialization folder outside web root.
public virtual void Serialize(ClientPipelineArgs args)
{
    Assert.ArgumentNotNull(args, "args");

    Item item = GetItem(args);

    if (item == null)
    {
        HandleItemNotFound(args);
    }
    else
    {
        try
        {
            Serializer.SerializeItem(item);
        }
        catch (Exception e)
        {
            Context.ClientPage.ClientResponse.Alert($"Failed to serialize item: {item.DisplayName}");
            args.AbortPipeline();
        }
    }
}

And Serializer class is quite simple static class:

public static class Serializer
{
    public static void SerializeItem(Item item)
    {
        if (item != null)
        {
            Manager.DumpItem(item);
        }
    }

    public static void RestoreItem(string serializedItemPath, Database database)
    {
        var options = new LoadOptions(database) {ForceUpdate = true};

        using (new Sitecore.SecurityModel.SecurityDisabler())
        {
            Manager.LoadItem(serializedItemPath, options);
        }
    }
}

6. ChangeId
Then need to locate serialized file and modify it. In order to open I am again relying on Sitecore API by calling PathUtils.GetFilePath(new ItemReference(item)) method so it will return me the same path item was previously serialized. Then I read the file and simply replace old ID to the new ID and save it back. 
public virtual void ChangeId(ClientPipelineArgs args)
{
    Assert.ArgumentNotNull(args, "args");

    string newId = StringUtil.GetString(Context.ClientPage.ServerProperties["NewID"]);
    if (string.IsNullOrEmpty(newId) || newId == "null" || newId == "undefined")
    {
        return;
    }

    var item = GetItem(args);

    if (item == null)
    {
        HandleItemNotFound(args);
    }
    else
    {
        try
        {
            string serializedItemPath = GetSerializationPath(item);

            if (File.Exists(serializedItemPath))
            {
                string text = File.ReadAllText(serializedItemPath);

                text = text.Replace(item.ID.ToString(), newId);

                File.WriteAllText(serializedItemPath, text);
            }
        }
        catch (Exception e)
        {
            Context.ClientPage.ClientResponse.Alert("Cannot find serialized file");
            args.AbortPipeline();
        }
    }
}

7. Deserialize
Deserialize file back with modified ID. Sitecore allows multiple items with the same name at the same level so it will end up having two exactly the same items next to it other with new and old IDs.
public virtual void Deserialize(ClientPipelineArgs args)
{
    Assert.ArgumentNotNull(args, "args");

    Item item = GetItem(args);

    if (item == null)
    {
        HandleItemNotFound(args);
    }
    else
    {
        try
        {
            string serializedItemPath = GetSerializationPath(item);
            Serializer.RestoreItem(serializedItemPath, item.Database);
        }
        catch (Exception e)
        {
            Context.ClientPage.ClientResponse.Alert($"Failed to deserialize item: {item.DisplayName}");
            args.AbortPipeline();
        }
    }
}

8. MoveChildren
Since items can have children, the next step obviuosly would be to relocate all children recursively from underneath old item to become the children of a new item. Than especially makes sense when you're modifying a template item.
public virtual void MoveChildren(ClientPipelineArgs args)
{
    Assert.ArgumentNotNull(args, "args");
    var item = GetItem(args);
    if (item == null)
    {
        HandleItemNotFound(args);
    }
    else
    {
        try
        {
            //if (item.Paths.FullPath.StartsWith("/sitecore/templates"))
            {
                string newId = StringUtil.GetString(Context.ClientPage.ServerProperties["NewID"]);
                var newIdItem = item.Database.GetItem(new ID(newId));

                var children = item.Children;
                foreach (Item child in children)
                {
                    child.MoveTo(newIdItem);
                }                            
            }
        }
        catch (Exception e) 
        {
        }
    }
}

9. UpdateReferences
Apart from having child items, an item can be referenced by other items, the entire data relationship in Sitecore is built on that principle. The good news is that in recent versions of Sitecore references are GUIDs and no more paths. So what is now important - to go through all the referrers and update them with a GUID of new item. Remember step 4 where we made CheckNumberOfReferences processor that counted refs and prompted if there are too many? Those are the links to be modified at this stage:
public virtual void UpdateReferences(ClientPipelineArgs args)
{
    Assert.ArgumentNotNull(args, "args");

    var item = GetItem(args);
    if (item == null)
    {
        HandleItemNotFound(args);
    }
    else
    {
        try
        {
            string newId = StringUtil.GetString(Context.ClientPage.ServerProperties["NewID"]);
            Relink(item, newId);
        }
        catch (Exception e)
        {
            Context.ClientPage.ClientResponse.Alert("Error while updating links: " + e.Message);
            args.AbortPipeline();
        }
    }
}

10. RemoveOriginalItem
And finally, when everything else is done and we've got new item with all children and references modified. So it is good now o delete an original item
public virtual void RemoveOriginalItem(ClientPipelineArgs args)
{
    Assert.ArgumentNotNull(args, "args");

    Item item = GetItem(args);

    if (item == null)
    {
        HandleItemNotFound(args);
    }
    else
    {
        try
        {
            using (new SecurityDisabler())
            {
                item.Delete();
            }
        }
        catch (Exception e)
        {
            Context.ClientPage.ClientResponse.Alert("Error deliting initial item");
            args.AbortPipeline();
        }
    }
}  

There will be also final part of this blog post later that will add unit testing, sum up the results and highlight what can be done to make it better.

I will ask readers to forgive me at this stage for not giving a package with ChangeId module - haven't it properly tested yet. However anyone curious can clone it from GitHub repo and give a try yourself.

Know your tools: The easiest way to install Habitat - Habitat Solution Installer

Working with Helix often encourages you to perform quick look-ups into the live-standard-implementation - Habitat project. That's why you have to have it installed. I remember the first time I installed Sitecore Habitat in October 2015 and how complicated that seemed at glance.

Luckily we now got a nice tool, that does exactly what it is named for - Habitat Solution Installer written by Neil Shack. So, let's go ahead and install Habitat into a new non-traditional destination using that tool.

Firs of all, let's grab Habitat Solution Installer itself from Sitecore Marketplace. Once downloaded, run HabitatInstaller.exe.


First screen takes three most important Habitat setting that we usually need to change as well as asks for the solution root folder where it will install the code. Once Install is clicked - it will download an archive of master branch from Habitat GitHub repository.


Then it will extract downloaded archive into temporal folder. By the way, you may alternate both path to master archive and your temporal files folder by clicking Settings button on the first (main) screen.


After extracting files, it will run npm install so you need to have node installed as a prerequisite.


Once finished, Habitat Solution Installer will display confirmation box.


So, what it has done - it installed and configured project code folder. But what hasn't it done?

1. It does not install Sitecore. You need to have it installed as another prerequisite, so that you provide Sitecore web folder and hostname to installer as shown on first screenshot. The best way would be to install using SIM (marketplace link). While installing Sitecore, make sure you're installing the right version corresponding to to codebase at Habitat master branch, you may look it up at Habitat Wiki page.

2. Not just to say you need to install Sitecore itself, you also need to install Web Forms for Marketers of the version corresponding to you Sitecore instance. And to ensure WFFM installation not failing, you need to install MongoDB prior to. Luckily that can be done in one click using SIM:


Finally, when all above is done, you may run gulp tasks from Task (View => Other Windows => Task Runner Explorer in Visual Studio 2015). Since npm install was already done for you - tasks are loaded as normal:


That's it! After Sitecore items are deserialised into your Sitecore instance, you'll be able to run Habitat website (however do not forget to publish from master to web unless you run it in live mode). The final result comes in you browser:


Know your tools: The easiest way to add a new project into your Helix solution

UPDATE: just came across a better solution from kamsar, that generates code, serialization and tests for the module. Please use that one instead of described below, however, the principle described below is exactly the same so you may refer for the sake of understanding.

---------------------------- original text below ----------------------------

I have found a great solution that makes adding a new project into existing Helix / Habitat solution so transparent and painless - Prodigious Helix Generator.

The guidance is well done and describes all thee steps. Is is soooo easy, and removes pain of fixing some forgotten references / namespaces / etc after you accidentally found out. It also optionally creates TDS project skeleton for your module, once you need to serialise items (why not to add Unicorn in addition to?).

So, to make it work you need to install yeoman first and afterwards the generator tool itself:

npm install -g yo
npm install -g generator-prodigious-helix

One important thing to mention is that not to mess with the paths and to get new module generated under the right path - run it at the root of your solution / repo.

You are at a choice of 3 options. In order to add a foundation, type in:

yo prodigious-helix:foundation

to make a feature:

yo prodigious-helix:feature

and for project even simpler:

yo prodigious-helix

As for example, below I am creating a new foundation module called AdminTools for the solution named HelixSolution. That will result in creating me a project called HelixSolution.Foundation.AdminTools within a same name folder (created) at the right path under Foundation folder. All the namespaces, references, settings and naming conventions would be auto-generated and correct!


After answering those 3 questions, you'll get your stuff generated:


That's it!

The only thing I noticed it that it appends solution name under App_config folder: App_Config\Include\HelixSolution\Feature\Feature.AdminTools.config so depending on your setup you may need to move Feature\Feature.AdminTools.config one level up into Include folder.

Hope it will start saving your time as much as it saves mine.

Migrating existing code to Helix. Fixing invalid dynamic placeholders

Recently I have inherited a project that utilised dynamic placeholder in a weird way:

public static HtmlString DynamicPlaceholder(this SitecoreHelper helper, string placeholderKey)
{
    if (string.IsNullOrEmpty(RenderingContext.Current.Rendering?.DataSource))
        return helper.Placeholder(placeholderKey);

    var currentRenderingId = Guid.Parse(RenderingContext.Current.Rendering.DataSource);
    return helper.Placeholder($"{placeholderKey}_{currentRenderingId}");
}

instead of more commonly used way suggested by Jason Bert:

namespace DynamicPlaceholders.Mvc.Extensions
{
	public static class SitecoreHelperExtensions
	{
		public static HtmlString DynamicPlaceholder(this SitecoreHelper helper, string placeholderName)
		{
			string text = PlaceholdersContext.Add(placeholderName, RenderingContext.Current.Rendering.UniqueId);
			return helper.Placeholder(text);
		}
	}
}

In two words, the first approach generates placeholder name using an ID of datasource item. The second approach is more traditional and is default for Helix. It was suggested by Jason Bert and also utilised by sitecore - that relies on rendering's UniqueID. In both cases, dynamic placeholders look like: /content/name-of-placeholder_017c3643-0fef-475c-95d2-bb1107beb664.

So I need to update it across entire solution. Let's iterate our items.

First of all, I do not need to go through all of item, but only those that are pages and have presentation configured, as I am going to adjust it. Secondly, those items are located under /sitecore/content folder. As many of you should know, presentation details (or deltas) for a page are kept within two fields of Standard Template - Renderings and Final Renderings that correspond to configuration you see at Shared Layout and Final Layout tabs. These thoughts resulted in using following Sitecore query to identify those items:

/sitecore/content//*[@__Renderings != '' or @__Final Renderings != '']

So far, so good. Also need to mention that I will perform the operation for master database only and for Default device:

private const string DatabaseName = "master";
private const string DefaultDeviceId = "{FE5D7FDF-89C0-4D99-9AA3-B5FBD009C9F3}";

I am using Sitecore presentation API in order to achieve my goal. Below is my Iterate() method:

public Dictionary<Item, List<KeyValuePair<string, string>>> Iterate()
{
    var result = new Dictionary<Item, List<KeyValuePair<string, string>>>();

    var master = Factory.GetDatabase(DatabaseName);
    var items = master.SelectItems(ItemsWithPresentationDetailsQuery);

    var layoutFields = new[] {FieldIDs.LayoutField, FieldIDs.FinalLayoutField};

    foreach (var item in items)
    {
        foreach (var layoutField in layoutFields)
        {
            var changeResult = ChangeLayoutFieldForItem(item, item.Fields[layoutField]);

            if (changeResult.Any())
            {
                if (!result.ContainsKey(item))
                {
                    result.Add(item, changeResult);
                }
                else
                {
                    result[item].AddRange(changeResult);
                }
            }
        }
    }

    return result;
}

That method iterates through each item from returned from the query and calls ChangeLayoutFieldForItem for that item twice - for both presentation fields Renderings and Final Renderings.

private List<KeyValuePair<string, string>> ChangeLayoutFieldForItem(Item currentItem, Field field)
{
    var result = new List<KeyValuePair<string, string>>();

    string xml = LayoutField.GetFieldValue(field);

    if (!string.IsNullOrWhiteSpace(xml))
    {
        LayoutDefinition details = LayoutDefinition.Parse(xml);

        var device = details.GetDevice(DefaultDeviceId);
        DeviceItem deviceItem = currentItem.Database.Resources.Devices["Default"];

        RenderingReference[] renderings = currentItem.Visualization.GetRenderings(deviceItem, false);

        var datasourceGuidsToRenderingUniqueIdMap = renderings
            .Where(r => !string.IsNullOrWhiteSpace(r.Settings.DataSource))
            .Select(r => new KeyValuePair<string, string>(Guid.Parse(r.Settings.DataSource).ToString(), r.UniqueId));

        if (device?.Renderings != null)
        {
            foreach (RenderingDefinition rendering in device.Renderings)
            {
                if (!string.IsNullOrWhiteSpace(rendering.Placeholder))
                {
                    var verifiedPlaceholderKey = FixPlaceholderKey(rendering.Placeholder, datasourceGuidsToRenderingUniqueIdMap);
                    result.Add(new KeyValuePair<string, string>(rendering.Placeholder, verifiedPlaceholderKey));
                    rendering.Placeholder = verifiedPlaceholderKey;
                }
            }

            string newXml = details.ToXml();

            using (new EditContext(currentItem))
            {
                LayoutField.SetFieldValue(field, newXml);
            }
        }
    }

    return result;
}

Further down it creates a list of matches for all the renderings within current presentation field of that particular item - datasource GUIDs matching to unique rendering IDs to go through it and do a replacement - that is done in FixPlaceholderKey method. Once everything is replaced, save the field by calling LayoutField.SetFieldValue() of course wrapping that call with EditContext as we are modifying item's field value.

FixPlaceholderKey is a simple method that just does case insensitive replacement by using Regex:

private string FixPlaceholderKey(string renderingInstancePlaceholder, IEnumerable<KeyValuePair<string, string>> map)
{
    var value = renderingInstancePlaceholder;

    foreach (var oldValue in map)
    {
        value = Regex.Replace(value, oldValue.Key, Guid.Parse(oldValue.Value).ToString(), RegexOptions.IgnoreCase);
    }

    return value;
}

That is pretty everything about the dynamic placeholder fixing logic.

But as for my case - I was aware that I'll need to run this dynamic placeholder replacements few more times in future and will likely need to implement some other similar small tools. So I decided that it would be great to place it under /sitecore/admin folder along with other admin tools - exact location by purpose! And since we're now going Helix, I decided to follow good principles and created a foundation module called AdminTools, where I will be adding similar admin folder tools. So here's how it looks for me in the Solution Explorer:


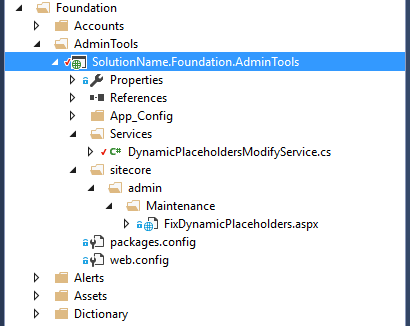
FixDynamicPlaceholders.aspx is a classical ASP.NET WebForm with one line markup (ah-h, I was so lucky not to deal with Webforms for couple past years till the moment)

<%@ Page Language="C#" AutoEventWireup="true" CodeBehind="FixDynamicPlaceholders.aspx.cs" Inherits="HomeServeUsa.Foundation.AdminTools.sitecore.admin.Maintenance.FixDynamicPlaceholders" %>

and the codebehind. Since FixDynamicPlaceholders.aspx is admin tool page - codebehind is inherited from Sitecore.sitecore.admin.AdminPage:

public partial class FixDynamicPlaceholders : AdminPage
{
    protected void Page_Load(object sender, EventArgs e)
    {
        var fixRenderings = new DynamicPlaceholdersModifyService();
        var result = fixRenderings.Iterate();

        OutputResult(result);
    }

    private void OutputResult(Dictionary<Item, List<KeyValuePair<string, string>>> result)
    {
        Response.ContentType = "text/html";

        Response.Write($"<h1>{result.Count} items processed</h1>");
        foreach (var pair in result)
        {
            Response.Write($"<h3>{pair.Key.Paths.FullPath}</h3>");

            foreach (var kvp in pair.Value)
            {
                if (kvp.Key != kvp.Value)
                {
                    Response.Write($"<div>{kvp.Key} ==> {kvp.Value}</div>");
                }
            }
        }
    }
}

Finally, it is complete. Hope this helps someone!

P.S. of course, that would be easier (and more elegant) to perform with Sitecore PowerShell extension. But unfortunately I am the only person in the organisation who uses it regardless of my promotional activity.