Experience Sitecore ! | All posts tagged 'Workflows'

Experience Sitecore !

More than 200 articles about the best DXP by Martin Miles

Field level deny permissions in Helix based on Habitat and how that affects your workflows?

If you decide to use Habitat as a bootstrap platform for your Helix solution, while setting up workflows for your solution, you may come across a situation described below. By this blog post I will try to explain what happens, why is it so, and how to make things work.

Symptoms: you are about to set up workflows for the solution and have created a role for the content editors. Then you give read / write permissions for that role to the site content (likely to be /Home and /Global nodes under your site definition item, recursively). When logging as a user having Content Editor role mention above, you are able to Lock and Edit and later to Check-In an item, but the fields for that item are disabled. Weird. But doing the same on other items outside your website works well (for instance - Home item coming with Sitecore initial installation). Why is it so?


There are few of StackOverflow questions trying to sort this out: one and two. I have left few comments there helping other to solve the situation.


Explanation: Habitat uses an "intersection" of feature-or-foundation-level permissions (also knows as Functional roles) with project-level permissions (also knows as organisational rights). Most of the Habitat modules have such a functional role coming as a part of the module, is in the following format: modules\Feature XXX Admin or modules\Foundation XXX Admin.

What habitat does - it denies write access for the inheritance for all the fields by default and then explicitly allows writing permission for that particular Functional Role within a module. That is briefly explained in the official Helix documentation but two images below would be more descriptive:


Solution: two potential ways of sorting this out. The first option is when you decide to keep Functional roles as a part of your solution. In that case, you need to make sure your Content Editor roles also inherits from these Functional roles (or from an umbrella role inheriting a combination of Functional roles).

Another way will be if you decide to drop these Functional roles. In that case, you'll need to remove them from serialization config and source control, and also perform the following for each field affected:

1. Navigate to that field in Sitecore, for example: /sitecore/templates/Feature/Navigation/_Navigable/Navigation/ShowInNavigation

2. Click Security tab, then Assign. You'll see at least two roles available - Everyone and a Functional role for that module.

3. Selecting Everyone, remove Inheritance denial for both Item and Descendants by clicking both red crosses, then save (OK).

4. Repeat that for each field of each template for each of the Feature / Foundation layers.

Then users from Content Editors role will be able to edit all the fields.

Hope this helps!

Creating a simple workflow in Helix

This may be a not as comprehensive guidance, as it should be, however, I am using this blog post mostly for leaving notes in a cheatsheet manner for later. So, there are several steps to make things happen.

1. Let's create a security domain for our website - that should typically be in a site config on a project layer (Website1.Website.config for my example):
<?xml version="1.0"?>
<configuration xmlns:patch="http://www.sitecore.net/xmlconfig/" xmlns:role="http://www.sitecore.net/xmlconfig/role/">
    <sitecore>
        <domainManager defaultProvider="file">
            <patch:attribute name="defaultProvider">config</patch:attribute>
            <domains>
                <domain id="website1" type="Sitecore.Security.Domains.Domain, Sitecore.Kernel">
                    <param desc="name">$(id)</param>
                    <ensureAnonymousUser>false</ensureAnonymousUser>
                </domain>
            </domains>
        </domainManager>
    </sitecore>
</configuration>


2. Create 3 roles: website1\Editor and website1\Approver on the same domain, as well as website1\everyone that is a member of sitecore\Sitecore Client Authoring and is shared between first two. Make website1\Editor and website1\Approver members of website1\everyone and website1\everyone in turn member of sitecore\Sitecore Client Authoring.Also make website1\Approver member of sitecore\Sitecore Client Publishing


3. Create user accounts. I am creating them as part of website1 domain but they may be part of sitecore domain if need them instance-wide.


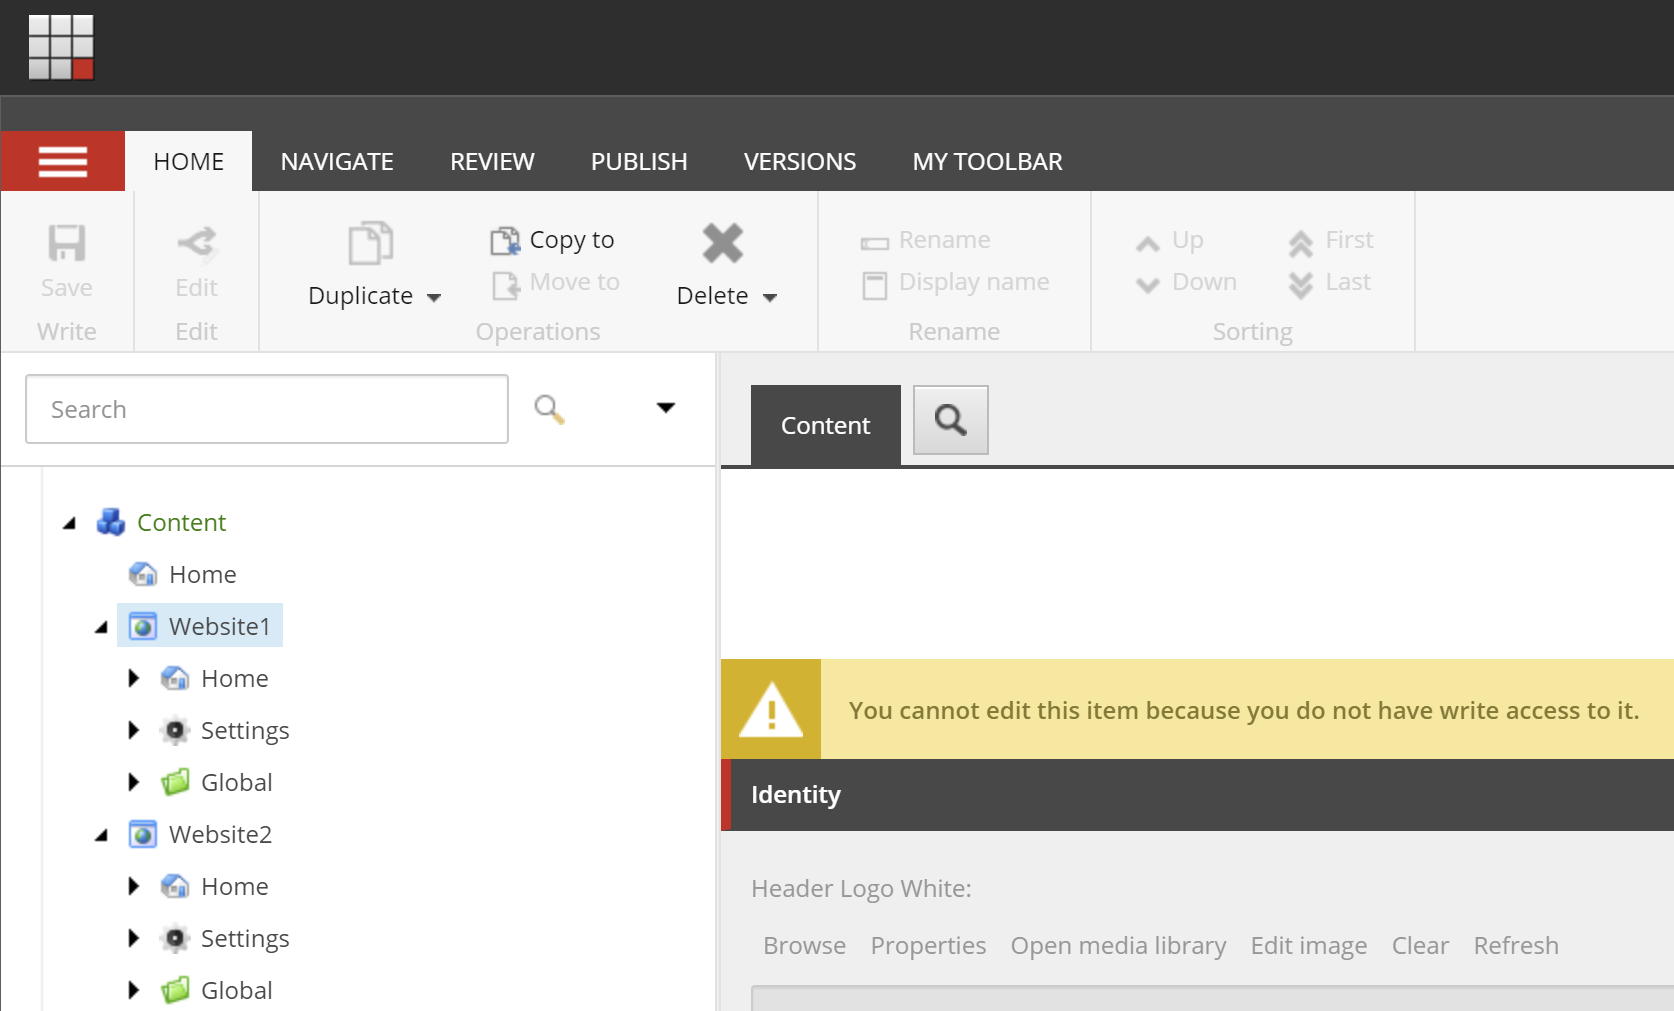
4. Assign users to their appropriate roles - editors or approvers. Once assigned - the user is able to log in and load content editor, however not able to insert new item for our website or change presentation details. User also is able to open a page in experience editor but again cannot edit this item because do not have write access to it.


Image above shows how LaunchPad looks when users log into Sitecore. However due to not having permissions they will see the following message in a Content Editor:

5. Create your workflow. I won't be original calling new workflow as Website1 Workflow. The easiest for a quick start would be to clone Sample Workflow and adjust states and other refs to point within corresponding items within that newly created workflow.


6. Then assign page relevant templates into Website1 Workflow. (Standard values -> Workflow section. Set default workflow into Website1 workflow). This ensures all the new items of this template will have Workflow field set into Website1 Workflow and State field will have state preselected as per workflow's Initial state field (workflow definition item)


7. Now give permissions to the role:
Open Access Viewer, click Account from the left top corner and select website1\Editor. Then having it selected give permissions to for everything under
/sitecore/content/Website1/Home,/sitecore/content/Website1/Global (but explicitly deny editing and deleting the top node itself), and do not forget media library for that project

Once complete - users will be able to Lock and Edit items and later submit for approval. So far so good.

8. Next step is to ensure that editors will not be able to approve items. It can be done by denying permission on Awaiting Approval state for editor.


That will result in the following permissions set for Editors in Access Viewer:


While Approvers' Acess Viewer shows Awaiting Approval state available:


9. One more thing to mention - if you got your Helix solution created from Habitat - you may come into a situation when certain fields are not editable. That happens due to write permission of fields for Feature-level templates are set to deny. I have written an explanation and the solution in a separate blog post.


10. Add language permissions to a shared role website1\everyone:


11. Last, but not the least - serialization. What you will serialize? Standard values for all templates that now became part of the workflow. Workflow itself (as a part of your Website1 project serialization configuration), Roles, possibly Users (however remember that there is no way to serialize a user with password - the only option is deserializing a user by Unicorn with setting a default password, also apart having the same default password these users will have Created field updated, which in turn will trigger source control changes). Also need to serialize Languages (foundation layer) with updated permissions - .\src\Foundation\Serialization\serialization\Foundation.Serialization.Languages\Languages.yml should be serialized.


12. Testing workflows in its basic falls into three steps routine:

- Firstly, you need to log in as an Editor and create a page and provide the rest of required content. Once done - submit that for approval. An important check is opening workbox to ensure that editors can only see Draft mode but not Awaiting approval


- Secondly, re-login as Approver and open Workbox. Now you should see Awaiting Approval section and will be able to Approve using it.


- Finally, login as an admin, switch to web database and make sure all the content has been published. That includes related and child items.

Mass update of field value for all existing items of certain template - two ways of achieving result

Given: I have multiple already existing items of a specific template across my content tree. Template has some field that I want to update with a new value for all existing items, within some node I can specify.

Use cases for that scenario are really universal - you may use that for various purposes. What comes into my head, at a first glance, is the situation when you would like to assign some template to a workflow but already have multiple existing items of that template (just to remind - setting a field value at Standard Values will apply for all new, but not existing items of that particular template). In that case you need assign a workflow to each existing item individually.

Another good example is when you have a folder with multiple items, growing in amount with time flow. Then you may decide to make a folder bucketable, but those existing items require to set a Bucketable checkbox for each existing item individually. I have described that case in one of my previous blog posts - "Understanding Buckets: adding new items to buckets correctly". So let's pick up second case and try to solve it.

Solution: So, what are possible ways of achieving that goal? Not so much of them, there are just two options.

1. Straightforward option - use C# code. With C# task may be achieved by a recursive method, that accepts an item, verifies if the one is of desired template and if yes - updates the field and does the same for all item's children if any. Here is an example of such method and example of call :

private void UpdateAllFieldsRecursively(Item parentItem, string templateName, string fieldName, string newValue)
{
    if (parentItem != null)
    {
        using (new SecurityDisabler())
        {
            foreach (Item childItem in parentItem.Children)
            {
                if (childItem.Fields[fieldName] != null && childItem.TemplateName == templateName)
                {
                    using (new EditContext(childItem))
                    {
                        childItem[fieldName] = newValue;
                    }
                }

                if (childItem.HasChildren)
                {
                    UpdateAllFieldsRecursively(childItem, templateName, fieldName, newValue);
                }
            }
        }
    }
}

// and below there is the call to recursive mehod
const string parentNode = "/sitecore/content";
var database = Sitecore.Context.Database;
var parentItem = database.GetItem(parentNode);

UpdateAllFieldsRecursively(parentItem, "Article", "Bucketable", "1");

The code above works out perfectly and does exactly what we want from it, however there are certain disadvantages: first of all you need to run the code in some context - call if from some existing class, for example. Second - as that is C# code - it must be re-compiled and re-deployed. And if you may need to amend small change into the code - will have to re-compile and re-deploy again. But, luckily, there is a much better and faster alternative:

2. PowerShell Module. That module integrates into the platform and offers unprecedentedly ultimate possibilities and power over Sitecore instance and databases. After installation there is PowerShell console and more advanced PowerShell ISE, where you may create and test scripts. They are executed immediately without any of prerequisites like rebuilt DLL with a code at your bin folder. So, here is a script that does exactly the same as previous C# code:

cd 'master:/sitecore/content'
Get-ChildItem -Recurse . | Where-Object { $_.TemplateName -match "Article" -and $_.Fields["Bucketable"] -ne $null } | ForEach-Object {
   
    $_.Editing.BeginEdit()
    $_.Fields["Bucketable"].Value = "1";
    $_.Editing.EndEdit()
    ""
}

PowerShell script above does exactly the same - iterates Sitecore tree for "Article" templates, starting recursively from /sitecore/content node and if anything found - updates the filed value.

Hope this code helps!

Sitecore Boilerplate - the repository of best practices all at the same place

I decided to create an ultimate "boilerplate" solution for Sitecore, implementing all the best Sitecore practices in one place, well documented and cross-linked with the support on this blog.

As a multi-language website with Experience Editor (ex. Page Editor) support utilizing with Glass Mapper, Lucene indexes and test-driven codebase and much more working well all together - it will be a perfect place for newbies to familiarize themselves with Sitecore platform. It aims also to simplify work of more senior Sitecore developers in terms of quickly searching for desired features and grabbing them into their working solutions.

The project originated out of my R&D activities as I decided it would be beneficial to share my workouts with Sitecore community. Any suggestions, comments and criticism are highly welcome!

List of the features I desire to supply into Sitecore boilerplate:

  • Support for Page Editor
  • Usage of Glass Mapper for ORM purposes
  • Unit testable code
  • Synchronization of user-editable content from CD environment to CM and further re-publish to the rest of CDs
  • Support for multi-language environment
  • Custom Lucene indexes
  • Custom personalisation of components and data
  • Workflows based on user permissions
  • Make all mentioned above working together as a solid and stable website
  • Implement new Sitecore 8 marketing features on top of that

.. for the moment I have planned and implemented several of mentioned features as a starting point, so it is coming soon on GitHub and further blog posts here.