Experience Sitecore ! | January 2024

Experience Sitecore !

More than 200 articles about the best DXP by Martin Miles

A crash course of Next.js: TypeScript (part 5)

This series is my Next.js study resume, and despite it’s keen to a vanilla Next.js, all the features are applicable with Sitecore SDK. It is similar to the guide I recently wrote about GraphQL and aims to reduce the learning curve for those switching to it from other tech stacks.

  • In part 1 we covered some fundamentals of Next.js – rendering strategies along with the nuances of getStaticProps, getStaticPaths, getServerSideProps as well as data fetching.
  • In part 2 we spoke about UI-related things coming to OOB with Next.js – layouts, styles, and fonts powerful features, Image and Script components, and of course – TypeScript.
  • We went through the nuances of Next.js routing and explained middleware in part 3
  • Part 4 was all about caching, authentication, and going live tasks

In this post, we are going to talk about TypeScript. It was already well mentioned in the previous parts, but this time we’d put it under a spotlight.

Intro

TypeScript became an industry standard for strong typing in the current state of the JavaScript world. There is currently no other solution allowing us to effectively implement typing into a project. One can, of course, use some kind of contracts, conventions, or JSDoc to describe types. But all this will be times worse for code readability compared to typical TypeScript annotations. They will allow you not to have your eyes darting up and down, you will simply read the signature and immediately understand everything.

Another point comes to JavaScript support in editors and IDEs being usually based on TypeScript. JavaScript support in all modern IDEs is built on TypeScript! JavaScript support in VS Code is implemented using the TypeScript Language Service. WebStorm’s JavaScript support largely relies on the TypeScript framework and uses its standard library. This reality is – that JavaScript support in editors goes built on top of TypeScript. One more reason to learn TypeScript is that when the editor complains about the JavaScript type mismatch, we’ll have to read the declarations from TypeScript.

However, TypeScript is not a replacement for other code quality tools. TypeScript is just one of the tools that allows you to maintain some conventions in a project and make sure that there are strong types. You are still expected to write tests, do code reviews, and be able to design the architecture correctly.

Learning TypeScript, even in 2024, can be difficult, for many various reasons. Folks like myself who grew from C# may find things that don’t function as they should expect. People who have programmed in JavaScript for most of their lives get scared when the compiler yells at them.

TypeScript is a superset of JavaScript, this means that JavaScript is part of TypeScript: it is in fact made up of JavaScript. Going with TypeScript does not mean throwing out JavaScript with its specific behavior – TypeScript helps us to understand why JavaScript behaves this way. Let’s look at some mistakes people make when getting started with TypeScript. As an example, take error handling. It would be very our natural logical expectation to handle errors, similarly, we are used to doing in other programming languages:

try {
    // let's pull some API with Axios, and some error occured, say Axios fetch failed
} catch (e: AxiosError) {
    //         ^^^^^^^^^^ Error 
}

The above syntax is not possible because that’s not how errors work in JavaScript. Code that would be logical to write in TypeScript cannot be written that way in JavaScript.

A quick recap of a Typescript

  • Strongly typed language developed by Microsoft.
  • Code written in TypeScript compiles to native JavaScript
  • TypeScript extends JavaScript with the ability to statically assign types.

TypeScript supports modern editions of the ECMAScript standards, and code written using them is compiled taking into account the possibility of its execution on platforms that support older versions of the standards. This means that a TS programmer can take advantage of the features of ES2015 and newer standards, such as modules, arrow functions, classes, spread, and destructuring, and do what they can in existing environments that do not yet support these standards.

The language is backward compatible with JavaScript and supports modern editions of the ECMAScript standards. If you feed the compiler pure JavaScript, the compiler will “eat out” your own JS and will not say that it is an error – that would be a valid TypeScript code, however with no type benefits. Therefore one can write a mixed code of ES2015 and newer standards, such as modules, arrow functions, classes, spread, destructuring, etc. using TypeScript syntax, and implementing methods without strongly typing just using pure JS – and that will also be valid.

So, what benefits does language provide?

  • System for working with modules/classes – you can create interfaces, modules, classes
  • You can inherit interfaces (including multiple inheritance), classes
  • You can describe your own data types
  • You can create generic interfaces
  • You can describe the type of a variable (or the properties of an object), or describe what interface the object to which the variable refers should have
  • You can describe the method signature
  • Using TypeScript (as opposed to JavaScript) significantly improves the development process due to IDE receives type information from the TS compiler in real time.

On the other hand, there are some disadvantages:

  • In order to use some external tool (say, “library” or “framework”) with TypeScript, the signature of each of the methods of each module of this tool must be described so that the compiler does not throw errors, otherwise, it simply won’t know about your tool. For the majority of popular tools, the interface description most likely could be found in the repository. Otherwise, you’ll have to describe it yourself
  • Probably the biggest disadvantage is the learning curve and building a habit of thinking and writing TypeScript
  • At least as it goes with me, more time is spent on development compared to vanilla JavaScript: in addition to the actual implementation, it is also necessary to describe all the involved interfaces and method signatures.

One of the serious advantages of TS over JS is the ability to create, in various IDEs, a development environment that allows you to identify common errors directly in the process of entering code. Using TypeScript in large projects can lead to increased reliability of programs that can still be deployed in the same environments where regular JS applications run.

Types

There are expectations that it is enough to learn a few types to start writing in TypeScript and automatically get good code. Indeed, one can simply write types in the code, explaining to the compiler that in this place we are expecting a variable of a certain type. The compiler will prompt you on whether you can do this or not:

let helloFunction = () => { "hello" };
let text: string = helloFunction();
// TS2322: Type 'void' is not assignable to type 'string'.

However, the reality is that it will not be possible to outsource the entire work to the compiler. And let’s see what types you need to learn to progress with TypeScript:

  • basic primitives from JavaScript: boolean, number, string, symbol, bigint, undefined and object.
  • instead of the function type, TypeScript has Function and a separate syntax similar to the arrow function, but for defining types. The object type will mean that the variable can be assigned any object literals in TypeScript.
  • TypeScript-specific primitives: null, unknown, any, void, unique symbol, never, this.
  • Next are the types standard for many object-oriented languages: array, tuple, generic
  • Named types in TypeScript refer to the practice of giving a specific, descriptive name to a type for variables, function parameters, and return types: type User = { name: string; age: number; }
  • TypeScript doesn’t stop there: it offers union and intersection. Special literal types often work in conjunction with string, number, boolean, template string. These are used when a function takes not just a string, but a specific literal value, like “foo” or “bar”, and nothing else. This significantly improves the descriptive power of the code.
  • TypeScript also has typeof, keyof, indexed, conditional, mapped, import, await, const, predicate.

These are just the basic types; many others are built on their basis: for example, a composite Record<T>, or the internal types Uppercase<T> and Lowercase<T>, which are not defined in any way: they are intrinsic types.

P.S. – do not use Function, pass a predefined type, or use an arrow notation instead:

// replace unknown with the types you're using with the function
F extends (...args: unknown[]) => unknown
// example of a function with 'a' and 'b' arguments that reutrns 'Hello'
const func = (a: number, b: number): string => 'Hello'

Map and d.ts files

TypeScript comes with its own set of unique file types that can be puzzling at first glance. Among these are the *.map and *.d.ts files. Let’s demystify these file types and understand their roles in TypeScript development.

What are .map Files in TypeScript?

.map files, or source map files, play a crucial role in debugging TypeScript code. These files are generated alongside the JavaScript output when TypeScript is compiled. The primary function of a .map file is to create a bridge between the original TypeScript code and the compiled JavaScript code. This linkage is vital because it allows developers to debug their TypeScript code directly in tools like browser developer consoles, even though the browser is executing JavaScript.

When you’re stepping through code or setting breakpoints, the .map file ensures that the debugger shows you the relevant TypeScript code, not the transpiled JavaScript. This feature is a game-changer for developers, as it simplifies the debugging process and enhances code maintainability.

Understanding .d.ts Files in TypeScript

On the other side, we have *.d.ts files, known as declaration files in TypeScript. These files are pivotal for using JavaScript libraries in TypeScript projects. Declaration files act as a bridge between the dynamically typed JavaScript world and the statically typed TypeScript world. They don’t contain any logic or executable code but provide type information about the JavaScript code to the TypeScript compiler.

For instance, when you use a JavaScript library like Lodash or jQuery in your TypeScript project, the *.d.ts files for these libraries describe the types, function signatures, class declarations, etc., of the library. This allows TypeScript to understand and validate the types being used from the JavaScript library, ensuring that the integration is type-safe and aligns with TypeScript’s static typing system.

The Key Differences

The primary difference between *.map and *.d.ts files lies in their purpose and functionality. While .map files are all about enhancing the debugging experience by mapping TypeScript code to its JavaScript equivalent, .d.ts files are about providing type information and enabling TypeScript to understand JavaScript libraries.

In essence, .map files are about the developer’s experience during the debugging process, whereas .d.ts files are about maintaining type safety and smooth integration when using JavaScript libraries in TypeScript projects.

Cheatsheet

I won’t get into the details of the basics and operations which can be visualized in this cheat sheet instead:

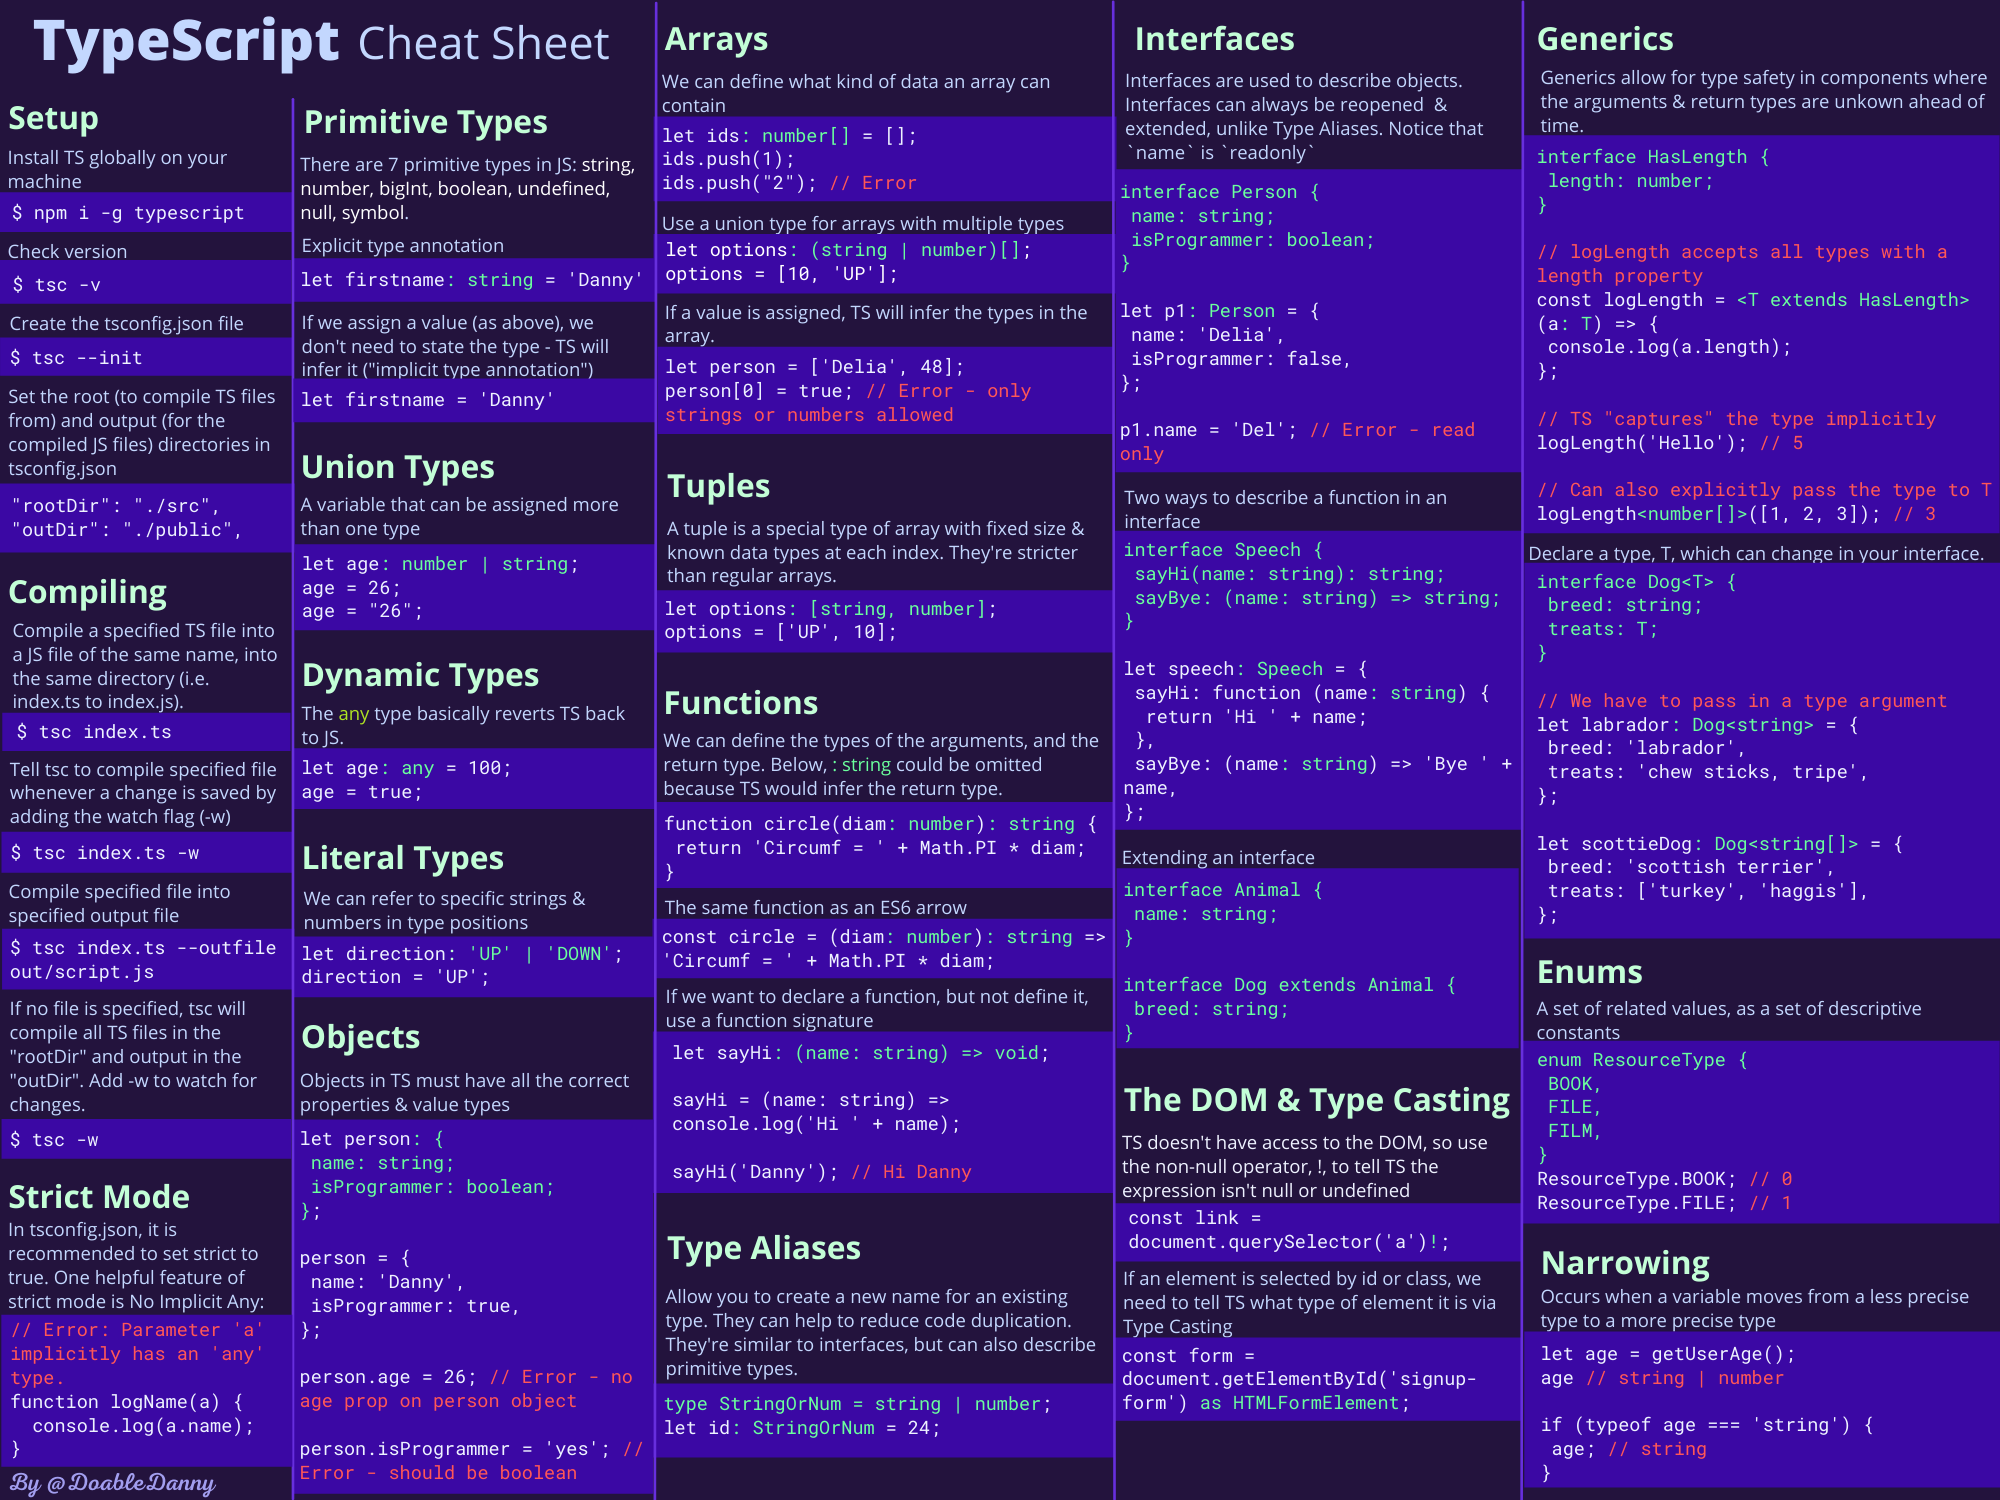
Better than a thousand words!

Let’s take a look at some other great features not mentioned in the above cheatsheet.

What the heck is Any?

In TypeScript you can use any data type. This allows you to work with any type of data without errors. Just like regular javascript – in fact what you do by using any is downgrading your TypeScript to just JavaScript by eliminating type safety. The best way is to look at it in action:

let car: any = 2024;
console.log(typeof car)// number

car = "Mercedes";
console.log(typeof car)// string

car = false;
console.log(typeof car)// boolean

car = null;
console.log(typeof car)// object

car = undefined;
console.log(typeof car)// undefined

The car variable can be assigned any data type. Any is an evil data type, indeed! If you are going to use any data type, then TypeScript immediately becomes unnecessary. Just write code in JavaScript.

TypeScript can also determine what data type will be used if we do not specify it. We can replace the code from the first example with this one.

const caterpie01: number = 2021;     // number
const caterpie001 = 2021;            // number  - that was chosen by typescript for us

const Metapod01: string = "sleepy";  // string
const Metapod001 = "sleepy";         // string  - that was chosen by typescript for us

const Wartortle01: boolean = true;   // boolean
const Wartortle001 = true;           // boolean - that was chosen by typescript for us

This is a more readable and shorter way of writing. And of course, we won’t be able to assign any other data type to a variable.

let caterpie = 2021;            // in typescript this vairable becomes number after assignment
caterpie = "text";              // type error, as the type was already defined upon the assingment

On the other hand, if we don’t specify a data type for the function’s arguments, TypeScript will use any type. Let’s look at the code:

const sum = (a, b) => {
    return a + b;
}
sum(2021, 9);

In strict mode, the above code will error out with “Parameter 'a' implicitly has an 'any' type; Parameter 'a' implicitly has an 'any' type” message, but will perfectly work outside of strict mode in the same manner as JavaScript code would. I assume that was intentionally done for the compatibility

Null checks and undefined

As simple as that:

if(value){
  ...
}

The expression in parentheses will be evaluated as true if it is not one of the following:

  • null
  • undefined
  • NaN
  • an empty string
  • 0
  • false

TypeScript supports the same type conversion rules as JavaScript does.

Type checking

Surprise-surprise, TypeScript is all about the types and annotations. Therefore, the next piece of advice may seem weird, but, is legit: avoid explicit type checking, if you can.

Instead, always prefer to specify the types of variables, parameters, and return values to harness the full power of TypeScript. This makes future refactoring easier.

function travelToTexas(vehicle: Bicycle | Car){
    if (vehicle instanceof Bicycle) {
        vehicle.pedal(currentLocation, newLocation('texas'));
    } elseif(vehicle instanceof Car){
        vehicle.drive(currentLocation, newLocation('texas'));
    }
}

The below rewrite looks much more readable and therefore easy to maintain. And there are no ugly type checking clauses:

type Vehicle = Bicycle | Car;

function travelToTexas(vehicle: Vehicle){
    vehicle.move(currentLocation, newLocation('texas'));
}

Generics

Use them wherever possible. This will help you better identify the type being used in your code. Unfortunately, they are not often used, but in vain.

function returnType <T> (arg: T): T {
    return arg;
}

returnType <string> ('MJ knows Sitecore')// works well
returnType <number> ('MJ knows Sitecore')// errors out
// ^ Argument of type 'string' is not assignable to parameter of type 'number'.

If you are using a specific type, be sure to use extends:

type AddDot<T extends string> = `${T}.`// receives only strings, otherwise errors out

Ternary operators with extends

extends is very useful, it helps to determine what a type is inherited from in the type hierarchy (any -> number -> …) and make a comparison. Thanks to the combination of extends and ternary operators, you can create such awesome conditional constructs:

type IsNumber <T> = T extends number ? true : false

IsNumber <5>        // true
IsNumber <'lol'>    // false

Readonly and Consts

Use readonly by default to avoid accidentally overwriting types in your interface.

interface User {
    readonly name: string;
    readonly surname: string;
}

Let’s say you have an array that comes from the backend [1, 2, 3, 4] and you need to use only these four numbers, that is, make the array immutable. The as const construction can easily handle this:

const arr = [1, 2, 3, 4]            // curent type is number so that you can assign any number
arr[3] = 5  // [1, 2, 3, 5]

const arr = [1, 2, 3, 4] as const   // now type is locked as readonly [1, 2, 3, 4]
arr[3] = 5  // errors out

Satisfies

That is a relatively recent feature (since version 4.9), but is so helpful as it allows you to impose restrictions without changing the type. This can be very useful when you manage different types that do not share common methods. For example:

type Numbers = readonly [1, 2, 3];
type Val = { value: Numbers | string };

// the valid accepted values could be numbers 1, 2, 3, or a string
const myVal: Val = { value: 'a' };
So far so good. Let’s say we have a string, and must convert it to capital letters. Intuitively trying to use the below code without Satisfies will get you an error:
myVal.value.toUpperCase()
// ^ Property 'toUpperCase' does not exist on type 'Numbers'.
So the right way to deal with it would be to use Satisfies, then everything will be fine:
const myVal = { value: 'a' } satisfies { value: string };
myVal.value.toUpperCase()   // works well and outputs 'A'

Unions

Sometimes you can see code like this:

interface User {
    loginData: "login" | "username";
    getLogin(): void;
    getUsername(): void;
}

This code is bad because you can use a username but still call getLogin() and vice versa. To prevent this, it is better to use unions instead:

interface UserWithLogin {
    loginData: "login";
    getLogin(): void;
}
interface UserWithUsername {
    loginData: "username";
    getUsername(): void;
}

type User = UserWithLogin | UserWithUsername;

What is even more impressive – unions are iterable, meaning they can be used to loop through a test:

type Numbers = 1 | 2 | 3
type OnlyRuKeys = { [R in Numbers]: boolean }
// {1: boolean, 2: boolean, 3: boolean}

Utility Types

TypeScript Utility Types are a set of built-in types that can be used to manipulate data types in code.

  • Required<T> – makes all properties of an object of type T required.
  • Partial<T> – makes all properties of an object of type T optional.
  • Readonly<T> – makes all properties of an object of type T read-only
  • NonNullable<Type> – Retrieves a type from Type, excluding null and undefined.
  • Parameters<Type> – retrieves the types of function arguments Type
  • ReturnType<Type> – retrieves the return type of the function Type
  • InstanceType<Type> – retrieves the type of an instance of the Type class
  • Record<Keys, Type> – creates a type that is a record with keys defined in the first parameter and values of the type defined in the second parameter.
  • Pick<T, K extends keyof T> – selects properties of an object of type T with the keys specified in K.
  • Omit<T, K extends keyof T> – selects properties of an object of type T, excluding those specified in K
  • Exclude<UnionType, ExcludedMembers> – Excludes certain types from the union type
  • Uppercase<StringType>, Lowercase<StringType>, Capitalize<StringType>, Uncapitalize<StringType> – string manipulation utility types that change the case of the string according to their name.

I won’t get into the details on all of them but will showcase just a few for better understanding:

// 1. Required
interface Person {
    name?: string;
    age?: number;
}

let requiredPerson: Required<Person>;   // now requiredPerson could be as { name: string; age: number; }

// 2. Partial
interface Person {
    name: string;
    age: number;
}

let partialPerson: Partial<Person>;    // now partialPerson could be as { name?: string; age?: number; }

// 3. NonNullable
let value: string | null | undefined;
let nonNullableValue: NonNullable<typeof value>;    // now nonNullableValue is a string

// 4. Awaited
asyncfunctiongetData(): Promise <string> {
    return'hello';
}
let awaitedData: Awaited<ReturnType<typeof getData>>;     // now awaitedData could be 'hello'

// 5 Case management
type Uppercased = Uppercase<'hello'>;       // 'HELLO'
type Lowercased = Lowercase<'Hello'>;       // 'hello'
type Capitalized = Capitalize<'hello'>;     // 'Hello'
type Uncapitalized = Uncapitalize<'Hello'>; // 'hello'

These above are just a few examples of utility types in TypeScript. To find out more please refer to the official documentation.

Interface vs types

One of the questions that raises most of the confusion for the C# developer trying TypeScript. What’s the difference between these two below signatures:

interface X {
    a: number
    b: string
}

type X = {
    a: number
    b: string
};

You can use both to describe the shape of an object or a function signature, it’s just the syntax differs.

Unlike interface, the type alias can also be used for other types such as primitives, unions, and tuples:

// primitive
type Name = string;

// object
type PartialPointX = { x: number; };
type PartialPointY = { y: number; };

// union
type PartialPoint = PartialPointX | PartialPointY;

// tuple
type Data = [number, string];

Both can be extended, but again, the syntax differs. Also, an interface can extend a type alias, and vice versa:

// Interface extends interface
interface PartialPointX { x: number; }
interface Point extends PartialPointX { y: number; }

// Type alias extends type alias
type PartialPointX = { x: number; };
type Point = PartialPointX & { y: number; };

// Interface extends type alias
type PartialPointX = { x: number; };
interface Point extends PartialPointX { y: number; }

// Type alias extends interface
interface PartialPointX { x: number; }
type Point = PartialPointX & { y: number; };

A class can implement an interface or type alias, both in the same exact way. However, a class and interface are considered static blueprints. Therefore, they can not implement or extend a type alias that names a union type.

Unlike a type alias, an interface can be defined multiple times and will be treated as a single interface (with members of all declarations being merged):

// These two declarations become:
// interface Point { x: number; y: number; }
interface Point { x: number; }
interface Point { y: number; }

const point: Point = { x: 1, y: 2 };

So, when I should use one against another? If simplified, use types when you might need a union or intersection. Use interfaces when you want to use extends or implements. There is no hard and fast rule though, use what works for you. I admit, that may still be confusing, please read this discussion for more understanding.

Error Handling

Throwing errors is always good: if something goes wrong at runtime, you can terminate the execution at the right moment and investigate the error using the stack trace in the console.

Always use rejects with errors

JavaScript and TypeScript allow you to throw any object. A promise can also be rejected with any reason object. It is recommended to use throw syntax with type Error. This is because your error can be caught at a higher level of code with catch syntax. Instead of this incorrect block:

function calculateTotal(items: Item[]): number{
    throw 'Not implemented.';
}

function get(): Promise < Item[] > {
    return Promise.reject('Not implemented.');
}

use the below:

function calculateTotal(items: Item[]): number{
    throw new Error('Not implemented.');
}
function get(): Promise <Item[]> {
    return Promise.reject(new Error('Not implemented.'));
}
// the above Promise could be rewritten with an async equivalent:
async function get(): Promise <Item[]> {
    throw new Error('Not implemented.');
}

The advantage of using Error types is that they are supported by try/catch/finally syntax and implicitly all errors and have a stack property which is very powerful for debugging. There are other alternatives: don’t use throw syntax and always return custom error objects instead. TypeScript makes this even easier and it works like a charm!

Dealing with Imports

Last but not least, I want to share some tips and best practices for using imports. With simple, clear, and logical import statements, you can faster inspect the dependencies of your current code.

Make sure you use the following good practices for import statements:

  • Import statements should be in alphabetical order and grouped.
  • Unused imports must be removed (linter will come to help you)
  • Named imports must be in alphabetical order, i.e. import {A, B, C} from 'mod';
  • Import sources should be in alphabetical order in groups, i.e.: import * as foo from 'a'; import * as bar from 'b';
  • Import groups are indicated by blank lines.
  • Groups must follow the following order:
    • Polyfills (i.e. import 'reflect-metadata';)
    • Node build modules (i.e. import fs from 'fs';)
    • External modules (i.e. import { query } from 'itiriri';)
    • Internal modules (i.e. import { UserService } from 'src/services/userService';)
    • Modules from the parent directory (i.e. import foo from '../foo'; import qux from '../../foo/qux';)
    • Modules from the same or related directory (i.e. import bar from './bar'; import baz from './bar/baz';)

These rules are not obvious to beginners, but they come with time once you start paying attention to the minors. Just compare the ugly block of imports:

import { TypeDefinition } from '../types/typeDefinition';
import { AttributeTypes } from '../model/attribute';
import { ApiCredentials, Adapters } from './common/api/authorization';
import fs from 'fs';
import { ConfigPlugin } from './plugins/config/configPlugin';
import { BindingScopeEnum, Container } from 'inversify';
import 'reflect-metadata';
against them nicely structured, as below:
import 'reflect-metadata';

import fs from 'fs';
import { BindingScopeEnum, Container } from 'inversify';

import { AttributeTypes } from '../model/attribute';
import { TypeDefinition } from '../types/typeDefinition';

import { ApiCredentials, Adapters } from './common/api/authorization';
import { ConfigPlugin } from './plugins/config/configPlugin';

Which one gets faster to read?

Conclusion

In my opinion, TypeScript’s superpower is that it provides feedback as you write the code, not at runtime: IDE nicely prompts what argument to use when calling a function, and types are defined and navigable. All that comes at the cost of a minor compilation overhead and a slightly increased learning curve. That is a fair deal, TypeScript will stay with us for a long and won’t go away – the earlier you learn it the more time and effort it will save later.

Of course, I left plenty of raw TypeScript features aboard and did that intentionally so as not to overload the readers with it. If the majority of you are coming in the capacity of professionals, either starting with Next.js development in general or switching from other programming languages and tech. stacks (like .NET with C#) where I was myself a year ago – that is definitely the right volume and agenda for you to start with. There are of course a lot of powerful TypeScript features for exploration beyond today’s post, such as:

  1. Decorators
  2. Namespaces
  3. Type Guards and Differentiating Types
  4. Type Assertions
  5. Ambient Declarations
  6. Advanced Types (e.g., Conditional Types, Mapped Types, Template Literal Types)
  7. Module Resolution and Module Loaders
  8. Project References and Build Optimization
  9. Declaration Merging
  10. Using TypeScript with WebAssembly

But I think that is enough for this post. Hope you’ll enjoy writing strongly typed code with TypeScript!

References:

XM Cloud Forms Builder

XM Cloud Forms Builder released

Composable Forms Builder is now available with Sitecore XM Cloud. Let’s take a look at this one of the most anticipated modules for Sitecore’s flagship hybrid headless cloud platform.

Historically, we had an external module called Web Forms for Marketers that one could install on top of their Sitecore instance in order to gain the desired functionality of collecting user input. This module was later well reconsidered and reworked, later finding its reincarnation as Sitecore Forms, an integral part of Sitecore platforms since version 9. Customers enjoyed this built-in solution provided along with their primary DXP, however with the headless architecture of XM Cloud there were no CD servers any longer, therefore no suitable place for saving the collected user input. There was clearly a need for a SaaS forms solution, and this gap if finally filled out!

An interesting fact: until the release of Forms with XM Cloud the relevant composable solution for interacting with the visitors was Sitecore Send, and because of that Sitecore logically decided to derive XM Cloud Form module from Sitecore Send codebase (as it already had plenty of the desired features), rather than from legacy Sitecore Forms.

Sitecore XM Cloud Forms

So, what we’ve got?

The main goal was to release a new Forms product as SaaS solution that integrates with any custom web front-end. The actual challenge was to combine the ultimate simplicity of creating and publishing forms for the majority of marketing professionals along with tailoring this offering optimized for typical headless projects. In my opinion, despite the complexities, it was well achieved!

Let’s first take a look at its desired/expected capabilities:

  • Template Library
  • Work with Components Builder
  • Use external datasources for pre-populating form
  • Reporting and analytics
  • Ability to create multi-step and multi-page forms
  • Conditional logic (not available yet)

One would ask, if there’s no CD server or any managed backend at all, where does the submission go into? There might be some SaaS-provided storage along with the required interface to manage the collected input. Incorrect! There’s none. It was actually a smart move by Sitecore developers who decided to kill two birds with one stone: save effort for not building a universal UI/UX with the tool that will hardly satisfy variable needs from such a diverse range of customers/industries, that would be hardly doable. But the second reason is more legit: avoid storing any Personally Identifiable Information data, so that it won’t be processed within XM Cloud, leaving particular implementation decisions to leave to customers’ discretion.

That is done in a very composable SaaS manner, offering you to configure a webhook, passing a payload of collected data to the desired system of your choice.

Webhooks

Upon the form submission, the webhook is triggered to submit the gathered data to the configured system, it could be a database, CRM, CDP, or whichever backend is for some form. Even more, you can have shared webhooks so that multiple forms can use the same configured webhook. Similarly to the legacy forms that submitted their data into xDB, the most logical choice would be using powerful Sitecore CDP for processing this data. However with webhooks, the use case of XM Cloud forms becomes truly universal, and if you combine it with Sitecore Connect – that could span to whichever integration gets provided by it.
Webhooks come with multiple authentication options, covering any potential backend requirement.

Let’s see it in action!

The editor looks and feels like XM Cloud Pages – similar styling, layout, and UI elements:
02 03

First, let’s pick up the layout by simply dragging and dropping it on a canvas. For simplicity, I selected Full Width Layout. Once there, you can start dropping fields to a chosen layout:

04
Available Fields:
  • Action Button
  • Email
  • Phone
  • Short Text
  • Long Text
  • Select (single dropdown)
  • Multi Select (where you can define the number of options, say selected 3 of 9)
  • Date
  • Number
  • Radio
  • Checkbox (single)
  • Checkbox Group
  • Terms & Conditions
  • reCAPTCHA
Besides input-capturing elements, you can also define “passive” UI elements from underneath Basic expander:
  • Text
  • Spacer
  • Social Media – a set of clickable buttons to socials you define
  • Image, which has a pretty strong set of source options:
Media Upload options
Look at the variety of configuration options on the right panel. You can define:
  • Background Color within that field – transparent is the default one. You can even put a background image instead!
  • Settings for the field box shadows which also define Horizontal and Vertical Lengths, Blur and Spread Radiuses, and of course – the shadow color
  • Help text that is shown below and prompts some unobvious guidance you’d like a user to follow
  • For text boxes, you can set placeholder and prefill values
  • The field could be made mandatory and/or hidden by the correspondent checkboxes
  • Validation is controlled by a regex pattern and character length limit
  • Additionally, you can style pretty everything: field itself, label, placeholder, and help text, as well as set the overall padding to it

Please note, that at the current stage, the edited form is in a Draft state. Clicking Save button suggests you run your form in a Preview before saving, and that was very helpful – in my case, I left the Full Name field as a hidden field by mistake, and preview mode immediately showed me that. After fixing the visibility, I am good to go with saving.

The Forms home screen shows all the available forms. To Activate, I need to create a Webhook first, then assign it to the form. In addition, you define the action you want to do upon webhook submission – redirect to URL, display success message, or maybe – do nothing, as well as configure failure submission message.

This time Activate button works well and my form is listed as Active. From now on you cannot edit fields anymore and you cannot change the status back from Active. Therefore always verify your form in Preview before publishing.

Weirdly, you cannot even delete a form in Active status. What you can do however is a duplicate active form into a draft one, and you could go on with fields editing from there.

Forms listing

Testing Form

The most obvious desire at this stage is to real-test your form before usage. And luckily developers took care of that as well.

Testing webhook
I also created a webhook catcher with Pipedream RequestBin. On my first go, I faced a deadlock being unable to submit the form for the test. The reason for this was that I mistakenly checked both the Hidden and Required checkboxes on a field and could bo progress from there. Even the validation message did not show on a hidden field. Another mistake was that I overlooked that on Preview and published form into the active state. Hopefully, developers will find a solution to it sooner rather than later.

I give it another try to test how validation works:

Validation in action

Once validation passes, Test Form Submission dialog shows you the JSON payload as it goes out along with HTTP headers supplied with this webhook request. Let’s hit Submit button and see the confirmation – I chose to see a confirmation message that shows up.

Webhook catcher shows all my submitted data along with HTTP headers, everything was sent and received successfully!

webhook catcher

Multipage Forms

Multipage Forms are supported and that is impressive. Pay attention to the Add Page link button in between page canvases. Once activated, it also enforces Next button on non-final page canvases that trigger switching to the next form page:
20

What’s Next? Pages Editor!

Let’s use this newly created form from XM Cloud pages. Please note a new section called Forms under the Components tab. That is where all of your active forms reside. You can simply drag-drop this form to a desired placeholder, as you normally do in the Pages editor.

Consume Forms from Pages Editor

Please note: you must have your site deployed to an editing host running on Headless (JSS) SDK version 21.6 or newer to make it work – that is when XM Cloud Forms support was added. In other case, you face this error:

BYOC error before SDK 21.6

Experience Editor and Components Builder

Surprisingly, created forms are available from Components Builder:
Forms in Components Builder
However, Experience Editor does not have a direct way of consuming XM Cloud Forms. I tried the following chain of steps in order to make it work:
  1. Create and Activate a new form from Forms editor
  2. Consume it from the Components builder into a new component using BYOC, then publish this component
  3. Open Pages app, find the component with an embedded form you’ve built at step (2) and drop it to a page, then publish
  4. Open that same page in Experience Editor

Live Demo in Action

As you know, often a video is worth a thousand words, so here it is below. I’ve recorded the whole walkthrough from explaining to showcasing it all in action up to еhe most extreme example – when you create and publish a form, then consume it from the XM Cloud Components builder, making the part of a composite component, which in turn is used Pages editor to put down on a page which also opens up successfully in the Experience Editor. Unbelievable, and it all functions well. Just take a look yourself:

Developers Experience

As developers, how would we integrate forms into our “head” applications? That should work with a Forms BYOC component for your Next.js App coming out of the box with SDK. I spotted some traces of XM Cloud forms a while ago as a part of Headless JSS SDK 21.6.0 a while ago when it was in a state of “Canary” build. Now it got released and among the features, one can see an import of SitecoreForm component into the sample next.js app, as part of pull request merged into this release.

The documentation is available here, but … everything is so absolutely intuitive, that you hardly need one, don’t you?

Template Library

It is worth mentioning that XM Cloud Forms contains a Template Library handful of pre-configured forms you can use straight away or slightly modify as per your needs. There is an expectation it will grow with time covering any potential scenario one could ever have.
Template Library

Licensing

Since Forms are bundled into XM Cloud they’re included with every XM Cloud subscription.

What is missing?

  • file upload feature is not supported – webhooks alone are not sufficient to handle it
  • ability for customization and extension – hopefully, it comes as there’s an empty section for custom fields

Hopefully, the product developers will implement these and more features in the upcoming releases. But even with what was released today, I really enjoyed XM Cloud Forms builder!

A crash course of Next.js: Caching, Authentication and Going Live tasks (part 4)

This series is my Next.js study resume, and despite it’s keen to a vanilla Next.js, all the features are applicable with Sitecore SDK. It is similar to the guide I recently wrote about GraphQL and aims to reduce the learning curve for those switching to it from other tech stacks.

  • In part 1 we covered some fundamentals of Next.js – rendering strategies along with the nuances of getStaticProps, getStaticPaths, getServerSideProps as well as data fetching.
  • In part 2 we spoke about UI-related things coming to OOB with Next.js – layouts, styles, and fonts powerful features, Image and Script components, and of course – TypeScript.
  • In part 3 we went through the nuances of Next.js routing and explained middleware

In this post we are going to talk about pre-going live optimizations such as caching and reducing bundle size as well as authentication.

Going live consideration

  • use caching wherever possible (see below)
  • make sure that the server and database are located (deployed) in the same region
  • minimize the amount of JavaScript code
  • delay loading heavy JS until you actually use it
  • make sure logging is configured correctly
  • make sure error handling is correct
  • configure 500 (server error) and 404 (page not found) pages
  • make sure the application meets the best performance criteria
  • run Lighthouse to test performance, best practices, accessibility, and SEO. Use an incognito mode to ensure the results aren’t distorted
  • make sure that the features used in your application are supported by modern browsers
  • improve performance by using the following:
    • next/image and automatic image optimization
    • automatic font optimization
    • script optimization

Caching

Caching reduces response time and the number of requests to external services. Next.js automatically adds caching headers to statics from _next/static, including JS, CSS, images, and other media.

Cache-Control: public, max-age=31536000, immutable

To revalidate the cache of a page that was previously rendered into static markup, use the revalidate setting in the getStaticProps function.

Please note: running the application in development mode using next dev disables caching:

Cache-Control: no-cache, no-store, max-age=0, must-revalidate

Caching headers can also be used in getServerSideProps and the routing interface for dynamic responses. An example of using stale-while-revalidate:

// The value is considered fresh and actual for 10 seconds (s-maxage=10).
// If the request is repeated within 10 seconds, the previous cached value
// considered fresh. If the request is repeated within 59 seconds,
// cached value is considered stale, but is still used for rendering
// (stale-while-revalidate=59)
// The request is then executed in the background and the cache is filled with fresh data.
// After updating the page will display the new value
export async function getServerSideProps({ req, res }){
    res.setHeader(
        'Cache-Control',
        'public, s-maxage=10, stale-while-revalidate=59'
    )
    return {
        props: {}
    }
}

Reducing the JavaScript bundle volume/size

To identify what’s included in each JS bundle, you can use the following tools:

  • Import Cost – extension for VSCode showing the size of the imported package
  • Package Phobia is a service for determining the “cost” of adding a new development dependency to a project (dev dependency)
  • Bundle Phobia – a service for determining how much adding a dependency will increase the size of the build
  • Webpack Bundle Analyzer – Webpack plugin for visualizing the bundle in the form of an interactive, scalable tree structure

Each file in the pages directory is allocated into a separate assembly during the next build command. You can use dynamic import to lazily load components and libraries.

Authentication

Authentication is the process of identifying who a user is, while authorization is the process of determining his permissions (or “authority” in other words), i.e. what the user has access to. Next.js supports several authentication patterns.

Authentication Patterns

Each authentication pattern determines the strategy for obtaining data. Next, you need to select an authentication provider that supports the selected strategy. There are two main authentication patterns:

  • using static generation to load state on the server and retrieve user data on the client side
  • receiving user data from the server to avoid “flushing” unauthenticated content (in the meaning of switching application states being visible to a user)

Authentication when using static generation

Next.js automatically detects that a page is static if the page does not have blocking methods to retrieve data, such as getServerSideProps. In this case, the page renders the initial state received from the server and then requests the user’s data on the client side.

One of the advantages of using this pattern is the ability to deliver pages from a global CDN and preload them using next/link. This results in a reduced Time to Interactive (TTI).

Let’s look at an example of a user profile page. On this page, the template (skeleton) is first rendered, and after executing a request to obtain user data, this data is displayed:

// pages/profile.js
import useUser from '../lib/useUser'
import Layout from './components/Layout'

export default function Profile(){
    // get user data on the client side
    const { user } = useUser({ redirectTo: '/login' })
    // loading status received from the server
    if (!user || user.isLoggedIn === false) {
        return <Layout>Loading...</Layout>
    }
    // after the request is completed, user data is
    return (
        <Layout>
            <h1>Your profile</h1>
            <pre>{JSON.stringify(user, null, 2)}</pre>
        </Layout>
    )
}

Server-side rendering authentication

If a page has an asynchronous getServerSideProps function, Next.js will render that page on every request using the data from that function.

export async function getServerSideProps(context){
    return {
        props: {}// will get passed down to a component as props
    }
}

Let’s rewrite the above example. If there is a session, the Profile component will receive the user prop. Note the absence of a template:

// pages/profile.js
import withSession from '../lib/session'
import Layout from '../components/Layout'

export const getServerSideProps = withSession(async (req, res) => {
    const user = req.session.get('user')
    if (!user) {
        return {
            redirect: {
                destination: '/login',
                permanent: false
            }
        }
    }
    return {
        props: {
            user
        }
    }
})
export default function Profile({ user }){
    // display user data, no loading state required
    return (
        <Layout>
            <h1>Your profile</h1>
            <pre>{JSON.stringify(user, null, 2)}</pre>
        </Layout>
    )
}

The advantage of this approach is to prevent the display of unauthenticated content before performing a redirect. Тote that requesting user data in getServerSideProps blocks rendering until the request is resolved. Therefore, to avoid creating bottlenecks and increasing Time to First Byte (TTFB), you should ensure that the authentication service is performing well.

Authentication Providers

Integrating with the users database, consider using one of the following solutions:

  • next-iron-session – low-level encoded stateless session
  • next-auth is a full-fledged authentication system with built-in providers (Google, Facebook, GitHub, and similar), JWT, JWE, email/password, magic links, etc.
  • with-passport-and-next-connect – old good node Password also works for this case

A crash course of Next.js: Routing and Middleware (part 3)

This series is my Next.js study resume, and despite it’s keen to a vanilla Next.js, all the features are applicable with Sitecore SDK. It is similar to the guide I recently wrote about GraphQL and aims to reduce the learning curve for those switching to it from other tech stacks.

  • In part 1 we covered some fundamentals of Next.js – rendering strategies along with the nuances of getStaticProps, getStaticPaths, getServerSideProps as well as data fetching.
  • In part 2 we spoke about UI-related things coming OOB with Next.js – layouts, styles and fonts powerful features, Image and Script components, and of course – TypeScript.

In this post we are going to talk about routing with Next.js – pages, API Routes, layouts, and Middleware.

Routing

Next.js routing is based on the concept of pages. A file located within the pages directory automatically becomes a route. Index.js files refer to the root directory:

  • pages/index.js -> /
  • pages/blog/index.js -> /blog

The router supports nested files:

  • pages/blog/first-post.js -> /blog/first-post
  • pages/dashboard/settings/username.js -> /dashboard/settings/username

You can also define dynamic route segments using square brackets:

  • pages/blog/[slug].js -> /blog/:slug (for example: blog/first-post)
  • pages/[username]/settings.js -> /:username/settings (for example: /johnsmith/settings)
  • pages/post/[...all].js -> /post/* (for example: /post/2021/id/title)

Navigation between pages

You should use the Link component for client-side routing:

import Link from 'next/link'

export default function Home(){
    return (
        <ul>
            <li>
                <Link href="/">
                    Home
                </Link>
            </li>
            <li>
                <Link href="/about">
                    About
                </Link>
            </li>
            <li>
                <Link href="/blog/first-post">
                    First post
                </Link>
            </li>
        </ul>
    )
}

So we have:

  • /pages/index.js
  • /aboutpages/about.js
  • /blog/first-postpages/blog/[slug].js

For dynamic segments feel free to use interpolation:

import Link from 'next/link'

export default function Post({ posts }){
    return (
        <ul>
            {posts.map((post) => (
                <li key={post.id}>
                    <Link href={`/blog/${encodeURIComponent(post.slug)}`}>
                        {post.title}
                    </Link>
                </li>
            ))}
        </ul>
    )
}

Or leverage URL object:

import Link from 'next/link'

export default function Post({ posts }){
    return (
        <ul>
            {posts.map((post) => (
                <li key={post.id}>
                    <Link
                        href={{
                            pathname: '/blog/[slug]',
                            query: { slug: post.slug },
                        }}
                    >
                        <a>{post.title}</a>
                    </Link>
                </li>
            ))}
        </ul>
    )
}

Here we pass:

  • pathname is the page name under the pages directory (/blog/[slug] in this case)
  • query is an object having a dynamic segment (slug in this case)

To access the router object within a component, you can use the useRouter hook or the withRouter utility, and it is recommended practice to use useRouter.

Dynamic routes

If you want to create a dynamic route, you need to add [param] to the page path.

Let’s consider a page pages/post/[pid].js having the following code:

import { useRouter } from 'next/router'

export default function Post(){
    const router = useRouter()
    const { id } = router.query
    return <p>Post: {id}</p>
}

In this scenario, routes /post/1, /post/abc, etc. will match pages/post/[id].js. The matched parameter is passed to a page as a query string parameter, along with other parameters.

For example, for the route /post/abc the query object will look as: { "id": "abc" }

And for the route /post/abc?foo=bar like this: { "id": "abc", "foo": "bar" }

Route parameters overwrite query string parameters, so the query object for the /post/abc?id=123 route will look like this: { "id": "abc" }

For routes with several dynamic segments, the query is formed in exactly the same way. For example, the page pages/post/[id]/[cid].js will match the route /post/123/456, and the query will look like this: { "id": "123", "cid": "456" }

Navigation between dynamic routes on the client side is handled using next/link:

import Link from 'next/link'

export default function Home(){
    return (
        <ul>
            <li>
                <Link href="/post/abc">
                    Leads to `pages/post/[id].js`
                </Link>
            </li>
            <li>
                <Link href="/post/abc?foo=bar">
                    Also leads to `pages/post/[id].js`
                </Link>
            </li>
            <li>
                <Link href="/post/123/456">
                    <a>Leads to `pages/post/[id]/[cid].js`</a>
                </Link>
            </li>
        </ul>
    )
}

Catch All routes

Dynamic routes can be extended to catch all paths by adding an ellipsis (...) in square brackets. For example, pages/post/[...slug].js will match /post/a, /post/a/b, /post/a/b/c, etc.

Please note: slug is not hard-defined, so you can use any name of choice, for example, [...param].

The matched parameters are passed to the page as query string parameters (slug in this case) with an array value. For example, a query for /post/a will have the following form: {"slug": ["a"]} and for /post/a/b this one: {"slug": ["a", "b"]}

Routes for intercepting all the paths can be optional – for this, the parameter must be wrapped in one more square bracket ([[...slug]]). For example, pages/post/[[...slug]].js will match /post, /post/a, /post/a/b, etc.

Catch-all routes are what Sitecore uses by default, and can be found at src\[your_nextjs_all_name]\src\pages\[[...path]].tsx.

The main difference between the regular and optional “catchers” is that the optional ones match a route without parameters (/post in our case).

Examples of query object:

{}// GET `/post` (empty object)
{"slug": ["a"]}// `GET /post/a` (single element array)
{"slug": ["a", "b"]}// `GET /post/a/b` (array with multiple elements)

Please note the following features:

  • static routes take precedence over dynamic ones, and dynamic routes take precedence over catch-all routes, for example:
    • pages/post/create.js – will match /post/create
    • pages/post/[id].js – will match /post/1, /post/abc, etc., but not /post/create
    • pages/post/[...slug].js – will match /post/1/2, /post/a/b/c, etc., but not /post/create and /post/abc
  • pages processed using automatic static optimization will be hydrated without route parameters, i.e. query will be an empty object ({}). After hydration, the application update will fill out the query.

Imperative approach to client-side navigation

As I mentioned above, in most cases, Link component from next/link would be sufficient to implement client-side navigation. However, you can also leverage the router from next/rou

import { useRouter } from 'next/router'

export default function ReadMore(){
    const router = useRouter()
    return (
        <button onClick={() => router.push('/about')}>
            Read about
        </button>
    )
}

Shallow Routing

Shallow routing allows you to change URLs without restarting methods to get data, including the getServerSideProps and getStaticProps functions. We receive the updated pathname and query through the router object (obtained from using useRouter() or withRouter()) without losing the component’s state.

To enable shallow routing, set { shallow: true }:

import { useEffect } from 'react'
import { useRouter } from 'next/router'

// current `URL` is `/`
export default function Page(){
    const router = useRouter()
    useEffect(() => {
        // perform navigation after first rendering
        router.push('?counter=1', undefined, { shallow: true })
    }, [])
    useEffect(() => {
        // value of `counter` has changed!
    }, [router.query.counter])
}

When updating the URL, only the state of the route will change.

Please note: shallow routing only works within a single page. Let’s say we have a pages/about.js page and we do the following:

router.push('?counter=1', '/about?counter=1', { shallow: true })

In this case, the current page is unloaded, a new one is loaded, and the data fetching methods are rerun (regardless of the presence of { shallow: true }).

API Routes

Any file located under the pages/api folder maps to /api/* and is considered to be an API endpoint, not a page. Because of its non-UI nature, the routing code remains server-side and does not increase the client bundle size. The below example pages/api/user.js returns a status code of 200 and data in JSON format:

export default function handler(req, res){
    res.status(200).json({ name: 'Martin Miles' })
}

The handler function receives two parameters:

  • req – an instance of http.IncomingMessage + several built-in middlewares (explained below)
  • res – an instance of http.ServerResponse + some helper functions (explained below)

You can use req.method for handling various methods:

export default function handler(req, res){
    if (req.method === 'POST') {
        // handle POST request
    } else {
        // handle other request types
    }
}

Use Cases

The entire API can be built using a routing interface so that the existing API remains untouched. Other cases could be:

  • hiding the URL of an external service
  • using environment variables (stored on the server) for accessing external services safely and securely

Nuances

  • The routing interface does not process CORS headers by default. This is done with the help of middleware (see below)
  • routing interface cannot be used with next export

As for dynamic routing segments, they are subject to the same rules as the dynamic parts of page routes I explained above.

Middlewares

The routing interface includes the following middlewares that transform the incoming request (req):

  • req.cookies – an object containing the cookies included in the request (default value is {})
  • req.query – an object containing the query string (default value is {})
  • req.body – an object containing the request body asContent-Type header, or null

Middleware Customizations

Each route can export a config object with Middleware settings:

export const config = {
    api: {
        bodyParser: {
            sizeLimit: '2mb'
        }
    }
}
  • bodyParser: false – disables response parsing (returns raw data stream as Stream)
  • bodyParser.sizeLimit – the maximum request body size in any format supported by bytes
  • externalResolver: true – tells the server that this route is being processed by an external resolver, such as express or connect

Adding Middlewares

Let’s consider adding cors middleware. Install the module using npm install cors and add cors to the route:

import Cors from 'cors'
// initialize middleware

const cors = Cors({
    methods: ['GET', 'HEAD']
})
// helper function waiting for a successful middleware resolve
// before executing some other code
// or to throw an exception if middleware fails
const runMiddleware = (req, res, next) =>
    newPromise((resolve, reject) => {
        fn(req, res, (result) =>
            result instanceof Error ? reject(result) : resolve(result)
        )
    })
export default async function handler(req, res){
    // this actually runs middleware
    await runMiddleware(req, res, cors)
    // the rest `API` logic
    res.json({ message: 'Hello world!' })
}

Helper functions

The response object (res) includes a set of methods to improve the development experience and speed up the creation of new endpoints.

This includes the following:

  • res.status(code) – function for setting the status code of the response
  • res.json(body) – to send a response in JSON format, body should be any serializable object
  • res.send(body) – to send a response, body could be a string, object or Buffer
  • res.redirect([status,] path) – to redirect to the specified page, status defaults to 307 (temporary redirect)

This concludes part 3. In part 4 we’ll talk about caching, authentication, and considerations for going live.