Experience Sitecore ! | All posts tagged 'Know-your-tools'

Experience Sitecore !

More than 200 articles about the best DXP by Martin Miles

Sitecore gets presented at Awesome List

After 3 months pull-requests-rejections-football I managed to squeeze Sitecore to be presented at Awesome List.

Awesome List logo

What is awesome list?

An awesome list is a list of "awesome things" curated by the community. There are awesome lists about everything from CLI applications to fantasy books. The main repository serves as a curated list of awesome lists, each of them represents the whole world presented in the most friendly way. If you never heard about it, I highly recommend start navigating if from the home page and can guarantee you'll find much great things there.

Until 2020 the list has missed Sitecore, so that I've fixed that. Now the repository contains comprehensive and well classified list of all known GitHub repositories. I personally find it useful for random lookups for certain code for a specific domain upon the demand - that saves much time! But apart from that, it's nice having the whole list of all the open source implementations just to review all the variety of things people did with Sitecore.


Existing categories

As for today, the whole Sitecore repositories are grouped into the below categories. I am leaving the direct links to each of them for the simplicity:

Everyone is welcome contributing to the repo as soon as you got any awesome stuff to add (by PR), but please be aware of the strict guidelines. 

Hope you find this list helpful!

Know your tools: The easiest way to install Habitat - Habitat Solution Installer

Working with Helix often encourages you to perform quick look-ups into the live-standard-implementation - Habitat project. That's why you have to have it installed. I remember the first time I installed Sitecore Habitat in October 2015 and how complicated that seemed at glance.

Luckily we now got a nice tool, that does exactly what it is named for - Habitat Solution Installer written by Neil Shack. So, let's go ahead and install Habitat into a new non-traditional destination using that tool.

Firs of all, let's grab Habitat Solution Installer itself from Sitecore Marketplace. Once downloaded, run HabitatInstaller.exe.


First screen takes three most important Habitat setting that we usually need to change as well as asks for the solution root folder where it will install the code. Once Install is clicked - it will download an archive of master branch from Habitat GitHub repository.


Then it will extract downloaded archive into temporal folder. By the way, you may alternate both path to master archive and your temporal files folder by clicking Settings button on the first (main) screen.


After extracting files, it will run npm install so you need to have node installed as a prerequisite.


Once finished, Habitat Solution Installer will display confirmation box.


So, what it has done - it installed and configured project code folder. But what hasn't it done?

1. It does not install Sitecore. You need to have it installed as another prerequisite, so that you provide Sitecore web folder and hostname to installer as shown on first screenshot. The best way would be to install using SIM (marketplace link). While installing Sitecore, make sure you're installing the right version corresponding to to codebase at Habitat master branch, you may look it up at Habitat Wiki page.

2. Not just to say you need to install Sitecore itself, you also need to install Web Forms for Marketers of the version corresponding to you Sitecore instance. And to ensure WFFM installation not failing, you need to install MongoDB prior to. Luckily that can be done in one click using SIM:


Finally, when all above is done, you may run gulp tasks from Task (View => Other Windows => Task Runner Explorer in Visual Studio 2015). Since npm install was already done for you - tasks are loaded as normal:


That's it! After Sitecore items are deserialised into your Sitecore instance, you'll be able to run Habitat website (however do not forget to publish from master to web unless you run it in live mode). The final result comes in you browser:


Know your tools: The easiest way to add a new project into your Helix solution

UPDATE: just came across a better solution from kamsar, that generates code, serialization and tests for the module. Please use that one instead of described below, however, the principle described below is exactly the same so you may refer for the sake of understanding.

---------------------------- original text below ----------------------------

I have found a great solution that makes adding a new project into existing Helix / Habitat solution so transparent and painless - Prodigious Helix Generator.

The guidance is well done and describes all thee steps. Is is soooo easy, and removes pain of fixing some forgotten references / namespaces / etc after you accidentally found out. It also optionally creates TDS project skeleton for your module, once you need to serialise items (why not to add Unicorn in addition to?).

So, to make it work you need to install yeoman first and afterwards the generator tool itself:

npm install -g yo
npm install -g generator-prodigious-helix

One important thing to mention is that not to mess with the paths and to get new module generated under the right path - run it at the root of your solution / repo.

You are at a choice of 3 options. In order to add a foundation, type in:

yo prodigious-helix:foundation

to make a feature:

yo prodigious-helix:feature

and for project even simpler:

yo prodigious-helix

As for example, below I am creating a new foundation module called AdminTools for the solution named HelixSolution. That will result in creating me a project called HelixSolution.Foundation.AdminTools within a same name folder (created) at the right path under Foundation folder. All the namespaces, references, settings and naming conventions would be auto-generated and correct!


After answering those 3 questions, you'll get your stuff generated:


That's it!

The only thing I noticed it that it appends solution name under App_config folder: App_Config\Include\HelixSolution\Feature\Feature.AdminTools.config so depending on your setup you may need to move Feature\Feature.AdminTools.config one level up into Include folder.

Hope it will start saving your time as much as it saves mine.

Know your tools: SIM - Sitecore Instance Manager

Sitecore Instance Manager (SIM) - the must-have tool for all Sitecore professionals and platform enthusiasts. It is a "Swiss army knife" for all types of activities related to installation and configuring Sitecore instances. So, what it does?

As it is obvious from its title, SIM simplifies installation of Sitecore, minimizing it to just few very intuitive clicks. SIM supports all versions of Sitecore, developers work tightly with platform vendor, so since recent they tend to synchronize SIM updates with new Sitecore releases. Oh, nearly forgot to mention, SIM has auto-update module that can update the program silently in background, or with a prompt, or just leave user alone once he prefers getting updates donу manually.

Here is the main screen of Sitecore Instance Manager:


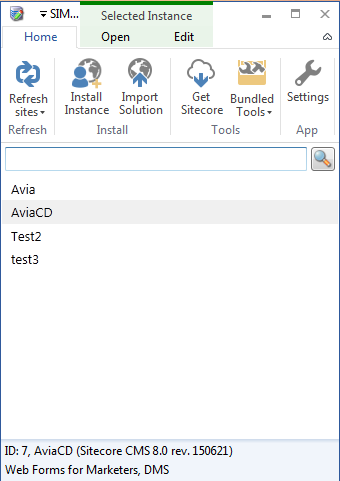
You have all available instances listed, you can install new or remove existing, do some configuration changes and much more. SIM operates "web-folder" installation archives as they came form Sitecore, one can download zip and manually place it into specific folder (that is configurable in program settings) or can download and store any platform version directly from SDN. In that case he/she might need to type in SDN credentials and pick up exact Sitecore version from options drop-down. As soon as zip is downloaded, it can be installed.

The installation process occurs in few clicks and is show on several screenshots below. First of all, we select which version we are going to install from the list of stored in local repository. Also there are fields to specify instance name, hostname and the installation folder.


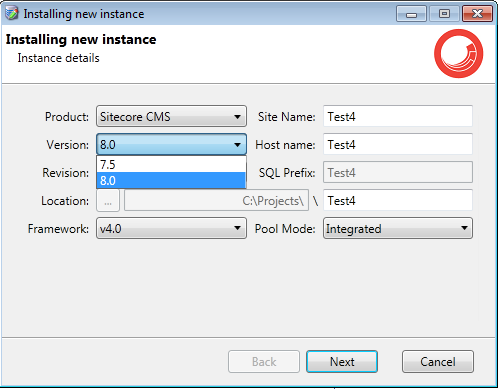
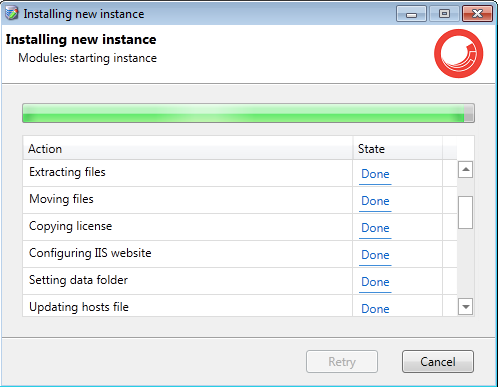
The program accurately installs files, restores database and sets appropriate SQL permissions, configures Application Pool and create config files with correct values.

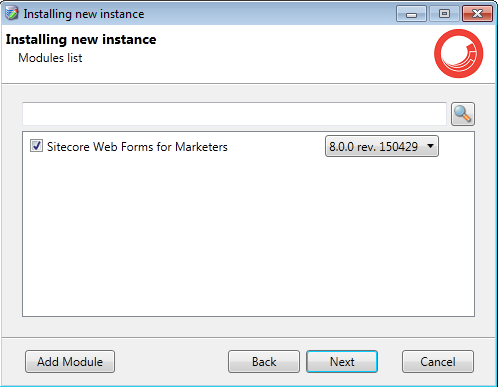
SIM is great in that it allows not just install Sitecore itself, but also you may specify which modules you would like to install straight away, just by simply checking them from the list of available.


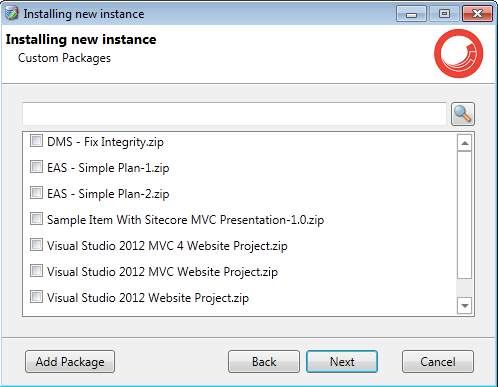
Apart from modules you may also install certain custom packages, likewise you may have a fully working website - both items and file system substructure packed within a package, so it may become available straight after the installation. As another example, I always install useful Sitecore adjustments with SIM in order to benefit out of them straight away.


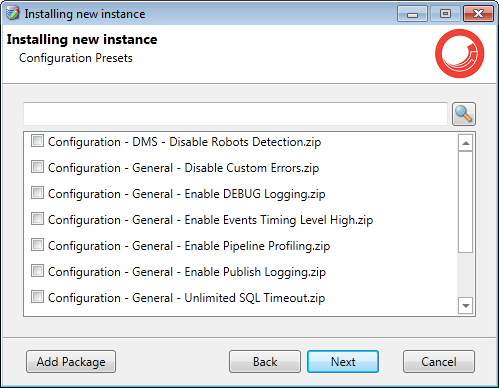
Not only custom packages can be auto-installed, but also such called configuration presets. These are certain configuration patches, each addressing small but important setting, will be placed into App_Config/Include folder.


The installation itself does not take much time. Sitecore 8 takes approximately 1 minute in virtual machine on my MacBookPro. Significantly faster comparing with time spent on default installer.


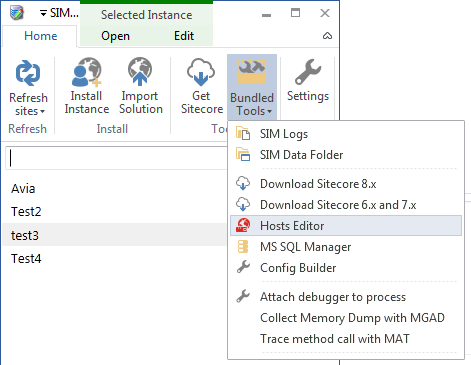
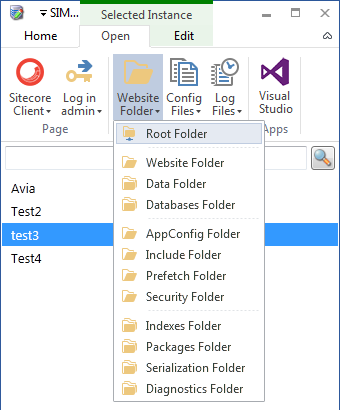
SIM also have multiple useful shortcuts at one place, like links to important Sitecore folders, configuration tools, hosts editor, IIS recycle an many many more.


I would award SIM with the highest rate and highly advise to download and play with it, even if you do not regularly play with installation and instances.

Download: SIM on Sitecore Marketplace