In Sitecore XM Cloud, one cannot modify web.config on the CM instance at runtime. By design, the CM webroot in XM Cloud containers is only writable by the deployment process, so "live" edits to web.config aren’t possible without redeploy. You can patch anything under App_Config/Include at runtime, by using Sitecore PowerShell Extensions, for example, but the main web.config file sits outside that folder, namely exactly at the web root, and requires stricter permissions. Only the Deploy process can modify it.
In this blog post, I am going to share all the techniques you can undertake to get your changes reflected within web.config on your desired environment.
Why?
Firstly, why at all would one need to modify web.config on the XM Cloud CM?
Transforming the CM instance’s web.config is essential because it’s the only way to inject critical, environment-specific settings, like Content Security Policy headers, custom session timeouts, IIS rewrite rules, or extra connection strings right into a locked-down XM Cloud deployment. Since the cloud platform prohibits direct edits to web.config at runtime, using XDT transforms ensures that everything from security hardening (CSP, HSTS) to feature flags or environment variables is baked into the build pipeline in a controlled, auditable way. This same transform can then be reapplied locally so your local CM containers mirror exactly what runs in production, reducing drift and making deployments predictable and secure. But..
How?
Since CM executes technically on an ASP.NET Framework runtime, an old good technique called XDT transformation, known from the old good days of ASP.NET, is still there with us. Iа you have never done it before, transformation may appear slightly complicated to produce it at first, but reading an XDT file is very intuitive. Here is an example:
<?xml version="1.0" encoding="utf-8" ?>
<configuration xmlns:xdt="http://schemas.microsoft.com/XML-Document-Transform">
  <system.web>
    <customErrors mode="Off" xdt:Transform="SetAttributes"/>
	<!--<customErrors mode="Off" xdt:Transform="SetAttributes" xdt:Locator="Condition(@mode!='Off')"/>-->
  </system.web>
  <appSettings>
    <add key="Some_New_Key" value="value_to_insert" xdt:Transform="InsertIfMissing" xdt:Locator="Match(key)" />
  </appSettings>
  <location path="sitecore">
	<system.webServer>
		<httpProtocol>
			<customHeaders>
				<add name="Content-Security-Policy" value="default-src 'self' 'unsafe-inline' 'unsafe-eval' [https://apps.sitecore.net](https://apps.sitecore.net/); img-src 'self' data: https://demo.sitecoresandbox.cloud/ [https://s.gravatar.com](https://s.gravatar.com/) https://*.wp.com/cdn.auth0.com/avatars; style-src 'self' 'unsafe-inline' [https://fonts.googleapis.com](https://fonts.googleapis.com/); font-src 'self' 'unsafe-inline' [https://fonts.gstatic.com](https://fonts.gstatic.com/); block-all-mixed-content; child-src 'self' https://demo.sitecoresandbox.cloud/; connect-src 'self' https://demo.sitecoresandbox.cloud/; media-src https://demo.sitecoresandbox.cloud/" xdt:Transform="Replace" xdt:Locator="Match(name)"/>
			</customHeaders>
		</httpProtocol>
	</system.webServer>
  </location>
</configuration>
Cloud build-time XDT transform: officially recommended approach
For the cloud deployments, you can leverage the transforms section of xmcloud.build.json to apply an XDT patch at build time:
"transforms": [
  {
    "xdtPath": "/xdts/web.config.xdt",
    "targetPath": "/web.config"
  }
]
The deploy process will do the rest, and it has everything required to apply the specified transform against the provided web.config. Please note that xdtPath is relevant to the CM customization .NET Framework project, also a cloud redeployment is mandatory for changes to take effect
This build-time transform is cloud-compatible with no custom images needed, and centralizes the change in a single file. It’s also the officially documented method for altering web.config in XM Cloud.
Pros: Officially supported, one versioned transform file, applied automatically by the pipeline.
Cons: Changes take effect only on redeploy, which is typically normal in XM Cloud.
So far, so good. But the above officially recommended approach only works with cloud deployments. What should we do to transform configs on a local development docker-run containers?
Local XDT Transformation
The first thing that probably came to your mind would be to create a custom CM image derived from the official XM Cloud image provided by Sitecore. However, you are not allowed to deploy any custom images for CM, due to the safety railguards. Anyway, even if it were possible, this idea would generally be overkill. Instead, for local XM Cloud Docker development, we generally want to somehow mirror the cloud approach but without custom images.
There are two main options:
1. Dockerfile build-time transform
Luckily, Sitecore supplies us with a helpful Docker tools image for XM Cloud, officially named as scr.sitecore.com/tools/sitecore-xmcloud-docker-tools-assets, that contains an Invoke-XdtTransform.ps1 PowerShell script to perform exactly what we need.
In the docker/build/cm directory, along with Dockerfile, create a new folder xdts and copy the desired XDT into it. Next, let's add copying and the execution instructions to the docker/build/cm/Dockerfile itself:
COPY ./xdts C:\inetpub\wwwroot\xdts

RUN (Get-ChildItem -Path 'C:\\inetpub\\wwwroot\\xdts\\web*.xdt' -Recurse ) | `
    ForEach-Object { & 'C:\\tools\\scripts\\Invoke-XdtTransform.ps1' -Path 'C:\\inetpub\\wwwroot\\web.config' -XdtPath $_.FullName `
    -XdtDllPath 'C:\\tools\\bin\\Microsoft.Web.XmlTransform.dll'; };
This will process all the transforms and bake the result into the CM image. After rebuilding the container with docker-compose build, the web.config receives our changes.
Pros: Uses the same XDT logic as XM Cloud; no extra runtime steps.
Cons: Requires rebuilding the Docker image for every change, which results in slower iterative development, and is not cloud-compatible. As I said above, you can’t push a custom CM image to XM Cloud, and you generally don't need that because xmcloud.build.json takes care of that anyway. The only real negative here is that you violate the DRY principle because you have the XDT file duplicated.
2. Development-only runtime patches
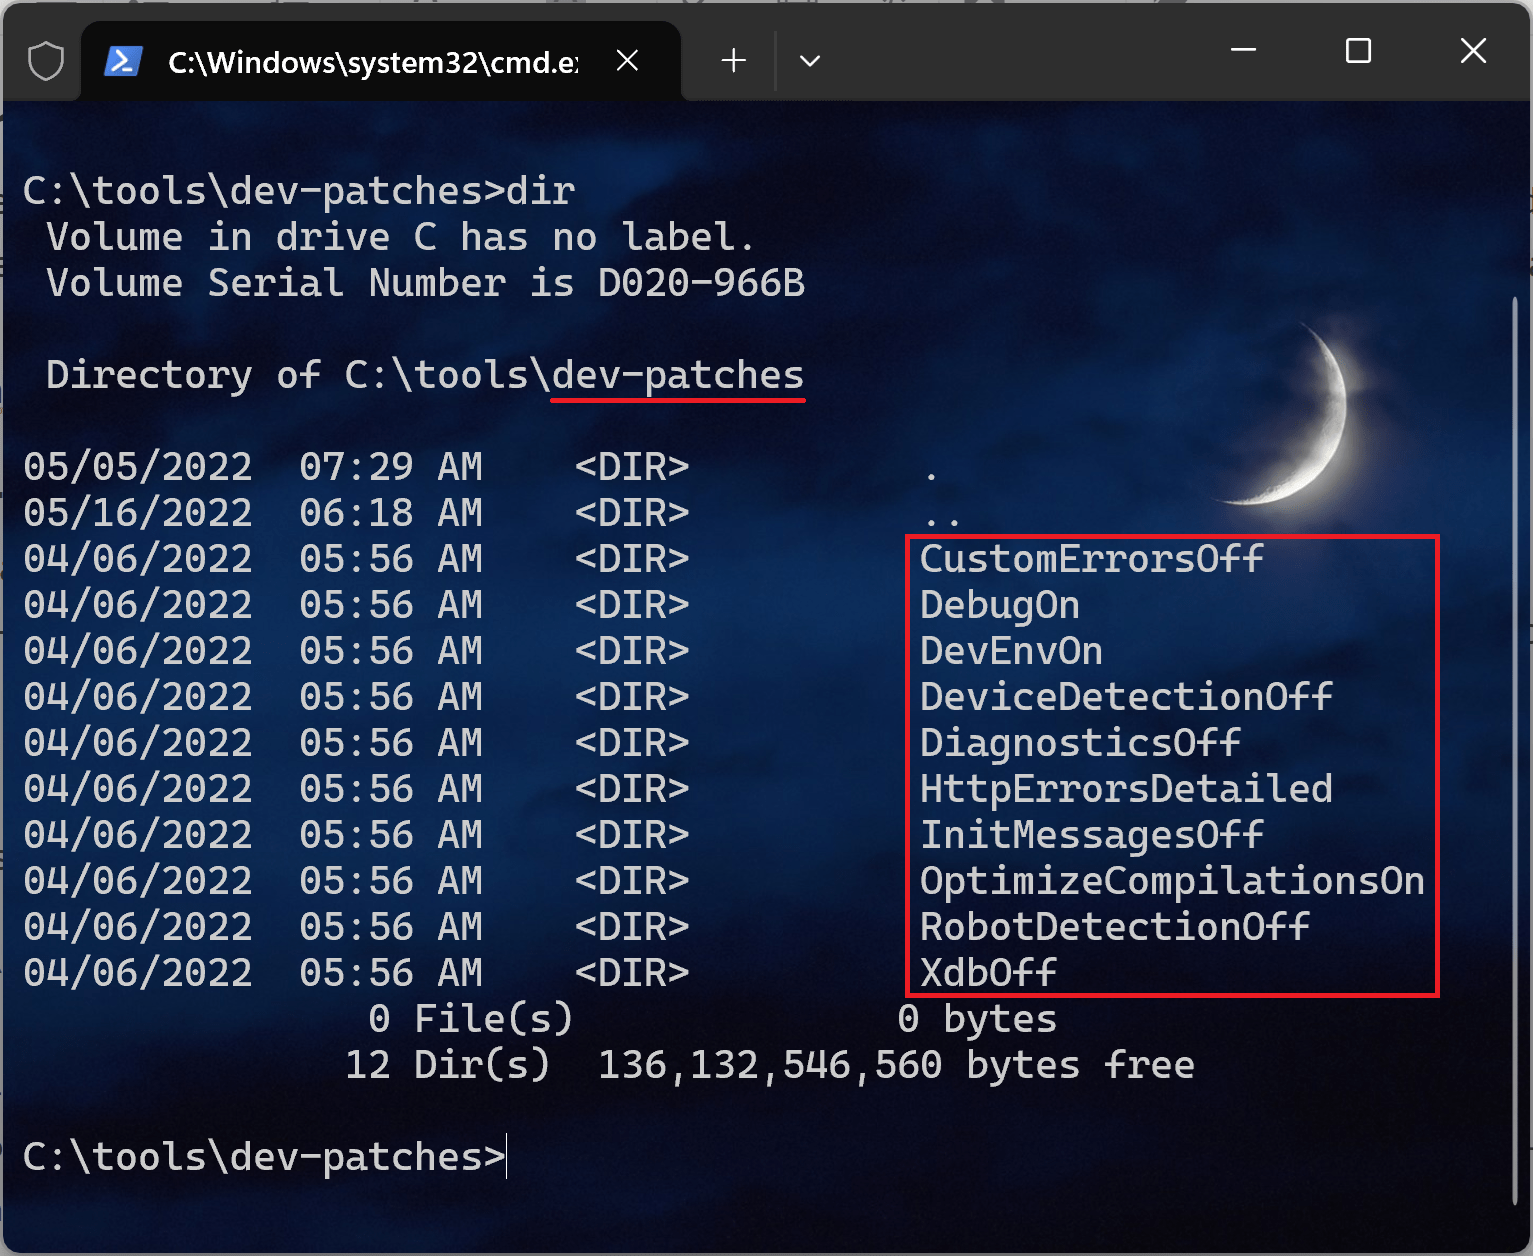
As we know, one cannot create custom CM images, but nothing stops us from creating our own custom tools image! What for? Your CM image copies the tools folder from the Sitecore XM Cloud Docker Tools Assets image into the tools folder, and this folder contains out-of-the-box development-only XDT configuration transforms in a folder called dev-patches and also the entrypoint for the CM image. This folder contains some default config patches provided by Sitecore out-of-the-box:
Therefore, our goal is to reuse this image by creating our own, where we will add our own XDT transform folder with actual files inside if these folders. Because we expect to reuse the execution script as well, it is important to maintain the same folder/file structure as on the original image. In this case, our changes will get picked up and processed automatically.
Steps to achieve:
1. First of all, we need to create a folder for a custom XDT transformation. Let's call it YouCustomXdtFolder and create Web.config.xdt file inside it. Naming convention is important here: transform is always called Web.config.xdt and the folder name will be later used on stage 5 to reference this transformation.
2. Create a custom tools image. Create a Dockerfile file under docker/build/tools, which you also created:
# escape=`

ARG BASE_IMAGE

FROM ${BASE_IMAGE}

COPY dev-patches\ \tools\dev-patches\
3. Build out tools image. In the docker-compose.override.yml let's add a new record under services:
  tools:
    image: ${REGISTRY}${COMPOSE_PROJECT_NAME}-sitecore-xmcloud-docker-tools-assets:${VERSION:-latest}
    build:
      context: ./docker/build/tools
      args:
        BASE_IMAGE: ${SITECORE_TOOLS_REGISTRY}sitecore-xmcloud-docker-tools-assets:${TOOLS_VERSION}
    scale: 0
4. Instruct CM to use the custom tools image rather than the default one:
services:
  cm:
    build:
      args:
        TOOLS_IMAGE: ${REGISTRY}${COMPOSE_PROJECT_NAME}-sitecore-xmcloud-docker-tools-assets:${VERSION:-latest}
    depends_on:
      - tools
    environment:
      SITECORE_DEVELOPMENT_PATCHES: ${SITECORE_DEVELOPMENT_PATCHES}
5. Append the name(s) of the custom transform folder to the environmental variable, for example:
SITECORE_DEVELOPMENT_PATCHES: DevEnvOn,CustomErrorsOff,DebugOn,DiagnosticsOff,InitMessagesOff,YouCustomXdtFolder
These five steps will do the entire magic on your local CM!
Pros: No need to rebuild the image – just restart the container when the XDT changes. Uses the official Docker entrypoint logic.
Cons: It only affects your local dev environment (you must still use xmcloud.build.json for cloud). It also requires maintaining the environment variable, but that can be version-controlled.
Volume Overwrites
Avoid this approach!
It is based on mounting or copying entire config folders like App_Config or web.config directly via /docker/deploy mounting point folder, and is absolutely not recommended!
That approach is error-prone and hard to maintain - you risk overwriting updates, missing subtle changes, aтв potentially receive false positives which may later hurt you badly. Instead, try to use either Dockerfile build-time transform or Development-only runtime patches approaches wherever possible.
You can only use the Volume Overwrites approach for experimental and time-critical cases for a one-off proving a concept, without any intent of keeping these changes. If your concept appears to be successful, consider using one of the above methods for local, along with reflecting the changes in xmcloud.build.json for the cloud deployment.
Summary Comparison of Approaches
-
Build Speed: The dev-only approach avoids image rebuilds, which brings fast feedback, whereas the Dockerfile method requires rebuilding the CM image after changes and is slower, especially upon each change. XM Cloud transforms only run on deployment builds.
-
Maintenance: Keeping one XDT file in source control for both cloud and local is easiest. The Dockerfile method scatters transform logic into build scripts (higher maintenance). The dev-only patch centralizes it with environment configuration.
-
Error-Proneness: Transform files are declarative and less error-prone than manual file swaps. Volume mounts risk configuration drift. The built-in dev-patches and XM Cloud pipeline both use the official transform engine, which is robust.
Conclusion and recommendations
First and obvious: use XDT transforms wherever possible! Even in those rare occasions when you can modify web.config manually, it does not mean that you should!
For cloud deployments, always use xmcloud.build.json transforms to modify web.config. In local Docker, mirror the same transform logic. The preferred local method is to leverage the SITECORE_DEVELOPMENT_PATCHES mechanism: place the same Web.config.xdt under docker/build/tools/YourPatchName/ and add YourPatchName to the environment variable. This requires no Dockerfile hacking and no custom CM image, yet applies the transform at runtime using the same Microsoft.Web.XmlTransform script.
As a fallback or if needed, you can also inject a RUN Invoke-XdtTransform.ps1 step into the CM Dockerfile, but this is more effort and not supported on XM Cloud. In all cases, avoid manual folder copies or replacing the entire config.
The transform-based approaches (build-time for cloud, and/or the dev-patch for local) strikes the best balance of simplicity, performance, and future maintainability and represents the current best practices.