Experience Sitecore ! | May 2019

Experience Sitecore !

More than 200 articles about the best DXP by Martin Miles

Boosting productivity with Sitecore by employing user scripts on an example of SXA activities

In one of my recent productivity blog posts, I wrote about an approach that saves me plenty of time - pre-opening numerous Content Editor on specific nodes so that I can switch between subnodes I am working with distributed across entire Sitecore tree almost immediately. This is especially helpful when working on SXA-based websites so that I will use it in the given example, however not limited to. Typically, when distributed SXA website, you'll need access to the following:

  1. Home page and all the children.
  2. Data folder for the site
  3. Rendering Parameters
  4. Renderings
  5. Site Media items
  6. Templates for site
All these are located under different paths, and I am still surprised meeting some folks who try to manipulate all of the above within single content tree of single Content Editor. I'd prefer spending time on something more productive rather than manipulating the content tree and have been previously pre-opening these items in individual Content Editor windows of Sitecore Desktop. As a hidden benefit, that approach raises a habit of having your stuff in persistent windows, for example, I got used to having Rendering Variants in the third tab. However, after each session reset or VM restart, I still had to re-open six editors and select items individually - that reduces the benefits of a given approach. Thus, let's fix this with automation.

In order to do that, I will employ such called User Scripts. But firstly, what are User Scripts? As per definition, a user script is programming that modifies the appearance or behavior of an application. A user script for a Web site, for example, can customize the way that content will display in the host browser. That's what we'll do with our beloved Sitecore. As for now, only Google Chrome supports these scripts out of the box and treats them as regular extensions. Opera browser also has support in some way, for the rest of browsers you may need to run an extension which will intermediate between the browser and Web servers. For Firefox, use the GreaseMonkey extension (it worked for me as well)

I am using TamperMonkey for Chrome as it gives additional benefits over OOB browser support, such as built-in editor with hotkeys and syntax highlighter, and more precise settings. 


First script

To start with lets practice on something very simple just to prove user script does work in principle. I decided to write a small script that after logging to Sitecore open Content Editor for you instead of the default behavior of showing LaunchPad. Here is its code:

// ==UserScript==
// @name         Launchpad redirects to shell
// @namespace    http://tampermonkey.net/
// @version      0.1
// @description  try to take over the world!
// @author       You
// @match        */sitecore/client/Applications/Launchpad*
// @grant        none
// ==/UserScript==

(function() {
    'use strict';

     window.location.href = "/sitecore/shell/default.aspx";
})();

The first nine commented rows at the beginning are specifying user script parameters and should not be removed. Please pay attention to @match parameter - it configures URL match where the script should run (however does not work with GreaseMonkey in FireFox). TamperMonkey also allows overriding this value.

After adding it to TamperMonkey, it looks like below:


Another simple example

I am quite often kicked-off into login screen due to session expiration or other reason that invalidate the current session. Even browser kindly stores last username and password for me, it takes some time to figure out what went on and use a mouse in order to click Submit button. If you opted out of browser remembering passwords for you and your password is smth. more complicated than b - then you'll likely to lose even more time. Let's fix that by writing auto-login script:

// ==UserScript==
// @name         Sitecore autologin
// @namespace    http://tampermonkey.net/
// @version      0.1
// @description  Automatically logs into Sitecore, especially helpful on session timeouts
// @author       Martin Miles
// @match        */sitecore/login*
// @grant        none
// ==/UserScript==

(function() {
    'use strict';

    var login = document.getElementById('UserName');
    var password = document.getElementById('Password');
    var submit = document.getElementById('LogInBtn');

    login.value = 'admin';
    password.value = 'b';
    submit.click();
})();

Works like a sharm - as soon as timeout brings you to Login screen, scrip does the rest! This of course is good to use on dev machines, but not qute suitable for production scenarios due to security concerns.


More advanced script

So now, after re-logging to Sitecore, you'll be redirected to Content Editor within Sitecore Desktop opened. It works!

Now I am going to write a more complicated script that will open 6 Content Editors and each of them will open its's predefined item.

The full code of this script can be obtained from my GitHub designated repository by this link: the code. Please keep in mind that this is a quick demo variant I have quickly created for the purpose of this blog post, so the code is quite minimal just to meet the objectives  Below I am showing how the execution looks like:

    start                        // click Sitecore Start button
        .then(loadContentEditor) // select Content Editor from start button menu
        .then(getContentEditor)  // gets iFrame handler in order to pass down the pipeline to furhter callers
        .then(clickId)           // expand Content node
        .then(clickId)           // expand tenant node
.then(clickId) // expand site node
.then(clickId) // expand Home page node
.then(selectItem) // click home item in order to select .then(startPromise) // a 'promise' version of clicking Sitecore Start button .then(loadContentEditor) // ... repeat the above actions for new Content Editor iframe .then(getContentEditor) .then(clickId) .then(clickId) .then(clickId) .then(clickId) .then(selectItem)
and parameters:
const items = {
    content: "{0DE95AE4-41AB-4D01-9EB0-67441B7C2450}",
    content_tenant: "{3E49489A-45F6-4FDC-BC53-CA40592AE944}",
    content_site: "{6B81532B-FCF4-461A-9964-C82980AE2933}",
    content_site_home: "{8CCB4C5D-B4A2-4476-91AA-275E9D1FB05B}",
    content_site_data: "{D1F7AC1A-9A4F-4009-A9F4-F8012C25FD9D}",
    content_site_presentation: "{2273EE5A-C314-4453-A2F4-69AD28B5B252}",
    content_site_presentation_renderingVariants: "{A9A0A0B7-C16F-49C9-BDBB-4CCFFC15124A}",

    layout: "{EB2E4FFD-2761-4653-B052-26A64D385227}",
    renderings: "{32566F0E-7686-45F1-A12F-D7260BD78BC3}",
    feature: "{DA61AD50-8FDB-4252-A68F-B4470B1C9FE8}",
    renderings_tenant: "{CD3E1C5B-DF68-439B-8AA3-055FE2FD7D42}",
    renderings_tenant_components: "{A69A614C-11BC-4052-949F-54978988F653}"
}
With that enabled, here's how the working result looks like: 
 

Future plans

I am thinking of wrapping more methods into a Selenium-like framework, so that one could chain any sequence of actions in an easy manner without the need of having any sort of dependencies, apart from framework script itself.

In general, this post demonstrates one of the thousands of possible use cases of User Scripts with Sitecore. Wise usage may save you and your content editors plenty of time by implementing reasonable automation. Hope this post helps.

Uploading scheduled auto-backups of editors content for your Helix / SXA website into Azure Blob storage

INTRODUCTION

I assume you are following good practices and develop Helix-powered websites (or SXA, that follows Helix by definition). In that case, you do separate actual user-generated content items from definition items, normally shipped along with each release and created by developers (if not, then please refer to an article I've previously written on that), so you end up having a Unicorn configuration that stores all of your author-edited content:

Will are going to split the process into 3 major steps

  1. Re-serialize Unicorn configuration for content items
  2. Archive serialized content
  3. Upload an archive into Azure Blob Storage

IMPLEMENTATION

1. Re-serialize Unicorn configuration for content items. Luckily, Unicorn provides us with MicroCHAP.dll library helping to automate the sync process as a part of your deployment process (note that the DLL and corresponding PowerShell module Unicorn.psm1  should be referenced from your code). The good news is that any verb can be passed to it, not just sync, so one can use 'Reserialize'. That call will look like:

$ErrorActionPreference = 'Stop'
$ScriptPath = Split-Path $MyInvocation.MyCommand.Path

Import-Module $ScriptPath\Unicorn.psm1
Sync-Unicorn -Verb 'Reserialize' -Configurations @('Platform.Website.Content') -ControlPanelUrl 'https://platform.dev.local/unicorn.aspx' -SharedSecret '$ecReT!'

2. Archiving serialized content would be the next step. If you click Show Config button for Platform.Website.Content configuration in Unicorn configuration page, you may find all the relevant information about it, including the physical folder where items are serialized. We need this folder to be archived. The step comes as:

$resource = "Content_$(get-date -f yyyy.MM.dd)"
$archiveFile = "d:\$resource.7z"
$contentFolder = "C:\inetpub\wwwroot\Platform.dev.local\App_Data\serialization\Project\serialization\Content"

7z a -t7z -m0=lzma -mx=9 -mfb=64 -md=32m -ms=on $archiveFile $contentFolder
I am using 7zip as an archiver, as my content is slightly more than 4GBs and traditional zip cannot handle that. As a hidden bonus, I am getting the best compression ratio coming with 7zip. Also, It would be worth checking if a file with such name exists at target and deleting it before archiving, especially if you run the script more often than daily.

3. Uploading to Azure Blob Storage concludes given routine. To make this happen you should have a subscription, and ideally a connection string to your Storage account. Then you may use the following code to achieve the result:
$containerName = "qa-serialization"
$ctx = New-AzureStorageContext -ConnectionString "DefaultEndpointsProtocol=https;AccountName=lab1234;AccountKey=y9CFAKE6PQYYf/vVDSFAKEzxOgl/RFv03PwAgcj8K80mSfQFDojdnKfakeaLMva0S9DbrQTzNjDMdGCp7rseRw==;EndpointSuffix=core.windows.net"

Set-AzureStorageBlobContent -File $archiveFile -Container $containerName -Blob $resource -Force -Context $ctx

Also, it is assumed you already have blob container created, if not you need to create it upfront:
New-AzureStorageContainer -Name $containerName -Context $ctx -Permission blob
Optionally, you may want to delete the temporal archive, once it's uploaded to blob storage.


RUNNING

Here's an entire code that works for me:
# Step 1: re-serialize user-generated content
$ErrorActionPreference = 'Stop'
$ScriptPath = Split-Path $MyInvocation.MyCommand.Path

Import-Module $ScriptPath\Unicorn.psm1
Sync-Unicorn -ControlPanelUrl 'https://platform.dev.local/unicorn.aspx' -Configurations @('Platform.Website.Content') -Verb 'Reserialize' -SharedSecret '$ecReT!'
# Step 2: archive serialized user-generated content with 7zip using best compression $resource = "Content_$(get-date -f yyyy.MM.dd)" $archiveFile = "d:\$resource.7z" $contentFolder = "C:\inetpub\wwwroot\Platform.dev.local\App_Data\serialization\Project\serialization\Content" 7z a -t7z -m0=lzma -mx=9 -mfb=64 -md=32m -ms=on $archiveFile $contentFolder # Step 3: upload generated content into Azure Blob Storage $containerName = "qa-serialization" $ctx = New-AzureStorageContext -ConnectionString "DefaultEndpointsProtocol=https;AccountName=lab1234;AccountKey=y9CFAKE6PQYYf/vVDSFAKEzxOgl/RFv03PwAgcj8K80mSfQFDojdnKfakeaLMva0S9DbrQTzNjDMdGCp7rseRw==;EndpointSuffix=core.windows.net"
Set-AzureStorageBlobContent -File $archiveFile -Container $containerName -Blob $resource -Force -Context $ctx #Step 4: clean-up after yourself Remove-Item $archiveFile -Force
I run it on a daily basis by Windows Task Scheduler in order to get a daily snapshot of editors' activity. The script produces the following output:


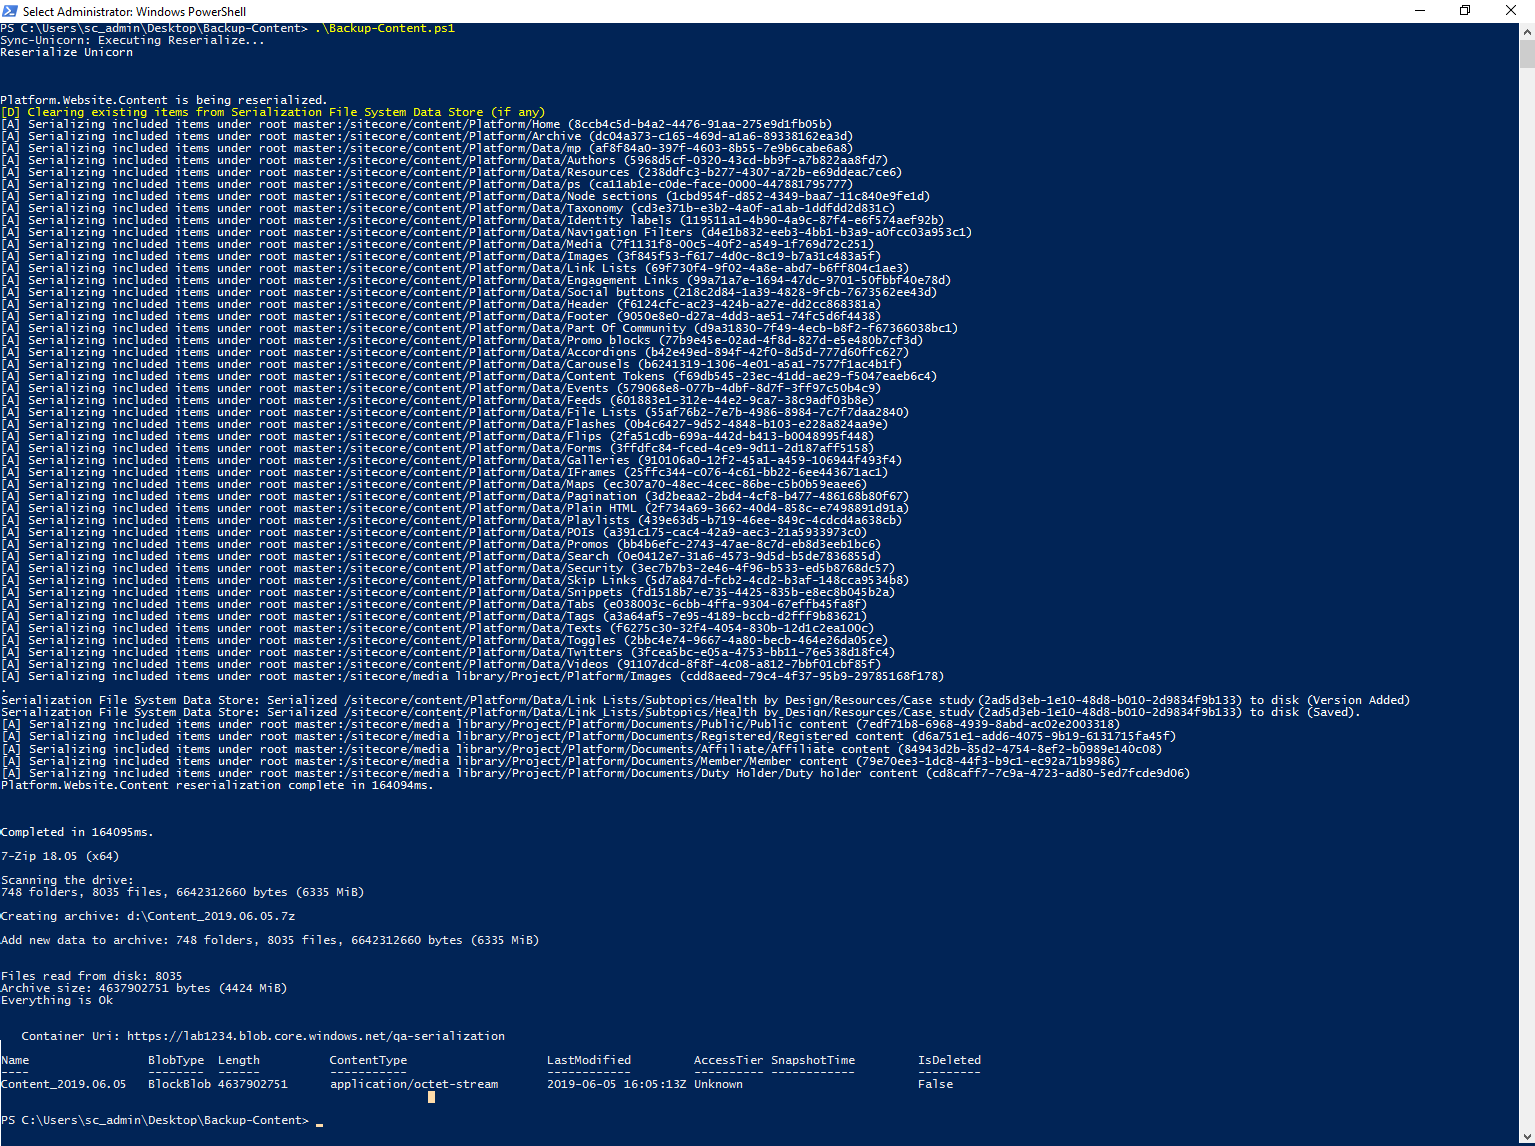
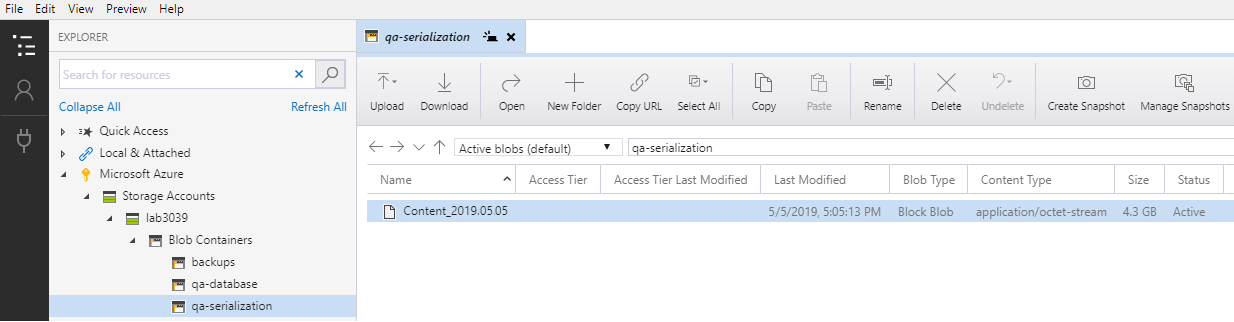
As a result of running script, I get an archive appearing in the Azure Blob Storage:


RESTORING

There's no sense in making backups unless you confirm restoring the data out of it works well. For content items, download an archive, restore and substitute content serialization folder with what you've extracted, then sync content configuration. As simple as that!

Note that your content should be aligned with the definition items, or it may not work well!

Hope this post helps!