Experience Sitecore ! | All posts tagged 'Productivity'

Experience Sitecore !

More than 200 articles about the best DXP by Martin Miles

Cannot use a Hyper-V disk VHDX image you've been shared with? That's how to manage it properly

Cannot use a Hyper-V disk VHDX image you've been shared with? It can be your colleague's shared VM or a disk exported from Azure VM. Below I am going to describe the steps required to managed it properly.

The first thing one is likely to perform is either importing this disk or creating a new VM without disk and attaching it later. Despite it seems absolutely valid, that will end up with:

If you see the above error it means you've most likely created a VM of 2-nd Generation of Hyper-V, and attached you drive to it. That won't work, but why?

To answer this question let's define the difference between both generations. The main fact about Generation 1 is that it emulates hardware - all required hardware components must be emulated to make the virtual machine work! Special software that can imitate the behaviour of real hardware is included in Hyper-V, as a result the VM can operate with virtual devices. Emulated hardware (that behaves identical to real hardware) includes drivers to most operating systems in order to provide high compatibility.

Generation 1 the emulation works way less productive compared to native equipment and has numerous limitations. Among those:

  • a legacy network adapter
  • IDE controllers with only 2 devices could be attached to each
  • MBR with max disk size of 2TB and not more than 4 partitions.

The 2-nd Generation uses:

  • UEFI BIOS
  • GPT support (without size and partitions legacy limit) and Secure Boot
  • because of the above - VMs boot (and operate) much faster
  • fewer legacy devices and new faster synthetic hardware used instead
  • better CPU and RAM consumption

UEFI is not just a replacement of BIOS, UEFI extends support of devices and features, including GPT (GUID Partition Table).

Secure Boot is a feature that allows protection against modifying boot loaders and main system files, done by comparing the digital signatures that must be trusted by the OEM.


The solution is quite simple.

What you need to do is create a 1-st Generation VM (without creating a new disk drive) and reference existing VHDX file. That would work and OS will load (slowly but will do). The laziest person would probably stop at this stage, but we progress ahead with converting it to the 2-nd Generation VM. But, how do we?

All you need to do is convert legacy BIOS to UEFI running the following command executed within a 1-st Generation VM:

mbr2gpt.exe /convert /allowFullOS

Please pay attention to the warning: since now you need to boot in UEFI mode.

Now you can turn off the Windows VM, delete existing 1-st Generation VS from Hyper-V Manager (but not the disk drive!), and then create a new 2-nd Generation VM referencing the converted VHDX disk image. Also make sure the attached hard Drive stands first for at the boot sequence order (Firmware tab) and also you may want unchecking Enable Secure Boot switch from the Security tab.

Now you may successfully start your received Hard Drive with a fast and reliable 2-nd Generation VM that manages resources of your host machine in a much reliable and savvy way!

Enhancing Treelist and Miltilist fields with a lookup feature for productivity. Two approaches, same goal: browser user script and serverside

brThis trick saves me lo-o-o-ot of time, especially working on large Helix/SXA solution.

Typically you have a treelist that looks like this:

Now tell me what actions do you take when there is a necessity to look up what are one or few of these templates? How you achieve that?

I assume you raw copy GUID, paste into search, inspect and then return back. Clumsy, isn't it?

Objective. My desire was to achieve a popup or new tab window by clicking ENTER hotkey once so that I immediately can look up this template for whatever interests me. I ended up not just achieving the goal but doing that in two opposite ways. Let's consider the pros and cons of each approach (they are almost opposite)


LET'S REVIEW THE OPTIONS

1. Browser user script. I recently wrote about implementing browser user script in order to enhance your productivity while working with Sitecore content management. This approach has

  • Pros:

    • leaves server untouched
    • user can easily adjust the flow right in the nice code editor provided by the extension
  • Cons:

    • applies only on a specific browser on your client machine
    • sometimes relies on browser extensions ie. TapmerMonkey


2. Serverside script alteration is an opposite option for achieving the goal. I recently blogged about developing Expand / Collapse all editor sections implementing this approach. In order to do so, I need to modify <web_root>\sitecore\shell\Applications\Content Manager\Content Editor.js file within my sitecore instance.

  • Pros:

    • applies to all users with all browsers using your Sitecore instance
  • Cons:

    • served by a back-end and risks interfering with other serverside code
    • business logic needs to be placed into Sitecore instance, whether by deployment or manually

Anyway, you may pick up either of the solutions depending on your preferences, it's better to have a choice. Let's turn to the implementation.


IMPLEMENTATION

1. Browser user script. The way Sitecore Desktop functions is dynamically loading iframes for specific features, so it is not as easy to use selectors with it due to not just elements but even documents not yet loaded into DOM. 

To address this implementation I picked Mutation. It allows you creating handlers for whatever mutation occurs in your DOM, one may also specify what types of events to handle:

// handing a mutation occured
var mutationObserver = new MutationObserver(function(mutations) {
  mutations.forEach(function(mutation) {
    console.log(mutation);
  });
});

// starts listening for changes in the root HTML element of the page.
mutationObserver.observe(document.documentElement, {
  attributes: true,
  characterData: true,
  childList: true,
  subtree: true,
  attributeOldValue: true,
  characterDataOldValue: true
});
I use nested MutationObserver approach where outer observer indirectly handles new documents appearing and once it happens - attaches the nested observer within a given iframe. So below is the entire code:
// ==UserScript==
// @name         Multilist and Treelist values lookup
// @namespace    http://tampermonkey.net/
// @version      0.1
// @description  When working with multilist / treelist items in Sitecore, simply hit ENTER on right-hand side selected item in order to preview it in new tab
// @author       Martin Miles
// @match        */sitecore/shell/default.aspx*
// @grant        none
// ==/UserScript==

(function () {
    'use strict';

    const settings = { mutation: { attributes: true, characterData: true, childList: true, subtree: true, attributeOldValue: true, characterDataOldValue: true } };

    var mutationObserver = new MutationObserver(function (mutations) {
        mutations.forEach(function (mutation) {

            if (mutation.type == "attributes" && mutation.target.id.startsWith("startbar_application_") && mutation.target.className == "scActiveApplication") {
                var iframe = getIframeFromActiveTab(mutation.target);
                if (iframe) {
                    internalMutationObserver(iframe);
                }
            }
        });
    });

    mutationObserver.observe(document.documentElement, settings.mutation);

    function internalMutationObserver(iframe) {
        var innerObserver = new MutationObserver(function (innerMutations) {
            innerMutations.forEach(function (m) {

                var _el = m.target;
                if (_el.className == 'scEditorFieldMarkerBarCell') {

                    var labels = _el.parentElement.querySelectorAll('.scContentControlMultilistCaption');
                    labels.forEach(function (label) {
                        if (label.innerHTML == 'Selected') {
                            label.innerHTML = label.innerHTML + ' (hit ENTER on selected item for preview in a new tab)';
                        }
                    });

                    var selects = _el.parentElement.querySelectorAll('select');
                    selects.forEach(function (select) {
                        select.addEventListener("keypress", keyPressed);
                    });
                }
            });
        });

        // wire up internal mutation
        innerObserver.observe(iframe.contentDocument, settings.mutation);
    }

    function getIframeFromActiveTab(element) {
        let frameName = element.id.replace('startbar_application_', '');
        let iframe = document.querySelectorAll('iframe#' + frameName);
        if (iframe.length > 0) {
            return iframe[0];
        }

        return null;
    }

    function keyPressed(e) {
        if (e.keyCode == 13) {

            var selsectedValue = e.target.options[e.target.selectedIndex].value;

            var url = getUrl(selsectedValue);
            if (url) {
                openInNewTab(url);
            }

            return false;
        }
    }

    function getUrl(selsectedValue) {

        let guid;
        var parts = selsectedValue.split("|");
        if (parts.length === 2) {
            guid = parts[1];
        }
        else if (isGuid(selsectedValue)) {
            guid = selsectedValue;
        }

        return !guid ? guid : '/sitecore/shell/Applications/Content Editor?id='
            + guid + '&amp;vs=1&amp;la=en&amp;sc_content=master&amp;fo='
            + guid + '&ic=People%2f16x16%2fcubes_blue.png&he=Content+Editor&cl=0';
    }

    function isGuid(stringToTest) {
        if (stringToTest[0] === "{") {
            stringToTest = stringToTest.substring(1, stringToTest.length - 1);
        }
        var regexGuid = /^(\{){0,1}[0-9a-fA-F]{8}\-[0-9a-fA-F]{4}\-[0-9a-fA-F]{4}\-[0-9a-fA-F]{4}\-[0-9a-fA-F]{12}(\}){0,1}$/gi;
        return regexGuid.test(stringToTest);
    }

    function openInNewTab(url) {
        var win = window.open(url, '_blank');
        win.focus();
    }
})();
To run this scrup add a new script from TamperMonkey's dashboard, paste the code, save and enable it. After refreshing Sitecore Desktop you'll be able to preview multiselect field values bu hitting ENTER button, just as on a demo below:

Ready-to-use script is available on GitHub: link

2. The serverside approach considers modifying some serverside component, in a given case, it is quite simple - just modifying <web_root>\sitecore\shell\Applications\Content Manager\Content Editor.js file by adding few functions at the bottom of it:

scContentEditor.prototype.onDomReady = function (evt) {
    this.registerJQueryExtensions(window.jQuery || window.$sc);
    this.addMultilistEnhancer(window.jQuery || window.$sc);
};

scContentEditor.prototype.addMultilistEnhancer = function ($) {
    $ = $ || window.jQuery || window.$sc;
    if (!$) { return; }

    $('#MainPopupIframe').load(function () {
        $(this).show();
        console.log('iframe loaded successfully')
    });

    $(document).on("keypress", "select.scContentControlMultilistBox", function (e) {
        if (e.keyCode == 13) {

            var selsectedValue = e.target.options[e.target.selectedIndex].value;

            var url = getUrl(selsectedValue);
            if (url) {
                openInNewTab(url);
            }

            return false;
        }
    });

    function getUrl(selsectedValue) {

        let guid;
        var parts = selsectedValue.split("|");
        if (parts.length === 2) {
            guid = parts[1];
        }
        else if (isGuid(selsectedValue)) {
            guid = selsectedValue;
        }

        return !guid ? guid : '/sitecore/shell/Applications/Content Editor?id='
            + guid + '&amp;vs=1&amp;la=en&amp;sc_content=master&amp;fo='
            + guid + '&ic=People%2f16x16%2fcubes_blue.png&he=Content+Editor&cl=0';
    }

    function isGuid(stringToTest) {
        if (stringToTest[0] === "{") {
            stringToTest = stringToTest.substring(1, stringToTest.length - 1);
        }
        var regexGuid = /^(\{){0,1}[0-9a-fA-F]{8}\-[0-9a-fA-F]{4}\-[0-9a-fA-F]{4}\-[0-9a-fA-F]{4}\-[0-9a-fA-F]{12}(\}){0,1}$/gi;
        return regexGuid.test(stringToTest);
    }

    function openInNewTab(url) {
        var win = window.open(url, '_blank');
        win.focus();
    }
};

Invalidate browser cache and refresh the page. I am not including a demo record as it works identical to the demo above for the first approach.

Note! if you also have Expand/Collapse script in place from previous blog post, then you need to share once handler for cboth calls since unlike in C# you may not have multi-delegate prototype handler:
// you cannot have multidelegate onDomReady here, so share all calls within one handler
scContentEditor.prototype.onDomReady = function (evt) {
    this.registerJQueryExtensions(window.jQuery || window.$sc);
    this.addMultilistEnhancer(window.jQuery || window.$sc);
    this.addCollapser(window.jQuery || window.$sc);
};

Result. Regardless of the approach taken, now you may look up Treelist selected items by selecting them and hitting the ENTER button. You may include this trick into your own Sitecore productivity pack (you have one already, don't you?) as it indeed helps so much.

Boosting productivity with Sitecore by employing user scripts on an example of SXA activities

In one of my recent productivity blog posts, I wrote about an approach that saves me plenty of time - pre-opening numerous Content Editor on specific nodes so that I can switch between subnodes I am working with distributed across entire Sitecore tree almost immediately. This is especially helpful when working on SXA-based websites so that I will use it in the given example, however not limited to. Typically, when distributed SXA website, you'll need access to the following:

  1. Home page and all the children.
  2. Data folder for the site
  3. Rendering Parameters
  4. Renderings
  5. Site Media items
  6. Templates for site
All these are located under different paths, and I am still surprised meeting some folks who try to manipulate all of the above within single content tree of single Content Editor. I'd prefer spending time on something more productive rather than manipulating the content tree and have been previously pre-opening these items in individual Content Editor windows of Sitecore Desktop. As a hidden benefit, that approach raises a habit of having your stuff in persistent windows, for example, I got used to having Rendering Variants in the third tab. However, after each session reset or VM restart, I still had to re-open six editors and select items individually - that reduces the benefits of a given approach. Thus, let's fix this with automation.

In order to do that, I will employ such called User Scripts. But firstly, what are User Scripts? As per definition, a user script is programming that modifies the appearance or behavior of an application. A user script for a Web site, for example, can customize the way that content will display in the host browser. That's what we'll do with our beloved Sitecore. As for now, only Google Chrome supports these scripts out of the box and treats them as regular extensions. Opera browser also has support in some way, for the rest of browsers you may need to run an extension which will intermediate between the browser and Web servers. For Firefox, use the GreaseMonkey extension (it worked for me as well)

I am using TamperMonkey for Chrome as it gives additional benefits over OOB browser support, such as built-in editor with hotkeys and syntax highlighter, and more precise settings. 


First script

To start with lets practice on something very simple just to prove user script does work in principle. I decided to write a small script that after logging to Sitecore open Content Editor for you instead of the default behavior of showing LaunchPad. Here is its code:

// ==UserScript==
// @name         Launchpad redirects to shell
// @namespace    http://tampermonkey.net/
// @version      0.1
// @description  try to take over the world!
// @author       You
// @match        */sitecore/client/Applications/Launchpad*
// @grant        none
// ==/UserScript==

(function() {
    'use strict';

     window.location.href = "/sitecore/shell/default.aspx";
})();

The first nine commented rows at the beginning are specifying user script parameters and should not be removed. Please pay attention to @match parameter - it configures URL match where the script should run (however does not work with GreaseMonkey in FireFox). TamperMonkey also allows overriding this value.

After adding it to TamperMonkey, it looks like below:


Another simple example

I am quite often kicked-off into login screen due to session expiration or other reason that invalidate the current session. Even browser kindly stores last username and password for me, it takes some time to figure out what went on and use a mouse in order to click Submit button. If you opted out of browser remembering passwords for you and your password is smth. more complicated than b - then you'll likely to lose even more time. Let's fix that by writing auto-login script:

// ==UserScript==
// @name         Sitecore autologin
// @namespace    http://tampermonkey.net/
// @version      0.1
// @description  Automatically logs into Sitecore, especially helpful on session timeouts
// @author       Martin Miles
// @match        */sitecore/login*
// @grant        none
// ==/UserScript==

(function() {
    'use strict';

    var login = document.getElementById('UserName');
    var password = document.getElementById('Password');
    var submit = document.getElementById('LogInBtn');

    login.value = 'admin';
    password.value = 'b';
    submit.click();
})();

Works like a sharm - as soon as timeout brings you to Login screen, scrip does the rest! This of course is good to use on dev machines, but not qute suitable for production scenarios due to security concerns.


More advanced script

So now, after re-logging to Sitecore, you'll be redirected to Content Editor within Sitecore Desktop opened. It works!

Now I am going to write a more complicated script that will open 6 Content Editors and each of them will open its's predefined item.

The full code of this script can be obtained from my GitHub designated repository by this link: the code. Please keep in mind that this is a quick demo variant I have quickly created for the purpose of this blog post, so the code is quite minimal just to meet the objectives  Below I am showing how the execution looks like:

    start                        // click Sitecore Start button
        .then(loadContentEditor) // select Content Editor from start button menu
        .then(getContentEditor)  // gets iFrame handler in order to pass down the pipeline to furhter callers
        .then(clickId)           // expand Content node
        .then(clickId)           // expand tenant node
.then(clickId) // expand site node
.then(clickId) // expand Home page node
.then(selectItem) // click home item in order to select .then(startPromise) // a 'promise' version of clicking Sitecore Start button .then(loadContentEditor) // ... repeat the above actions for new Content Editor iframe .then(getContentEditor) .then(clickId) .then(clickId) .then(clickId) .then(clickId) .then(selectItem)
and parameters:
const items = {
    content: "{0DE95AE4-41AB-4D01-9EB0-67441B7C2450}",
    content_tenant: "{3E49489A-45F6-4FDC-BC53-CA40592AE944}",
    content_site: "{6B81532B-FCF4-461A-9964-C82980AE2933}",
    content_site_home: "{8CCB4C5D-B4A2-4476-91AA-275E9D1FB05B}",
    content_site_data: "{D1F7AC1A-9A4F-4009-A9F4-F8012C25FD9D}",
    content_site_presentation: "{2273EE5A-C314-4453-A2F4-69AD28B5B252}",
    content_site_presentation_renderingVariants: "{A9A0A0B7-C16F-49C9-BDBB-4CCFFC15124A}",

    layout: "{EB2E4FFD-2761-4653-B052-26A64D385227}",
    renderings: "{32566F0E-7686-45F1-A12F-D7260BD78BC3}",
    feature: "{DA61AD50-8FDB-4252-A68F-B4470B1C9FE8}",
    renderings_tenant: "{CD3E1C5B-DF68-439B-8AA3-055FE2FD7D42}",
    renderings_tenant_components: "{A69A614C-11BC-4052-949F-54978988F653}"
}
With that enabled, here's how the working result looks like: 
 

Future plans

I am thinking of wrapping more methods into a Selenium-like framework, so that one could chain any sequence of actions in an easy manner without the need of having any sort of dependencies, apart from framework script itself.

In general, this post demonstrates one of the thousands of possible use cases of User Scripts with Sitecore. Wise usage may save you and your content editors plenty of time by implementing reasonable automation. Hope this post helps.

Starting with Docker and Sitecore

There was much of recent buzz around containers as technology and Docker in particular, especially now where more and more community efforts focused at Docker in conjunction with Sitecore. Plenty of articles do explain how it works on the very top level, what the benefits are but very rare do precise guidance. As for an ultimate beginner - I know how it is important to get a quick start, the minimal positive experience as a further point of development. This blog exactly about how to achieve the bare minimal Sitecore running in Docker.

Content


1. Terminology

  • Docker images - a blueprint for creating containers, is what you pull from remote registry
  • Docker container - an implementation of a specific image, you run and work with containers, not images
  • Docker repository - a logical unit containing one or many built images (specified by tags)
  • Docker registry - works like a remote git repo, it's a hosted solution to you push your built images into

There are plenty more of terminology, but these are the essentials for a demo below

2. Installing Docker

If you have it up and running, you may skip to the next part.

In order to operate the repository for given walk-through, you need to have Windows 10 x64 with at least build 1809.

The simplest way is to install it from Chocolatey gallery:

cinst docker-desktop

Missing something from your host OS installation? Docker will manage that itself!

Once done, you'll need to switch a mode. Docker for Windows can work in either Windows or Linux mode at the same time - which means you cannot mix types of containers.

One of the biggest issues at the moment is the size of Windows base images - the minimal Nano Server with almost everything cut off is already 0.5Gb and Server Core (this one either does not have UI - just a console) goes to 4Gb. That's too much comparing to minimal Linux images starting from as little as 5 megs. That's why it may seem very attractive to run Solr from Linux image (as both Solr and Java it requires are cross-platform and there are ready-to-use images there), same for Ms SQL Server which also has been ported on Linux and its images are also available.

Until the very-very recent the short answer was no - one could manage only single type of container at a time (while already running Linux container will keep up running unmanageable, there are also few workarounds how to make them work in parallel, but that's out of scope for now), but as from April 2019 it is doable (from Linux mode on Windows), I managed to combine NGINX on Linux with IIS on Windows.

Switching mode from UI is done by right-clicking Docker icon context menu from a system tray:


3. Docker registry

What you should do next is to provide a docker registry. Docker Hub is probably the first option for any docker beginner.

Docker Hub however allows only one private repository for free. You need to ensure sure all your repositories are private. Images you're building will contain your license file, having them in a public access will also be treated as sharing Sitecore binaries on your own, which you're not allowed - only Sitecore can distribute that publicly.

Alternatively, you may consider Canister project, they give up to 20 private repositories for free.

Pluralsight has a course on how to implement your own self-hosted docker registry.

But what is even more surprising, Docker itself provides a docker image with Docker Registry for storing and distributing Docker images.


4. Preparing images

Now let's clone Sitecore images repository from GitHub - https://github.com/sitecoreops/sitecore-images
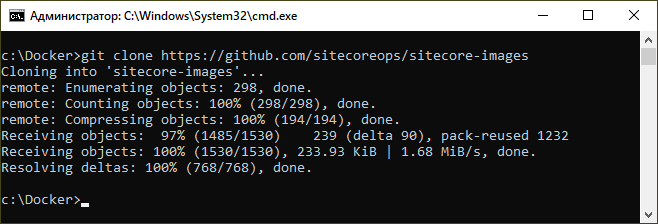
If you don't have git installed - use Chocolatey tool already familiar from previous steps: cinst git (once complete - you'll need to reopen console window so that PATH variable gets updated).

To keep things minimal, I go to sitecore-images\images folder and delete everything unwanted - as for this demo, I keep only 9.1.1 images, removing the rest. So, I left only 9.1.1 images and sitecore-openjdk required for Solr:

Images folder contains instructions on how to build you new Sitecore images. As input data they require Sitecore installers and license file, so put them into this folder:
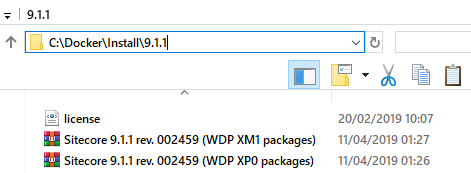
And the last but not the least, create build.ps1 PowerShell script.

Important: do not use an email as the username, it's not your email (in my case username is martinmiles), and from what I've heard many people find this confusing and were wondering why getting some errors.

This is my build script, replace usernames and password and you're good to go:

"YOUR_DOCKER_REGISTRY_PASSWORD" | docker login --username martinmiles --password-stdin

# Load module
Import-Module (Join-Path $PSScriptRoot "\modules\SitecoreImageBuilder") -Force

# Build and push
SitecoreImageBuilder\Invoke-Build `
    -Path (Join-Path $PSScriptRoot "\images") `
    -InstallSourcePath "c:\Docker\Install\9.1.1" `
    -Registry "martinmiles" `
    -Tags "*" `
    -PushMode "WhenChanged"


5. Building images

Run the build script. If receiving security errors, you may also be required to change execution policy prior to running build:

set-executionpolicy unrestricted
Finally you get your base images downloading and build process working:
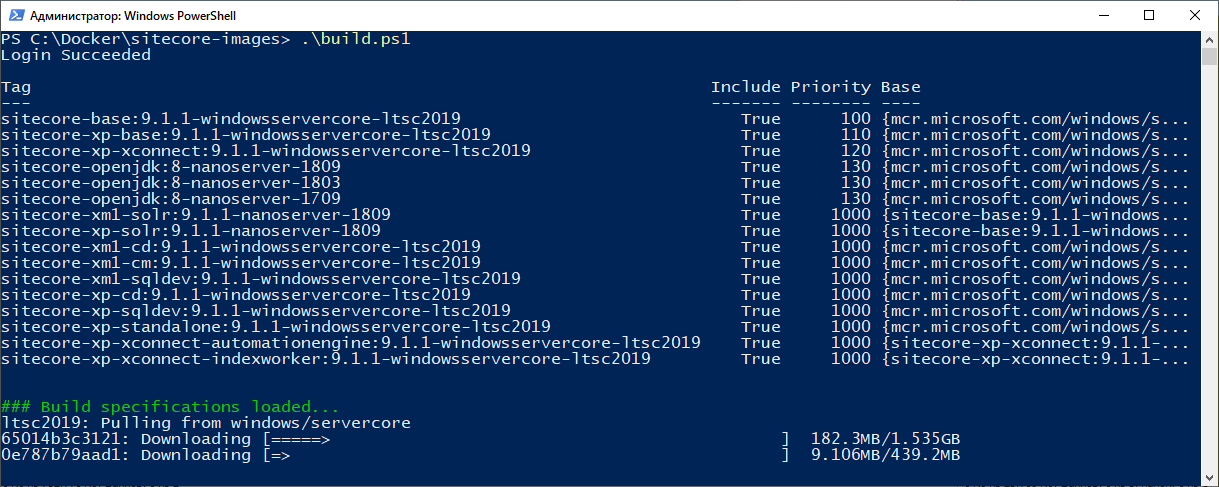
As I said, the script pulls all the base images and builds, as scripted. Please be patient as it may take a while. Once built, your images will be pushed to the registry. Here's what I finally got - 15 images built and pushed to Docker Hub. Again, please pay attention to Private badge next to each repository:
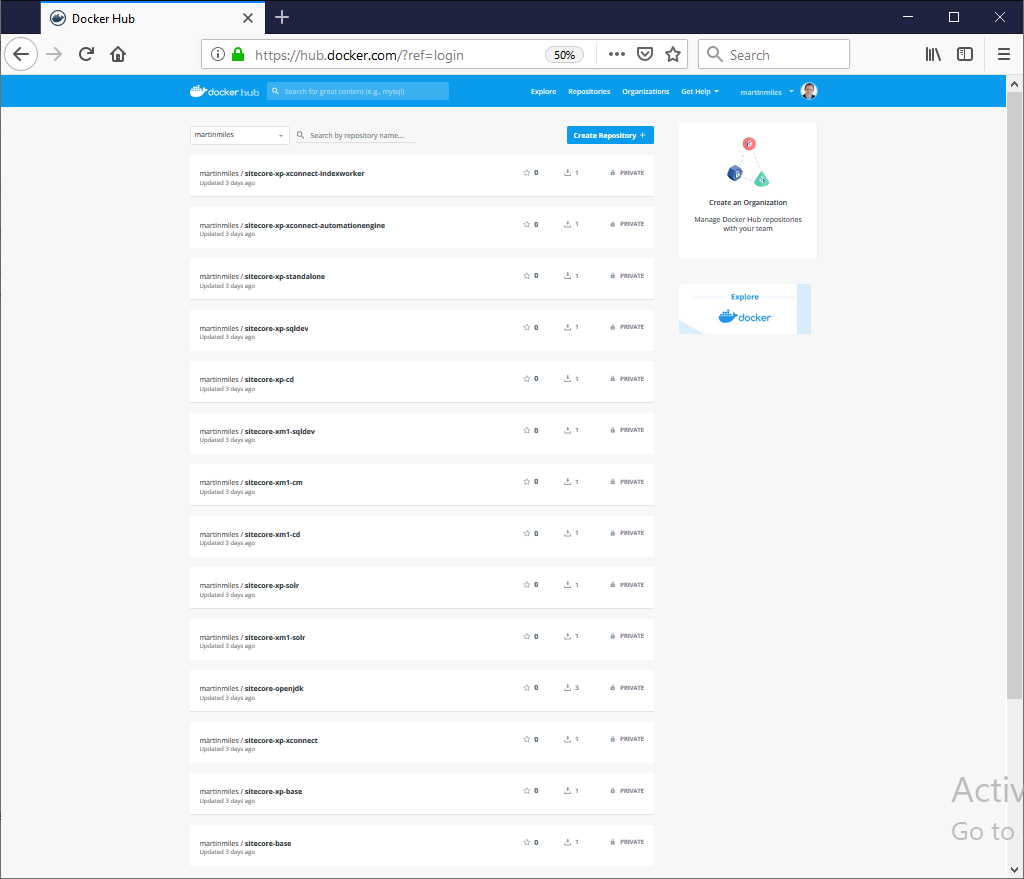
Docker Hub has a corresponding setting for defining privacy defaults:


6. Running containers

Images are built and pushed to registry, so we are OK to run them now. Navigate to tests\9.1.1 rev. 002459\ltsc2019 folder where you see two docker-compose files - one for XM topology and another for XP. If simplified, docker compose is a configuration for running multiple containers together defining common virtual infrastructure, it is written in YAML format.

Since we are going the simplest route - we keep with XM topology, but that same principle works well for anything else.

Rename docker-compose.xm.yml to docker-compose.yml and open it in the editor. What you see is a declarative YAML syntax of how containers will start and interact with each other.

version: '2.4'

services:

  sql:
    image: sitecore-xm1-sqldev:9.1.1-windowsservercore-ltsc2019
    volumes:
      - .\data\sql:C:\Data
    mem_limit: 2GB
    isolation: hyperv
    ports:
      - "44010:1433"

  solr:
    image: sitecore-xm1-solr:9.1.1-nanoserver-1809
    volumes:
      - .\data\solr:C:\Data
    mem_limit: 1GB
    isolation: hyperv
    ports:
      - "44011:8983"

  cd:
    image: sitecore-xm1-cd:9.1.1-windowsservercore-ltsc2019
    volumes:
      - .\data\cd:C:\inetpub\sc\App_Data\logs
    isolation: hyperv
    ports:
      - "44002:80"
    links:
      - sql
      - solr

  cm:
    image: sitecore-xm1-cm:9.1.1-windowsservercore-ltsc2019
    volumes:
      - .\data\cm:C:\inetpub\sc\App_Data\logs
    isolation: hyperv
    ports:
      - "44001:80"
    links:
      - sql
      - solr

If your docker-compose has isolation set to process, please change it to hyperv (this is mandatory hosts on Windows 10, while on Windows Server docker can also run its process natively). In that case, processes will run in a hypervisor and is not a naked process next to native windows processes, that prevents you from memory allocations errors such as PAGE_FAULT_IN_NONPAGED_AREA and TERMINAL_SERVER_DRIVER_MADE_INCORRECT_MEMORY_REFERENCE

Notice data folder? This is how volumes work in docker. All these folders within data are created on your host OS file system - upon creation, a folder from container is mapped to a folder on a host system, and once container terminates, data still remains persistent on a host drive.

For example, one running SQL Server in docker can place and reference SQL database files (*.mdf and *.ldf files) on a volume externally in such a manner so that databases actually exist on a host OS and will not be re-created on each container run.

My data folder already has data folders mapped to data folders from all the various roles' containers run on previous executions (yours will be blank at that moment before the first run):
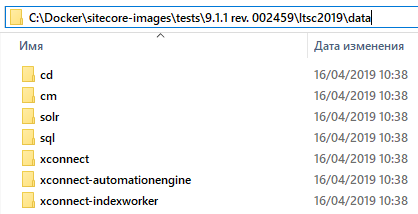
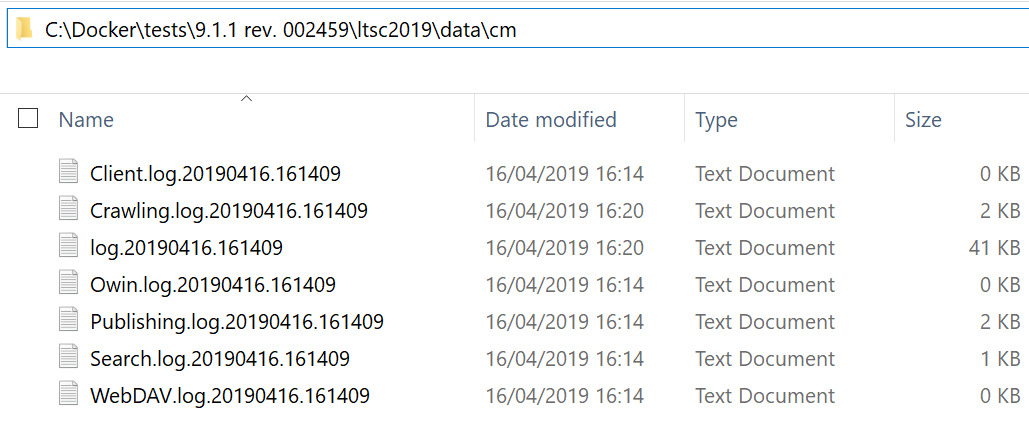
Just for a curiosity, below is an example of what you can find within cm folder, looks familiar, right?

Anyway, we are ready to run docker-compose:

docker-compose up

You'll then see 4 containers being created, then Solr container starts making its job, providing plenty of output:
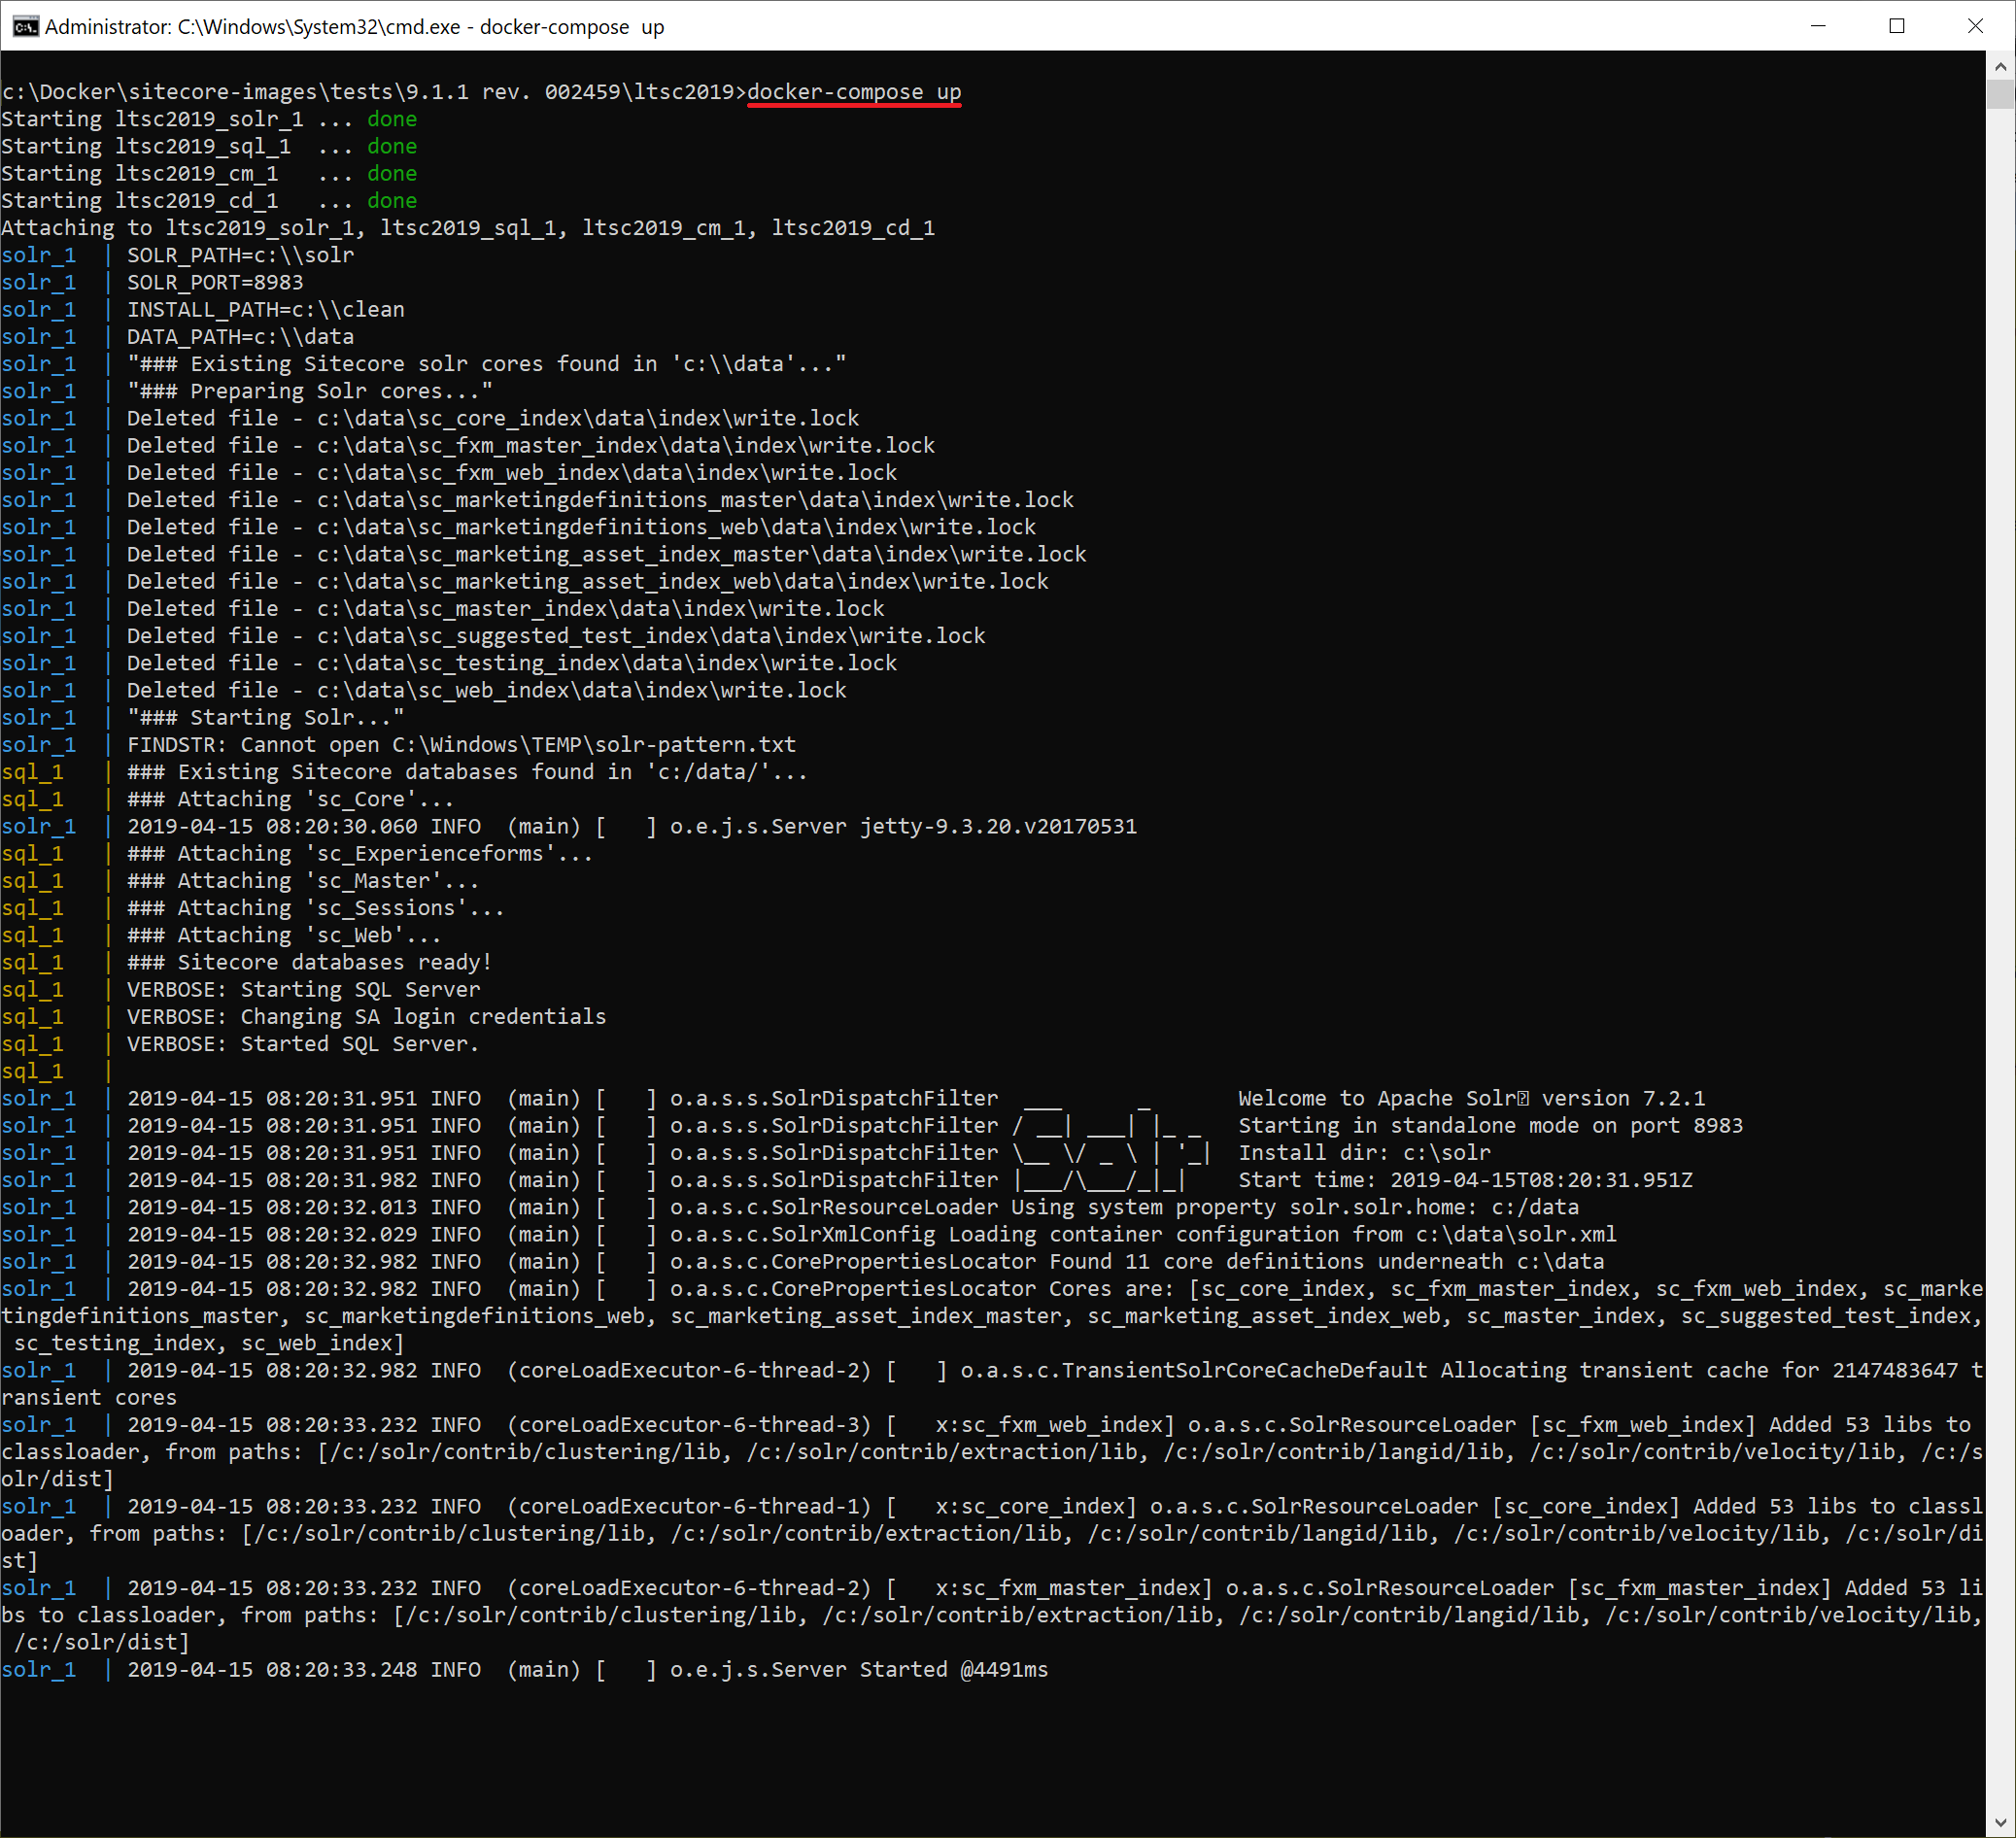
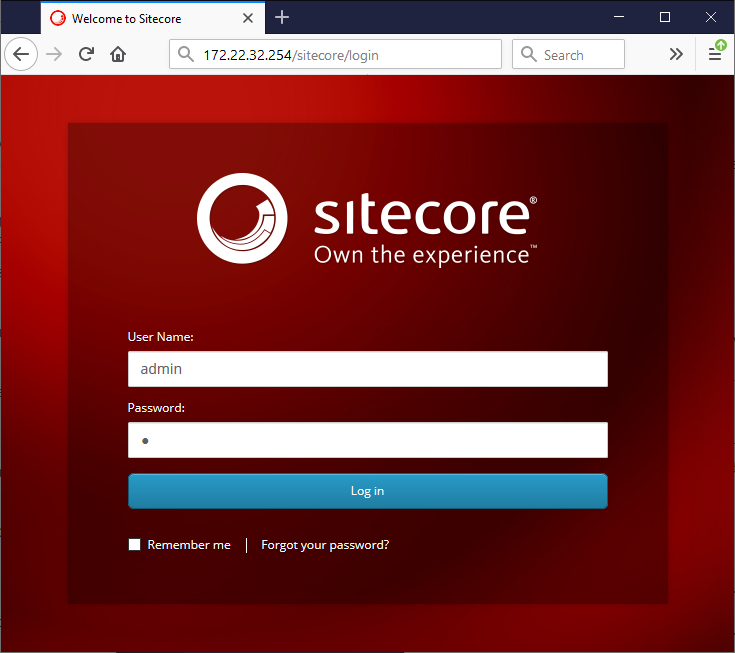
In a minute you'll be able to use these containers. In order to log into Sitecore, one needs to know an IP address of a container running a particular role - so need to refer to a cm container. Every container has its hash value which serves as an identifier, so with docker ps command you can list all docker containers currently running, get hash of cm and execute ipconfig command within a context of that cm container (so that ipconfig runs inside of it internally):

Now I can call 172.22.32.254/sitecore in order to login to CMS:
What else can you do?

With docker you may also execute commands in interactive mode (sample) with -it switch, so you may do all the things such as deploying your code there (it is always good to deploy on top of clean Sitecore instance). That's how to enter an interactive session with remote command prompt:

docker exec -it CONTAINER_HASH cmd

You may go with more folder mappings using volume. Running XP topology offers even more interesting but safe playground for experiments.

Building other versions of Sitecore allows regression testing your code against legacy systems - always quick manner and always on clean! Going ahead you may use it for the development having only Visual Studio running on a host machine, with no IIS and no SQL server installed, publishing from VS directly in docker. Plenty other scenarios possible - it's only for you to choose from.


7. Stopping and clean-up

Stopping containers occurs in a similar way:

docker-compose down
After finished, you won't see any of the containers running by executing
docker ps
You'll be still able to see existing images on a system and their size occupied:
docker image ls

So if finally, after playing it over and want to clean-up you drive a noticed there's way less free disk space now. I want to beware you from doing one more common mistake - don't delete containers data manually! If you navigate to c:\ProgramData\Docker\windowsfilter folder, one can see plenty of them:
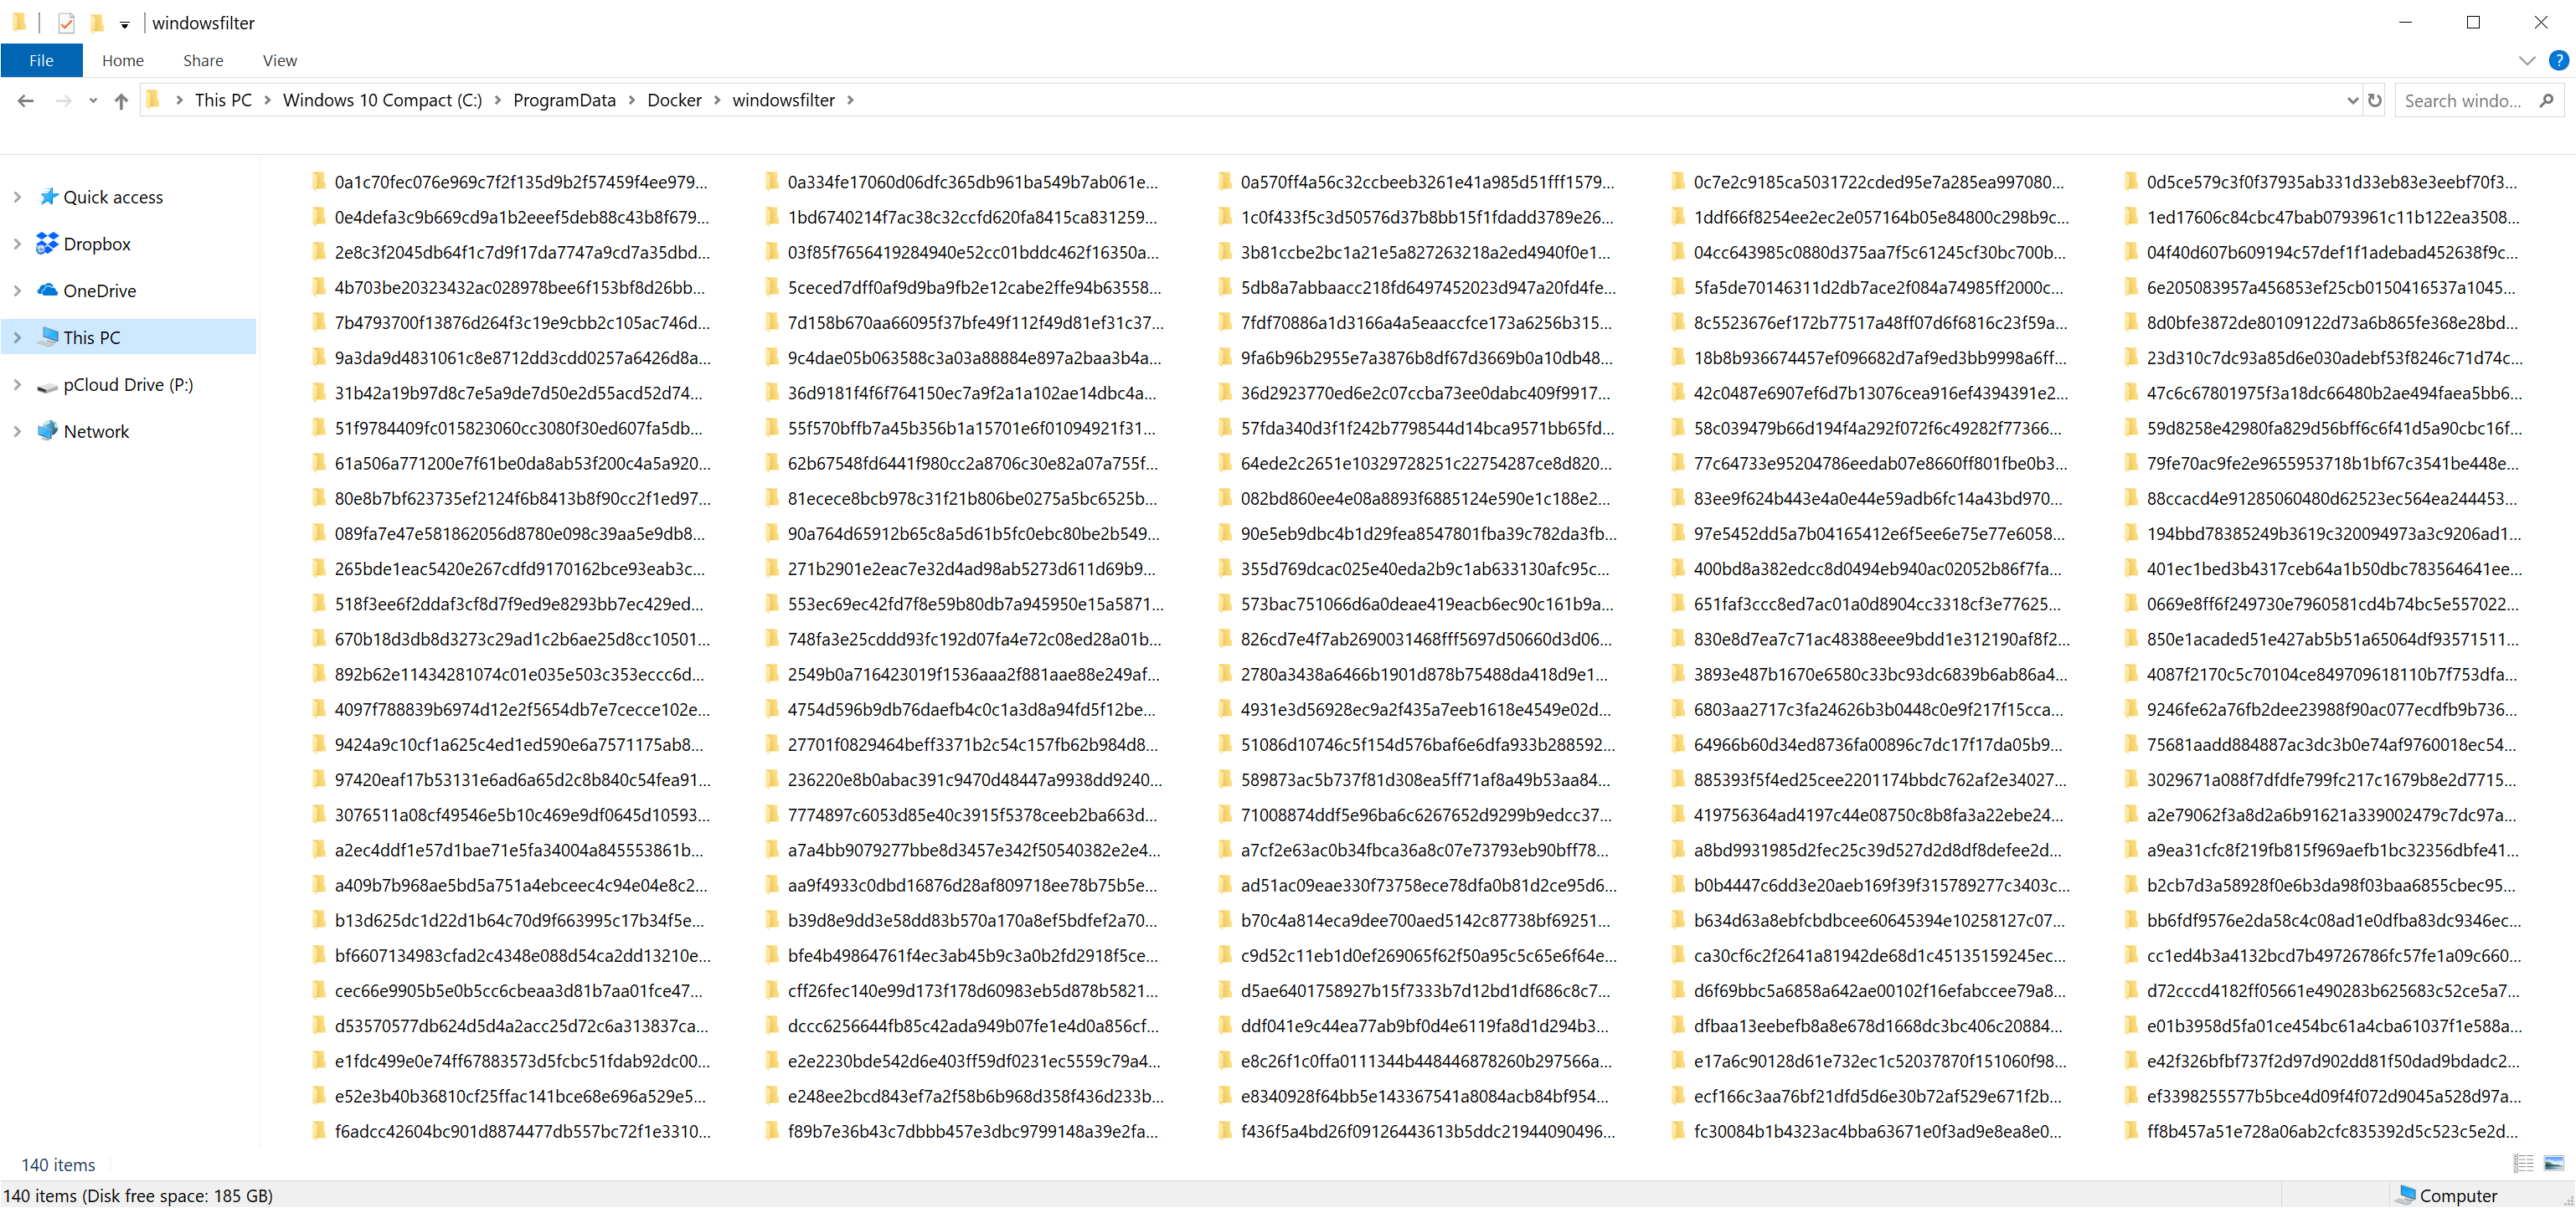
These are not container folders, they are symlinks (references) to windows system resources folders - deleting data from these symlinks actually deleted you resources from your host OS bringing you to a sorry state. Instead, use the command:

docker prune -a

This gets rid of all the images and containers from your host system correctly and safely.


8. Afterthoughts

Docker is a very strong and flexible tool, it is great for devops purposes. I personally find questionable using it for production purposes. That may be fine with Linux containers, but as for Windows... I'd rather opt out, for now, however I am aware of people doing that.

Proper use docker will definitely improve your processes, especially combining it with other means of virtualisation. Containers may take you a while to get properly into, but after getting your hands on you'll have your cookbook of docker recipes for plenty of day-to-day tasks.

As for Sitecore world, I do understand it is all only starting yet, but docker with Sitecore becomes more inevitable, as Sitecore drills deeper into microservices. Replacing Solr and SQL Server with Linux-powered images is only a matter of time, and what I am anticipating so much is XP and XC finally running together in Docker, facaded by IDS (ideally also on Linux) just in fractions after calling docker-compose. Fingers crossed for that.

Hope this material serves you as a great starting point for containers and Docker!

Staying productive on Sitecore development

Always having productivity and effectiveness as the major criteria of measuring my work, I have identified most of the time-wasters and came up with the list of things that slow down my development process. It is important to differ productivity from performance - the first applies to your personal bottlenecks while the second - to your solution or configuration. Performance tuning has been covered by numerous blog posts so far so I will be mentioning only those affecting my personal productivity. I am also not going to cover things like CI / CD and Application Insights / KUDOs at this post, while all of the mentioned is the proven great tools, they are not related to pure development productivity adn more tend to be DevOps.

I am sharing this list with you also accompanied by some improvements, tips & tricks that can help to decrease time to market for your products. Despite it is Sitecore-focused, there are more-less generic recommendations at the bottom as well.

Content

  1. Sitecore Productivity
  2. Software
  3. Hardware
  4. Organizational


1. SITECORE PRODUCTIVITY

If you are on Sitecore 9.1 and onwards - use XM topology for starting up, prototyping and coming up with an early PoC or MVP. XM topology is now shipped with all analytics configs, DLLs and the rest of unused stuff physically cut out of the provisioned system, resulting in quicker operational times. I am assuming you very unlikely need analytics features at early development stages. however, please be aware of personalization limitations.


If you are using XP - you may disable EXM unless you develop for it:

<appSettings>
    <add key="exmEnabled:define" value="no"/>
</appSettings>


Use the trick with cutting out unwanted languages from core database. Do you really need all these languages for Sitecore interface? The way Sitecore is built is that it uses Sitecore items for translating itself. That create unwanted loops and leads to unwanted performance losses. The items for deletion are:

/sitecore/system/Languages/da
/sitecore/system/Languages/de-DE
/sitecore/system/Languages/ja-JP
/sitecore/system/Languages/zh-CN

Be careful to avoid deletion of English by mistake as you'll then have to reinstall your Sitecore instance. By default these language items are greyed-out and the message says "You cannot edit this item because it is protected" so you need to "Unprotect it" firstly. You'll be double-asked for confirmation:

Agree OK and that's it! Of course, you can do things quicker and unobtrusively from Sitecore PowerShell:

cd core:/
Get-Item "/sitecore/system/Languages/da" | remove-item


Get rid of Notification table. This table is known for supporting clones, but you don't need it unless you're actually using this functionality. In that case, you can at least remove it from if from web database, as clones only work at CM helping editors with managing numerous clones of the specific item being modified, before getting published. Also, there was an alternative solution coming from Sitecore KnowledgeBase.

Anyway, disabling clones is as simple as the setting:

<setting name="ItemCloning.Enabled" value="false"/>


Disable Links Database (it's a table, in fact) on CD database. It is normally used for identifying links between items, but there's no need of it on web database where items turn into URLs.


Publishing productivity tips:

  • May sound obvious but publish only what you've changed and rebuild only what you need.
  • Consider using Publishing Service - that's really quick and saves batches directly into the database.
  • Or even better - build it encapsulated in Docker or at least VM so that you can just have it referenced from any of your dev-environment.
  • Running Sitecore in Live Mode vs. default publishing mode may successfully save some time on publishing for you. For those lucky who are developing with SXA it is way more simple to switch for using both master database and index: just select master from Database field of /sitecore/content/Tenant/Site/Settings/Site Grouping/Site item - no rebuild, restart or "re-whatever" is required.


Use Virtual Machines with snapshots and/or Docker. You may consider a nice triple-combo of Hyper-V - Vagrant - Boxstarter. Wisely configuring and using allows save plenty of time on switching between VMs, restoring, experimenting the code - in other words changing the state, which in Sitecore world is an expensive operation. You may also run an entire farm of VMs configured together, and also (partly or entirely) remotely. Microsoft even gives totally free Hyper-V Server to manage your VMs.

As for Docker, нou may use it as a non-production-unit-of-deployment - it can save plenty of time for some cases for example when working Sitecore-agnostic but very good front-end developers on non-JSS website; I want them, however, be able to have their copy temp of Sitecore instance without all the mess of setup and which they "cannot break".


Fight instance cold starts that happen after you change config or DLLs! There are several things you may do in order to improve your development environment:

  • Consider switching <compilation optimizeCompilations="true"> but before make sure you understand what is dynamic ASP.NET compilation and how it works. This is the biggest save for cold starts.
  • Tune up your prefetch cache for master database to the minimum
  • Disable content testing Sitecore.ContentTesting.config as
  • Not a silver bullet, but when starting a new project, why not consider working with SXA or even better - with JSS? While the first several times reduces the number of cold starts, the second eliminates them entirely!
  • Reduce time ListManagement agent to run every hour rather than every 10 seconds, used for EXM mostly:
    <scheduling>
        <agent type="Sitecore.ListManagement.Operations.UpdateListOperationsAgent, Sitecore.ListManagement">
            <patch:attribute name="interval">01:00:00</patch:attribute>
        </agent>
    </scheduling>
  • Do the same frequency change for IndexingStateSwitcher - from 10 seconds to, let's say, 1 hour:
    <scheduling>
        <agent type="Sitecore.ContentSearch.SolrProvider.Agents.IndexingStateSwitcher, Sitecore.ContentSearch.SolrProvider">
            <patch:attribute name="interval">01:00:00</patch:attribute>
        </agent>
    </scheduling>
  • Also, turn off rebuilding indexes automatically:
    <scheduling>
        <agent name="Core_Database_Agent">
            <patch:attribute name="interval">00:00:00</patch:attribute>
        </agent>
        <agent name="Master_Database_Agent">
            <patch:attribute name="interval">00:00:00</patch:attribute>
        </agent>
    </scheduling>
  • Processors that aren't used while in development, you can remove them too:
    <pipelines>
        <initialize>
            <processor type="Sitecore.Pipelines.Loader.ShowVersion, Sitecore.Kernel"><patch:delete /></processor>
            <processor type="Sitecore.Pipelines.Loader.ShowHistory, Sitecore.Kernel"><patch:delete /></processor>
            <processor type="Sitecore.Analytics.Pipelines.Initialize.ShowXdbInfo, Sitecore.Analytics"><patch:delete /></processor>
            <processor type="Sitecore.Pipelines.Loader.DumpConfigurationFiles, Sitecore.Kernel"><patch:delete /></processor>
        </initialize>
    </pipelines>
  • Last but not the least, since cold starts are inevitable, I still spend this time with use looking the emails, planning, scoping out or ... just attending kitchen for a fresh cup of green tea.

Content Editor

  • Favourites tab under Navigate menu allows you adding some items for quick access. Once added, it will be stored under /sitecore/content/Documents and settings/<domain>_<username>/Favorites in core database.
  • Similarly to the previous one, did you know that you may create Sitecore Desktop shortcuts - the same way as you do on Windows desktop? Use this feature in order to speed you accessing your frequent items.
  • For LaunchPad, you can set some tools seen by admin only there, like Unicorn, ShowConfig, File Manager etc. (package).
  • Pre-load tabs in Content editor. Seriously, I noticed that plenty, if not the majority of folks work in Content Editor in just one windows! Navigating tree structure аor me is an insane loss of productivity while switching between opened windows in Sitecore desktop has zero overhead. For example, working on SXA website I have the following for opened and pre-loaded:
    1. Home page
    2. Data folder 
    3. Partial designs (if I currently work with page structure)
    4. Rendering variants
    5. Renderings
    6. Media Library
    7. Templates
    8. PowerShell ISE
    Once again, these points (except the last one) are site-related items that sit normally deeper in SXA (ie: /sitecore/templates/Project/Tenant/Site vs. /sitecore/templates). This trick saves me seconds, but does that constantly! So normally it looks for me like that:

    You can even automate that, I blogged out automation approach in this post.
  • Expand Collapse buttons are especially helpful when working on large Helix-based solutions so that you can quickly collapse all sections and open only the desired one.
  • Remove unused Content Editor stuff from Application Options (under hamburger menu), also unchecking View -> Standard fields will improve Content Editor performance up to twice faster.
  • Limit number of versions to 10
  • Setting Field Section Sort order will also help saving time by having the most important sections at the top 


2. SOFTWARE

Visual Studio, VS Code and most useful Visual Studio extensions, I can mention a few of them:

  • ReSharper is the king of all the extensions and worth of every dollar spent. VS 2019 takes some of its features but is still far from ReSharper functionality
  • Attach to IIS extension, that adds Attach to IIS into VS Debug menu, so that you also can assign hotkeys to debug you Sitecore
  • Use snippets instead of manually typing the code (one, two, three - plenty of them) or make your own.
  • T4 templates code generator (use them in conjunction with Glass Mapper)

It's important to have some sort of master productivity tool. For example, I am using Total Commander, that far more than just a great two-panel file manager - I made it as a power pack so it includes:

  • Diff tool (I configured to use Beyond Compare with Total Commander) but it comes with a free and fair built-in tool as well
  • Built-in FTP client with encrypted password storage
  • Hotkeys on almost everything you can do.
  • Rapid access to the most important folder you define (and yes - hotkeys for that)
  • true and reliable search by content, regex, ... and also in archives (ex compare with windows)
  • Ooverride system file associations and assign your tool of choice, with parameters
  • I integrated TeraCopy into Commander, so that I have the best and fastest copying tool as well
  • I also integrated PowerShell console into TC so helps a lot save much time opening it in the right context
  • plenty of plugins and much more useful stuff that I struggle to remember at the moment
That's why I feel quite surprised seeing majority developers still using classical Windows Explorer - it is such a bottleneck (in my humble opinion). This tool alone saves me about an hour daily!

Since I've just mentioned PowerShell, nowadays it helps you automating almost everything. This includes:

  • managing Windows server, all its dependencies, all types of activities on a filesystem, registry, MMC, etc.
  • installing, modifying, deploying Sitecore and all the dependencies
  • building images, starting, stopping, deploying containers
  • do all that same with Hyper-V virtual machines (and I assume, that also should be possible with VMs from other vendors)
  • all the type of management and configuration with IIS and SQL
It is probably more difficult to imagine what is not doable with PowerShell. And of course, investing time in mastering PowerShell brings you more benefits when using Sitecore PowerShell Extensions. Combining both you can benefit from Sitecore PowerShell Remoting accessing Sitecore assets and resource from outside of your instance.

Other tools that significantly save my day-to-day life:

  • Chocolatey. I put it to the first place intentionally - that is a console package manager for Windows, that allows you installing almost any software from a Windows console (not even PowerShell!)
  • LockHunter helps me to find out what process lockout folders/files and force releasing them. Biggest abusers typically are IIS, console windows left open and of course our beloved Visual Studio.
  • Slack became the most used tool for the self-organized team, especially nowadays - with the growth of Agile-based approaches. With an ability to create channels on any aspect and having great mobile clients - it helps thousands of distributed teams globally. When setting up CI / CD pipelines I usually configure sending build notifications to a dedicated channel. Slack is also a proven solution to replace boring meetings.
  • dotPeek .NET decompiler should be made mandatory for each Sitecore developer since that's the most genuine way to how it all works internally in Sitecore
  • Synergy helps me to unite few laptops (2 having Windows and 1 Mac OS) into one large multi-screen environment with keyboard, mouse and even clipboard shared across the different OS.
  • Postman and Fiddler are tools for creating RESTful web requests and intercepting others, even those coming by HTTPS
  • smtp4dev becomes inevitable when you start developing emailing functionality. It intercepts your email sending attempts, grabs these email messages and even puts them into your mail app. You don't need to have SMTP server anymore!
  • PCloud - expensive cloud storage but worth of every penny spent and brings true Swiss quality. I got lifetime subscription with them, including crypto folder (which is truly crypto!). Currently trying to entirely replace Dropbox with PCloud
  • Telegram messenger (I give more explanation about it below)
  • Jing screenshot creator tool that comes far beyond Alt + PrnScr built-in Windows functionality
  • Instance backup/restore tool
  • Yet one more triple-combo of Evernote + Dropbox + 1Password - save me plenty of time on a daily basis.

Source control

Won't be unique saying that I prefer using git along with Git Flow approach. Master branch is used only to keep primary releases, develop branch is all developers' cumulative snapshot that is always deployable and used for CI / CD. Further down we got functional (feature and integration) branches. Its approach also allows my teams to avoid serialization conflicts when doing large structural refactorings on Sitecore items.

For git I use three tools in parallel:

  • SourceTree is an excellent free tool for history visualization, branches tracking, etc. Unfortunately, it still has buggy UI especially after it was re-written with WPF - sometimes it struggles to reappear from the minimized state, errors out on some repos with a long history and plenty of branches, it is also quite slow in starting up.
  • Tortoise GIT - I use for commit, historical comparison, repo browser and few more, mostly due to my legacy habits of using SVN 10-15 years ago (Tortoise SVN of course). It also comes free of charge.
  • Console - for everything else.
The simplest to get them is as usually from Chocolatey:
cinst sourcetree
cinst tortoisegit
cinst git.install

One of the positive habits that I want to share is making last-minute check all the items and the code immediately before committing it. When writing a code, you're a deeply focused into some functionality you're building, while pre-commit check merely shows you overall picture. I also check for something stupid, like potential null references, badly named variables, and other high level but important stuff.

Another productivity improvement I am using working with git is creating aliases. This allows assigning short and easy to remember aliases to long-to-remember commands with parameters. This is how I am assigning an alias:
git config --global alias.lga "log --decorate --graph --oneline --all"
Now I can call git lga and it will give me that same result a calling long version git log --decorate --graph --oneline --all:


Browser today is still our primary target application, so it's also a point of tuning the productivity:

  • organize your bookmarks properly into folders and subfolders. Once done, it will sync across all your machines where you've logged into.
  • User scrips with Greasemonkey (Firefox) or Tampermonkey (Chrome) allow improving the functionality of many websites, where authors have intentionally or occasionally forgotten to improve UI / UX. Plenty ready-to-use of scripts are available through GitHub and custom repositories.
  • Invest time in mastering DevTools - this is the first-class tool for any web developer and will start saving your time and efforts quite shortly, if not immediately. Pluralsight has few useful courses for that (one, two)
  • Use some other helpful Chrome extensions: Sitecore Developer Tool, Sitecore Extensions, Grammarly, EditThis Cookie, AdBlock, OneClick URL Shortener.
  • Browsers hotkeys are nowadays mostly crossbrowserly universal. I promice you'll come across at least one big finding after going through the list of keyboard shortcuts, and it is not the full one. For the full list please refere to your specific cbrowser documentation.


3. HARDWARE

Hardware is very crucial for productivity. For my productive setup I use:
  • Dell XPS 15" with 32 Gb RAM and fastest Samsung PM961 SSD. I got 1 TB of storage but even that volume is hard enough due to numerous VMs and snapshots. That is an expensive laptop, but you get what you pay for - frameless 4K touch screen and top spec: as for 2019, you can get a version with i9-8950HK processor and 2TB SSD.
  • Craft Keyboard and MX Anywhere 2S mouse - both top-spec input devices from Logitech work perfectly together in conjunction through the same receiver (but can hot-switch between three of them) and are configured through the same software.
  • I normally use 3 monitors (one of which is the laptop itself). If a monitor has Pivot Function (as on an image below) - that's an excellent bonus to productivity. Such a vertical layout is excellent for code. The left-hand side monitor is usually used for browser with Sitecore always and/or running live website under development. Laptop's monitor is for everything else - file manager, configuration, notes, Slack, etc.
This is how it works all together:


4. ORGANISATIONAL

Approaching technical debt

Technical debt is a deliberate decision to implement a not-the-best solution or write not-the-best code to release software faster. Taking on some technical debt is inevitable and can increase speed in software development in the short run. However, in the long run, it contributes to system complexity, which slows the developers down. Non-programmers often underestimate the loss of productivity and are tempted to always move forward, and that becomes an issue. But if refactoring is never part of the priorities, it will not only impact productivity but also product quality. 

Someone wise identified an approach to managerial stuff regarding managing technical debt - an image below show how is correctly explain technical debt to managers:


General productivity thoughts

In general, productivity is a combination of 3 parameters: time, energy spent on achieving a goal and level of concentration. These pieces of advice are disclosed below:

  • Try staying in The Flow - for the developers it is the state when they feel the most focused and productive. Most of their work is done during this state. For most developers productivity follows Pareto's Law with 20% of time delivering 80% of the result, and the rest 80% of time bringing the rest 20% of the result.
  • Minimize distractions from open space, headphones on! BTW, can recommend Rainy Mood which is my recent finding. Every distraction switches you out of context, and switching contexts is an expensive activity in terms of time and efforts.
  • Avoid meetings where it makes sense to. Only 30-40 percent of meetings are important, the rest invite you to participate "just in case" (they may need to ask something from you and sometimes they do). But at which cost? A single meeting can blow a whole afternoon by breaking it into two pieces, each too small to do anything hard in, again due to switching contexts.
  • In addition, it highly demotivates when management spending your time so loosely, especially when the timeframes are tight and you have to work overtime in order to meet the deadlines. Just to highlight my point - some meetings are useful and very important, especially in the planning stage, but unfortunately, people overuse meetings.
  • Because of the above, a working week of 4 days x 10 hours is way more productive than 5 x 8, despite the same hours worked. The first case has hidden costs of switching the context, plus it also adds me one roundtrip of commute (3 hours for in average).
  • The general approach would be identifying what your actual biggest bottlenecks. Theory of constraints is something that may come to your help. Also, anything outside of job description (along with learning new stuff) should be by definition treated as a non-productive waste of your time.
  • Organize your own notes / knowledge base/ todo lists / planners with the quickest access for both read and write. These can be any tools of your choice, if they give you immediate (and offline as well) access to your important information. Surprisingly, Telegram became such a tool for me despite being primarily a messenger, due to its built-in cloud, offline access, cross-platform sync, and immediate access.
  • Everything you come across which is worth of further checking (and not at the moment,) should be recorded in your "hot" operational notes in order to avoid switching context. and making sure that your brain’s capacity is not consumed by "remembering stuff" rather than focusing on the most important.
  • Identify all you most frequent actions across the system, IDE and most used software and find keyboard shortcut combinations for them, or assign your own.
  • Finally, I'd recommend reading this hacks list of tactics - likely you'll pick something out of there.


That's what came into my head, as for now. And what productivity tips do you have?

SXA tip: use information scaffolding fields to get more visibility over your components in Experience Editor

When working in Experience Editor, by default you see empty fields of components, that allows you editing these fields, selecting hierarchy and thus modifying components. However not always that happens...

Scenario: creating a rendering variant that has VariantReference (for switching context of related item) while editing partial design in Experience Editor. 

Symptoms: what actually happens is that partial designs are edited in their own context, all presentation data you create is stored in Final Renderings for that particular Partial Design, and not the page item. It will pull data from page item only once applied that item or (more likely) associated with its page template. But when using VariantReference field, it won't be wired to any data, thus not proxying the context to anything, leading to all the fields underneath VariantReference field item not rendered in EE. If there are not any other visuals within given rendering variant - entire component becomes non-selectable in EE.

Suggestion: to create some information field to be shown in Experience Editor, so that you may select given component and adjust its settings, as you normally do. At the same time we don't want this field to present outside of Experience Editor since its only purpose is make editors aware about this component.

Solution: that's the case where we can use personalization with a custom "where the Experience Editor is in editing mode" condition I recently wrote about. Having it in scope trick goes very simple - simply create a text variant field and enter component and rendering variant info: 


And once done, create a personalization rule for that info field to be shown only in Experience Editor, using newly created condition:


Finally, instead of unclickable whitespace, you'll see the component:


Hope this basic trick helps improving your productivity while working with SXA!

Adding Unicorn icon to Sitecore Launchpad

Seriously, I cannot understand why no one hasn't done that earlier before myself!

Recently, yet another time bookmarking a unicorn.aspx for another specific environment, I caught myself on why not to have Unicorn icon as a standard launchpad tile icon. Benefits of having it there against bookmarking:

  • it becomes available not only for myself but for the rest of admin users in particular environment
  • yes, by saying admin, I want to say that you can customize security for that shortcut
  • if serialized, this icon shortcut becomes available on all the environments it is being deploys

So please welcome Unicorn Launchpad icon. You may download the installation package at the bottom of this blog post.


So, as you might know, all the Launchpad icons are taken from core database and you may find them by the following path:/sitecore/client/Applications/Launchpad/PageSettings/Buttons. So you may add a new icon by simply creating an item called Unicorn (of the template /sitecore/client/Applications/Launchpad/PageSettings/Templates/LaunchPad-Button) as a child of any LaunchPad-Group items (for example, Tools, along with Content Editor).


The much better option would be to duplicate already existing item that is available to admins only - in such case you'll also inherit permissions set) - AppCenter for instance. Once done, adjusts all the fields correspondingly. The most important field to set is Link, so make it pointing to /unicorn.aspx (but remember you may also include parameters, such as unicorn.aspx?verb=sync).

The next challenge is to set an icon. Unicorn is not a part of Sitecore, obviously, Sitecore won't have icon packs for it. Let's create our own icon pack for Unicorn.


Each of these drops down values above (Applications, Apps, Business, Controls etc.), in fact, is a zip archive underneath folder<SITE_ROOT>\sitecore\shell\Themes\Standard.


The structure of archive is the following - unicorn.zip\Unicorn\32x32\Unicorn.png - you may have icons for the other resolutions but I am referencing this one:


That's all the job and it took a couple of minutes!

Download ready to use package (19.7kb, keep in mind that Unicorn icon will be shown to admin users only).

Get rid of IIS Express processes when debuggind Helix solutions

Problem: you are running a solution with a large number of projects (as we normally have with Helix) and willing to debug it. You are attaching to IIS process (from Debug menu of Visual Studio, or using magical hotkeys) but that takes way too much time to happen. You CPU usage increases and even likely to boost the cooling fans. Another thing you can evidence - slowly responding icon os IIS Express in the system tray:


What comes to one's mind as the first possible solution? To opt out of using IIS Express in favour of full local IIS, as soon as we are using it anyway to host our Helix-based solution. So you open up Web tab of Project Properties and indeed evidence that IIS Express is configured and has Project Url set to http://localhost with some specific long-digit port number:


Then expectedly you change it to Local IIS with Project Url having something similar to http://platform.dev.localwhere hostname for platform.dev.local already exists in your Windows hosts file as well as in IIS binding for that particular website, so that running this URL in a browser will, in fact, give you that locally running website. But you get a weird error instead:


Things are a bit worse, because if you deny creating a Virtual Directory, you'll get a message box as on the image below, and won't be able to close your project tab as it remains modified and will prompt you the same message again and again until you manually terminate devenv.exe process from Task Manager.


What happens? Something has alternative settings preventing you from changing to Local IIS. So need to find this out. After investigating a while I came across...

The solution contains two steps. Part one occurs because there is already a project extension file (ex. Sitecore.Foundation.Serialization.csproj.user) along with your actual project file, that extends (overrides) project settings. Normally, all *.user files are excluded from a source control so your colleague may not experience that same problem despite running the same code from the same repo branch. What exactly prevents you from saving Local IIS changes is UseIISExpress setting, so change it to false:

<PropertyGroup>
  <UseIISExpress>false</UseIISExpress>
</PropertyGroup>

Or just delete it - then settings from actual *.сsproj file will take effect, but as soon as you somehow customise your project, even as little as just clicking "Show All Files" button in the Solution Explorer - then *.user file will be immediately created. So let's move to the second part of this exercise. Now we need to change actual project to use Local IIS. Make sure you set already familiar UseIISExpress property to false

<PropertyGroup>
  <UseIISExpress>false</UseIISExpress>
</PropertyGroup>
and also specify Local IIS to false, CustomServerURL to true with the correct URL where your site is running:
<UseIIS>False</UseIIS>
<UseCustomServer>True</UseCustomServer>
<CustomServerUrl>http://platform.dev.local</CustomServerUrl>
<SaveServerSettingsInUserFile>False</SaveServerSettingsInUserFile>
So now all works. It loads correctly and you can modify and save Web tab of Project Properties without anу issues:


Also, if you already have virtual folders created under your IIS website, make sure they are removed and the website itself contains the right web folder path:


That's it. Please also pay attention to applicationhost.config file that resides under \.vs\config folder in order to be picked by IIS Express. You may delete it without any potential damage, as we just got rid of IIS Express.

Hope this helps!

10 Useful tricks for Helix development

1. First, is the most important hotkey that published a single file - whether a static file oк Razor view, to the web folder, preventing you from running gulp script. Selecting the desired file, hold ALT and then click ; (semicolon) and p. Your file will be immediately available at web destination. Then most time-taking is Application pool recycle process, running each time you add/remove/modify a config file or DLL, so current approach prevents you from wasting time on that. The result:


2. Next, in order to run Sitecore in a debugger, one usually need to go to "Debug" menu of Visual Studio, then pick up "Attach to process". Then find w3wp.exe from a long list of available processes after selecting "Show processes from all users" checkbox. When you need to do that multiple times in a day (and you do) it becomes an unwanted waste of time. There is a Visual Studio extension called AttachToAllTheThings that adds 3 handy menu items into Tools menu, one of which is "Attach to IIS". So far so good, but it would be even better to assign a hotkey to make attachments quicker, I use a combination of SHIFT + ALT + I:


3. Working with Helix you often need to run gulp tasks, that is executed from Task Runner Explorer. Normally you need, to go to View menu item then Other windows and there find out Task Runner Explorer. In a clean vanilla Visual Studio you may use CTRL + ALT + BackSpace binding. However those using ReSharper may find that combination re-mapped, so I opt-out in favour of neutral SHIFT + ALT + T combination:


4. If you are using ReSharper, you can benefit from its solution-wide code analysis tool. This is a very handy tool that is often overlooked, but it may give you plenty of insights of what's going wrong with your solution and how to fix that. But please be careful as if it is enabled permanently - if affects your performance. Double click a grey circle at the right bottom corner of Visual Studio in order to enable this feature.


After a while, it presents you with a list of issues you need to review (and likely to fix):


5. Also, one more useful trick of ReSharper will be useful for everyone working with abstractions. We got used to navigating to a class by doing CTRL + Left Mouse Click. But when doing the same on an interface, you'll navigate to the interface definition - not something useful when you expected to get some concrete implementation. Do CTRL + ALT + Left Mouse Click instead and you'll navigate to exact implementation if the is one, or will be presented with a list of all concrete classes implementing that abstraction.


6. Helix: An approach(es) for restoring WebRoot to an initial state of vanilla Sitecore installation.


7. Know your tools: The easiest way to add a new project to your Helix solution


8. Use Helix + Glass Mapper + T4 Templates = Code Generation


9. In addition to T4 Templates code generation, you may use young brother - Visual Studio code snippets. Recently Raul Jimenez prompted at https://github.com/rauljmz/Sitecore.VisualStudio.Snippets.


10. ZeroDeploy from Hedgehog, who also made TDS, Razl and Feydra. This is something unbelievable, you can't imagine that! The idea of the project is to get rid of Application Pool recycles upon deployments of code and config files. How could that be at all possible? ZeroDeploy relied on Sitecore Dependency Injection (that's why it only can run on Sitecore 8.2 or later) and instead of /bin folder it stores versioned libraries into Sitecore database, being even visible at the Sitecore tree! To make this magic possible, it is advised to separate most of your high-level abstractions into standalone libraries, that are very rarely change and that referenced from your web project. At the same time most of the concrete implementation, including Controllers, Services, Repositories and libraries down-referenced by them can be dynamically deployed and loaded back without being put to /bin, retaining the functionality. ZeroDeploy also uses Visual Studio extension and NuGet packages for Sitecore. Seriously, the magic! I am now testing a beta version of ZeroDeploy and am going to write a detailed guide on how to enable this on your development environment (your UAT / staging / prod) still remain untouched.

Hope these tips and tricks will improve your productivity!

Helix: An approach for restoring WebRoot to an initial state of vanilla Sitecore installation

I have an interesting approach to organizing work with Helix. Imagine a quite standard situation, when you have an already running solution with a code base outside web folder, into which gulp script deploys into. Actually, default Helix scenario.

So, you've been working on some module, then halfway down you've renamed that module or simply decided to remove it from solution. After changes finishing with renaming /deleting, and following redeploying the solution, you may potentially get an error (or not get it), but in any case, sooner or later you find out that your web folder still has an old module in a previous stage, dll and configs. To fix that, a DLL of that module needs to be deleted from bin folder manually, as well as all the corresponding old config files from App_Config/Include folder. Not a nice approach...

Things get even worse if you continuously repeat that delete/rename exercise with other modules, increasing chances of malfunction or false positive, and the far you go with that - the more complicated is to clean up the ends. Can you imagine how many unwanted trails are left in your web folder?

For sanity purpose, it is the best practice to ensure that your code is deployed into a clean copy of Sitecore at webroot so that you can be sure that it functions as expected (or not). So how would you achieve obtaining an exactly the same clean Sitecore as you have installed initially, and make this procedure super quick and repeatable? In case you are working on Sitecore previous to version 9 and have used SIM tool in order to install your Sitecore instance, then the answer is obvious - just use SIM backup / restore for that Sitecore instance, quick and reliable. But what if not? What if you are using the latest Sitecore 9?

The method I am suggesting may be sort of arguably, however, it does the job perfectly, quickly and keeps things consistent and at the same place. What I do - I create an isolated git branch called SitecoreFiles_CM at the same git repository where the main codebase sits, and commit an initial state of Sitecore to that branch. Saying initial I mean exactly the same files as they were installed, before Sitecore was even ever accessed - a clean installation. Of course, not all the files are pushed to remote: things like configurations with my individual (for my local dev instance) passwords do not need to be shared with other developers as well as Sitecore license file. That's why on top of that branch that is pushed to remote, I create one more local commit having these individual settings/changes that I do not push. When I have a need to restore vanilla Sitecore, I navigate to web folder and restore folder to that commit. The next step is git clean command required to get rid of the rest of unversioned files on top of vanilla Sitecore that were deployed from the codebase. As simple, as functional.

  git reset --hard
  git clean -fdx


Both codebase and the corresponding vanilla Sitecore are kept together at the same git repo, for consistency.

Additional benefit: with git diff, you may always see the difference between current web folder state and initial clean install. Not to say, that you can restore each individual file from that set!

When doing platform version upgrades, I upgrade my major codebase along with SitecoreFiles_CM branch, so they again remain consistent Looking ahead, no one stops you from having also a SitecoreFiles_CD branch with a CD set of files, however that is outside of current discussion.

Hope this helps!