Experience Sitecore ! | All posts tagged 'Automation'

Experience Sitecore !

More than 200 articles about the best DXP by Martin Miles

Boosting productivity with Sitecore by employing user scripts on an example of SXA activities

In one of my recent productivity blog posts, I wrote about an approach that saves me plenty of time - pre-opening numerous Content Editor on specific nodes so that I can switch between subnodes I am working with distributed across entire Sitecore tree almost immediately. This is especially helpful when working on SXA-based websites so that I will use it in the given example, however not limited to. Typically, when distributed SXA website, you'll need access to the following:

  1. Home page and all the children.
  2. Data folder for the site
  3. Rendering Parameters
  4. Renderings
  5. Site Media items
  6. Templates for site
All these are located under different paths, and I am still surprised meeting some folks who try to manipulate all of the above within single content tree of single Content Editor. I'd prefer spending time on something more productive rather than manipulating the content tree and have been previously pre-opening these items in individual Content Editor windows of Sitecore Desktop. As a hidden benefit, that approach raises a habit of having your stuff in persistent windows, for example, I got used to having Rendering Variants in the third tab. However, after each session reset or VM restart, I still had to re-open six editors and select items individually - that reduces the benefits of a given approach. Thus, let's fix this with automation.

In order to do that, I will employ such called User Scripts. But firstly, what are User Scripts? As per definition, a user script is programming that modifies the appearance or behavior of an application. A user script for a Web site, for example, can customize the way that content will display in the host browser. That's what we'll do with our beloved Sitecore. As for now, only Google Chrome supports these scripts out of the box and treats them as regular extensions. Opera browser also has support in some way, for the rest of browsers you may need to run an extension which will intermediate between the browser and Web servers. For Firefox, use the GreaseMonkey extension (it worked for me as well)

I am using TamperMonkey for Chrome as it gives additional benefits over OOB browser support, such as built-in editor with hotkeys and syntax highlighter, and more precise settings. 


First script

To start with lets practice on something very simple just to prove user script does work in principle. I decided to write a small script that after logging to Sitecore open Content Editor for you instead of the default behavior of showing LaunchPad. Here is its code:

// ==UserScript==
// @name         Launchpad redirects to shell
// @namespace    http://tampermonkey.net/
// @version      0.1
// @description  try to take over the world!
// @author       You
// @match        */sitecore/client/Applications/Launchpad*
// @grant        none
// ==/UserScript==

(function() {
    'use strict';

     window.location.href = "/sitecore/shell/default.aspx";
})();

The first nine commented rows at the beginning are specifying user script parameters and should not be removed. Please pay attention to @match parameter - it configures URL match where the script should run (however does not work with GreaseMonkey in FireFox). TamperMonkey also allows overriding this value.

After adding it to TamperMonkey, it looks like below:


Another simple example

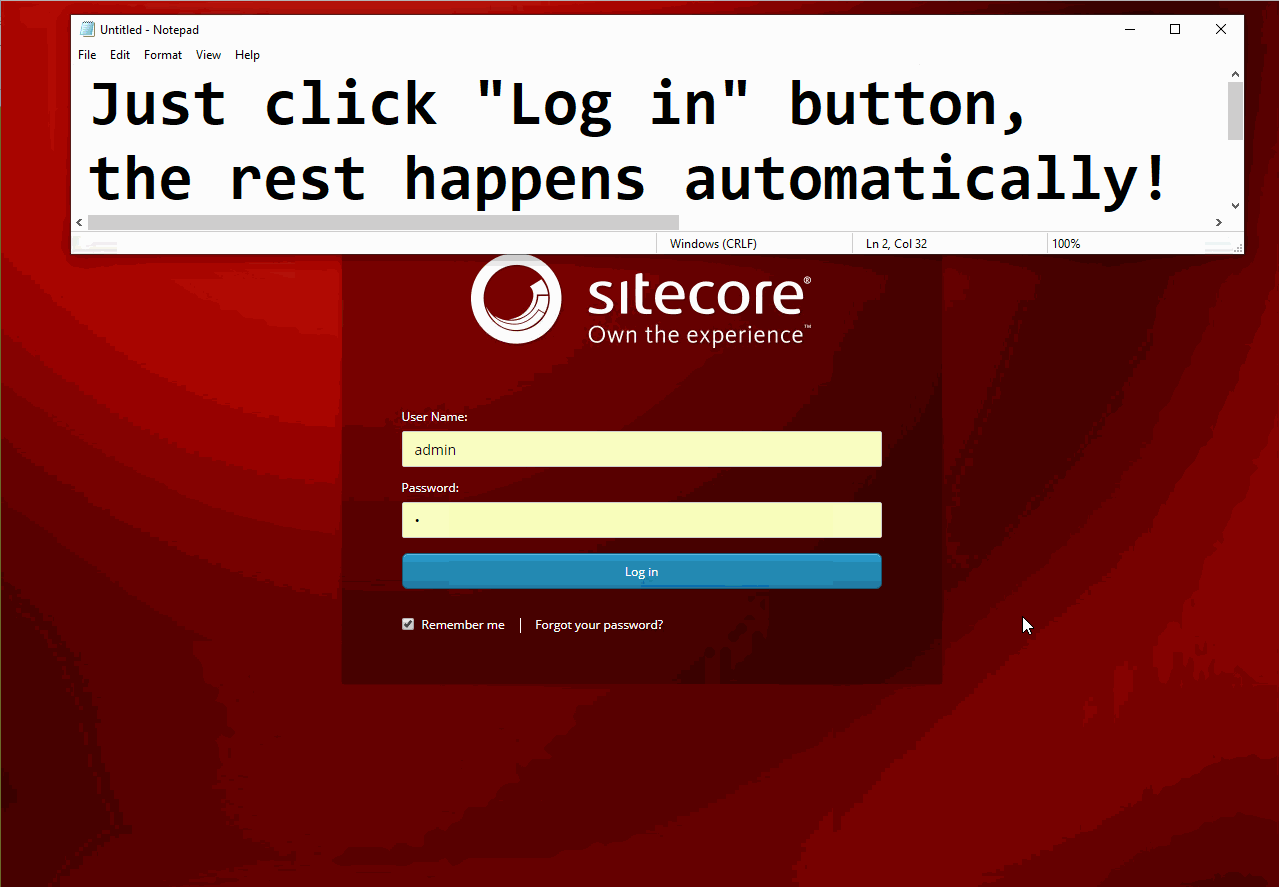
I am quite often kicked-off into login screen due to session expiration or other reason that invalidate the current session. Even browser kindly stores last username and password for me, it takes some time to figure out what went on and use a mouse in order to click Submit button. If you opted out of browser remembering passwords for you and your password is smth. more complicated than b - then you'll likely to lose even more time. Let's fix that by writing auto-login script:

// ==UserScript==
// @name         Sitecore autologin
// @namespace    http://tampermonkey.net/
// @version      0.1
// @description  Automatically logs into Sitecore, especially helpful on session timeouts
// @author       Martin Miles
// @match        */sitecore/login*
// @grant        none
// ==/UserScript==

(function() {
    'use strict';

    var login = document.getElementById('UserName');
    var password = document.getElementById('Password');
    var submit = document.getElementById('LogInBtn');

    login.value = 'admin';
    password.value = 'b';
    submit.click();
})();

Works like a sharm - as soon as timeout brings you to Login screen, scrip does the rest! This of course is good to use on dev machines, but not qute suitable for production scenarios due to security concerns.


More advanced script

So now, after re-logging to Sitecore, you'll be redirected to Content Editor within Sitecore Desktop opened. It works!

Now I am going to write a more complicated script that will open 6 Content Editors and each of them will open its's predefined item.

The full code of this script can be obtained from my GitHub designated repository by this link: the code. Please keep in mind that this is a quick demo variant I have quickly created for the purpose of this blog post, so the code is quite minimal just to meet the objectives  Below I am showing how the execution looks like:

    start                        // click Sitecore Start button
        .then(loadContentEditor) // select Content Editor from start button menu
        .then(getContentEditor)  // gets iFrame handler in order to pass down the pipeline to furhter callers
        .then(clickId)           // expand Content node
        .then(clickId)           // expand tenant node
.then(clickId) // expand site node
.then(clickId) // expand Home page node
.then(selectItem) // click home item in order to select .then(startPromise) // a 'promise' version of clicking Sitecore Start button .then(loadContentEditor) // ... repeat the above actions for new Content Editor iframe .then(getContentEditor) .then(clickId) .then(clickId) .then(clickId) .then(clickId) .then(selectItem)
and parameters:
const items = {
    content: "{0DE95AE4-41AB-4D01-9EB0-67441B7C2450}",
    content_tenant: "{3E49489A-45F6-4FDC-BC53-CA40592AE944}",
    content_site: "{6B81532B-FCF4-461A-9964-C82980AE2933}",
    content_site_home: "{8CCB4C5D-B4A2-4476-91AA-275E9D1FB05B}",
    content_site_data: "{D1F7AC1A-9A4F-4009-A9F4-F8012C25FD9D}",
    content_site_presentation: "{2273EE5A-C314-4453-A2F4-69AD28B5B252}",
    content_site_presentation_renderingVariants: "{A9A0A0B7-C16F-49C9-BDBB-4CCFFC15124A}",

    layout: "{EB2E4FFD-2761-4653-B052-26A64D385227}",
    renderings: "{32566F0E-7686-45F1-A12F-D7260BD78BC3}",
    feature: "{DA61AD50-8FDB-4252-A68F-B4470B1C9FE8}",
    renderings_tenant: "{CD3E1C5B-DF68-439B-8AA3-055FE2FD7D42}",
    renderings_tenant_components: "{A69A614C-11BC-4052-949F-54978988F653}"
}
With that enabled, here's how the working result looks like: 
 

Future plans

I am thinking of wrapping more methods into a Selenium-like framework, so that one could chain any sequence of actions in an easy manner without the need of having any sort of dependencies, apart from framework script itself.

In general, this post demonstrates one of the thousands of possible use cases of User Scripts with Sitecore. Wise usage may save you and your content editors plenty of time by implementing reasonable automation. Hope this post helps.

Some useful batch and PowerShell snippents helping Sitecore automation

From time to time working with Sitecore I have to rely on automation (especially when working with CI / CD) so just decided to store some snippets for myself that use occasionally. This list will update with time.

  1. Run MsBuild from a console
  2. Config transform
  3. Test SQL connectivity from PowerShell
  4. Archive a folder and place it into a specific location using PowerShell only
  5. Unzip a folder from an archive using PowerShell only
  6. Install a NuGet package using CLI
  7. Run xUnit tests
  8. Push a NuGet package into a repository on example of Ocopus with API secret
  9. Upload a file to FTP using WebClient via PowerShell
  10. Transform of webconfig setting Sitecore 9 "role" and "localenv" variables
  11. Deserialize Unicorn from a PowerShell
  12. Create new IIS hostname winding for existing website

1. Run MsBuild from a console
Building solution outside of Visual Studio or alternative IDE requires a manual call of MsBuild. In the very simple call you need to pass just two parameters - a solution itself and target, that can be Clean, Build etc.:
"c:\Program Files (x86)\Microsoft Visual Studio\2017\Enterprise\MSBuild\15.0\Bin\MSBuild.exe" c:\Projects\Platform\Platform.sln  /t:Build

2. Config transform
Calling config transform described in more details by this link, so there is just a snippet below: 
"C:\Program Files (x86)\Microsoft Visual Studio\2017\Enterprise\MSBuild\15.0\Bin\amd64\MSBuild.exe" 
/nologo /maxcpucount 
/nodeReuse:False 
/property:Configuration=Debug 
/property:Platform="Any CPU" 
/property:WebConfigToTransform=C:\inetpub\wwwroot\Platform.dev.local\ 
/property:TransformFile=C:\Projects\Platform\src\Project\YourWebsite\code\web.config.xdt 
/property:FileToTransform=web.config 
/target:ApplyTransform 
/toolsversion:15.0 
/verbosity:minimal 
C:\Projects\Platform\scripts\applytransform.targets

3. Test SQL connectivity from PowerShell
The easiest way to test connectivity between a custom machine running PowerShell and the desired SQL Server instance:
Invoke-Sqlcmd -ServerInstance 'hostname-and-instance-and-optionally-port' `
                      -Username 'sa' `
                      -Password 'Pa55W0rd!' `
                      -Query 'SELECT GETDATE() AS TimeOfQuery'

4. Archive a folder a place it into a specific location using PowerShell only
When you need to archive a folder you need to rely on an external tool such as zip, which brings another dependency into your pipeline. But that is not a case anymore when using PowerShell as it has entire power of .NET and that in turn has zip support within the namespaceSystem.Net.Compression. So why not to rely on PowerShell and .NET to do the entire job?
IF EXIST output.zip DEL /F output.zip
powershell.exe -nologo -noprofile -command "& { Add-Type -A 'System.IO.Compression.FileSystem'; [IO.Compression.ZipFile]::CreateFromDirectory('c:\Projects\Platform\build\output\', 'output.zip'); }"

5. Unzip a folder from an archive using PowerShell only
The reverse procedure of unzipping an archive into a folder can also be performed with .NET and PowerShell in the same manner:
powershell.exe -nologo -noprofile -command "& { Add-Type -A 'System.IO.Compression.FileSystem'; [IO.Compression.ZipFile]::ExtractToDirectory('c:\Projects\SomeArchive.zip', 'c:\inetpub\wwwroot\TargetFolder'); }"

6. Install a NuGet package using CLI
When you need to use NuGet from a console, you will be likely using NuGet CL. An example below shows installing a NuGet package into a folder passed as a parameter. Please keep in mind that package repositories should be mentioned in the accompanying configuration for nuget.exe:
nuget install xunit.runner.console -OutputDirectory c:\Projects\!\NuGet\

7 Run xUnit tests
After installing xUnit running unit tests from a console, the rest is easy as than simply passing a library containing tests as a parameter:
c:\Projects\!\NuGet\xunit.runner.console.2.3.1\tools\net452\xunit.console.exe c:\Projects\Platform\src\Foundation\Dictionary\tests\bin\Debug\Sitecore.Foundation.Dictionary.Tests.dll

8. Push a NuGet package into a repository on an example of Octopus with API secret key
When you create a versioned package and may want to push that into NuGet repository, you will rely on nuget push command. A snippet shown below demonstrates that on the example of Octopus Deploy, passing it API key. A code below use to substitute current site context, pretty easy:
NuGet.exe push Platform.68.0.0.nupkg -ApiKey API-UZYKODSIIRJZQF25QP2T7WFWG -Source http://winbuildserver.local:8080/nuget/packages

9. Upload a file to FTP using WebClient via PowerShell
One more trick to avoid using system dependencies by calling .NET commands via PowerShell. This time it is for sending a file over FTP to the remote server. Quite a disadvantage is storing the details open-text, including a password. That should be parametrised, of course:
$File = "c:\Projects\archive.zip"
$ftp = "ftp://hostname-and-port\username:Pa55w0rd@domain/path/more-folder/archive.zip"

"ftp url: $ftp"

$webclient = New-Object System.Net.WebClient
#$uri = New-Object System.Uri($ftp)

$uri = [uri]::EscapeUriString($ftp)

"Uploading $File..."

$webclient.UploadFile($uri, $File)

10. Transform of web.config settings for "role" and "localenv" variables
In Sitecore 9, one can set up an instance into a specific role that also takes predefined configurations. Further ahead, you may keep your numerous custom configurations next to each other targeting different 'roles' - that avoids clumsy config pathing and keeps settings functionally together in order to simplify maintenance. There is also localenv setting that helps you to distinguish various groups of servers from the same role, but residing in the different environments. 
I have a separate blog post dedicated to this task.

11. Deserialize Unicorn from a PowerShell
If you are using Unicorn in a Continuous Delivery pipeline, you need to make unicorn deserialise (sync) items into Sitecore from a console. Luckily, Unicorn has support for doing that by calling sync.ps1 that uses MicroCHAP.dll and supporting script Unicorn.psm1, passing Unicorn URL and a secret key as a parameter. That secret key can be configured at Unicorn.SharedSecret.config. Make sure there is unrestricted execution policy. Usage is pretty easy: 
sync.ps1 -secret 749CABBC85EAD20CE55E2C6066F1BE375D2115696C8A8B24DB6ED1FD60613086 -url http://platform.dev.local/unicorn.aspx

12. Create new IIS hostname winding for existing website
When installing Sitecore with SIF, it makes sense also to add all your additional custom domain names bindings into IIS website, that has been just created by SIF, ideally should be done for both HTTP on port 80 and HTTPS on 443. The last one also requires creating a self-signed certificate for given hostname. So you may create a step having this command at the very end of installation PowerShell script:
	$Hostname = "YourSiteCustomHostname.dev.local" 
	$SiteNameHere = "$SolutionPrefix.$SitePostFix" # "Platform.dev.local"
	
        write-host "Adding IIS Hostname Binding for website (HTTP and HTTPS)"
        write-host "Site name: $SiteNameHere"
        write-host "Hostname: $Hostname"

	$cert=(Get-ChildItem cert:\LocalMachine\My | where-object { $_.Subject -match "CN=$Hostname" } | Select-Object -First 1) 
	if ($cert  -eq $null) { 
		$cert = New-SelfSignedCertificate -DnsName $Hostname -CertStoreLocation "Cert:\LocalMachine\My" 
	} 
	$binding = (Get-WebBinding -Name $SiteNameHere | where-object {$_.protocol -eq "https"})
	if($binding -ne $null) {
		try{
	     	Remove-WebBinding -Name $SiteNameHere -Port 80 -Protocol "http" -HostHeader $Hostname
	     	Remove-WebBinding -Name $SiteNameHere -Port 443 -Protocol "https" -HostHeader $Hostname
		}
		catch{
		     	write-host "$SiteNameHere yet does not have a binding for $Hostname"
		}
	} 
	
	New-WebBinding -Name $SiteNameHere -IPAddress "*" -Port 80 -HostHeader $Hostname
New-WebBinding -Name $SiteNameHere -Port 443 -Protocol https -HostHeader $Hostname (Get-WebBinding -Name $SiteNameHere -Port 443 -Protocol "https" -HostHeader $Hostname).AddSslCertificate($cert.Thumbprint, "my")