Last year I've spent an enormous of time developing Sifon, which gave me a dive deep into the wonderful world of PowerShell. Of course, by these days I already had a decent 6-7 years experience with this scripting language, starting from the earliest version. However, the Sifon experience gave me a chance of revising all of my past experience and aggregating it into the best practices.
Obviously, I do expect my reader to have some snippets of experience of PowerShell, a partial understanding of its principles and object nature, etc. My objective is to advise certain best practices on top of that for increasing the readability and maintainability of the PowerShell code used in your company and, as a result, increasing the productivity of the administrator working with it.
Content
Styleguides
Developing scripts according to styleguides is a good practice universally, and there can hardly be two opinions on it. Due to the lack of any officially approved or detailed descriptions from Microsoft, the community has filled that gap (at the time of PowerShell v3) and maintained that on GitHub: PowerShellPracticeAndStyle. This is "the must" repository for anyone who has ever used the "Save" button in the PowerShell ISE.
Briefly, style guides fall to the following statements:
- PowerShell uses PascalCase to name variables, cmdlets, module names, and pretty much everything except operators;
- Language statements such as
if, switch, break, process, -match are exclusively written in lowercase;
- There is only one correct way for curly braces, also known as the Kernighan and Richie style, leading its history from the book The C Programming Language;
- Avoid using aliases other than at interactive console session, do not write any
ps | ? processname -eq firefox | %{$ws=0}{$ws+=$_.workingset}{$ws/1MB}; in the actual scripts.
- Specify the parameter names explicitly, the cmdlets behavior and/or their signature may change with time making such call invalid. Furthermore doing that provides a context to whoever is nonfamiliar with a specific cmdlet;
- Make out the parameters for calling scripts, and do not write a function inside the script and call this function in the last line with the need to change the values of global variables instead of specifying parameters;
- Specify
[CmdletBinding ()] - this enriches your cmdlet with -Verbose and -Debug flags and certain other useful features. I personally am not a fan of specifying this attribute in simple inline functions and filters that are literal to a few lines;
- Write a comment-based help: just a sentence, or a link to a ticket, and an example of a call;
- Specify the required version of PowerShell in the #requires section;
- Use
Set-StrictMode -Version Latest, it will help you avoid these problems;
- Process error and exceptions
- Don't rush rewriting everything in PowerShell. In the first place, PowerShell is a shell responsible for invoking binaries which is its primary task. There is nothing wrong with using robocopy in a script, rather than trying to mimic all of its logic with PS.
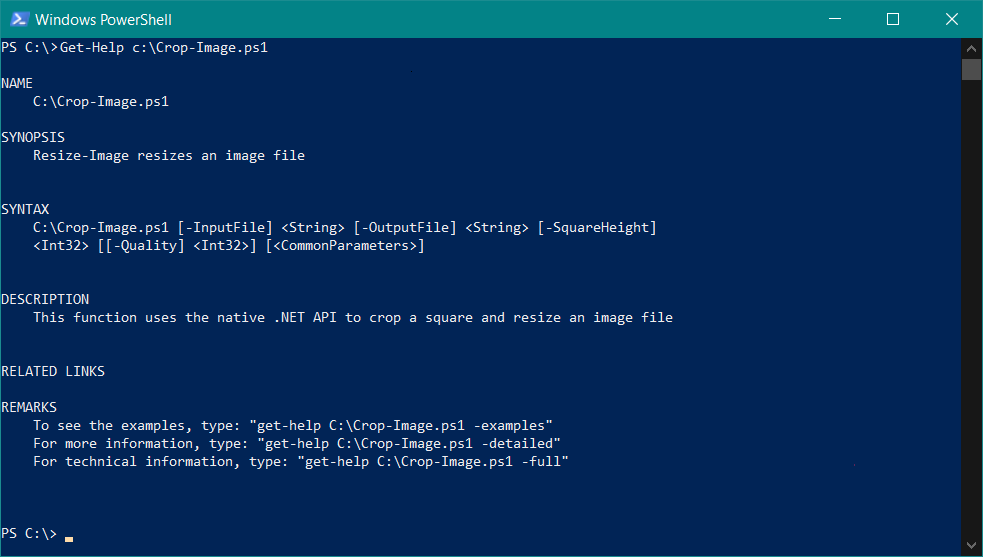
Please find an example of a script help implementation. The actual script crops the image bringing it to a square and resizes, It may seem familiar to those who once made avatars for users. There is a call example in the .EXAMPLE section, try it. And since PowerShell executes by the CLR (that same as other .NET languages use), it has the ability to employ the full power of .NET libraries:
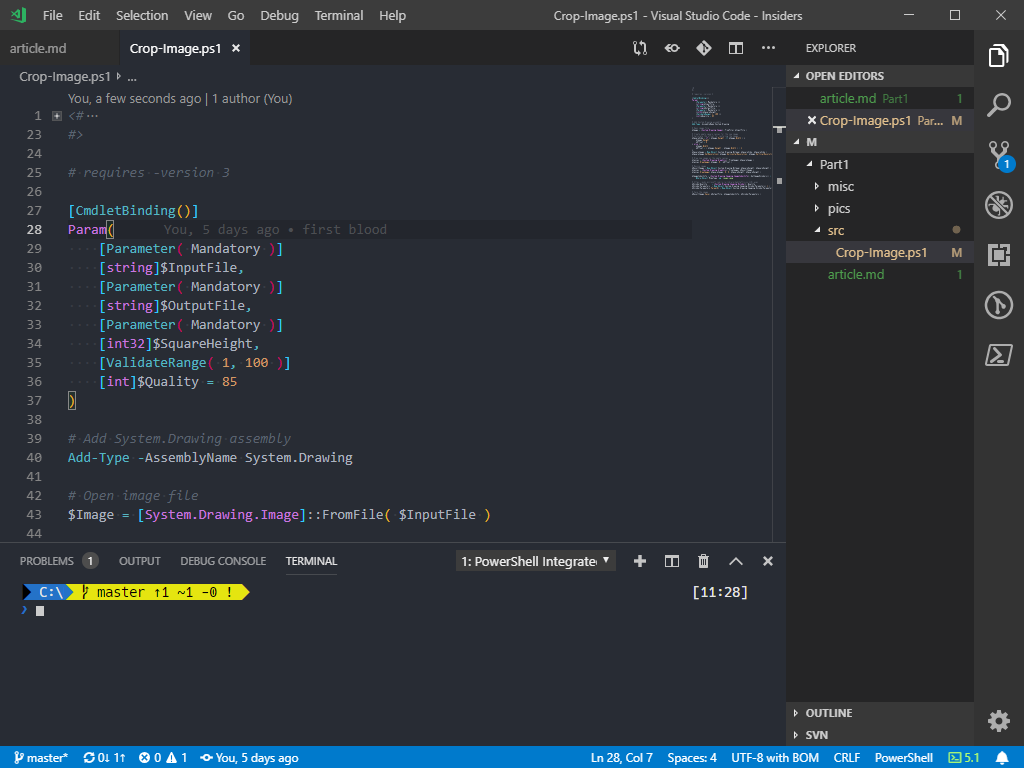
<#
    .SYNOPSIS
    Resize-Image resizes an image file

    .DESCRIPTION
    This function uses the native .NET API to crop a square and resize an image file

    .PARAMETER InputFile
    Specify the path to the image

    .PARAMETER OutputFile
    Specify the path to the resized image

    .PARAMETER SquareHeight
    Define the size of the side of the square of the cropped image.

    .PARAMETER Quality
    Jpeg compression ratio

    .EXAMPLE
    Resize the image to a specific size:
    .\Resize-Image.ps1 -InputFile "C:\userpic.jpg" -OutputFile "C:\userpic-400.jpg"-SquareHeight 400
#>

# requires -version 3

[CmdletBinding()]
Param(
    [Parameter(Mandatory)]
    [string]$InputFile,
    [Parameter(Mandatory)]
    [string]$OutputFile,
    [Parameter(Mandatory)]
    [int32]$SquareHeight,
    [ValidateRange(1, 100)]
    [int]$Quality = 85
)

# Add System.Drawing assembly
Add-Type -AssemblyName System.Drawing

# Open image file
$Image = [System.Drawing.Image]::FromFile($InputFile)

# Calculate the offset for centering the image
$SquareSide = if ($Image.Height -lt $Image.Width) {
    $Image.Height
    $Offset = 0
} else {
    $Image.Width
    $Offset = ($Image.Height - $Image.Width) / 2
}
# Create empty square canvas for the new image
$SquareImage = New-Object System.Drawing.Bitmap($SquareSide, $SquareSide)
$SquareImage.SetResolution($Image.HorizontalResolution, $Image.VerticalResolution)

# Draw new image on the empty canvas
$Canvas = [System.Drawing.Graphics]::FromImage($SquareImage)
$Canvas.DrawImage($Image, 0, -$Offset)

# Resize image
$ResultImage = New-Object System.Drawing.Bitmap($SquareHeight, $SquareHeight)
$Canvas = [System.Drawing.Graphics]::FromImage($ResultImage)
$Canvas.DrawImage($SquareImage, 0, 0, $SquareHeight, $SquareHeight)

$ImageCodecInfo = [System.Drawing.Imaging.ImageCodecInfo]::GetImageEncoders() |
    Where-Object MimeType -eq 'image/jpeg'

# https://msdn.microsoft.com/ru-ru/library/hwkztaft(v=vs.110).aspx
$EncoderQuality     = [System.Drawing.Imaging.Encoder]::Quality
$EncoderParameters  = New-Object System.Drawing.Imaging.EncoderParameters(1)
$EncoderParameters.Param[0] = New-Object System.Drawing.Imaging.EncoderParameter($EncoderQuality, $Quality)

# Save the image
$ResultImage.Save($OutputFile, $ImageCodecInfo, $EncoderParameters)
The above script starts with a multi-line comment <# ... #>. When such a comment comes first and contains certain keywords, PowerShell is smart enough to guess building help for a given script. That's why this type of help is called that - Comment Based Help:
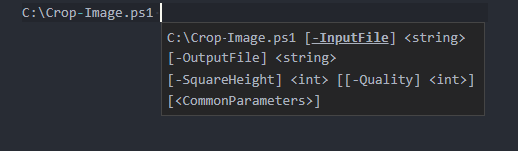
Moreover, after typing the script name, IntelliSense hints will suggest the relevant parameters, regardless of if that's PowerShell console or code editor:
Once again, I want to encourage you not to neglect it. If you don't have a clue what to write there, take a break and think of your function and its purpose - that helps writing meaningful help. Always works for me.
There's no need to fill in all the keywords, PowerShell is designed to be self-documenting, and if you've given meaningful and fully qualified names to the parameters, a short sentence in the .SYNOPIS section with one example will be sufficient.
Strict mode
Similar to many other scripting languages PowerShell is dynamically typed. This approach brings many benefits: writing simple yet powerful high-level logic appears to be a matter of minutes, but when your solution grows to thousands of lines, you'll face the fragility of this approach.
For example, while testing a script, you always received a set of elements as an array. In real life, it could receive just one element and at the next condition, instead of checking the number of elements, you will receive the number of characters or another attribute, depending on the element type. The script logic will definitely break, but the runtime will pretend that everything is fine.
Enforcing strict mode avoids this kind of problem, at a cost of a little more code from you, like variable initialization and explicit types casting.
This mode is enabled by the Set-StrictMode -Version Latest cmdlet, although there are other options for "strictness", my choice is to use the latter.
In the example below, strict mode catches a call to a nonexistent property. Since there is only one element inside the folder, the type of the $Input variable as a result of execution will be FileInfo, and not the expected array of the corresponding elements:
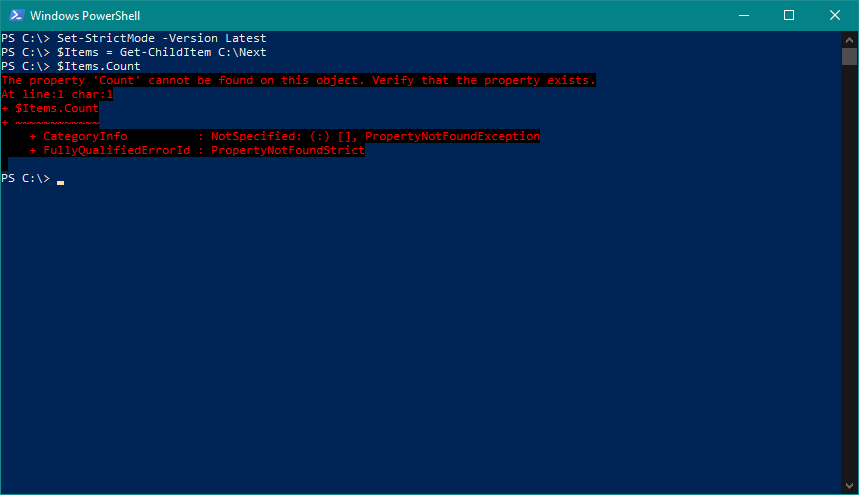
To avoid such a problem, the result of running the cmdlet should be explicitly converted to an array:
$Items = @(Get-ChildItem C:\Nextcloud)
Make it a rule to always enable strict mode to avoid unexpected results from your scripts.
Error processing
ErrorActionPreference
Looking at other people's scripts, I often see either complete ignoring of the error handling mechanism or an explicit force of silent continuation mode in case of an error. Error handling is certainly not the easiest topic in programming in general and in scripts in particular, but it definitely does not deserve to be ignored. By default, if an error occurs, PowerShell displays it and continues working (I simplified it a little). This is convenient, for example, if you need urgently send requests to numerous hosts,. It's unproductive to interrupt and restart the whole process if one of the machines is turned off, or returns a faulty response.
On the other hand, if you are doing a complex backup of a system consisting of more than one data file of more than one part of a system, you' better be sure that your backup is consistent and that all the necessary data sets were copied without errors.
To change the behavior of cmdlets in the event of an error, there is a global variable $ErrorActionPreference, with the following list of possible values: Stop, Inquire, Continue, Suspend, SilentlyContinue.
Get-ChildItem 'C:\System Volume Information\' -ErrorAction 'Stop'
Actually, such an option defines two potential strategies: either to resolve all errors "by default" and set ErrorAction only for critical places, where they must be handled; or include it at the whole script level by setting a global variable and setting -ErrorAction 'Continue' for non-critical operations. I always prefer the second option, but do not impose it on you. I only recommend understanding this issue and using this useful tool wisely based on your needs.
try/catch
In the error handler, you can control the execution flow by an exception type. Interestingly, one can build the whole execution flow with try/catch/throw/trap operator, that in fact has a terrible "smell" due to being severe antipattern. Not just because it uglifies the code turning it into the worst sort of "spaghetti". but also exception handling is very costly with .NET and abusing it dramatically reduces the script performance.
#requires -version 3
$ErrorActionPreference = 'Stop'

# create logger with a path to write
$Logger = Get-Logger "$PSScriptRoot\Log.txt"

# global errors trap
trap {
    $Logger.AddErrorRecord($_)
    exit 1
}

# connection attempt count
$count = 1;
while ($true) {
    try {
        # connection attempt
        $StorageServers = @(Get-ADGroupMember -Identity StorageServers | Select-Object -Expand Name)
    } catch [System.Management.Automation.CommandNotFoundException] {
        # there is no sense going ahead without modeule, thus throw an exception
        throw "Get-ADGroupMember is not available, plase add feature Active Directory module for PowerShell; $($_.Exception.Message)"
    } catch [System.TimeoutException] {
        # sleep a bit and do one more attempt, if attempt count is not exceeded
        if ($count -le 3) { $count++; Start-Sleep -S 10; continue }
        # terminate and throw exception outside
        throw "Server failed to connect due to a timeout, $count attempts done; $($_.Exception.Message)"
    }
    # since no exceptins occured, just leave the loop
    break
}
It is worth mentioning trap operator if you haven't come across it before. It works as a global error trap: catches everything not processed at lower levels, or thrown out from an exception handler due to the impossibility of self-fixing.
Apart from object-oriented exception handling, PowerShell also provides more familiar concepts that are compatible with other "classic" shells, such as error streams, return codes, and variables accumulating errors. All this is definitely convenient, sometimes with no alternative, but is out of the scope of this overview topic. Luckily, there is a good book on GitHub highlighting this topic.
When I am not sure the target system has PowerShell v5, I use this logger compatible with version 3:
# poor man's logger, compatible with PowerShell v3
function Get-Logger {
    [CmdletBinding()]
    param (
        [Parameter(Mandatory = $true)]
        [string] $LogPath,
        [string] $TimeFormat = 'yyyy-MM-dd HH:mm:ss'
    )

    $LogsDir = [System.IO.Path]::GetDirectoryName($LogPath)
    New-Item $LogsDir -ItemType Directory -Force | Out-Null
    New-Item $LogPath -ItemType File -Force      | Out-Null

    $Logger = [PSCustomObject]@{
        LogPath    = $LogPath
        TimeFormat = $TimeFormat
    }

    Add-Member -InputObject $Logger -MemberType ScriptMethod AddErrorRecord -Value {
        param(
            [Parameter(Mandatory = $true)]
            [string]$String
        )
        "$(Get-Date -Format 'yyyy-MM-dd HH:mm:ss') [Error] $String" | Out-File $this.LogPath -Append
    }
    return $Logger
}
But once again - do not ignore errors!
It will save your time and nerves in the long run. Don't confuse a faulty script completing without an error with a good script. A good script will terminate when needed instead of silently continuing with an unpredicted result.
Tools
New Windows Terminal is a decent configurable terminal with tabs and plenty of hidden features. It does not exclusively use PowerShell, old school cmd.exe is also there, while I mostly use it for a Linux console of WSL2.
The next step is to install the modules: oh-my-posh and posh-git - they will make the prompt more functional by adding information about the current session, the status of the last executed command, and the status of the git repository in the current location.
Visual Studio Code
Just the best editor! All the worst that I could say about PowerShell relates exclusively to PowerShell ISE, those who remember its first three-panel version won't forget that experience! The different terminal encoding, the lack of basic editor features, such as autocomplete, auto-closing brackets, code formatting, and a whole set of anti-patterns generated by it - this is all about ISE. Don't use it, use Visual Studio Code with the PowerShell extension instead - everything you want is there.
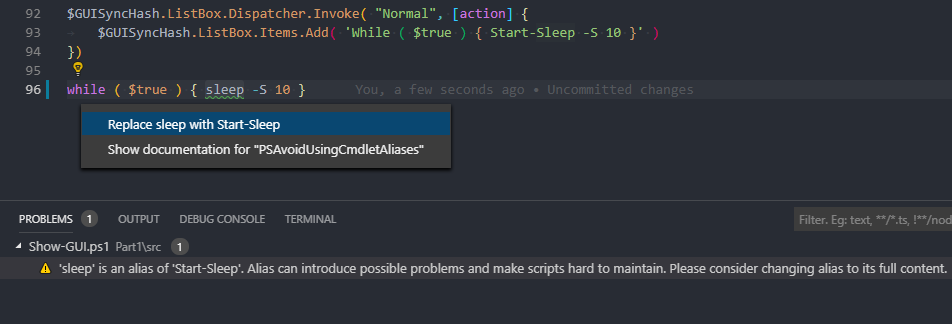
In addition to syntax highlighting, method hints, and the ability to debug scripts, the plugin installs a linter that will also help you follow established practices in the community, for example, deploy abbreviations in one click (on a bulb icon). In fact, this is a regular module that can be installed independently, for example, add it to your script signing pipeline: PSScriptAnalyzer.
It is worth remembering that any action in VS Code can be performed from the control center, called by the CTRL + Shift + P combination. Format the piece of code inserted from the chat, sort the lines alphabetically, change the indent from spaces to tabs, and so on, all this in the control center. Or, for example, enable full screen and centered editor position:
Git
People sometimes have a phobia of resolving conflicts in version control systems, those who are often alone and do not encounter any problems of this kind. With VS Code, conflict resolution is literally a matter of mouse clicks on those parts of the code that need to be retained or replaced. How to work with version control systems is available and with pictures is written in the VSCode doc, go over your eyes to the end there briefly and well.
Snippets
Snippets are a kind of macros/templates that speed up the writing of code. Definitely, a must-use. Let's take a look at a few of them.
Quick object creation:
Template for comment-based help:
When cmdlet needs to pass a large number of parameters, it makes sense to use splatting.Here's a snippet for it:
All available snippets can be viewed by Ctrl + Alt + J:

You could improve your working environment furthermore, there are LOTS of goodies accumulated by the community, for example at Awesome Lists.
Performance
The topic of performance is not as simple as it might seem at first glance. On the one hand, premature optimizations can greatly reduce the readability and maintainability of the code, saving 300ms of script execution time, the usual running time of which can be ten minutes, their use, in this case, is certainly destructive. On the other hand, there are several fairly simple techniques that increase both the readability of the code and the speed of its operation, which are quite appropriate to use on an ongoing basis. Below I will talk about some of them, in case performance is all for you, and readability fades into the background due to strict time constraints for service downtime for the duration of maintenance, I recommend referring to the specialized literature.
Pipeline и foreach
The easiest and always working way to increase productivity is to avoid using pipes. Due to the type safety and convenience, when passing elements through the pipe, PowerShell wraps each of them with an object. In .NET languages, this is known as boxing. Boxing is good as it guarantees safety but is a heavy operation, which sometimes it makes sense to avoid.
In order to improve performance and to increase readability the first step would be removing all usages of the Foreach-Object cmdlet replacing it with the foreach statement. You may be surprised to find out that these are actually two different entities, with foreach being an alias for Foreach-Object. In practice, the main difference is that foreach does not take values from the pipeline, and it works up to three times faster!
Let's think of a task where we need to process a large log to get some result, for example, selecting and converting its records to a different format:
Get-Content D:\temp\SomeHeavy.log | Select-String '328117'
The above example looks nice and is easy to read at first glance. At the same time, it contains a performance bottleneck - the pipe. To be correct, it is not the pipeline itself to blame, but the behavior of the Get-Content cmdlet. To use the pipeline, it reads a file line by line wrapping each line of a log from a string type into an object. That increases its size greatly, decreasing the number of data objects in the cache and doing unwanted work.
Avoiding this is simple - you just need to indicate that data must be read in full at one time by setting ReadCount to 0:
Get-Content D:\temp\SomeHeavy.log -ReadCount 0 | Select-String '328117'
For my 1Gb log file the advantage of the second approach is almost three times:
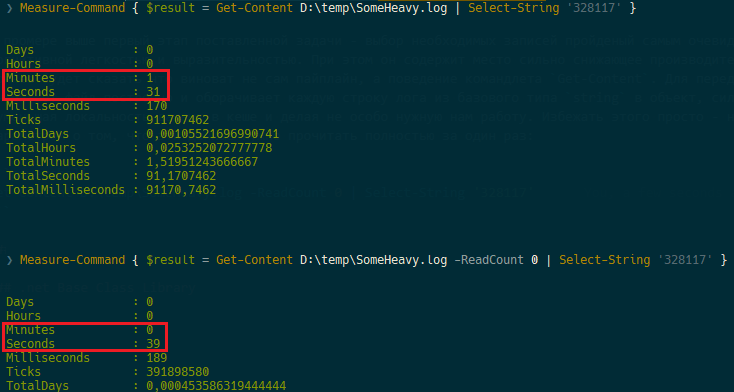
I advise you not to take my word on faith but to check it yourself whether this is true with a file of similar size. In general, Select-String gives a good result, and if the final time suits you, it's time to stop optimizing this part of the script. If the final script execution time still strongly depends on the stage of data retrieval, you can slightly reduce the data retrieval time by replacing the Select-String cmdlet. This is a very powerful and convenient tool, but in order to be so, Select-String adds a certain amount of metadata to its output, again doing not free time work, we can refuse unnecessary metadata and related work by replacing the cmdlet with the language operator:
foreach ($line in (Get-Content D:\temp\SomeHeavy.log -ReadCount 0)) {
    if ($line -match '328117') {
        $line
    }
}
As per tests, the execution time decreased to 30 seconds, meaning I won 30%. The overall readability of the code also decreased just a little. But if you operate with tens of gigabytes of logs, then this is your way with no doubt.
Another thing I would like to mention is the -match operator, a search by a regular expression pattern. In this particular case, the search turns simple substring location, but this is not always the case of such simplicity. Your regular expression can be extremely complex progressively increasing the execution time - RegEx is a Turing-complete language, so be careful with them.
The next task would be to process a heavy log file. Write the straightforward solution with the addition of the current date to each selected line and write to the file via the pipe:
foreach ($line in (Get-Content D:\temp\SomeHeavy.log -ReadCount 0)) {
    if ($line -match '328117') {
        "$(Get-Date -UFormat '%d.%m.%Y %H:%M:%S') $line" | Out-File D:\temp\Result.log -Append
    }
}
And the measurement results done by the Measure-Command cmdlet:
Hours             : 2
Minutes           : 20
Seconds           : 9
Milliseconds      : 101
Now, let's improve the result.
It is obvious that writing a file on a per-line basis isn't optimal, it is much better to make a buffer that is periodically flushed to disk, ideally to flush it once. It is also worth reminding that strings in .NET (therefore, in PowerShell as well) are immutable and any string manipulation creates memory allocation for a new string to be written, while the old one remains to wait for the garbage collector. This is expensive both in terms of speed and memory. .NET has a specialized class to solve this problem that allows you to change strings while encapsulating the logic for more accurate memory allocation and its name is StringBuilder. When creating a class, a buffer is allocated in RAM in which new lines are added without re-allocating memory, if the size of the buffer is not enough to add a new line, then a new one twice as large is created and the work continues with it. In addition to the fact that such a strategy greatly reduces the number of memory allocations, it can still be tweaked if you know the approximate amount of memory that the lines will occupy and set it in the constructor when creating an object.
$StringBuilder = New-Object System.Text.StringBuilder
foreach ($line in (Get-Content D:\temp\SomeHeavy.log -ReadCount 0)) {
    if ($line -match '328117') {
        $null = $StringBuilder.AppendLine("$(Get-Date -UFormat '%d.%m.%Y %H:%M:%S') $line")
    }
}
Out-File -InputObject $StringBuilder.ToString() -FilePath D:\temp\Result.log -Append -Encoding UTF8
The execution time of this code is only 5 minutes, instead of the last two and a half hours:
Hours             : 0
Minutes           : 5
Seconds           : 37
Milliseconds      : 150
It is worth noting the Out-File -InputObject construction, its essence is to get rid of the pipeline once again. This method is faster than a pipe and works with all cmdlets - any value that in the signature of the cmdlet is the value received from the pipe can be specified by a parameter. The easiest way to find out which parameter takes the values passing through the pipe is to run Get-Help on the cmdlet with the -Full parameter, among the list of parameters one should contain Accept pipeline input? true (ByValue):
-InputObject <psobject>

    Required?                    false
    Position?                    Named
    Accept pipeline input?       true (ByValue)
    Parameter set name           (All)
    Aliases                      None
    Dynamic?                     false
In both cases, PowerShell limited itself to three gigabytes of memory:
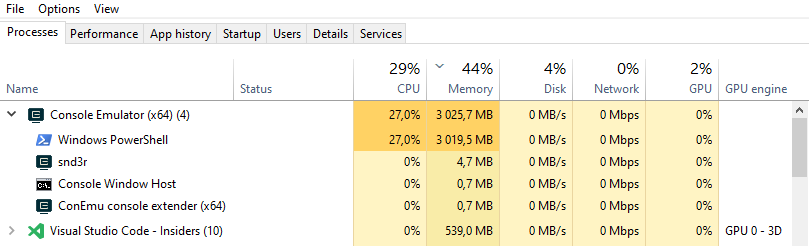
The previous approach is fairly good, except perhaps that 3GB of memory consumption.
Let's try to reduce memory consumption and use another .NET class written to solve such problems - StreamReader:
$StringBuilder = New-Object System.Text.StringBuilder
$StreamReader  = New-Object System.IO.StreamReader 'D:\temp\SomeHeavy.log'
while ($line = $StreamReader.ReadLine()) {
    if ($line -match '328117') {
        $null = $StringBuilder.AppendLine("$(Get-Date -UFormat '%d.%m.%Y %H:%M:%S') $line")
    }
}
$StreamReader.Dispose()
Out-File -InputObject $StringBuilder.ToString() -FilePath C:\temp\Result.log -Append -Encoding UTF8
Hours             : 0
Minutes           : 5
Seconds           : 33
Milliseconds      : 657
The execution time has remained almost the same, but the memory consumption and its nature have changed. If in the previous example, when reading a file in memory, space was occupied at once for the entire file, I have more than a gigabyte, while the script's memory usage was about three gigabytes, then when using a streamer, the memory occupied by the processor slowly increased until it reached 2GB. I did not manage to screenshot the final amount of memory occupied, but here is a screenshot of what happened towards the end of the work:
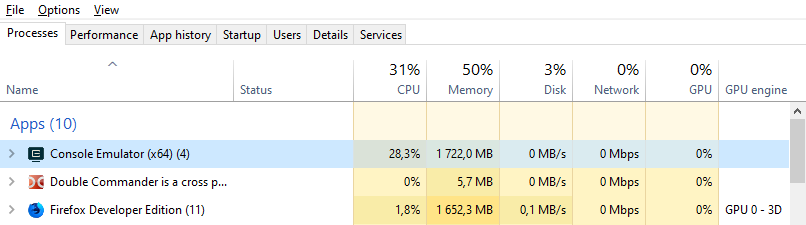
The behavior of the program in terms of memory consumption is quite obvious - its input is, roughly speaking, a "pipe", and the output is our StringBuilder - a "pool" that spills until the end of the program.
Let's set the buffer size of 100MB in order to remove unnecessary allocations and start dumping the contents to a file when approaching the end of the buffer. I implemented it straightforward by comparing if the buffer passed the mark of 90% of the total size (it makes sense to take this operation out of the loop to make it even better):
$BufferSize     = 104857600
$StringBuilder  = New-Object System.Text.StringBuilder $BufferSize
$StreamReader   = New-Object System.IO.StreamReader 'C:\temp\SomeHeavy.log'
while ($line = $StreamReader.ReadLine()) {
    if ($line -match '1443') {
        # check if we are approaching ond of buffer
        if ($StringBuilder.Length -gt ($BufferSize - ($BufferSize * 0.1))) {
            Out-File -InputObject $StringBuilder.ToString() -FilePath C:\temp\Result.log -Append -Encoding UTF8
            $StringBuilder.Clear()
        }
        $null = $StringBuilder.AppendLine("$(Get-Date -UFormat '%d.%m.%Y %H:%M:%S') $line")
    }
}
Out-File -InputObject $StringBuilder.ToString() -FilePath C:\temp\Result.log -Append -Encoding UTF8
$StreamReader.Dispose()
Hours             : 0
Minutes           : 5
Seconds           : 53
Milliseconds      : 417
The maximum memory consumption was 1 GB with almost the same execution speed:
Of course, the results for the absolute numbers of reclaimed memory will differ from one machine to another, it all depends on how much memory is available on the machine and how tough it will be to free it. If memory is critical for you, but a few percent of the performance is not so, then you can further reduce its consumption by using StreamWriter.
In my opinion, the idea is explained well - the main thing is to localize this problem. There's no need to re-invent the wheel: as people have already solved most of the problems, it is always good to look up a solution in the standard library first. But if Select-String and Out-File suit your timings, the machine does not crash with OutOfMemoryException, then use them - simplicity and readability are more important.
Native binaries
Often, having amazed with all the convenience of PowerShell, developers begin to opt-in favor of built-in cmdlets rather than using system binaries. On the one hand, it is understood - convenience is the king, but on the other - PowerShell is, in the first place, a shell, and launching binaries is its primary purpose. If PowerShell does that pretty well, so why not?
A good example of getting the relative paths of all the files in a directory and subdirectories (with lots of files).
Using a native command, the execution time took five times less:
$CurrentPath = (Get-Location).Path + '\'
$StringBuilder = New-Object System.Text.StringBuilder
foreach ($Line in (&cmd /c dir /b /s /a-d)) {
    $null = $StringBuilder.AppendLine($Line.Replace($CurrentPath, '.'))
}
$StringBuilder.ToString()
Hours             : 0
Minutes           : 0
Seconds           : 3
Milliseconds      : 9
$StringBuilder = New-Object System.Text.StringBuilder
foreach ($Line in (Get-ChildItem -File -Recurse | Resolve-Path -Relative)) {
    $null = $StringBuilder.AppendLine($Line)
}
$StringBuilder.ToString()
Hours             : 0
Minutes           : 0
Seconds           : 16
Milliseconds      : 337
Assigning the output to $null is the cheapest and easiest way of suppressing an output. The most expensive as you might guess it already would be using a pipe to send output to Out-Null
Moreover, such a suppression (assigning the result to $null) also reduces the execution time, albeit not that much:
# works faster:
$null = $StringBuilder.AppendLine($Line)

# works slower:
$StringBuilder.AppendLine($Line) | Out-Null
Once I had the task of synchronizing directories with a large number of files. This was only part of the work of a rather large script, kind of the preparation stage. The directory synchronization using Compare-Object looked decent and compact but required more time for the implementation than the whole time allocated by me. The way out of this situation was using robocopy.exe but through writing a wrapper (as a class in PowerShell 5) which became a compromise. Here's the code:
class Robocopy {
    [String]$RobocopyPath

    Robocopy () {
        $this.RobocopyPath = Join-Path $env:SystemRoot 'System32\Robocopy.exe'
        if (-not (Test-Path $this.RobocopyPath -PathType Leaf)) {
            throw 'Robocopy not found'
        }

    }
    [void]CopyFile ([String]$SourceFile, [String]$DestinationFolder) {
        $this.CopyFile($SourceFile, $DestinationFolder, $false)
    }
    [void]CopyFile ([String]$SourceFile, [String]$DestinationFolder, [bool]$Archive) {
        $FileName   = [IO.Path]::GetFileName($SourceFile)
        $FolderName = [IO.Path]::GetDirectoryName($SourceFile)

        $Arguments = @('/R:0', '/NP', '/NC', '/NS', '/NJH', '/NJS', '/NDL')
        if ($Archive) {
            $Arguments += $('/A+:a')
        }
        $ErrorFlag = $false
        &$this.RobocopyPath $FolderName $DestinationFolder $FileName $Arguments | Foreach-Object {
            if ($ErrorFlag) {
                $ErrorFlag = $false
                throw "$_ $ErrorString"
            } else {
                if ($_ -match '(?<=\(0x[\da-f]{8}\))(?<text>(.+$))') {
                    $ErrorFlag   = $true
                    $ErrorString = $matches.text
                } else {
                    $Logger.AddRecord($_.Trim())
                }
            }
        }
        if ($LASTEXITCODE -eq 8) {
            throw 'Some files or directories could not be copied'
        }
        if ($LASTEXITCODE -eq 16) {
            throw 'Robocopy did not copy any files. Check the command line parameters and verify that Robocopy has enough rights to write to the destination folder.'
        }
    }
    [void]SyncFolders ([String]$SourceFolder, [String]$DestinationFolder) {
        $this.SyncFolders($SourceFolder, $DestinationFolder, '*.*', '', $false)
    }
    [void]SyncFolders ([String]$SourceFolder, [String]$DestinationFolder, [Bool]$Archive) {
        $this.SyncFolders($SourceFolder, $DestinationFolder, '*.*', '', $Archive)
    }
    [void]SyncFolders ([String]$SourceFolder, [String]$DestinationFolder, [String]$Include) {
        $this.SyncFolders($SourceFolder, $DestinationFolder, $Include, '', $false)
    }
    [void]SyncFolders ([String]$SourceFolder, [String]$DestinationFolder, [String]$Include, [Bool]$Archive) {
        $this.SyncFolders($SourceFolder, $DestinationFolder, $Include, '', $Archive)
    }
    [void]SyncFolders ([String]$SourceFolder, [String]$DestinationFolder, [String]$Include, [String]$Exclude) {
        $this.SyncFolders($SourceFolder, $DestinationFolder, $Include, $Exclude, $false)
    }
    [void]SyncFolders ([String]$SourceFolder, [String]$DestinationFolder, [String]$Include, [String]$Exclude, [Bool]$Archive) {
        $Arguments = @('/MIR', '/R:0', '/NP', '/NC', '/NS', '/NJH', '/NJS', '/NDL')
        if ($Exclude) {
            $Arguments += $('/XF')
            $Arguments += $Exclude.Split(' ')
        }
        if ($Archive) {
            $Arguments += $('/A+:a')
        }
        $ErrorFlag = $false
        &$this.RobocopyPath $SourceFolder $DestinationFolder $Include $Arguments | Foreach-Object {
            if ($ErrorFlag) {
                $ErrorFlag = $false
                throw "$_ $ErrorString"
            } else {
                if ($_ -match '(?<=\(0x[\da-f]{8}\))(?<text>(.+$))') {
                    $ErrorFlag = $true
                    $ErrorString = $matches.text
                } else {
                    $Logger.AddRecord($_.Trim())
                }
            }
        }
        if ($LASTEXITCODE -eq 8) {
            throw 'Some files or directories could not be copied'
        }
        if ($LASTEXITCODE -eq 16) {
            throw 'Robocopy did not copy any files. Check the command line parameters and verify that Robocopy has enough rights to write to the destination folder.'
        }
    }
}
Attentive readers will ask, how that comes: why on earth Foreach-Object used in a class that fights for performance? This is a valid query, and the given example is one of the exclusions for using of this cmdlet, and here's why: unlike foreach, the Foreach-Object cmdlet does not wait for the complete execution of the command sending data to the pipe - processing occurs in a stream, in a specific situation, for example, by throwing exceptions immediately, rather than waiting for the end of the synchronization process. Parsing the output of a utility is a suitable place for this cmdlet.
Using the wrapper described above is trivially simple, all you need is just adding an exception handling:
$Robocopy = New-Object Robocopy

# copy a singe file
$Robocopy.CopyFile($Source, $Dest)

# syncing folders
$Robocopy.SyncFolders($SourceDir, $DestDir)

# syncing .xml only with setting an archive bit
$Robocopy.SyncFolders($SourceDir, $DestDir, '*.xml', $true)

# syncing all the files except *.zip *.tmp *.log with setting an archive bit
$Robocopy.SyncFolders($SourceDir, $DestDir, '*.*', '*.zip *.tmp *.log', $true)
I wrote this code several years ago so the implementation may not seem the best. The above example uses PowerShell classes, that do have a payload of transferring from Powershell to CLR and then back from CLR to PowerShell - that actively consumes stack. In addition, classes do have some drawbacks:
- they require PowerShell version 5, but as for 2021 it is not that critical
- do not support generating help from comments
- do not work nicely in pipelines (
ValueFromPipeline/ValueFromPipelineByPropertyName), well you can still access that via % { SomeClass.Method($_.xxx) }
- the whole class must be within the same file
- when class is defined within a module, it won't be easily consumed from outside
- class are unimplemented: do not have namespaces, private fields, getters/setters
But thinking widely, do we really need to run several instances of Robocopy so that implement it as a class? So, instead, you can just make Robocopy as a module:
Import-Module robocopy.psm1

# copy a singe file
Robocopy-CopyFile $Source $Dest

# syncing folders
Robocopy-SyncFolders $SourceDir $DestDir

# syncing .xml only with setting an archive bit
Robocopy-SyncFolders $SourceDir $DestDir -Include '*.xml' -Archive $true

# syncing all the files except *.zip *.tmp *.log with setting an archive bit
Robocopy-SyncFolders $SourceDir $DestDir -Include '*.*' -Exclude '*.zip *.tmp *.log' -Archive $true
Few more tips to improve your code:
- Take a look at Plaster for generating boilerplate for modules.
- Did you know you can unit-test PowerShell? Pester is a test framework for PowerShell. It provides a language that allows you to define test cases and the
Invoke-Pester cmdlet to execute these tests and report the results.
Coming back to scripts performance - that is a tricky topic. Implementing micro-optimizations may take more time than the benefits they bring, at the cost of the code's maintainability and readability. The cost of supporting it could be higher than any profit from using such a solution.
At the same time, there are a number of simple recommendations that make your code simpler, clearer, and faster, would you just start using them:
- Use the
foreach statement instead of the Foreach-Object cmdlet in scripts
- minimize the number of pipelines
- read/write files at once, instead of line-by-line
- use
StringBuilder and other specialized classes
- profile your code to understand bottlenecks before optimizing it
- do not avoid executing native binaries
And once again: do not rush to optimize something without a real need as premature optimization can break it all.
Jobs
Once you optimize everything and come to some compromise between readability and speed, but either operation is still lengthy or the data is huge, you still need to reduce the operating time. In this case, the parallel execution of some parts of the code becomes an answer. (You obviously ensure you're in possession of all necessary resources on the machine).
From the second version of PowerShell, cmdlets are available for working with jobs (Get-Command * -Job), you can read more here. There is nothing conceptually complicated in jobs: we make out the script block, run the task, get the results at the right time:
$Job = Start-Job -ScriptBlock {
    Write-Output 'Good night'
    Start-Sleep -S 10
    Write-Output 'Good morning'
}

$Job | Wait-Job | Receive-Job
Remove-Job $Job
The code above is intended solely for demonstration purposes and carries out zero value. As a great example of using jobs, I recommend you to play and debug this multithreaded script for network ping.
A problem that seems to be not a problem, but it is indicated - every job wants a little memory to be faster and is launched by a full-fledged operating system process with all the pros and cons of this approach.
In fact, every job executes an individual runspace, that reserves 30-50 megabytes, as any other .NET process would do. But unlike other .NET apps, these are not really consumed memory, but just a cache speeding up the work. Of course, if you do 100 of parallel jobs for asynchronous pinging - it will take few GBs of RAM, but it is doable on most of modern machines.
Jobs will help running any of your parallel tasks in and make it convenient. Be sure to study this mechanism, jobs are the best choice for a simple solution to a problem at a fairly high level of abstraction while keeping number of lines to the minimum. Just keep in mind - your scripts must be readable after you, scripts are written for people.
But it so happens that this abstraction is no longer enough due to the architectural limitations of such a solution, for example, it is difficult in such a paradigm to make an interactive gooey with binding of values on the form to some variables.
Runspaces
A whole series of articles on the Microsoft blog is devoted to the concept of runspaces, and I highly recommend referring to the primary source - Beginning Use of PowerShell Runspaces: Part 1. In short, the runspace is a separate PowerShell thread that runs in the same process of the operating system, and therefore does not have an overhead on new process.
If you like the concept of light streams and you want to launch dozens of them (there is no concept of channels in PowerShell), then I have good news for you: for convenience, all the low-level logic in this module repository on the github (there are gifs) is already wrapped in a more familiar concept of jobs. In the meantime, I'll demonstrate how to work with them natively.
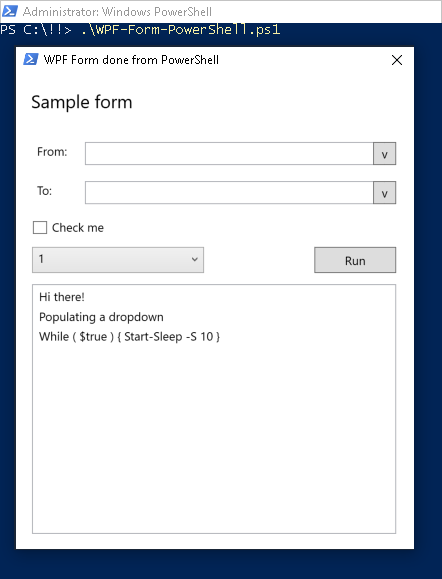
As an example of using runspaces, let's build a simple WPF form, which is rendered in the same OS thread as the main PowerShell process, however in a separate runtime thread. Interaction occurs through a thread-safe hashtable - so that you do not need to add any complexity like mutexes, it just works! The advantage of this approach is that you can implement any logic of any complexity and duration in the main script. It won't block the main execution flow leading to the form "freezing" (take a look at the last line of the script below - despite it "sleeps" a thread for half a minute - there's no block).
In a specific example, only one runspace is launched, although nothing stops you from creating a few more (and creating a pool for them for convenience).
# Thread-syncronized hashtable
$GUISyncHash = [hashtable]::Synchronized(@{})

<#
    WPF form
#>
$GUISyncHash.FormXAML = [xml](@"
<Window xmlns="http://schemas.microsoft.com/winfx/2006/xaml/presentation"
        xmlns:x="http://schemas.microsoft.com/winfx/2006/xaml"
        Title="Sample WPF Form" Height="510" Width="410" ResizeMode="NoResize">
    <Grid>
        <Label Content="Sample form" HorizontalAlignment="Left" Margin="10,10,0,0" VerticalAlignment="Top" Height="37" Width="374" FontSize="18"/>
        <Label Content="From:" HorizontalAlignment="Left" Margin="16,64,0,0" VerticalAlignment="Top" Height="26" Width="48"/>
        <TextBox x:Name="BackupPath" HorizontalAlignment="Left" Height="23" Margin="69,68,0,0" TextWrapping="Wrap" Text="" VerticalAlignment="Top" Width="300"/>
        <Label Content="To:" HorizontalAlignment="Left" Margin="16,103,0,0" VerticalAlignment="Top" Height="26" Width="35"/>
        <TextBox x:Name="RestorePath" HorizontalAlignment="Left" Height="23" Margin="69,107,0,0" TextWrapping="Wrap" Text="" VerticalAlignment="Top" Width="300"/>
        <Button x:Name="FirstButton" Content="√" HorizontalAlignment="Left" Margin="357,68,0,0" VerticalAlignment="Top" Width="23" Height="23"/>
        <Button x:Name="SecondButton" Content="√" HorizontalAlignment="Left" Margin="357,107,0,0" VerticalAlignment="Top" Width="23" Height="23"/>
        <CheckBox x:Name="Check" Content="Check me" HorizontalAlignment="Left" Margin="16,146,0,0" VerticalAlignment="Top" RenderTransformOrigin="-0.113,-0.267" Width="172"/>
        <Button x:Name="Go" Content="Run" HorizontalAlignment="Left" Margin="298,173,0,0" VerticalAlignment="Top" Width="82" Height="26"/>
        <ComboBox x:Name="Droplist" HorizontalAlignment="Left" Margin="16,173,0,0" VerticalAlignment="Top" Width="172" Height="26"/>
        <ListBox x:Name="ListBox" HorizontalAlignment="Left" Height="250" Margin="16,210,0,0" VerticalAlignment="Top" Width="364"/>
    </Grid>
</Window>
"@)

<#
    Form thread
#>
$GUISyncHash.GUIThread = {
    $GUISyncHash.Window       = [Windows.Markup.XamlReader]::Load((New-Object System.Xml.XmlNodeReader $GUISyncHash.FormXAML))
    $GUISyncHash.Check        = $GUISyncHash.Window.FindName("Check")
    $GUISyncHash.GO           = $GUISyncHash.Window.FindName("Go")
    $GUISyncHash.ListBox      = $GUISyncHash.Window.FindName("ListBox")
    $GUISyncHash.BackupPath   = $GUISyncHash.Window.FindName("BackupPath")
    $GUISyncHash.RestorePath  = $GUISyncHash.Window.FindName("RestorePath")
    $GUISyncHash.FirstButton  = $GUISyncHash.Window.FindName("FirstButton")
    $GUISyncHash.SecondButton = $GUISyncHash.Window.FindName("SecondButton")
    $GUISyncHash.Droplist     = $GUISyncHash.Window.FindName("Droplist")

    $GUISyncHash.Window.Add_SourceInitialized({
        $GUISyncHash.GO.IsEnabled = $true
    })

    $GUISyncHash.FirstButton.Add_Click({
        $GUISyncHash.ListBox.Items.Add('Click FirstButton')
    })

    $GUISyncHash.SecondButton.Add_Click({
        $GUISyncHash.ListBox.Items.Add('Click SecondButton')
    })

    $GUISyncHash.GO.Add_Click({
        $GUISyncHash.ListBox.Items.Add('Click GO')
    })

    $GUISyncHash.Window.Add_Closed({
        Stop-Process -Id $PID -Force
    })

    $null = $GUISyncHash.Window.ShowDialog()
}

$Runspace = @{}
$Runspace.Runspace = [RunspaceFactory]::CreateRunspace()
$Runspace.Runspace.ApartmentState = "STA"
$Runspace.Runspace.ThreadOptions = "ReuseThread"
$Runspace.Runspace.Open()
$Runspace.psCmd = { Add-Type -AssemblyName PresentationCore, PresentationFramework, WindowsBase }.GetPowerShell()
$Runspace.Runspace.SessionStateProxy.SetVariable('GUISyncHash', $GUISyncHash)
$Runspace.psCmd.Runspace = $Runspace.Runspace
$Runspace.Handle = $Runspace.psCmd.AddScript($GUISyncHash.GUIThread).BeginInvoke()

Start-Sleep -S 1

$GUISyncHash.ListBox.Dispatcher.Invoke("Normal", [action] {
    $GUISyncHash.ListBox.Items.Add('Hi there!')
})

$GUISyncHash.ListBox.Dispatcher.Invoke("Normal", [action] {
    $GUISyncHash.ListBox.Items.Add('Populating a dropdown')
})

foreach ($item in 1..5) {
    $GUISyncHash.Droplist.Dispatcher.Invoke("Normal", [action] {
        $GUISyncHash.Droplist.Items.Add($item)
        $GUISyncHash.Droplist.SelectedIndex = 0
    })
}

$GUISyncHash.ListBox.Dispatcher.Invoke("Normal", [action] {
    $GUISyncHash.ListBox.Items.Add('While ($true) { Start-Sleep -S 10 }')
})

while ($true) { Start-Sleep -S 30 }
Note: you do not need to have full Visual Studio for the sake of drawing WPF forms - just use this simple tool to quickly generate desired markup.
WinRM
It is mostly known as PowerShell Remoting and is one of my most used PowerShell features. If simplified, it allows you to execute full power of PowerShell in the context of any remote machine, so that all the code you execute runs on that machine. Of course, it is possible to pass parameters into a remotely-running script and get the results back.
To make the whole magic happen, WinRm must be enabled on both client and server and that is understood given the ultimate power it brings us.
Client
As for me, this is how PowerShell was written by the paranoid. Everything that is allowed and not allowed is forbidden. So it is also forbidden to connect to servers. I am exaggerating this a little, of course. If everything is in the same domain, then everything will be transparent. But in my situation, the machine is outside the domain and not even on the same network. In general, I decided that I would be careful and allow any extramarital affairs.
set-item wsman: localhost\client\trustedhosts -value * -force
restart-service WinRm
Server
It looks like a simple PowerShell one-liner but is tricky: enabling PowerShell remoting cannot be executed remotely. You may need either physical access or RDP. Eventually, you will run:
Enable-PSRemoting -SkipNetworkProfileCheck -Force
Despite being so short, this command does loads of actions:
- starts WinRM service and sets the autostart of the WinRM service to automatic
- creates a listener
- adds firewall exceptions
- includes all registered PowerShell session configurations for receiving instructions from remote machines
- registers a configuration if it is not registered with "Microsoft.PowerShell", and the same for x64
- removes the "Deny Everyone" ban from the security descriptor of all session configurations
- restarts the WinRM service
Once both server and client get configured, it becomes possible to enter an interactive remote session, so that everything you do happens in the remote context:
Enter-PSSession -ComputerName RemoteMachine -Credential "RemoteMachine\Administrator"
Optionally you can just execute remote code from within ScriptBlock at a host machine in a similar manner:
$pass = ConvertTo-SecureString -AsPlainText '123' -Force
$Cred = New-Object System.Management.Automation.PSCredential -ArgumentList 'Martin',$pass
Invoke-Command -ComputerName 192.168.173.14 -ScriptBlock { Get-ChildItem C:\ } -credential $Cred
You can do whatever you want for example copy files both ways:
$pass = ConvertTo-SecureString -AsPlainText '123' -Force                                       # 123 - password
$Cred = New-Object System.Management.Automation.PSCredential -ArgumentList 'Martin',$pass      # Martin - username
$Session = New-PSSession -ComputerName RemoteMachine -Credential $Cred
$remotePath = Invoke-Command -Session $session -ScriptBlock {  New-Item -ItemType Directory -Force -Path FolderName }
Copy-Item -Path "c:\Some\Path\To\Local\Script.ps1" -Destination $remotePath.FullName -ToSession $session
Remove-PSSession $Session
Remoting however has certain restrictions:
- you cannot make a second jump - only 1 session, you cannot connect deeper inside the session
- you cannot use commands that have a graphical interface. If you do this, the shell will hang until Ctrl + C pressed
- you cannot run commands that have their own shell, for example
nslookup, netsh
- you can run scripts if the launch policy on the remote machine allows them to run
- you cannot attach to an interactive session, you enter as
network logon, as if you were attached to a network drive. Therefore, logon scripts will not start, and you may not get the home folder on the remote machine (an extra reason not to map home folders with logon scripts)
- you will not be able to interact with users on a remote machine even they got logged in. You won't be able to show users a window or print anything to them.
Once done with interactive session, you can Exit-PsSession.
The whole concept of Sifon - an application I've done for installing and managing Sitecore on both local and remote machines, is built on the concept of WinRM along with runspaces, threads and plenty of other tricks describe in this blog post.
Conclusion
PowerShell is a powerful and easy-to-use environment for working with Windows infrastructure. It is good conceptually, it is convenient for its syntax and self-documenting cmdlet names, it can perform itself as an environment and you as a specialist, you just need to understand its concepts and start having fun. And of course, this technology fully justifies its title - as it is truly Power Shell.