As you've might hear, Sitecore has chosen Next.js to be used along with its JSS SDK. But what makes Next that great tool for most of us switching to a new paradigm of development for Sitecore? In this blog post, I'll go through Sitecore development evolution, starting with a review of Sitecore development progressing with time.
Old school development
A decade ago, we used classical ASP.NET WebForms to render a page on a server and pass it to the client. The whole idea of WebForms was faulty as it tried to mimic the event-based model of desktop development to make web development feel familiar to them. That was at cost of ignoring the stateless nature of HTML, creating weird ugly abstractions (ie. ViewState and EventValidation).
It was later made obsolete with an MVC approach which turned ASP.NET web development to what it should be in a better world: no state and events abstractions, server controls, and Master pages. Proper separation of code and markup (which itself went better and readable with the introduction of Razor views). It all benefited from an MVC architecture, proven with other web technologies, such as Ruby on Rails. Moreover, the implementation allowed extensibility at always every lifecycle of web request while ASP.NET MVC going open-source allowed writing your code aligned with the exact implementation of the framework.
MVC made a great step ahead and stayed a default way of making sites with Sitecore for as long as 5-8 years. Being so close to a raw request was a great strength but at a cost of having a lot of repetitive activities.
The introduction of SXA fixed most of these issues by strongly relying on Sitecore PowerShell for addressing most things that should and were in fact automated. The overall developers and editors' experience has improved with SXA due to the introduction of Page and Partial Designs, powerful components adjustable with rendering variants, most popular grid systems support, flexible search and SEO tools.
SXA was great in most aspects, except the one but most important - it was still based on top of MVC. That means web pages were generated at the server by rendering content into HTML views. Or in other words, it was not headless...
Headless
Meanwhile, the world of front-end development has experienced massive growth and after half-a-decade craziness of JS frameworks appearing one after another, a triad of winners stood out: React, Angular, and Vue. Those good old days of using jQuery came to an end giving way to industry-proven frameworks with the bigger feature sets and revised architecture that suits modern web development.
With time It became even harder and harder to split work between back-end and front-end teams (as for full-stack guys most of them tend to choose either side). Even bigger efforts have been spent on unwanted work of merging FE and BE teams in sync, which could not last long as both sides were struggling from that situation.
The headless approach was the right answer resolving all those issues with JSS being Sitecore response for that.
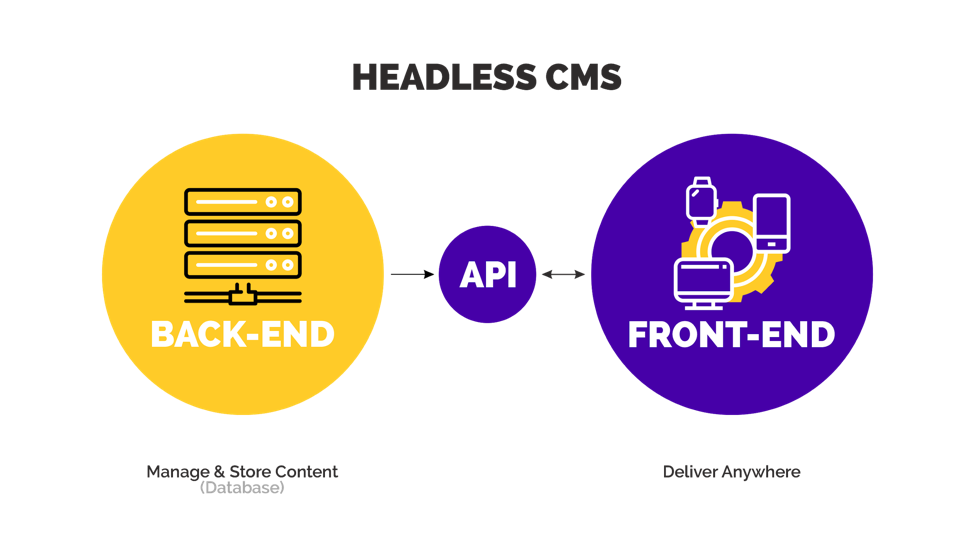
With the release of JSS, it became possible to separate BE and FE in a way that page each side becomes responsible for only its own duties. Front-end becomes free of previous limitations and could use React / Vue / Angular as much as they wanted. They did not need to use a heavily loaded web server with Sitecore for generating HTML pages - a new component called Rendering Host did that job exclusively for them. The only interaction with the back-end left was receiving just the necessary data asynchronously thanks to Layout Service and GraphQL.
NOTE: Actually headless means anything can consume the data from back-end services, not just FE frameworks. That is well done in ASP.NET Core renderings as an alternative option for headless implementation for Sitecore.
Client-Side Rendering
With a typical non-Sitecore single-page application the webserver firstly sends the browser an HTML page being in some initial state. Once that page gets loaded, the browser executes its JavaScript code which raises an asynchronous request(s) to an API endpoint in order to get actual data. As the user progresses with this app, more requests are sent by the browser, which will partially update content on a page without the whole page reloading from a web server. This approach is known as Client-Side Rendering, CSR and it brings lots of advantages such as apps responding faster and reducing traffic between client and server.
What's wrong with single-page applications?
Since single-page apps only load an initial HTML page once, this is the same as what search engine bots get. They struggle to obtain follow-up data from APIs and cannot index the page. Also without page reload the URL reaming the same and it can vary by only appending a #-anchor to a page URL. Often these URLs cannot be correctly processed when called directly.
Next.js
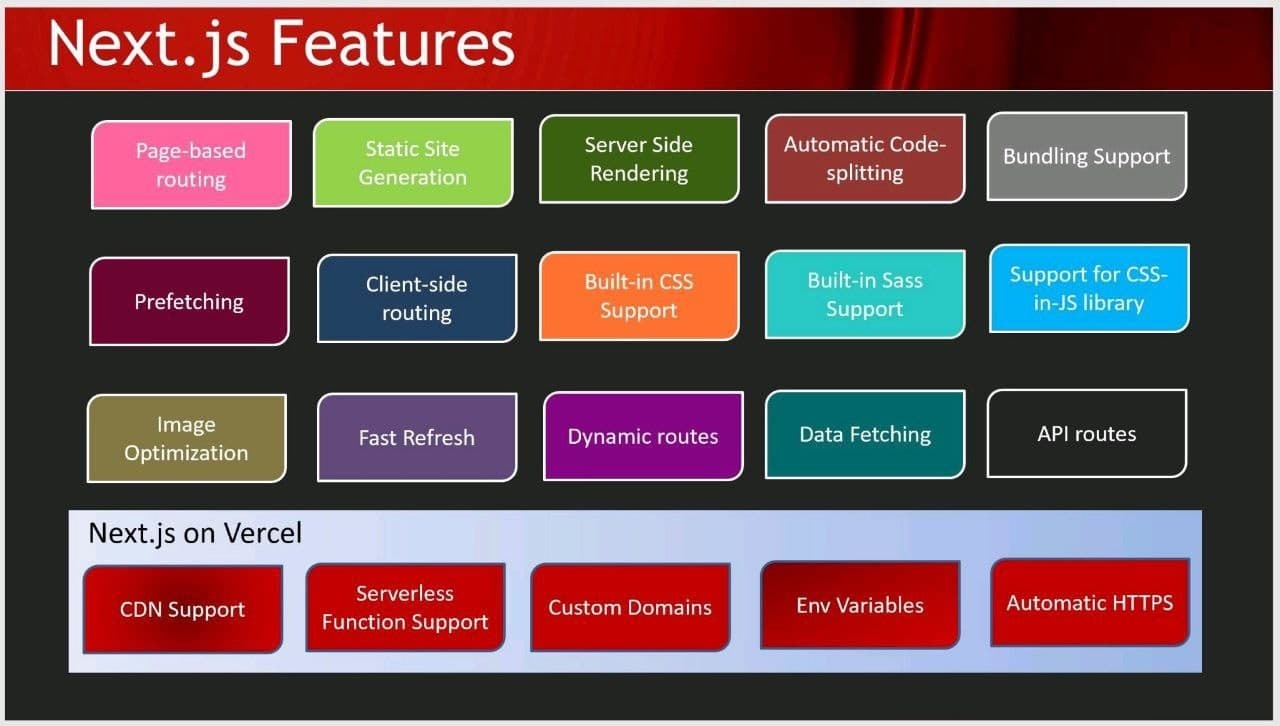
To address the above we have Next.js - a framework for statically generated and server-rendered React applications that opens up a lot of possibilities for developers: creating ready-to-use, zero-configuration applications, code separation, static HTML exporting, better UX, faster performance, and more. You can see many of its features below:
Next.js will ensure SEO without any extra actions from users beyond creating an application. Just to make clear, that results not from Next.js specifically, but from server-side rendering.
Once can do some SEO reports with Lighthouse even at earlier stages as you begin building your application.
But that still wasn't that....
SSG challenge
The idea behind Jamstack is truly attractive: instead of serving webpages in real-time (even when taking those from a cache), the webpages are already pre-rendered and deployed to CDN being globally accessible immediately upon publishing. In a simple scenario, one does not even have to keep a running server up as the traffic never reaches it going to CDN. Static content is fast, resilient to downtime, and gets indexed immediately by crawlers.
This approach however has some issues.
Let's think about a huge site with millions of pages. Deploying such a site may last hours rather than minutes due to static pages generation and the number of files to process. An increasing amount of content means increasing generation time. It seems to be reasonable to re-generating only those pages been updated, but it is only a small part of the solution (deployment becomes complicated and even one character change in a common part like a header will still make you process all the pages).
ISR
That is where Incremental Static Regeneration (ISR) comes into play. ISR is a new evolution step for Jamstack. Next.js allows you to create or update static pages beyond you’ve built a site. Incremental Static Regeneration enables developers and content editors to use static-generation on a per-page basis, without needing to rebuild the entire site. With ISR, you can benefit best from both worlds while scaling to millions of pages.
The principle difference is that now Static pages could be generated on-demand at runtime. The developers' job is now deciding which portion of pages you pre-generate, i.e. well known 80/20 Pareto's Law where 80% of traffic is served by only 20% of pages, while the other 80% of pages get the remaining 20% of traffic.
So it makes good sense to pre-generate that heavily used 20 % of pages. How to know which pages or sections to go through? You've got an arsenal of tools like analytics, A/B testing, alternative metrics - in any case, you got the flexibility to make your own tradeoff on build times, as the image below compares:
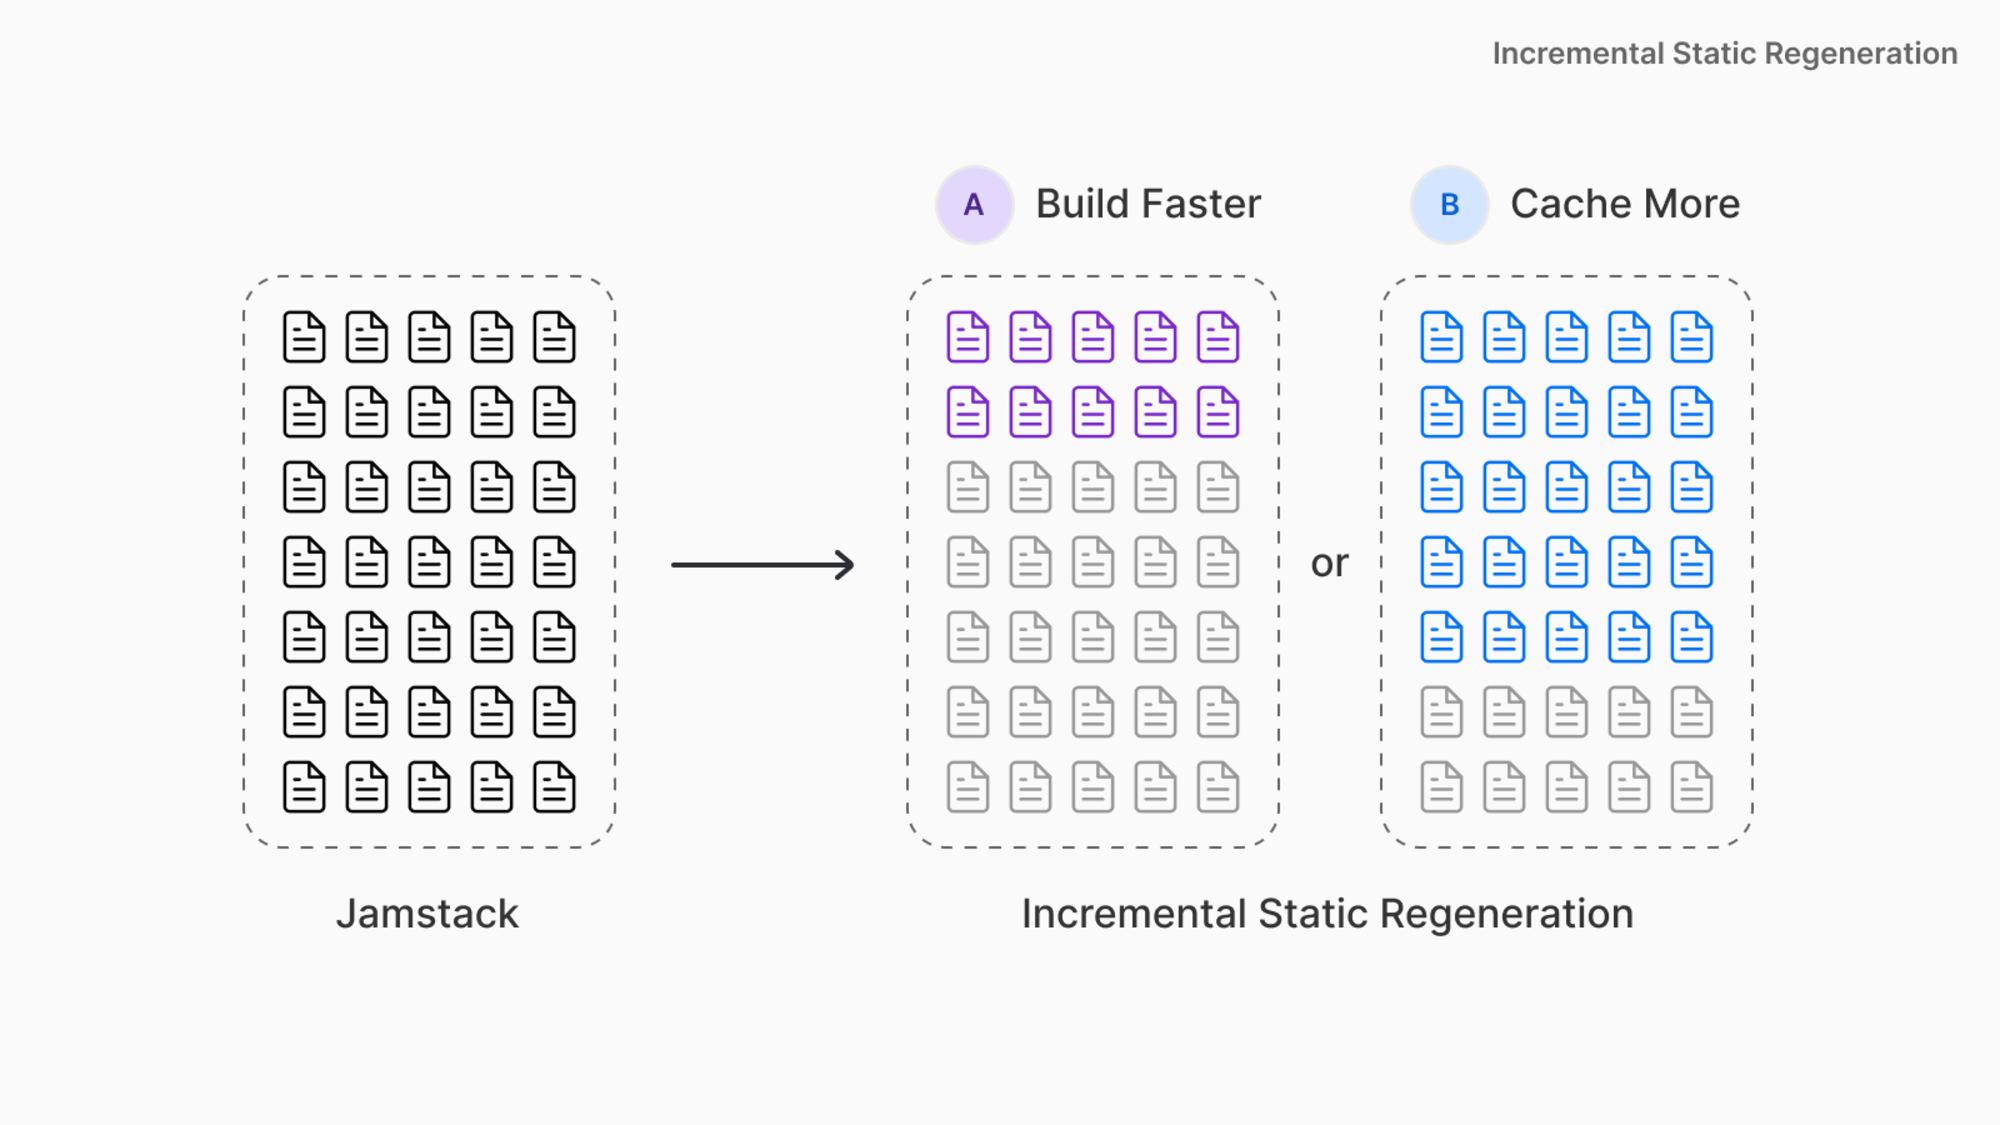
With being given a choice now, developers can define options A or B and choose between them: Selecting option A build time gets faster, while option B generates more pages.
This becomes crucial when working on large eCommerce implementations or headless CMSs such as Sitecore.
How that works
ISR relies on that same API being used for static sites generation getStaticProps. The difference is that by setting revalidate parameter to 60 we make Next.js using ISR for a page. Here's how the request goes with ISR:
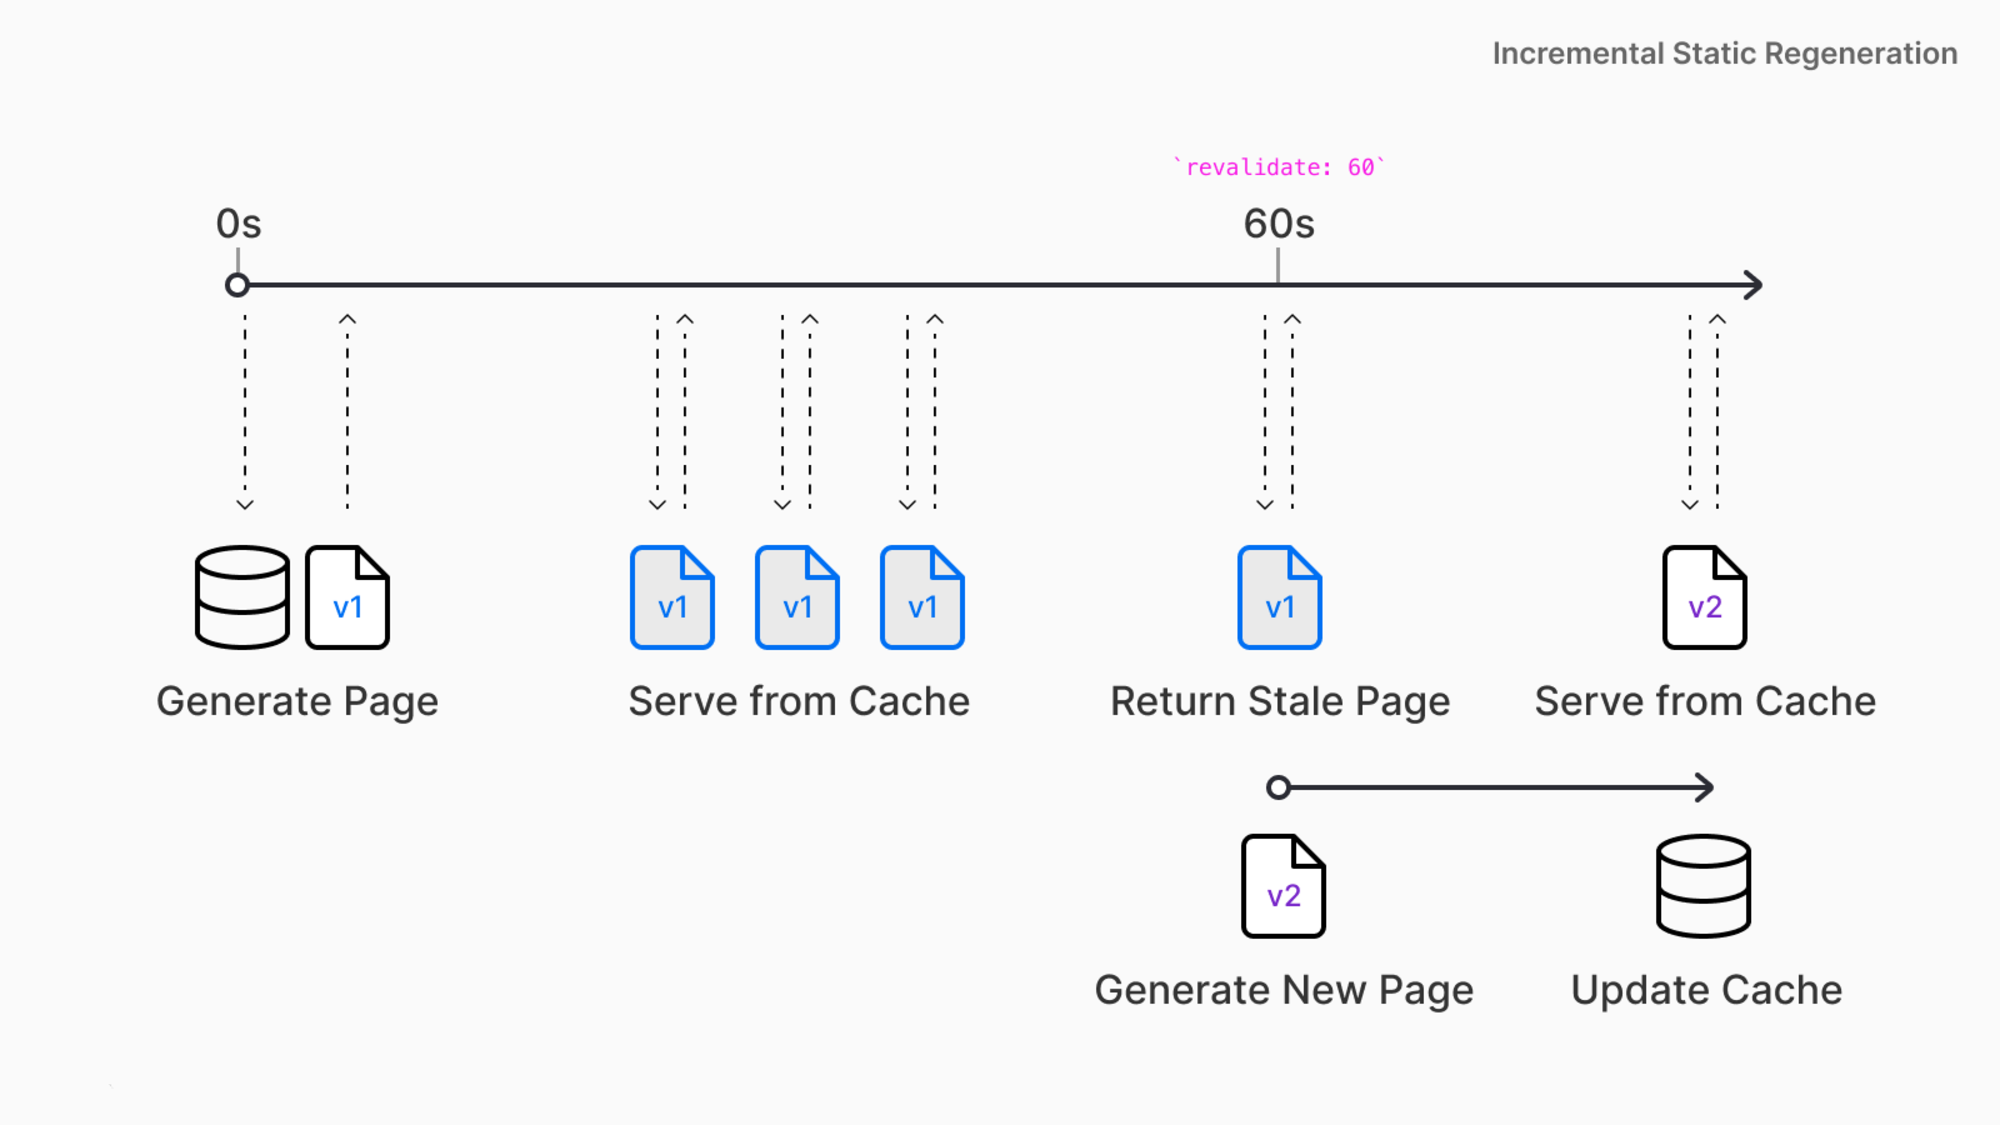
- With Next.js one can define a revalidation time per page (ie. 60 seconds)
- The initial request to a product page will return the cached page with the original price
- At this stage, someone makes changes into a product data, affected in the database changes
- All requests to the page after the initial request but before 60 seconds are returned immediately as are cached.
- After a given 60-second window, the following request will still show the cached (old) page. But Next.js triggers background regeneration of that page. Once completed, it will update a cache for that single page or keep an old cached page upon a background regeneration failure.
Finding a compromise
Since all the sites vary by volume, audience, purpose, and internal architecture - there's no a silver bullet to cover them all with a universal solution. That is why Next.js is end-user-centric, offering developers shifting between solutions without leaving the bounds of the framework. It's for you to choose the right tool for a project.
Edge caching
In certain cases, ISR is not the best option, like some apps where live data display is crucial. Those would be better handled with server rendering, with some option of own Cache-Control headers with surrogate keys to invalidate content. Server rendered pages could get cached at some edge servers. With a hybrid framework, one can make own tradeoff and still stay within the framework.
SSR with edge server caching may look similar to ISR (especially with stale-while-revalidate headers for cache control).
The major difference comes from the way of handling the first request. With ISR it returns a statically rendered page that ensures the user will see a page even in case of API connectivity loss or database failure. SSR allows setting the pages depending on the specific features of requests.
One thing to care about in that case is using SSR whiteout caching may affect the performance as every millisecond of wait is important. In addition SSR with no cache badly impacts the TTFB metric (Time to First Byte) being used by Lighthouse.
In addition to that, ISR is not beneficial for small websites. That is reasonable if build time for the whole site is times lower than the revalidation parameter - just use classic SSR instead.
ISP fallback options
This is an important parameter with two potential options. When working with data that is fast to retrieve it makes sense using fallback: blocking. In that case, you do not need to display using a temporal "in progress" page while the data retrieval. That will guarantee users see the right page regardless of it is cached or not.
For uncertain or slow loading data the above approach will affect UX badly, therefore setting fallback: true makes an immediate display of the "please wait" page while data is processed.
SEO is the cause
SEO (search engine optimization) is a set of techniques (and even unobvious tricks) for changing your site in order to attract higher traffic from search engines. In order to increase the site's search rate, one needs to keep in mind many of them, such as:
Visitors won’t wait an eternity until your page loads. Performance is actually a crucial factor for SEO
and therefore should be the main concern when building an app. In addition to FTFB (mentioned previously), there is another important parameter abbreviated as FCP (First Contentful Paint). Google uses FCP as a key metric for performance - FCP directly affects SEO rating. You can read more about improving FCP.
With Next.js you can analyze FCP and LCP (Largest Contentful Paint - time used for major content shown) by creating App component with a reportWebVitals function:
// pages/_app.js
export function reportWebVitals(metric)
{
  console.log(metric)
}
Once these parameters get calculated
reportWebVitals function is called with all the metrics for you to log and analyze. Follow this link for more details about
measuring performance with Next.js
I hope this post gives an overall highlight on the rendering evolution from the old days till ISR and nuances choosing them with Next.js.