For years, the Sitecore community has been the
platform's secret weapon. We've built countless modules, shared our knowledge at SUGCONs, and pushed
the boundaries of what's possible with this DXP. Today, I'm thrilled to share my experience with the
Sitecore Marketplace,
which officially launched in 2025 and
represents a fundamental shift in how we extend and customize Sitecore in the composable
era.
I've had the privilege of participating in the
Early Access Program and recently submitted a proposal for the Sitecore AI Challenge that made it to
the finals. Today, I'm completing the final submission, and I can tell you firsthand: this is not
just another feature release. The Marketplace is a strategic bet on the community, a multiplication
of our collective effort, and a recognition that Sitecore's greatest strength has always been its
people.
In this comprehensive guide, I'll walk you through everything you need to know
to build production-ready Marketplace apps, from arch.
Why the Marketplace Matters: The Strategic Context
Let's be honest: the shift to SaaS has been
challenging for many of us who built our careers on the extensibility of Sitecore XP. We could
customize anything, extend everything, and build solutions that were uniquely tailored to our
clients' needs. When XM Cloud launched, there was a legitimate concern: how do we maintain that
level of customization in a managed SaaS environment?
The Marketplace is Sitecore's answer to that
question. It's a way to preserve the extensibility we love while embracing the benefits of SaaS.
More importantly, it's a recognition that the community is the engine of innovation. By
providing us with the tools to build and share apps, Sitecore is effectively multiplying their
own development capacity by the size of the community. That's brilliant.
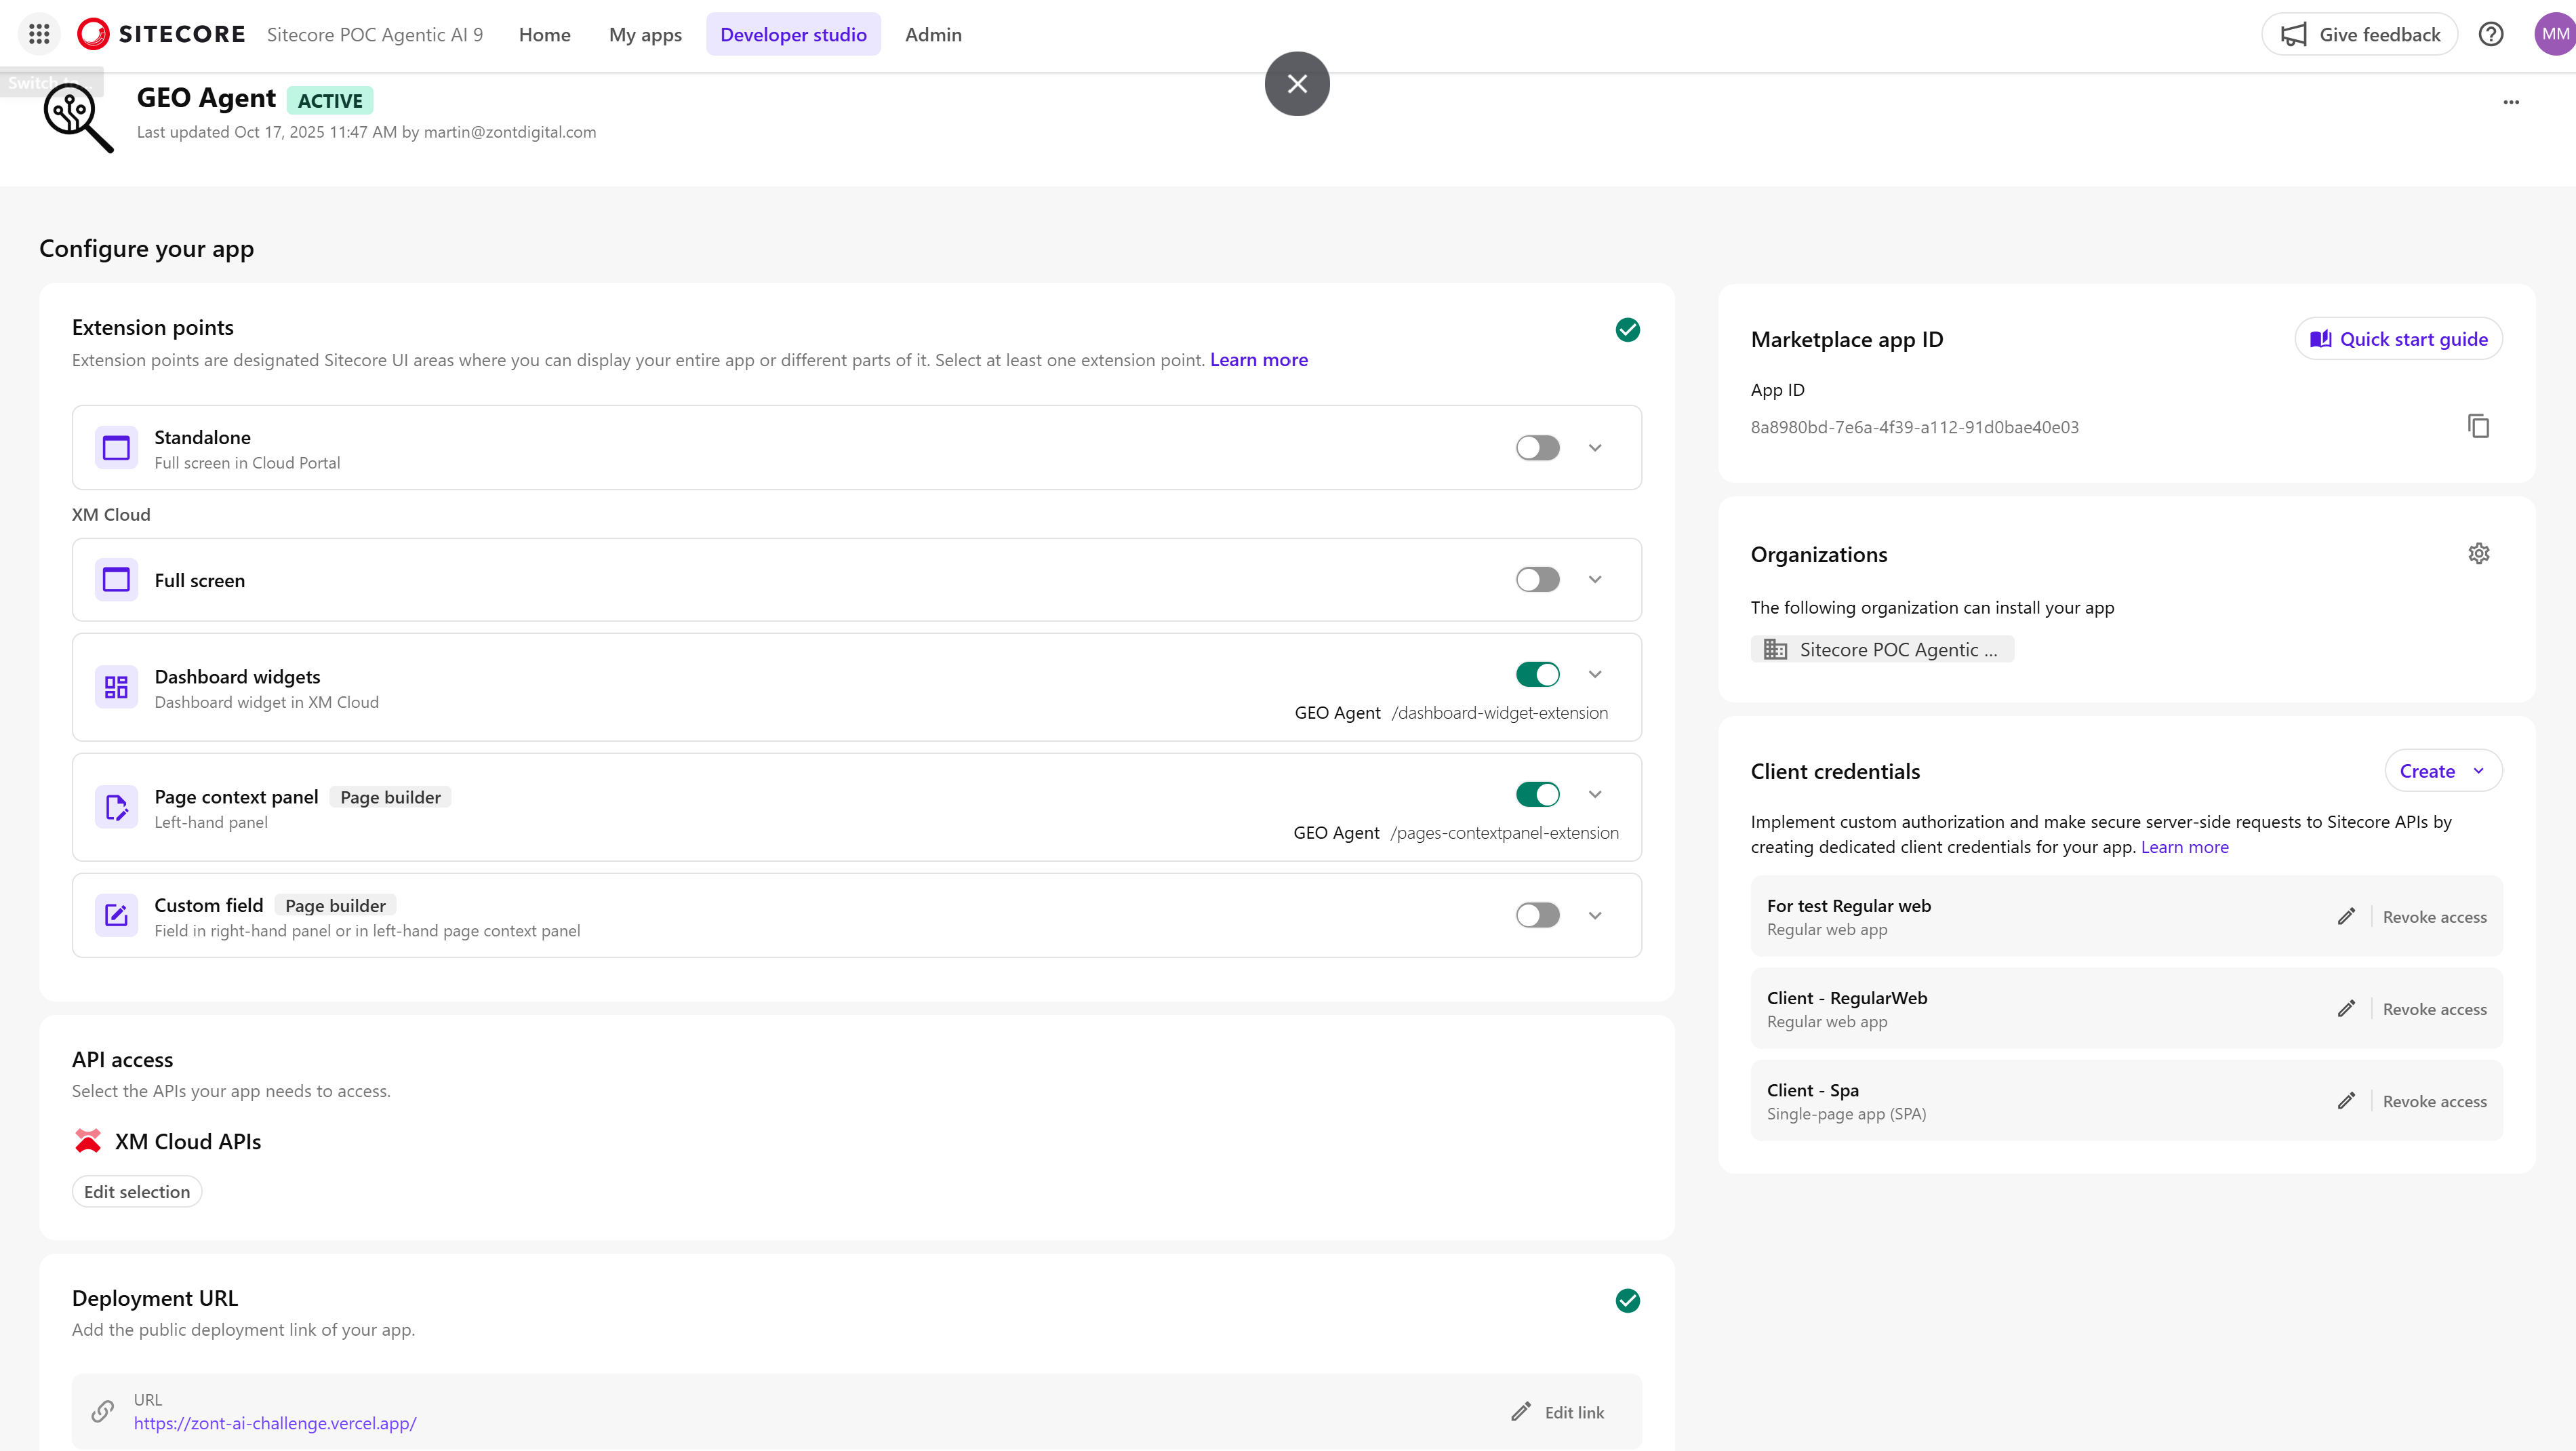
The Developer Studio: Your Starting Point
Your journey begins in the
Developer Studio, a new
section in the Sitecore Cloud Portal. This is where you'll create and configure your apps. The
interface is clean and intuitive, but there are some important decisions to
make:
Creating Your App
When you create a new app, you'll need to
provide:
- App Name: This
appears in the Marketplace
and to end users.
- Description:
Make it clear and
compelling.
- Logo URL: This
is mandatory. Your logo
needs to be hosted somewhere accessible.
- Extension
Points: Where
your app will appear in the Sitecore UI.
- API Access:
Which Sitecore APIs your app
needs to call.
- Deployment URL:
Where
your app is hosted.
It's important to note that
you host your own
apps. Sitecore provides the SDK and the
integration points, but the hosting is entirely up to you. This gives you complete control over
your technology stack, deployment pipeline, and scaling strategy. I'm hosting my AI Challenge
app on Vercel, which has been seamless.
App Types: Custom vs.
Public
Currently, you can build
Custom Apps, which are
available to your organization and any other organizations you explicitly authorize.
Public Apps, which will
be available to all Sitecore customers through the Marketplace, are coming in a later release.
Public apps will undergo a quality review process, which is a good thing for the
ecosystem.

Architecture: Making the Right Choice
The architecture you choose for your
Marketplace app has significant implications for what you can build and how complex your
development will be. There are two main patterns:
1. Client-Side Architecture
In a client-side architecture, your app runs
entirely in the user's browser. All API requests to Sitecore APIs are proxied through the
browser using the SDK. This is the simplest option and is ideal for:
- UI
extensions and custom fields
- Dashboard widgets
- Simple
data visualization
- Apps
that don't require server-side processing
The key advantage is simplicity. You can build
a client-side app with just React or Vue, deploy it as a static site, and you're done. The SDK
handles all the authentication and communication with Sitecore
automatically.
2. Full-Stack Architecture
A full-stack architecture includes both
client-side and server-side components. This is necessary when you need to:
- Make
direct server-to-server API calls to Sitecore
- Integrate with AI services (like OpenAI, Anthropic,
etc.)
- Perform
heavy processing or data transformations
- Implement agentic workflows
- Store
and manage your own data
For full-stack apps, you'll need to use
custom authorization with
Auth0.
This is more complex to set up, but it gives you the flexibility to build sophisticated
applications. My AI Challenge submission is a full-stack app because it integrates with multiple
AI services and requires server-side orchestration.
3. Authorization: Built-in vs. Custom
The Marketplace SDK supports two authorization
patterns:
- Built-in
Authorization: The SDK
automatically manages authentication. This is the default and recommended option for
client-side apps.
- Custom Authorization
(Auth0):
Required for server-side API calls. You'll need to configure Auth0 credentials in the
Developer Studio and handle session invalidation when your app is available in multiple
organizations.
For your first app, I strongly recommend
starting with client-side architecture and built-in
authorization. Get something working, understand the SDK,
and then move to full-stack if you need to.
Extension
Points: Where Your App Lives
Extension points are the designated areas in
the Sitecore UI where your app can be displayed. Understanding them is crucial to designing a
great user experience.
1. Standalone (Cloud Portal)
Your app appears on the Cloud Portal home page
in the "Marketplace apps" section. It opens in a new tab under the navigation header. This is
ideal for apps that are used independently of XM Cloud, like reporting dashboards or
administrative tools.
Image source: cloud portal app configuration screen
2. XM Cloud Full Screen
Your app is listed in the "Apps" dropdown in
the XM Cloud navigation header and appears full screen. This is perfect for apps that need a lot
of screen real estate, like content migration tools or complex configuration
interfaces.
Image source: cloud portal app configuration screen
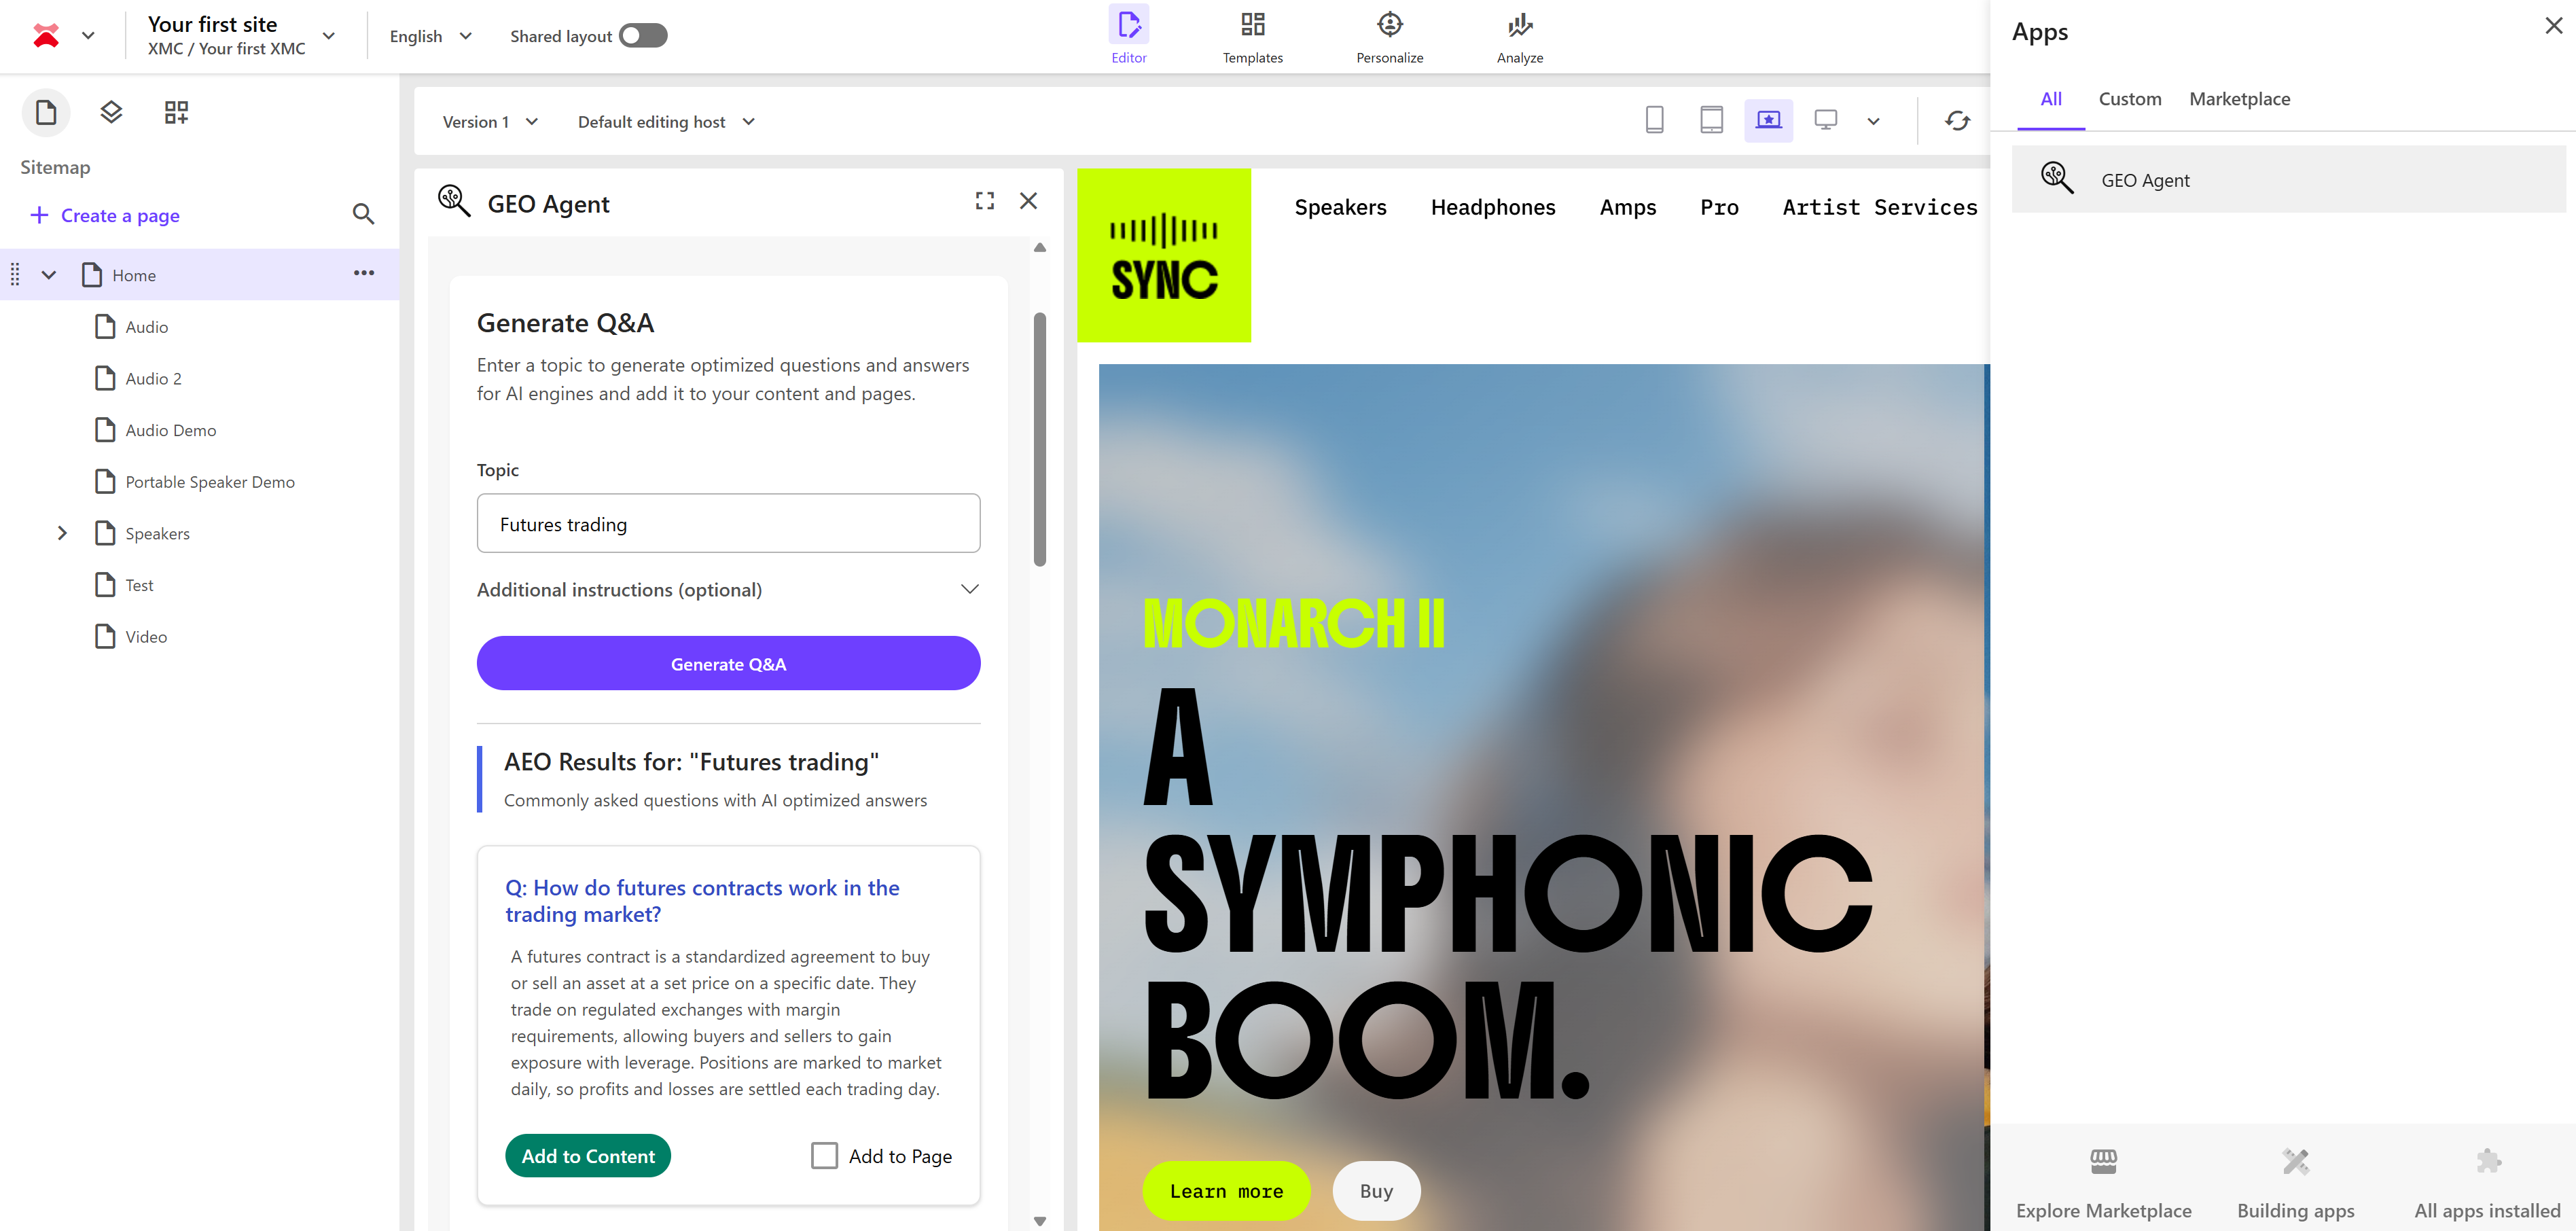
3. XM Cloud
Page Builder Context Panel
This is one of my favorite extension points.
Your app appears in the context panel to the left of the Page Builder canvas. This is ideal for
page-level extensions, like:
- Real-time analytics
insights
- SEO
analysis tools
- Content
quality checkers
- HTML
validators
The context panel is always visible while
editing a page, so your app is right there when users need it.
4. XM Cloud
Page Builder Custom Field
Your app appears in a modal when a user clicks
"Open app" on a custom field. This is perfect for:
- Icon
pickers
- Color
pickers
- External
data selectors
- Media
libraries
I've seen some brilliant implementations of
this extension point, including a Material UI icon picker with over 10,000
icons.
Image source: cloud portal app configuration screen
5. XM Cloud Dashboard Widget
Your app can be added as a draggable widget to
the XM Cloud site dashboard. This is ideal for displaying site-wide metrics, like bounce rates,
popular pages, or performance data from third-party analytics tools.
The
Marketplace SDK: A Deep Dive
The Sitecore Marketplace SDK is the foundation
of all Marketplace development. It's open-source, well-documented, and a pleasure to work with.
Let's dive into the details.
1. Package Structure
The SDK is divided into distinct
packages:
@sitecore-marketplace-sdk/client:
Required for all
apps. Handles secure communication between your app and
Sitecore.@sitecore-marketplace-sdk/xmc:
Optional. Provides
type-safe interfaces for XM Cloud APIs, including queries, mutations, and
subscriptions.
2. Getting Started: The 5-Minute Quickstart
Here's how you can get a basic Marketplace
app running in about 5 minutes:
1. Create a new Next.js or Vite app:
npx create-next-app@latest my-marketplace-app
cd my-marketplace-app
2. Install the SDK
packages:
npm install @sitecore-marketplace-sdk/client @sitecore-marketplace-sdk/xmc
3. Create a custom hook for the Marketplace client:
// hooks/useMarketplaceClient.ts
import { useEffect, useState } from 'react';
import { ClientSDK } from '@sitecore-marketplace-sdk/client';

export const useMarketplaceClient = () => {
    const [client, setClient] = useState<ClientSDK | null>(null);
    const [isInitialized, setIsInitialized] = useState(false);
    const [error, setError] = useState<Error | null>(null);

    useEffect(() => {
        const initClient = async () => {
            try {
                const sdkClient = new ClientSDK({
                    onError: (err) => {
                        console.error('SDK Error:', err);
                        setError(err);
                    }
                });

                await sdkClient.initialize();
                setClient(sdkClient);
                setIsInitialized(true);
            } catch (err) {
                setError(err as Error);
            }
        };

        initClient();
    }, []);

    return { client, isInitialized, error };
};
4. Use the client in your component:
// app/page.tsx
"use client"
import { useMarketplaceClient } from '@/hooks/useMarketplaceClient';
import { ApplicationContext } from '@sitecore-marketplace-sdk/client';
import { useState, useEffect } from 'react';

export default function Home() {
    const { client, error, isInitialized } = useMarketplaceClient();
    const [appContext, setAppContext] = useState<ApplicationContext | null>(null);

    useEffect(() => {
        if (isInitialized && client) {
            client.query('application.context')
                .then((res) => {
                    if (res.data) {
                        console.log('Application context:', res.data);
                        setAppContext(res.data);
                    }
                })
                .catch((err) => console.error('Query failed:', err));
        }
    }, [isInitialized, client]);

    if (error) {
        return <div>Error initializing SDK: {error.message}</div>;
    }

    if (!isInitialized) {
        return <div>Initializing Marketplace SDK...</div>;
    }

    return (
        <div>
            <h1>My Marketplace App</h1>
            {appContext && (
                <div>
                    <p>Organization: {appContext.organization.name}</p>
                    <p>User: {appContext.user.email}</p>
                </div>
            )}
        </div>
    );
}
That's it. You now have a working
Marketplace app that can communicate with Sitecore.
3. Queries, Mutations, and
Subscriptions
The SDK provides three main ways to
interact with Sitecore APIs
1. Queries: Reading Data
Queries are used to retrieve data from
Sitecore. Here are some common examples:
// Get application context
const contextResult = await client.query('application.context');

// Get list of sites
const sitesResult = await client.query('sites.list', {
    contextId: appContext.tenant.id
});

// Get a specific page
const pageResult = await client.query('pages.get', {
    contextId: appContext.tenant.id,
    pageId: 'your-page-id'
});
2. Mutations: Writing Data
Mutations are used to create,
update, or delete data in Sitecore:
// Create a new template
const templateResult = await client.mutate('templates.create', {
    contextId: appContext.tenant.id,
    name: 'My Custom Template',
    baseTemplates: ['{1930BBEB-7805-471A-A3BE-4858AC7CF696}']
});

// Create a new item
const itemResult = await client.mutate('items.create', {
    contextId: appContext.tenant.id,
    parentId: 'parent-item-id',
    templateId: 'template-id',
    name: 'My New Item',
    fields: {
        Title: 'My Item Title',
        Text: 'My item content'
    }
});

// Delete an item
await client.mutate('items.delete', {
    contextId: appContext.tenant.id,
    itemId: 'item-to-delete'
});
3. Subscriptions: Real-Time
Updates
Subscriptions
allow your app to receive real-time updates when data changes in
Sitecore. This is particularly useful for Page Builder
extensions:
// Subscribe to page changes
const unsubscribe = client.subscribe('pages.changed', (data) => {
    console.log('Page changed:', data);
    // Update your UI accordingly
});

// Don't forget to unsubscribe when your component unmounts
useEffect(() => {
    return () => {
        if (unsubscribe) {
            unsubscribe();
        }
    };
}, []);
4. Context Management: Application vs. Pages
The SDK provides two types of context:
Application
Context is
available in all extension points and
includes:
- Tenant and resource
IDs
- Environment
details
- User information and
permissions
- Organization
data
Pages
Context is
only available in Page Builder extension points and
includes:
- Current page
information
- Site details and
configuration
- Real-time updates via
subscriptions
Understanding which context is
available in your extension point is crucial for building the
right user experience.

Example of both contexts as they feed the Page Content Panel Extension point
Server-Side Logic with
Next.js
For full-stack apps, you'll need to
make server-side API calls to Sitecore. The SDK provides an
experimental server-side client for this
purpose:
// app/api/items/route.ts
import { experimental_createXMCClient } from '@sitecore-marketplace-sdk/xmc';
import { NextRequest, NextResponse } from 'next/server';

export async function POST(request: NextRequest) {
    try {
        // Get the access token from the Authorization header
        const authHeader = request.headers.get('Authorization');
        if (!authHeader) {
            return NextResponse.json(
                { error: 'Missing authorization' },
                { status: 401 }
            );
        }

        const accessToken = authHeader.replace('Bearer ', '');

        // Get the context ID from the request body
        const { contextId, itemData } = await request.json();

        // Create the XMC client
        const xmcClient = experimental_createXMCClient({
            accessToken,
            contextId
        });

        // Make the API call
        const result = await xmcClient.items.create({
            parentId: itemData.parentId,
            templateId: itemData.templateId,
            name: itemData.name,
            fields: itemData.fields
        });

        return NextResponse.json(result);
    } catch (error) {
        console.error('Server-side API call failed:', error);
        return NextResponse.json(
            { error: 'Failed to create item' },
            { status: 500 }
        );
    }
}
The
key pattern here is:
- Get the access
token from
the Authorization header
- Get the context ID
from the
request
- Create the XMC
client with
both
- Make your API
calls
- Handle errors
appropriately
Styling: Blok vs.
shadcn/ui
Sitecore recommends using
Blok,
their official design system, for Marketplace apps. Blok
ensures your app looks and feels like a native part of
Sitecore, and it includes built-in accessibility
compliance.
However, many developers
(myself included) prefer
shadcn/ui
for
its flexibility and modern design. There's even a
project called
blok-shadcn
that
combines the best of both worlds, providing shadcn/ui
components styled to match Sitecore's design
language.
For my
AI Challenge app, I used shadcn/ui with custom
Sitecore-inspired theming, and the results have been
excellent.
Development Best
Practices
After
building several Marketplace apps, here are some best
practices I've learned:
1. Local
Development with Hot Reload
During
development, set your deployment URL to
https://localhost:3000
(or
whatever port you're using). This allows you to test
your app in the actual Sitecore UI while developing
locally. You'll
need to use HTTPS, even locally. For Vite apps, use
vite-plugin-mkcert.
For
Next.js, use
mkcert
to
generate self-signed certificates.
2. Start
Simple, Add Complexity Gradually
Don't
try to build a full-stack app with AI integration on
your first attempt. Start with a simple client-side app
that displays some data. Get comfortable with the SDK,
understand the extension points, and then add
complexity.
3. Leverage
TypeScript
The
SDK is built with TypeScript, and the type definitions
are excellent. Use them. They'll save you hours of
debugging and make your code more
maintainable.
4. Handle
Errors Gracefully
The
Marketplace SDK can throw errors for various reasons:
network issues, authentication problems, invalid
queries, etc. Always handle errors gracefully and
provide meaningful feedback to
users.
5. Test
in Multiple Environments
Make
sure your app works in all the environments where it
will be used: local, dev, staging, and production. Pay
special attention to CORS issues and authentication edge
cases.
Hosting and
Deployment
Since
you host your own apps, you have complete control over
your deployment strategy. Here are some popular
options:
- Vercel:
Excellent for Next.js apps. Automatic deployments
from Git, great performance, generous free
tier.
- Netlify:
Great for static sites and Vite apps. Easy to set
up, good CI/CD
integration.
- Azure Static
Web
Apps:
Good choice if you're already in the Azure
ecosystem.
- AWS
Amplify:
Another solid option with good integration with
other AWS services.
For my
AI Challenge app, I'm using Vercel, and the deployment
workflow is seamless: push to Git, and Vercel
automatically builds and deploys.
Learning Resources: A New Developer Course
To
further support the community, the Sitecore Learning
team is releasing a new developer course for the
Marketplace. While the course isn't available yet, you
can see the announcement from Learning Team on
LinkedIn.
This
is a fantastic initiative that will help onboard even
more developers to the Marketplace
ecosystem.
My AI
Challenge Experience: Lessons
Learned
Participating in the AI
Challenge has been an incredible learning experience.
Our proposal made us to the finals, and today I'm
completing the final submission.
Here are some key
lessons I've learned:
- The
Marketplace enables rapid
innovation. I was
able to go from idea to working prototype in a matter of
days, not weeks or months.
- The SDK is that
good.
- Full-stack architecture is
essential for AI
apps. If
you're building anything that involves AI services,
you'll need server-side logic.
- The experimental XMC
client makes this straightforward.
My team and I ended up creting an AI marketplace extension that optimizes any of your page-under-edit for the agentic engines, by creating brand-aware content that will be consumed by agents parsing the site and therefore - affecting its LLM's output. IT also suggests how this page could get optimized according to schema.org markup for the better LLM parsers consumption:
Throughout the challenge, I've been in contact with
other developers, sharing ideas and solving problems
together. This is what makes Sitecore and its community very special.
What's
Next?
The Sitecore Marketplace is more than just a new feature; it's a fundamental shift in how Sitecore approaches product development. By empowering the community to build and share apps, Sitecore is effectively multiplying their own development capacity. This is brilliant strategy.
The community has always been Sitecore's greatest strength. We've built modules, shared knowledge, and pushed the platform forward for years. The Marketplace is Sitecore's way of saying:
"We trust you. We value you. Let's build the future together."
If
you're a Sitecore developer or architect, I encourage
you to start exploring the Marketplace today. Build
something small, get comfortable with the SDK, and then
tackle something more ambitious. The barrier to entry is
low, and the potential is enormous.
What
will you build? A custom field? A dashboard widget? An
AI-powered content assistant?
The possibilities are
endless. I'd
love to hear your thoughts.