Not many people know that IIS itself can serve as Reverse Proxy, with rewriting URLs on-the-fly. We are going to take a look on how to configure that feature. Let's assume we have 2 websites - primary website that has URL http://test2/ and is a hosted by IIS, moreover there is an instance of Sitecore installed; and another external static website that has URL http://external/ and it has few static pages and resources. For this experiment I got external website hosted at the same IIS instance, while in reality it can be literary anything and anywhere.
Apart from having IIS, you will need the following prerequisite:
- URL Rewrite Module installed, version 2.0
- Application Request Routing version 2.0
The easiest way to get all the prerequisites is to install them through Web Platform Installer. It will install all of them so you'll just need to have IIS refreshed and get ready to start.

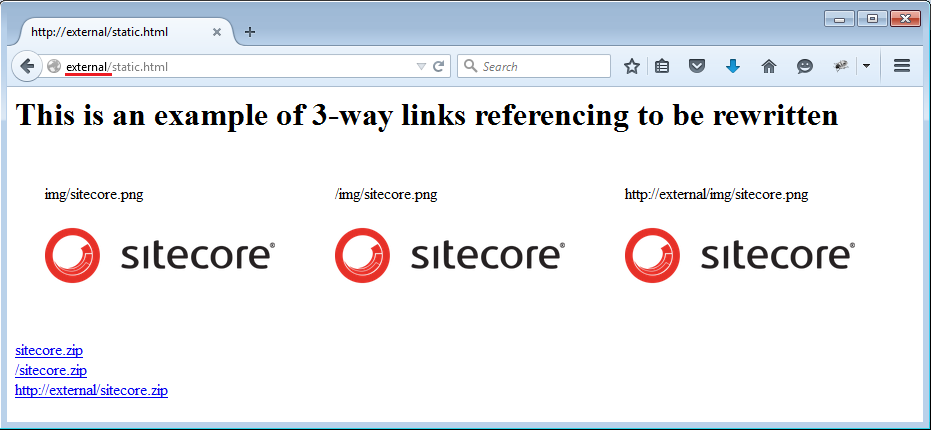
External website contains static.html file with the following code
<div>
    img/sitecore.png<br>
    <img src="img/sitecore.png" alt="sitecore" width="230" height="106">
</div>
<div>
    /img/sitecore.png<br>
    <img src="/img/sitecore.png" alt="sitecore" width="230" height="106">
</div>
<div>
    http://external/img/sitecore.png<br>
    <img src="http://external/img/sitecore.png" alt="sitecore" width="230" height="106">
</div>
<p>
    <a href="sitecore.zip">sitecore.zip</a><br>
    <a href="/sitecore.zip">/sitecore.zip</a><br>
    <a href="http://external/sitecore.zip">http://external/sitecore.zip</a><br>
</p>
This code has 3 images and 3 links to an archive file, each of them is either relative link (from the doc level, for sure) or absolute link (from web root) or fully qualified link including domain name and protocol. This HTML renders renders into the following screenshot:
Our objective is to have a "virtual" "folder" called ext on the test2 website so that it "mapped" to external website and also correctly "maps" and rewrites all the resources of external website on resulting page.
Example:
When we hit http://test2/ in browser - we get default Sitecore page as it is provided by Test2 website, as normally.
When we hit http://test/ext/static.html - we get the page at that URL but with the content of external/static.html page with all links and references rewritten to be test2/ext/*.* instead of external/*.*
So, to make IIS Rewrite work as reverse Proxy, let's do the following steps:
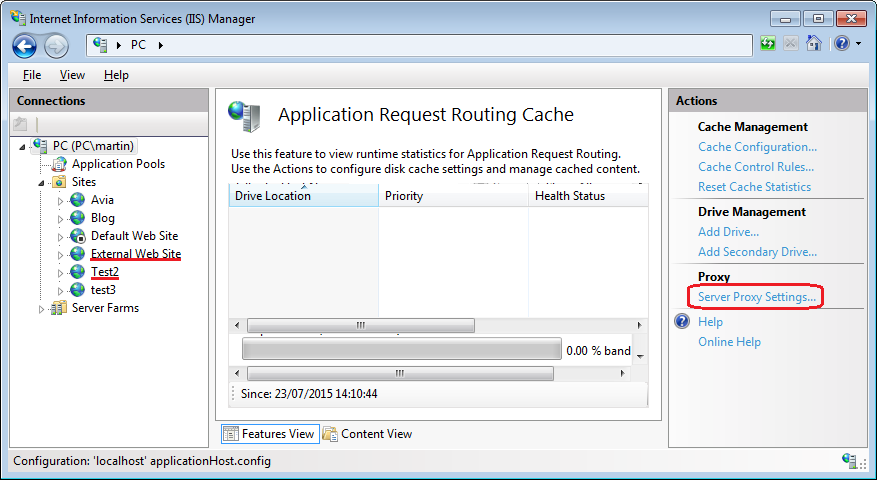
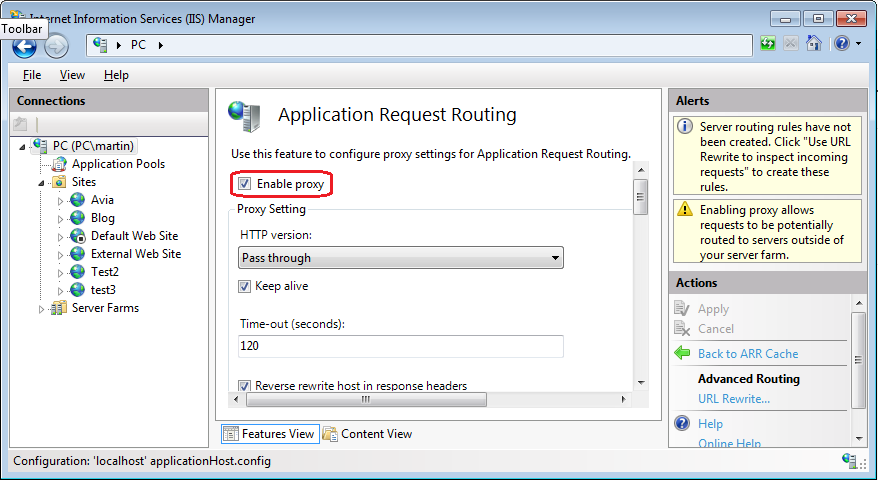
Make sure "Enable proxy"is checked, otherwise nothing will work.
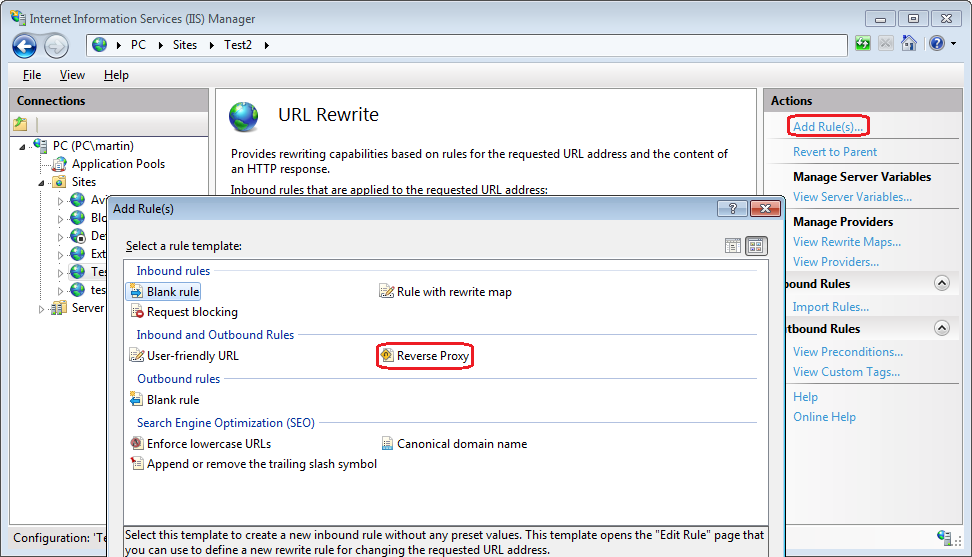
In URL Rewrite section, click "Add Rule(s)" link, then from popup screen select "Reverse Proxy" and specify the rule. Also check outbound rules as the are rules that factually rewrite internal links. Please note that this function may add some overhead to your website performance.
After you specify the rules - one inbound and 2 outbound (they are shown below) - reverse proxy now functions and you may verify that by requesting the following ULR (as on the screenshot below):

Notice, that all links and images look correct, as the were before. To ensure they were rewritten correctly, let's view the source file of resulting page. Here is it:
<div>
    img/sitecore.png<br>
    <img src="img/sitecore.png" alt="sitecore" width="230" height="106">
</div>
<div>
    /img/sitecore.png<br>
    <img src="http://test2/ext/img/sitecore.png" alt="sitecore" width="230" height="106">
</div>
<div>
    http://external/img/sitecore.png<br>
    <img src="http://test2/ext/img/sitecore.png" alt="sitecore" width="230" height="106">
</div>
<p>
    <a href="sitecore.zip">sitecore.zip</a><br>
    <a href="http://test2/ext/sitecore.zip">/sitecore.zip</a><br>
    <a href="http://test2/ext/sitecore.zip">http://external/sitecore.zip</a><br>
</p>
As there were no need to rewrite relative URLs - they remain untouched. However root-folder URL and full URL were rewritten to satisfy new domain name and desired folder-path.
And finally, here is resulting configuration that makes it all work. Whatever we have previously configured is stored in the configuration file within system.webserver node in rewrite section:
<rewrite>
      <rules>
        <clear></clear>
          <rule name="ReverseProxyInboundRule2" stopprocessing="true">
            <match url="(ext)/(.*)?"></match>
              <conditions>
                  <add input="{CACHE_URL}" pattern="^(https?)://"></add>
              </conditions>
              <action type="Rewrite" url="{C:1}://external/{R:2}"></action>
          </rule>
      </rules>
      <outboundrules>
        <rule name="ReverseProxyOutboundRule2" precondition="ResponseIsHtml1">
          <match filterbytags="A, Form, Img" pattern="^/(.*)" negate="false"></match>
          <action type="Rewrite" value="http://test2/ext/{R:1}"></action>
        </rule>
        <rule name="ReverseProxyOutboundRule1" precondition="ResponseIsHtml1">
          <match filterbytags="A, Form, Img" pattern="^http://external/(.*)?" negate="false"></match>
          <action type="Rewrite" value="http://test2/ext/{R:1}"></action>
        </rule>
        <preconditions>
              <precondition name="ResponseIsHtml1">
                  <add input="{RESPONSE_CONTENT_TYPE}" pattern="^text/html"></add>
              </precondition>
          </preconditions>
      </outboundrules>
    </rewrite>
There is no need to use visual configurer at all, you may just drop this snippet on web.config into appropriate section and it will start working straight away!