I am proud to be chosen as a presenter at SUGCON 2022 which took place in Budapest.
This blog post contains the supporting material for my topic "The Mastery of Sitecore Upgrades".
Content
Why upgrade?
Why do we upgrade Sitecore given it is not that quick and easy? The answer is simple – a carrot and a stick motivation!
The Stick: every New Year Mainstream support expires for one or a few versions. This means Sitecore still provides security updates and fixes, they do not support development and compatibility queries. Read more details about it at Sitecore Product Support Lifecycle.
Now, the Carrot: companies update due to the new features or new experiences. For example, you may read a detailed article I wrote about those in the latest version - New features in 10.2 you must be aware of.
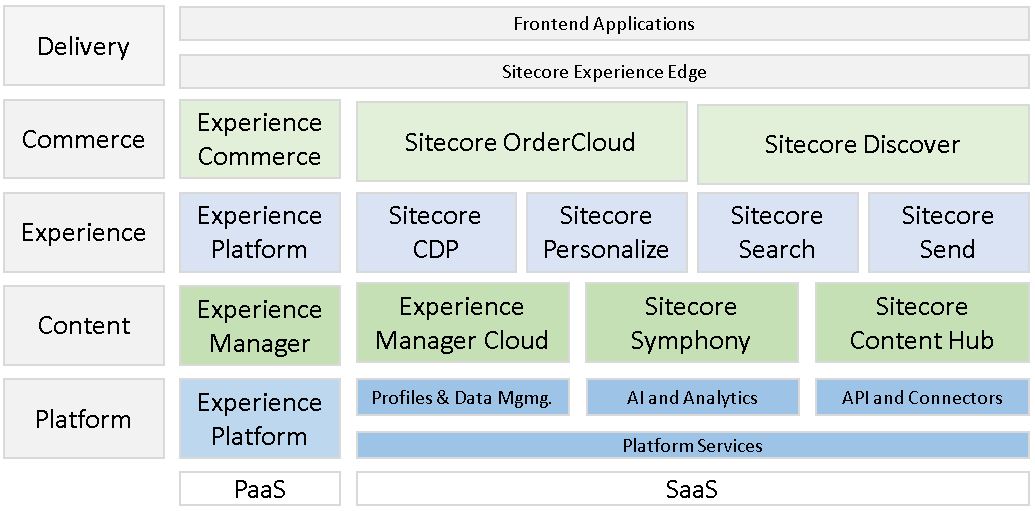
Also, having the latest version is especially valuable in front of Composable DXP, which already takes place:
Planning the upgrade
Propper planning is the key to success. How do we perform the planning and what should be considered?
1. Upgrading vanilla Sitecore would cost you minimal effort, but with the more custom code you have - the more labor is expected to commit. How much is it customized? These will affect your timescale and impose additional risks which is better to know in advance.
2. If you get access to any of the existing documentation - that would be a perfect place to start. And it will likely give some answers to the previous point.
Find the details about all environments, code branches, and which code branch is deployed to which environment. Also, you will be interested in the details about existing CI/CD pipelines.
3. Find the custom configurations made into the Sitecore.
4. Finally, talk to stakeholders! Who if not they know the details and are the most interested in the success!
5. It sounds logical that the more versions you jump through – the more complicated the upgrade process will be.
However, that isn’t a rule of thumb - some versions have very minor changesets and could be updated with minimal effort. Others - the opposite, could be difficult as hell.

For example, it is the exact reason 9.3 stands out from this version chain. It happened that it took most breaking changes, deprecations, and internal housekeeping improvements than any other version did.
6. Because of that, one of the most valuable planning activities - investigating Release Notes for every single version on your upgrade path. Pay special care to these two sections: Deprecated/Removed & Breaking changes.
7. Identify the functionalities which are no more supported including any third-party add-ons/modules and find their alternatives.
8. With new platform features license file format changes with time. Even with the most permissive license, your old license file may be incompatible with the newer platform. That for example happened when version 9 was released.
It is good to care about that in advance, as the process takes some time. Please check that with your account manager.
9. Every solution is unique, and the same unique the teams are. Estimates must consider these factors, along with previous relevant experience of your team. Make sure you will have the resources for the whole duration of the upgrade also care about the fallback plan if someone gets ill or leaves (also known as "bus factor").
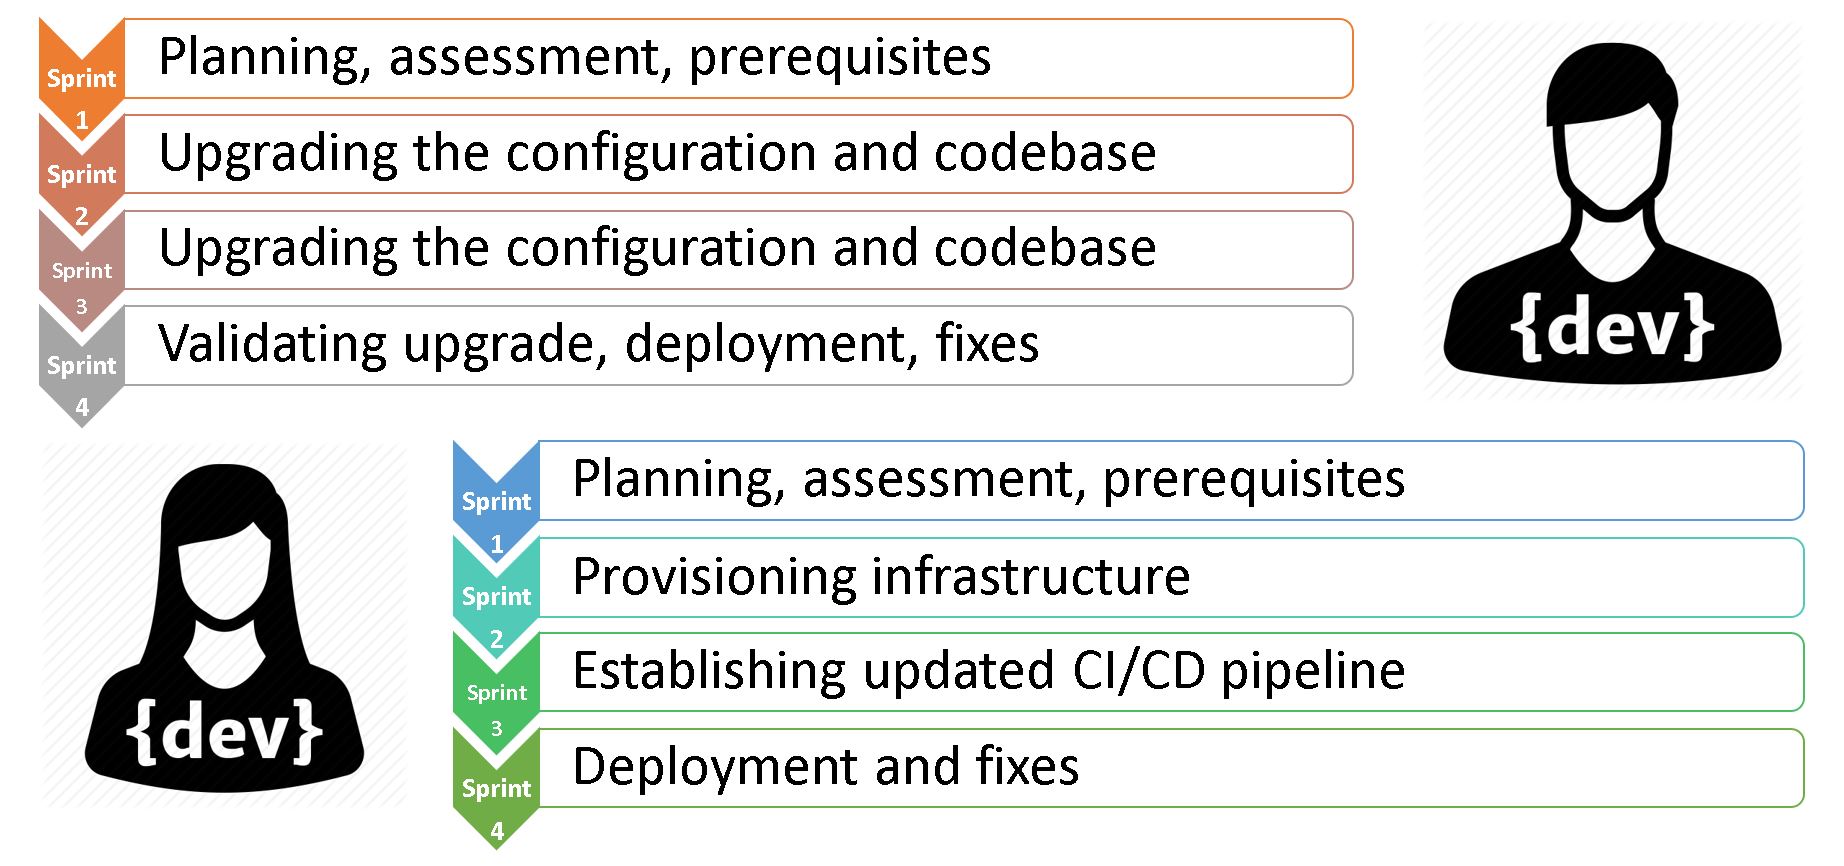
This diagram shows a very optimistic view of the team of two experienced Sitecore professionals, performing the upgrade in 4 typical sprints. While sharing the pool of tasks with each other, one of them is primarily focused on the codebase, while another more cares about DevOps things.
Once again, this is not guidance or any sort of assessment. But just a high-level view of teams’ activity through sprints.
10. Also take a look at Sitecore compatibility guide to ensure all your planned tech spec stays valid.
Recap legacy tools
Before heading to the upgrade tactics, let’s quickly recap some upgrade tools we did have over time and how they performed.
1. Express Migration Tool
You can use Sitecore's Express Migration Tool to move over data from your old instance to your new one. It supports migrating from previous old versions to Sitecore 9 initial version. Express Migration Tool copies items and files from one Sitecore instance at a time.
The Sitecore Express Migration Tool copies items and files from one Sitecore instance at a time. The tool supports the migration of remote servers.
2. The update Center
Update Centre was introduced in Sitecore 9.0 Update 2 and is valid up to Sitecore 10.1.
You can find, download, install, and manage updates and hotfixes for the Sitecore platform and Sitecore modules. The Update Center accesses a package management service provided by Sitecore, or you can install and provide a service yourself.
The Sitecore Update Center uses this URL of the Package Management Service to check for the Sitecore updates:
<add name="PackageManagementServiceUrl" connectionString="https://updatecenter.cloud.sitecore.net/" />
Upgrade tactics
Next, let’s talk through some upgrade tactics that can significantly help your upgrade process.
1. Affixing the states and being able to switch between them as quickly as possible is crucial for productivity when working on instance upgrades. Small mistakes are inevitable and we actually need some sort of Undo button for the whole process.
We already have this for the codebase – git, with its ability to switсh between the branches.
But what about the published sites, indexes, certificates, and the rest of the minors that matter? Even database backups are not that fast and straightforward.
The one and only solution that comes into mind is fixing the whole state of a working machine. Something that one could have with a Virtual machine. Luckily, we have at least one suitable technology:
2. Hyper-V
Actually, this ticks all the boxes:
- free and included in Win Pro
- extremely fast with SSD
- maximum OS integration
- move backups between hosts
- perfect networking options
- remote management
- universal virtual drives
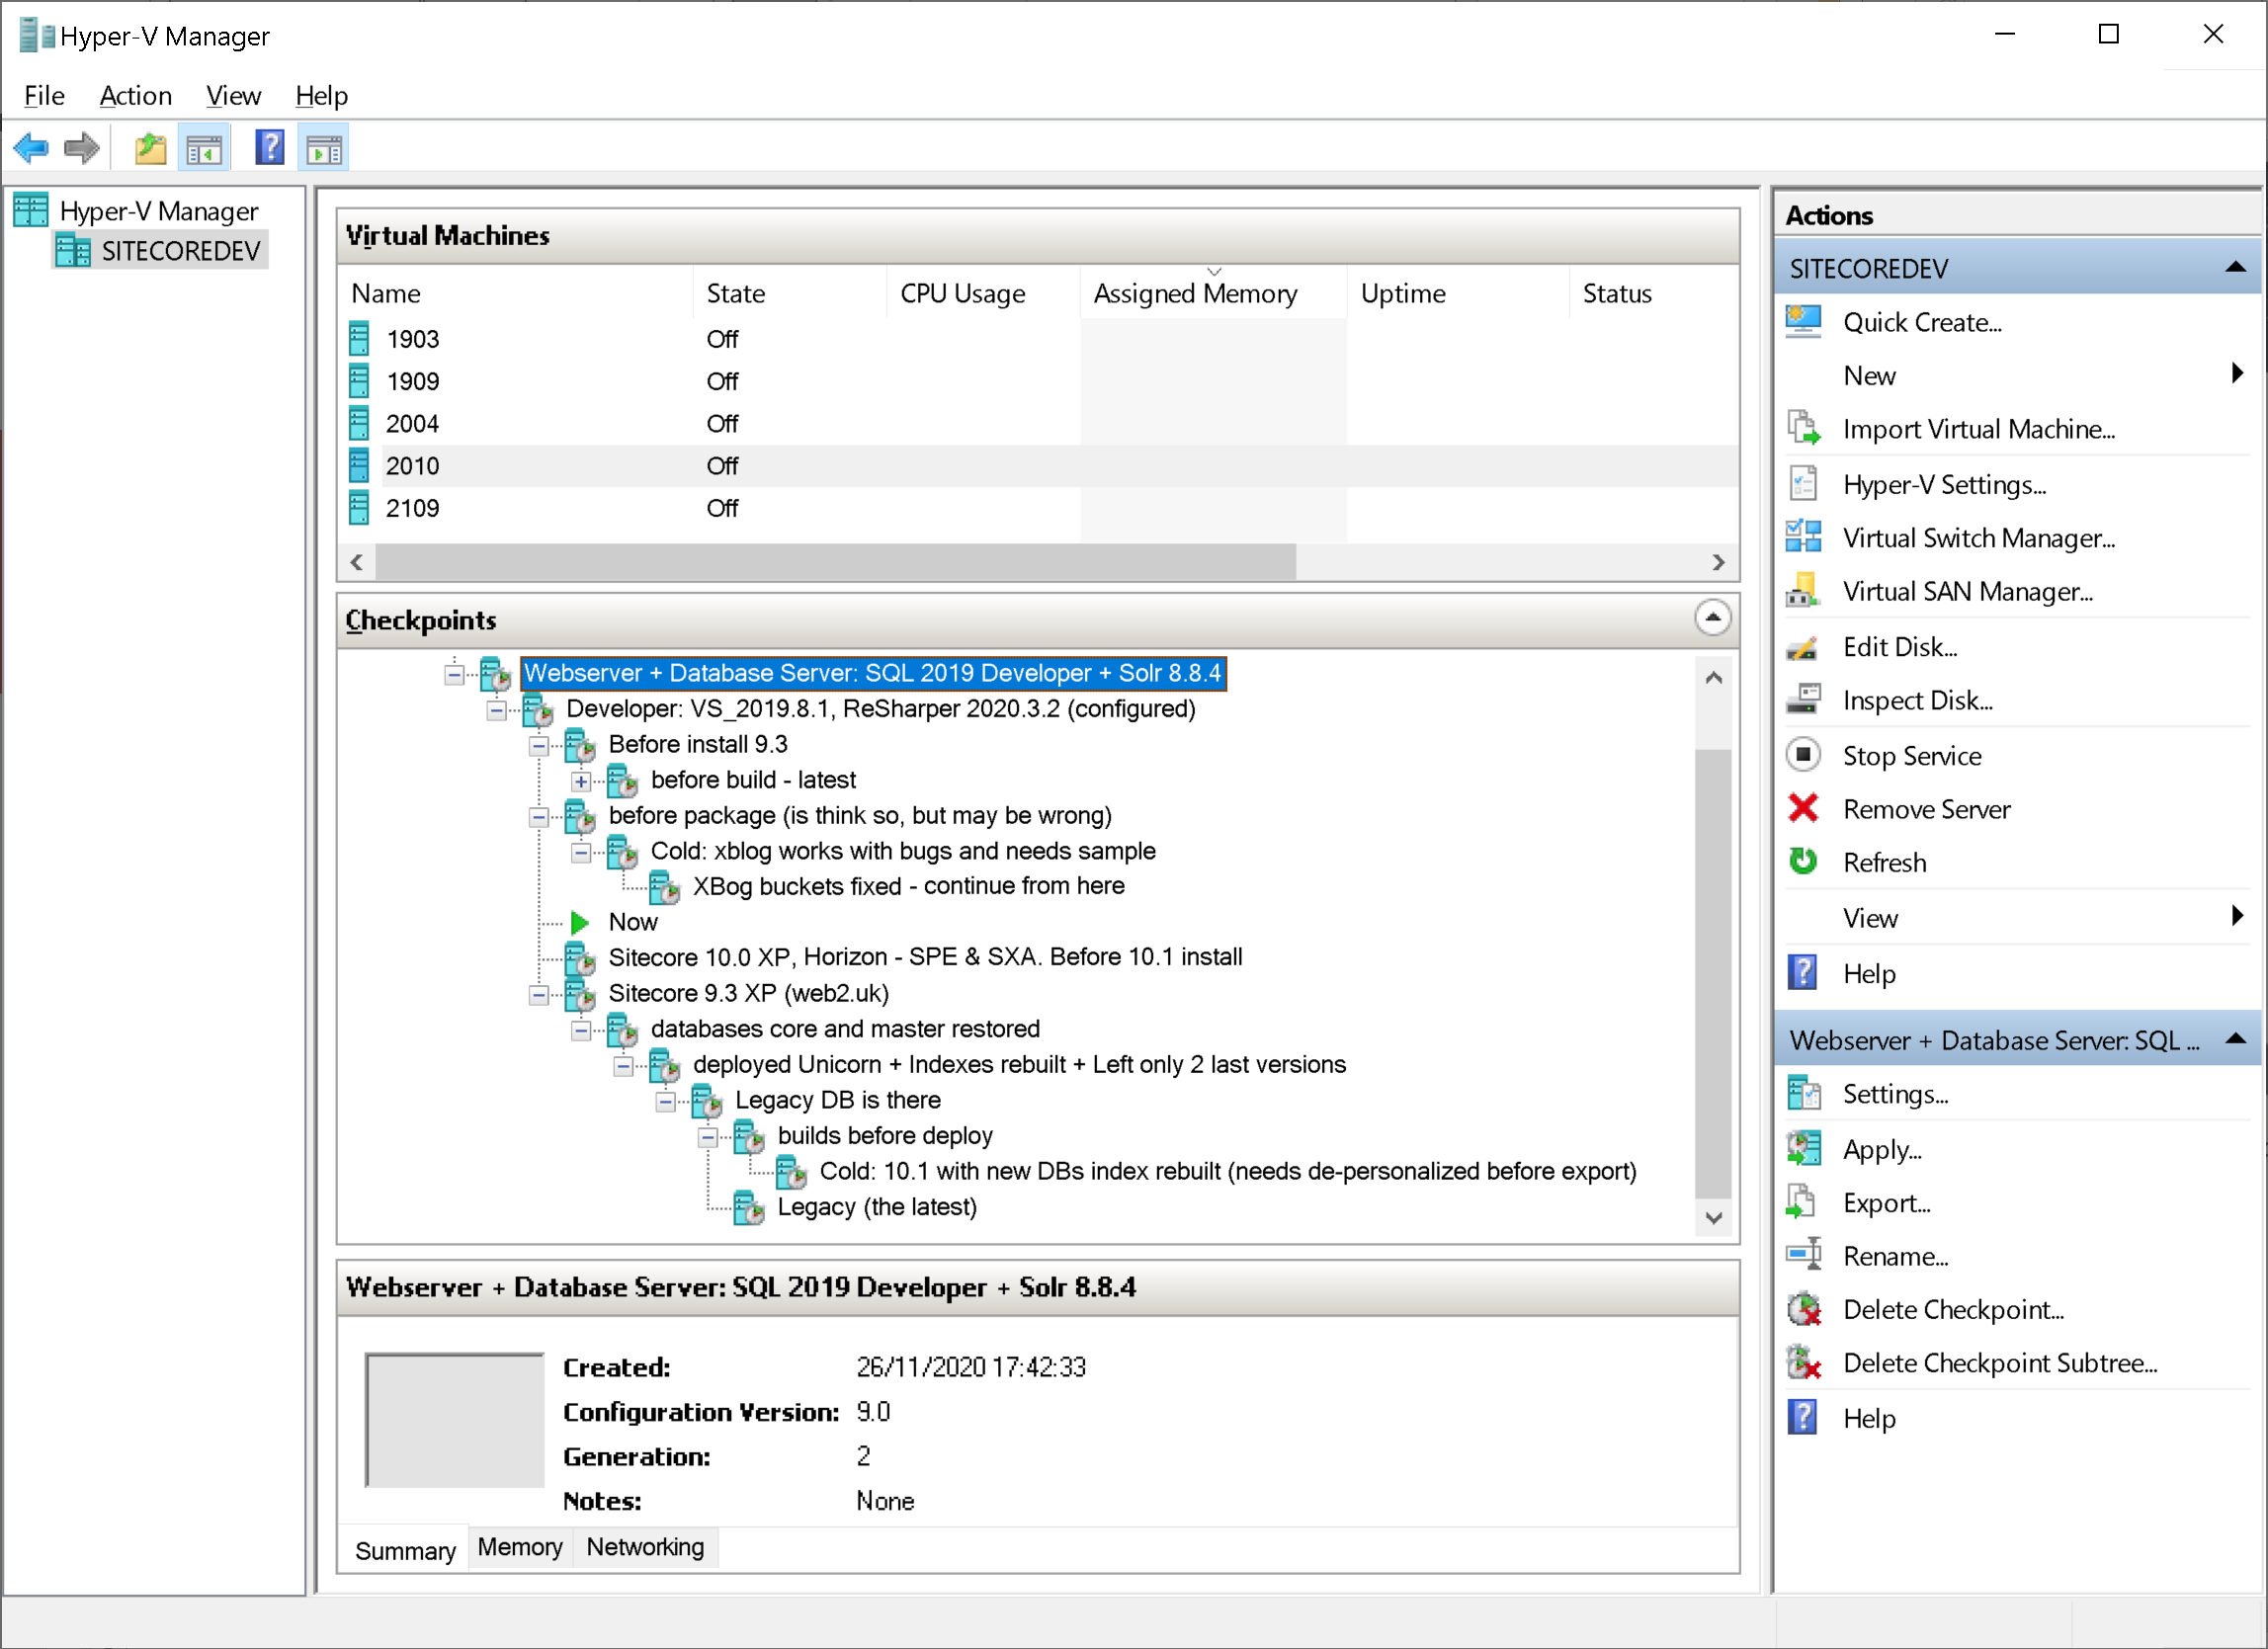
However, you will need a relatively fast SSD and you should mind the disk space – it easily gets eaten out by multiple snapshots as you progress. Having a 1TB drive is probably the minimum you'd need to have for productive work on and upgrade.
3. Leverage PowerShell
Now we are confident with reverting bad things quickly. But how about redoing successful steps? With a lot of monotonous and repetitive actions, one could lose very much valuable time for things they will re-do again and again.
Let’s think about the case when someone spent the last 2 hours upgrading NuGet references for a Helix solution with 100 projects in it. Unfortunately, at last-minute something went totally wrong - restoring to the latest Hyper-V checkpoint will take less than a minute, but should one repeat these monotonous steps again and again?
One could think - why not to make restore point more often. Well, creating a restore point for every minor step seems to be an overkill here, an also Hyper-V will quickly eat out all of your disk drive space.
It is fairly difficult to perform an upgrade of everything from the first attempt. We will have to repeat the successful steps, again and again, so the only matter would be automating them. PowerShell built in the OS is the best and natural fit for such activities. You can leverage PowerShell for:
- Any sort of automation, system tasks and jobs
- Mass replace configuration and code with RegEx
- Backup and restore databases and web application
- Managing you infrastructure: either local or cloud
- Leveraging SPE Remote to operate your instance: Managing content, security, publishing, and indexing
So what would and could be a good idea to write these scripts for? In addition to the above points, consider scripting some activities that take longer to complete and/or which result in a minor textual change in files.
Returning to the above case os upgrading NuGet references in a large solution, that took 2 hours to complete - on your disk it ends up with just a few lines of difference in a project or packages file. That means, comparing the difference “before and after” (with a diff tool) it is fairly easy to use PowerShell in order to process all such files performing regular expression replace. Not being a master of regular expressions, you're unlikely to succeed from the first attempt, but with a quick and easy checkpoint restore option you’ll quickly master it. Also, you'll end up with the artifacts: successful scripts that could be used for your future upgrades with minimal or no alterations.
I wrote a good long article about PowerShell best practices and all the aspects of leveraging this built-in scripting language. It is a long read, but highly valuable.
4. Quick Proof-of-Concept
In some cases, when you are performing a jump to the following version (or maybe a few) and if your solution is relatively simple staying close to vanilla Sitecore, it makes sense to pitch PoC. That will either give you a quick win or if not - then at least will identify most of the traps and things to improve. Having those open up better opportunities for planning.
Ideally, it should be a one-day job for a single professional.
5. Try to get a recent backup of a master database
It’s a highly desirable thing to obtain a relatively recent backup of the master database. I do realize, it is not always possible to do: sometimes due to the large size or more often because of the organization's security policy, especially when you're working for a partner agency or being an external contractor.
But why do you need that?
First of all, you restore it along with the existing solution to verify the codebase you've obtained performs exactly the same and on the published website(s). Of course, if you work for a given organization and were standing in charge of the project under upgrade from day one - this step could be dismissed, as you fairly know the codebase, infrastructure, the history of decisions taken over the project lifetime, and most of the potential traps.
But what is more important, you will need to upgrade and use this database with a new solution instance to ensure that also looks and works as it functioned before. That would help you eliminate most of the unobvious bugs and errors just before regression testing starts, which will save lots of time.
A good example from my own experience: I committed and upgrade from 8.2.7 to 10.0.1 and everything seemed to be successful. I used an upgraded full master database, I was visually comparing old sites running at the existing production with those I have locally upgraded to the latest Sitecore. Accidentally I spotted that some small SVG icons were missing from an upgraded site. Escalating this issue brought me to one of the breaking changes that would be difficult to spot - the codebase builds, no runtime errors, and no obvious logs issues.
6. What if a newer Sitecore release comes while you’re upgrading?
The upgrade process takes a decent amount of time and it may be a case when a new Sitecore version released meanwhile. My best advice will be to stick to the newer version.
Just take it!
First of all, it may be not be an easy task from an organizational point of view, especially if you are working for a partner rather than an end client and the version has been signed off. It will take lots of effort to persuade stakeholders to consider the latest version instead, and you have to motivate your argument pretty well.
Upgrading the solution to the newer build when you a halfway done upgrading to a previous one adds some time but will cost times less than upgrading once you go live. It will be a good idea in most of the cases with the only exclusion of the main component getting deprecated in the newer version (for example once I was upgrading to 9.0.2 and then 9.1 has been released, but due to large usage of WFFM it was not possible to easily jump to 9.1 as WFFM was deprecated). Otherwise, we should have chosen a newer version.
Choosing a newer version in fact could cost you even less. That happened to me while upgrading to 10.0.1 when the newer 10.1 got released. Switching to 10.1 from 10.0.1 would cost me very little effort, and also would reduce operational efforts due to the specific advantages of Sitecore 10.1 - but unfortunately, the decision chain to the stakeholders was too long (I was subcontracted by an implementing partner), and that never happened.
7. Take comprehensive notes
Last but not least advice may seem to be obvious, but please take it seriously. Please document even minor steps, decisions, and successful solutions. You will likely go through them again, and maybe several times. Save your
scripts either.
An even better job would be if you could wrap all your findings
into a blog post and share the challenge and solution with the rest of the
world. Because of our blogs being indexed, you’ll help many other people. Several
times in my career I googled out my own blog posts with the solution while facing
a challenge and googling it out.
Content migration
When asking my colleagues what was the biggest challenge with their upgrade experience, almost everyone responded - migrating the content.
1. Content maintenance
Depending on your level of ownership, it may be a good idea to undertake content maintenance. This is optional but desirable.
Remove legacy version - it is a know good practice to keep less than 10 versions per item improving content editing performance. Once I saw 529 versions of the site's Home item and doubted the authors did need them all.
You can remove legacy items manually by running the SPE script (Rules Engine Actions to Remove Old Versions in the Sitecore) or perform that on a regular basis by creating a Rule in Rules Engine to automatically keep a number of versions less than the desired number (PowerShell Extensions script to delete unused media Items older than 30 days).
Clean up Media Library as it is the most abused area of content, typically. Untrained or simply rushing editors often place content without any care. Almost every single solution I’ve seen had some issues with the media library: either messed up structure, lots of unused and uncertain media, or both. These items are heavyweight and bloat database and content tree without bringing any benefit. We got a PowerShell Extensions script to list all media items that are not linked to other items, so having those you may revise the list and get rid of those unwanted ones.
You may also want to clean up broken links prior to doing an upgrade. Sitecore has an admin page that allows removing broken links. You can find it in the Admin folder: RemoveBrokenLinks.aspx - just select the database and execute the action.
From 9.1 default Helix folders comes OOB with databases so became universal. But lots of Helix solutions were implemented before and their folders IDs do not match those coming OOB in later versions.
For example, the existing solution also has folders like /sitecore/Layout/Renderings/Feature but they are not coming out of the box and therefore serialized, but what is even worse - having different IDs from those coming OOB that are now universal.
You’ll need to rework serialization to match the correct parent folders coming OOB.
2. Content migration options
In fact, you've got plenty of options to migrate the content. Let's take a look at what they are.
Sitecore Packaging
This is the default way of occasionally exchanging items between instances known to every developer. However, it is extremely slow and does not work well with large packages of a few hundreds of megabytes.
Sidekick
Is free and has a Content Migrator module using Rainbow serialization format to copy items between instances in a multi-threaded way. Unlike packages it super-fast. Keep in mind that both servers need to have the content migrator installed on them.
Razl
Offers quite an intelligent way of copying items between the servers. However, this software is not free and requires a license to run.
Sitecore PowerShell Migration
Move an item to another database from Control Panel
If none of the above options work for you, there is a built-in tool to copy items between databases that is part of the Control Panel. The trick is to plug the target database as an external database to an instance so that it becomes seen in Sitecore, then you’ll be able to copy items using this option. It has limited functionality and works reasonably slow, but allows copying data both ways.
If you are migrating content to version 10.1 or newer, there is a much better way of dealing with a content and database upgrade, which I will explain in detail below.
3. Content Security
There are a few options to transfer Users and Roles from one instance to another.
Sitecore Packages
You can use the standard Package Designer from the Development Tools menu in the Sitecore Desktop. You can then add the Roles and Users that you want to package up for migration, generate the package, download it and then install it at the target instance in the same way you would do for content.
Serialization
An alternative is to use the Serialization option from within the User Manager and Role Manager applications. The users and roles will be serialized to (data)/serialization/security folder. You can copy this from the source instance to the target instance and then use the revert option.
For both of these options, the user's password is not transferred and instead reset (to a random value when using Sitecore Packages or to "b" when using serialization).
How to deal with passwords?
You can then either reset the password for the users manually (from the User Manager ), or the users themselves can reset the password by the "forgot your password" option from the login screen, assuming the mail server has been configured and they get password recovery email.
You also have the option to use the admin folder TransferUserPasswords.aspx tool to transfer the passwords from the source and target databases. To do so you will need both connection strings and these connections must have access enabled. Read more about Transferring user passwords between Sitecore instances with TransferUserPasswords.aspx tool.
Raw SQL?
Without having the required access, you could do that manually with SQL. The role and user data are stored using ASP.NET Membership provider in SQL Server tables in the Core database. Please note that Sitecore 9.1 and newer Membership tables could be extracted from Core into their own isolated Security database (moving Sitecore membership data away from Core db into an isolated Security database).
So it is possible to transfer the roles and users with a tool such as Redgate SQL. You will need to ensure you migrate user data from the following tables:
aspnet_Membership
aspnet_Profile
aspnet_Roles
aspnet_Users
aspnet_UsersInRoles
RolesInRoles
You may adjust and use SQL script to migrate content security when both source and target DBs are on the same SQL server. Also, follow up on a StackExchange answer about Moving users/roles/passwords to a new core database (by Kamruz Jaman).
4. Dynamic placeholders format
From version 9.0 they became an integral part of the platform, unlike previously we used 3-rd party modules. However, Sitecore has implemented its own format of addressing components: {placeholder key}-{rendering unique suffix}-{unique suffix within rendering}
That means your previous layouts will not be shown on the page unless you update presentation details for these differences otherwise the renderings. For example, if you have a component on a page in an old dynamic placeholder format, you need to change it from:
main_9d32dee9-17fd-4478-840b-06bab02dba6c
to the new format, so it becomes:
main-{9d32dee9-17fd-4478-840b-06bab02dba6c}-0
There are a few solutions how to approach that
- with PowerShell Extensions (by Rich Seal)
- by creating a service (or admin folder) page: one, two
Also, you no longer need a 3-rd party implementation module, so remove it (both DLL and its config patch file). Its functionality was "moved" into built-in Sitecore MVC libraries which you of course need to reference from web.config:
<add namespace="Sitecore.Mvc"/>
<add namespace="Sitecore.Mvc.Presentation"/>
Read more: an official guide on dynamic placeholders
Upgrading codebase
The most central part of my presentation comes about upgrading the actual codebase and the challenges with it. To start with I want to share two useful tips to identify the customization of a given project.
Trick 1 on how to Identify customization
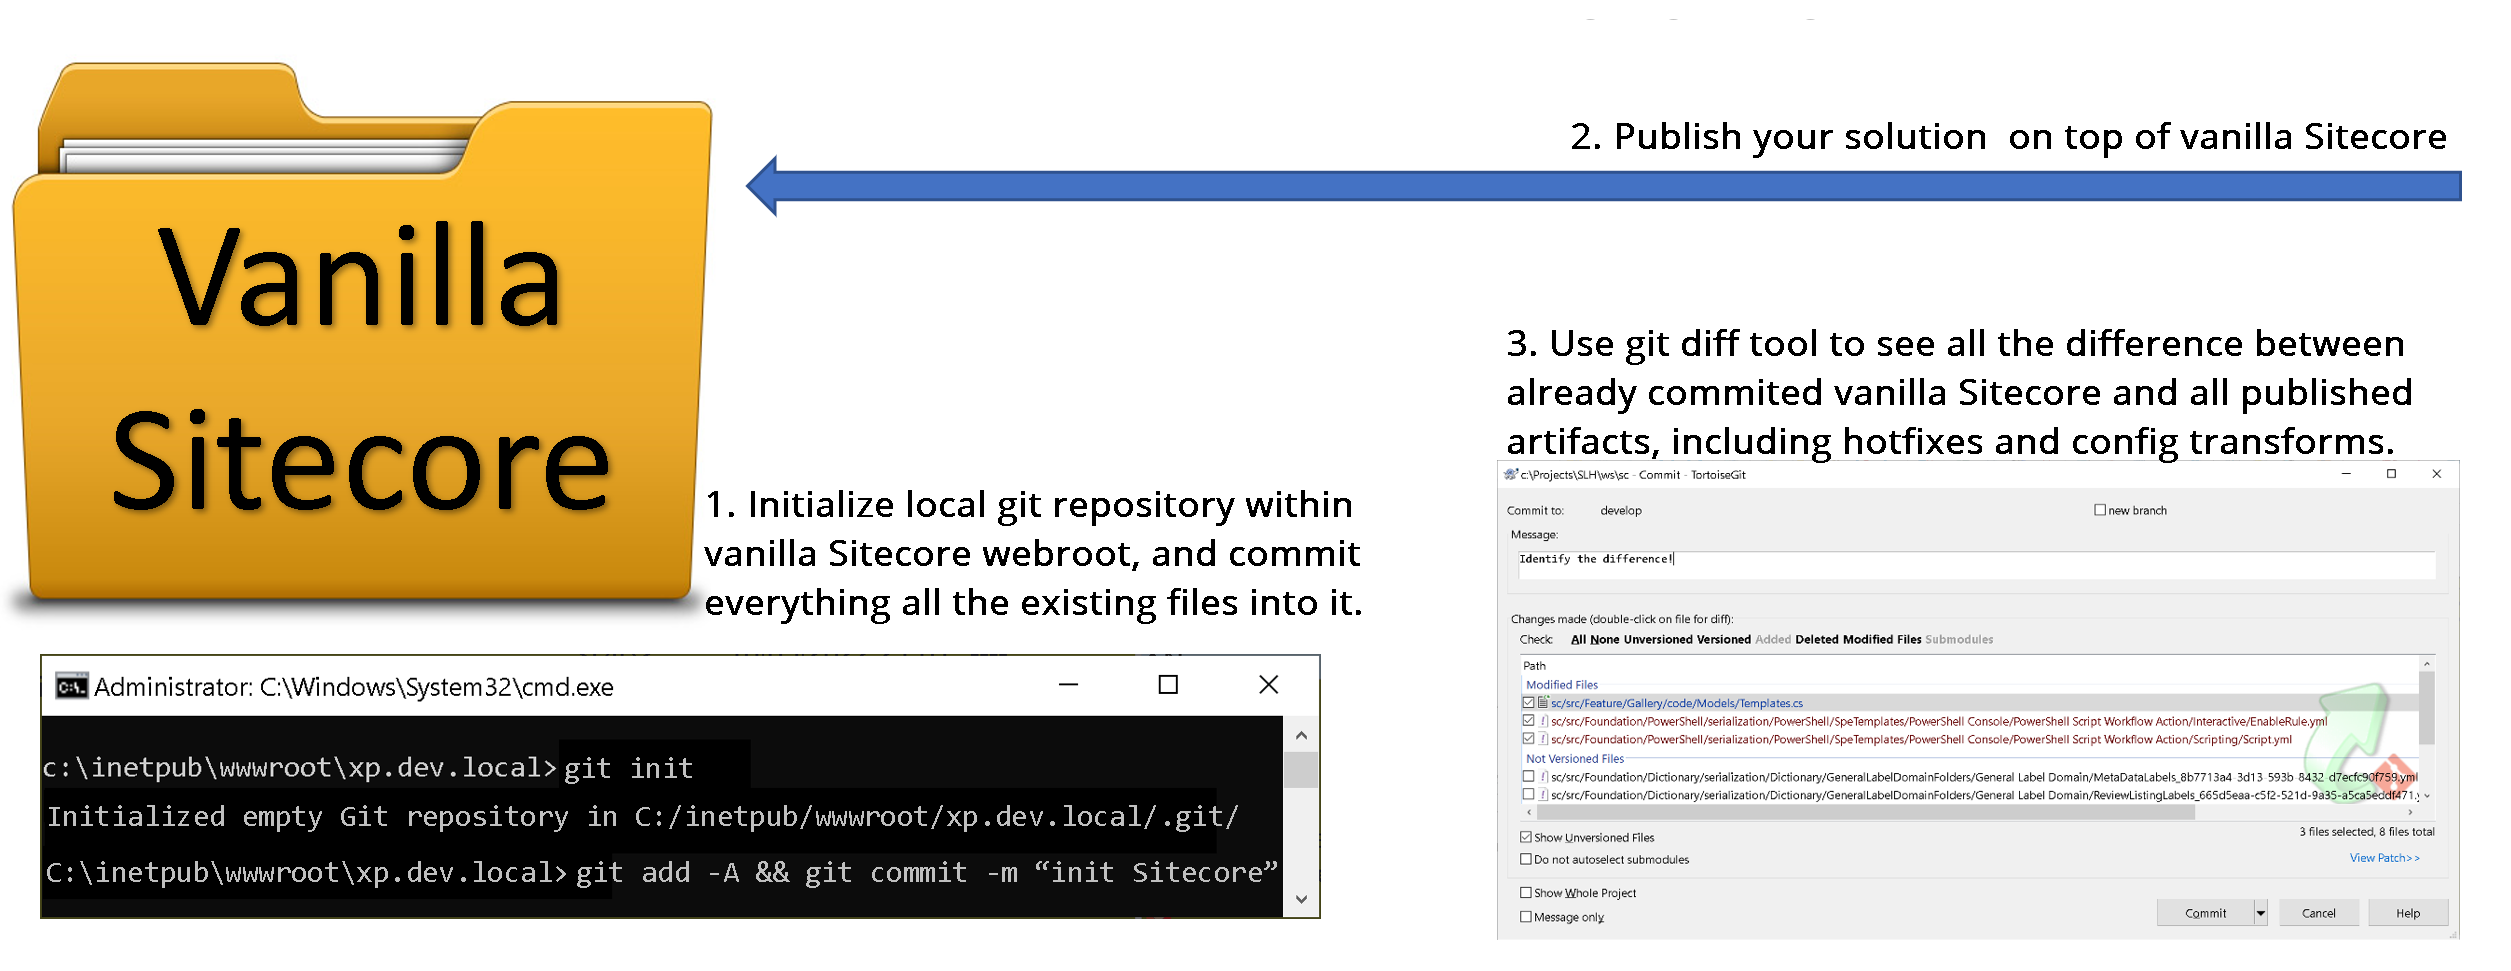
In order to estimate to amount of customization for a solution, I do the following quick trick.
First of all, I need to have a vanilla version of Sitecore that the existing solution is using.
After it is up and running, I come to the webroot and do: git init, and then commit everything. It’s just a local git initialized within Webroot - I do not push it anywhere and delete git files immediately after completing this exercise.
Next, I build and publish the codebase as normal, so that all the artifacts come above vanilla Sitecore into a Webroot.
Finally, my git tool of choice shows the entire delta of all the customizations of that solution. With that trick I could also easily see all web.config transforms and mismatching or altered DLLs, for example, provided with hotfixes.
That trick gives me the overall feel of how much that instance varies from the vanilla one.
Trick 2 on how to find customization with ShowConfig
When previous trick 1 mostly aims to show the overall amount of customizations, this one would be more specific about the changes in configuration. It will show all the patches and config alterations done on top of the vanilla instance so that a more precise estimation could be done.
We already got vanilla Sitecore of the legacy instance version at the previous step. What we need to do is run showconfig.aspx admin folder tool for generating the combined configuration. And save it into an XML file.
Next, once again perform build and publish as normal. Once the instance gets up and running – run showconfig tool again and save the output into a different file.
Now, having an actual solution configuration we can compare it against a vanilla combined configuration for that same version of the platform – using any diff tool. I recommend using advanced Beyond Compare.
For your convenience, you could also extract the whole delta between both into a single config file – it will be a valid patch!
3. Incorrect DLL(s) coming from the deployment
While upgrading the codebase you might also find facing a dependency hell in terms of referenced assemblies not playing well with each other. This can take an age to fix.
Every Sitecore release contains an Assembly List featuring a complete list of assemblies shipped with this release in the Release Information section. (for example, there are 400 assemblies exactly shipped for the 10.2 platforms).
DLLs must exactly match counterpart vanilla DLLs in versions and also in size unless that is a hotfix DLL.
With a previous first trick, you could identify all the mismatching DLLs, and with the second trick – where those are referenced from.
You may also perform a solution-wide search for a specific faulty assembly and then see all the found results along with their sized bytes. At least one would mismatch – that will point you to the specific project where the faulty one is coming from. I would recommend my file manager of choice – Total Commander which is perfect for such operations.
If the previous result gives you more than one – but lots of faulty referenced assemblies, you could rely on PowerShell for performing RegEx replace all the invalid references with the correct ones. It may have a steep learning curve initially, but very soon this technique will start saving you lots of time.
4. Troubleshoot the assembly bindings
This issue occurs due to the dependencies used in your solution projects, that mismatch those
DLLs versions that are actually shipped with vanilla Sitecore. For example,
your feature module uses Sitecore.MVC dependency, which in turn relies on
System.Web.MVC. When you add Sitecore.MVC using NuGet package manager, it will
pull the latest dependency, but not the one that was latest and referenced at the
time when Sitecore build was released. Or in case if you add a library ignoring
dependencies, you could process with the latest dependency yourself.
Two ways of getting
out of this. One is strictly hard referencing your project dependencies to match
those from webroot. Troubleshooting becomes really annoying when upgrading the
solution with a large number of projects (the max I have seen was 135) or in rare
cases not possible.
Another approach is
advised to adjust particular Assembly Binding to the latest version. Since you
should not modify vanilla config manually – you may employ the config transform
step as a part of your local build & deploy script (see using web.config transforms on assembly binding redirects).
The situation has
improved with 10.1 as libraries have been updated to the latest versions and
bindings became less strict.
5. NoReference packages
Sitecore no longer publishes the NoReferences NuGet packages.
For example, if you install the 9.3 packages you will get a lot of dependencies
installed. Not what we wanted.
The correct way, in this case, is to use the Dependency Behavior
option of the Nuget Package Manager.
Choosing the dependency behavior to “IgnoreDependencies” will
only install the package without any of the dependencies.
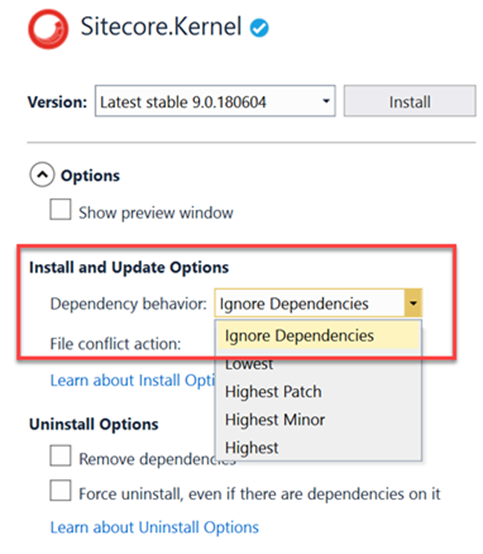
This function is also available as a parameter switch in
PowerShell.
6. Migrate from packages.config to PackageReference
Just like a project to project references and assembly
references, PackageReferences are managed directly within project files rather
than using separate packages.config file.
Unlike packages.config, PackageReference lists only those
NuGet packages you directly installed in the project.
Using
PackageReference, packages are maintained in the global-packages folder
rather than in a packages folder within the solution. That
results in performing faster and with less disk space consumption.
MSBuild allows you to conditionally
reference a NuGet package and choose package references per
target framework, configuration, platform, or other pivots.
So if you are convinced - please perform the update either manually from right-click context menu in Visual Studio or by running a migrate from packages.config to PackageReference script by Nick Wesselman.
7. Update Target Framework
Net Framework 4.8 is the terminal version of Framework and is being used from Sitecore 9.3 onwards.
Migrating from earlier solutions will require you to update Target Framework for every project within a solution. I personally prefer to do that in PowerShell (PowerShell way to upgrade Target Framework), but there is a Target Framework Migrator Visual Studio extension that also bulk-updates Target
Framework for the whole solution.
8. Update Visual Studio
But of course, to benefit from this extension you may need to update Visual Studio itself first so that it has the required Target Framework. Least and most important – install the latest VS Build Tools which you of
course can be updated on your own.
You will still likely be keen to get the latest VS, the 2022 worked well for me but is not yet officially supported. In that case, you can get at least VS 2019 which also has nice features.
Helix Solutions may have up to a hundred projects that affect overall performance. Solution filters allow filtering only those projects you’re working with, keeping unloaded from VS but still operable. It works as an SLNF-file that references your solution with an array of whitelisted projects.
You can also now perform one-click code cleanups and also search for Objects and Properties in the Watch, Autos, and Locals Windows.
9. Unsupported third-party libraries
The solution you’re upgrading may reference some third-party libraries that are discontinued. In that case, you need to do an investigation for each of those libraries and decide what to do.
Example from my experience. I came across Sitecore.ContentSearch.Spatial library that performed a geo-spatial searches. It has the source code available but has not been updated for 5 years so far. Meantime Lucene search has been removed from Sitecore and this library became no longer relevant, as the library hard-referenced Lucene.
As an outcome, the whole related feature at the solution was temporarily disabled to be later rewritten using Solr Spatial search.
10. Dependency injection
Microsoft.Extensions.DependencyInjection became built into Sitecore from version 8.2
It is fast and reliable and supports pretty much everything you may need. Just use this one!
Read more: Sitecore Dependency Injection and scoped Lifetime (by Corey Smith)
11. Glass Mapper
You will need to update Glass Mapper to version 5 unless already done. Package naming has changed to reflect the version of Sitecore it is working with, and are three related packages:
Glass.Mapper.Sc.{Version}Glass.Mapper.Sc.{Version}.MvcGlass.Mapper.Sc.{Version}.Core
Glass has lots of changes in v5 most significant of which would be a new way of accessing content from Sitecore. Glass Controller gets obsolete, same is true for GlassView which went in favor of elegancy:
<!-- instead of of GlassView -->
@inherits GlassView<ModelClass>

<!-- it becomes -->
@model ModelClass
Instead of ISitecoreContext using the new IMvcContext, IRequestContext and IWebFormsContext abstractions.
public class FeatureController : Controller
{
    private readonly IMvcContext _mvcContext;
    public FeatureController()
    {
        _mvcContext = new MvcContext();
    }
    var parameters = _mvcContext.GetRenderingParameters();
    var dataFromItem = _mvcContext.GetDataSourceItem();
}
Glass lazy loads by default now and [IsLazy] attributes on model classes were removed. Other attributes removed are [SitecoreQuery], [NotNull].
You will need to remove these model properties in order to re-implement them as methods, getting rid of the attributes (see Lazy loading after upgrading to Glass Mapper 5).
After upgrading Glass if faced a bunch of run time errors that were difficult to identify. Eventually, I realized that happened due to a lack of virtual property modifiers in model classes. With old versions of Glass Mapper, model properties still map correctly even without the virtual modifier, but not any longer.
[SitecoreChildren(InferType = true)]
public virtual IEnumerable<Model> InnerChildren { get; set; }
Tip: Installing a higher version of the GlassMapper with NuGet package makes sure the files
App_Start\GlassMapperSc.cs and App_Start\GlassMapperScCustom.cs are not overwritten with the defaults. Also, they should not appear in the feature modules, but only in the Foundation module that is responsible for Glass Mapper.
Before upgrading GlassMapper I would recommend reading through these great blog posts about the changes:
12. Custom Pipelines
Sitecore try and reduce breaking changes where possible but sometimes they are unavoidable, so as with all Sitecore upgrades some custom code and configuration will need to be updated to be compatible with
The
HttpRequestArgs.Context property has been removed in favor of
HttpRequestArgs.HttpContext – in fact, just been renamed. It resulted in a breaking change for all of your custom pipeline processors, which you all need to rewrite. I used my preferred PowerShell RegEx to replace one-liner to update them in one go:
gci -r -include "*.cs" | foreach-object {$a = $_.fullname; (Get-Content -Raw $a -Encoding UTF8) | `
foreach-object {$_ -replace 'args\.Context\.','args.HttpContext.' } | `
set-content -NoNewLine $a -Encoding UTF8}
Custom processors patched into a pipeline now required mandatory attribute resolve.
<CustomPipeline>
    <processor type="ProcessorType, Library.DLL"
        patch:instead="processor[@type='Sitecore.Mvc.Pipelines.Response.RenderRendering.GenerateCacheKey, Sitecore.Mvc']"
        resolve="true" />
</CustomPipeline>
13. Link Manager
One more change in version 9.3 takes place with LinkManager in the way we get the default option for building a URL:
var options = LinkManager.GetDefaultUrlBuilderOptions();
var url = LinkManager.GetItemUrl(item, options);
Long story short - its internals has been rewritten to the best, and are mostly hidden from our eyes. What we need to know is an updated way of patching default URL options. The old way of patching
<configuration xmlns:patch="http://www.sitecore.net/xmlconfig/">
  <sitecore>
    <linkManager defaultProvider="sitecore">
      <providers>
        <add name="sitecore">
          <patch:attribute name="languageEmbedding">never</patch:attribute>
          <patch:attribute name="lowercaseUrls">true</patch:attribute>
      </add>
      </providers>
    </linkManager>
  </sitecore>
</configuration>
now became more elegant:
<configuration xmlns:patch="http://www.sitecore.net/xmlconfig/">
  <sitecore>
    <links>
      <urlBuilder>
        <languageEmbedding>never</languageEmbedding>
        <lowercaseUrls>true</lowercaseUrls>
      </urlBuilder>
    </links>
  </sitecore>
</configuration>
Read more about LinkManager changes to link generation in 9.3 (by Volodymyr Hil).
14. Caching changes
The solution I was upgrading had an publish:end event configuration to do HTML Cache clearing for different site instances:
<events>
  <event name="publish:end">
    <handler type="Sitecore.Publishing.HtmlCacheClearer, Sitecore.Kernel" method="ClearCache">
      <sites hint="list">
        <site hint="apple">apple</site>
      </sites>
    </handler>
  </event>
  <event name="publish:end:remote">
    <handler type="Sitecore.Publishing.HtmlCacheClearer, Sitecore.Kernel" method="ClearCache">
      <sites hint="list">
        <site hint="apple">apple</site>
      </sites>
    </handler>
  </event>
</events>
Since 9.3 such behavior became default after a publish. It actually works the other way around now - you have to actually disable HTML cache clearing explicitly if you need to.
The previous code will break, and you have to remove that whole section.
<site name="apple" cacheHtml="true" preventHtmlCacheClear="true" … />
15. Forms
WebForms For Marketers, one of the most questionable modules, was deprecated in Sitecore 9.1 in favor of built-in Sitecore Experience Forms. That also raised questions on how to keep the data and migrate the existing forms while performing platform upgrade
Thankfully there is a tool to do exactly that: convert WFFM forms and data to Sitecore Forms. WFFM Conversion Tool (by Alessandro Faniuolo) is a console application that provides an automated solution to
convert and migrate Sitecore Web Forms For Marketers (WFFM) forms items and
their data to Sitecore Forms. It takes WFFM data from a SQL or MongoDB database as a source into the destination - Sitecore Experience Forms SQL
database.
16. Support Patches & Hotfixes
You will likely find some hotfixes or support patches that have been applied to your solution over time. Sitecore Support addresses issues by providing support DLLs and releasing hotfixes.
Each of them sorts out some certain issue that you need to investigate if it was resolved in the version you’re upgrading to. Use this 6-digit support code to find more details by using a search at Sitecore Knowledge Base website.
When it comes to hotfixes when they keep the original name of DLL they replace, the knowledge base code could be found in the file properties dialog.
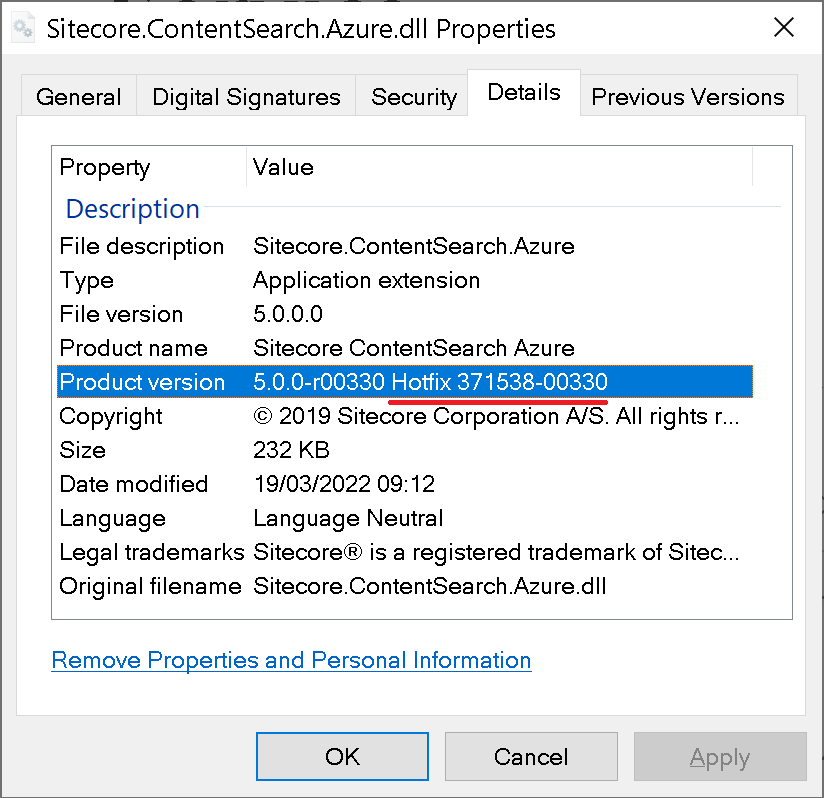
Once it got resolved, you may remove those along with any related configuration. This post is aimed at giving an idea of how we can identify if we have hotfix DLLs within Sitecore \bin folder so that we could approach them individually.
17. SXA
Is not an integral part of the platform and it has its own upgrade guidance
released along with each version. So I only touch it briefly.
As is true for the rest of the Sitecore platform, the most of SXA changes took place with the 9.3 release. As for me, the biggest change was NVelocity deprecation from 9.3 in favor of Scriban templates, which
affects Rendering Variants - one of the most powerful features of SXA.
Also since that version, it has a version parity with its holding XP or XM.
Read more:
18. Sitecore Search
SearchStax and Sitecore: The top integration benefits for search optimization and personalization
Both Lucene and Azure Search became obsolete and removed. With Sitecore 10, Solr became the recommended technology to manage all of the search infrastructure and indices for Sitecore. Managed Solr allows your developers to implement faster, and spend more time focused on building a better search experience and less time supporting search infrastructure.
Please migrate your solution, it might take significant effort.
Consider using SearchStax which takes from you the pain of installation, failover, security, maintenance, and scale. SearchStax provides solutions to teams for the most challenging issues for developing with Solr.
There are also a few commonly met issues while upgrading Solr. Sometimes you can come across the case of core name mismatching index name. This is a fairly simple issue and could be fixed with a config patch:
<configuration>
  <indexes>
    <index id="sitecore_testing_index">
      <param desc="core">$(id)</param>
    </index>
  </indexes>
</configuration>
The second issue relates to a configuration that defines Solr index. If you are indexing all fields – that must be wrapped with documentOptions tag of the correct type:
<defaultSolrIndexConfiguration>
  <documentOptions type="Sitecore.ContentSearch.SolrProvider.SolrDocumentBuilderOptions, Sitecore.ContentSearch.SolrProvider">
    <indexAllFields>true</indexAllFields>
  </documentOptions>
</defaultSolrIndexConfiguration>
19. Custom Content Databases
Custom Sitecore databases now require a Blob Storage setting and you have to append Blob Storage for all the custom databases you are using, in a similar manner as that is done for those coming out of the box.
20. Upgrading xDB and analytics
After the introduction of xConnect, there was a question on what to do with all existing analytics data from MongoDB upgrading it to 9.X or 10.X. To address that Sitecore created a tool called the xDB migration tool which works on top of Data Exchange Framework reads from MongoDB, and writes to the xConnect server.
Keep in mind if you have years of data on production, you can be looking at gigabytes of data migration. Be sure to take the appropriate precautions, like preventing regular app pool recycles, as the process can take days. If possible, discuss trimming the MongoDB data, or not importing it at all if it's not used. This tool uses a custom collection model to be deployed to both xConnect service and the xConnect indexer service. After rebuilding the xDB search index you will get the data in the Experience Profile.
It has an optional Verification feature, which is in fact a standalone database that gets a record of each entity being submitted to xConnect.
Changes in Sitecore 10.X
1. Containers
Containers are immutable which means that any changes to the file system within the container will be lost as soon as the container restarts
When switching to containers your codebase will remain the same, however, there are minor changes
- debugging now works a little bit differently: now we need to choose a relevant container and then pick up a process within it. instead of publishing artifacts into
webfolder we now build images and run a container from it.
With Docker, you no longer deploy just your application
code. A container is now the unit of deployment, which includes the whole
environment: OS and application dependencies. Therefore, your build process
will have to be extended to build Docker containers and push them to the container
registry.
Both Azure and AWS are suitable for running Sitecore in
containers. They both provide managed Kubernetes services and other container
hosting options.
Besides containers you need to consider other system
components: SQL, Solr, and optionally Redis
Luckily, Sitecore comes with health check endpoints
(/healthz/live and /healthz/ready) out of the box, which you
can use for this purpose.
Kubernetes on its own will impose quite a steep learning curve.
You can learn more tips on migrating your Sitecore solution to Docker.
2. Upgrade the database
Databases were not 100% compatible between the versions.
Previously (before 10.1) one had to run an upgrade script against Core and Master in order
to attach both to a vanilla target instance and progress with the rest of the upgrade.
The update script ensured the schema and default OOB content get
updated by applying all the intermediate changes between both versions. This article explains in more detail how did we upgrade databases before 10.1.
The idea that came into consideration was that supplying empty
databases with a vanilla platform would eliminate the above need for
everyone who updates DB to operate at an SQL admin level. But every version has its
own unique set of default OOB items, where do we keep them?
Because of container-first the way of thinking, there was a
clear need to store those somewhere at a filesystem level, so it was a matter of
choosing and adopting a suitable data provider. Protobuf from Google was a perfect choice ticking all the boxes, moreover, it is a very mature technology.
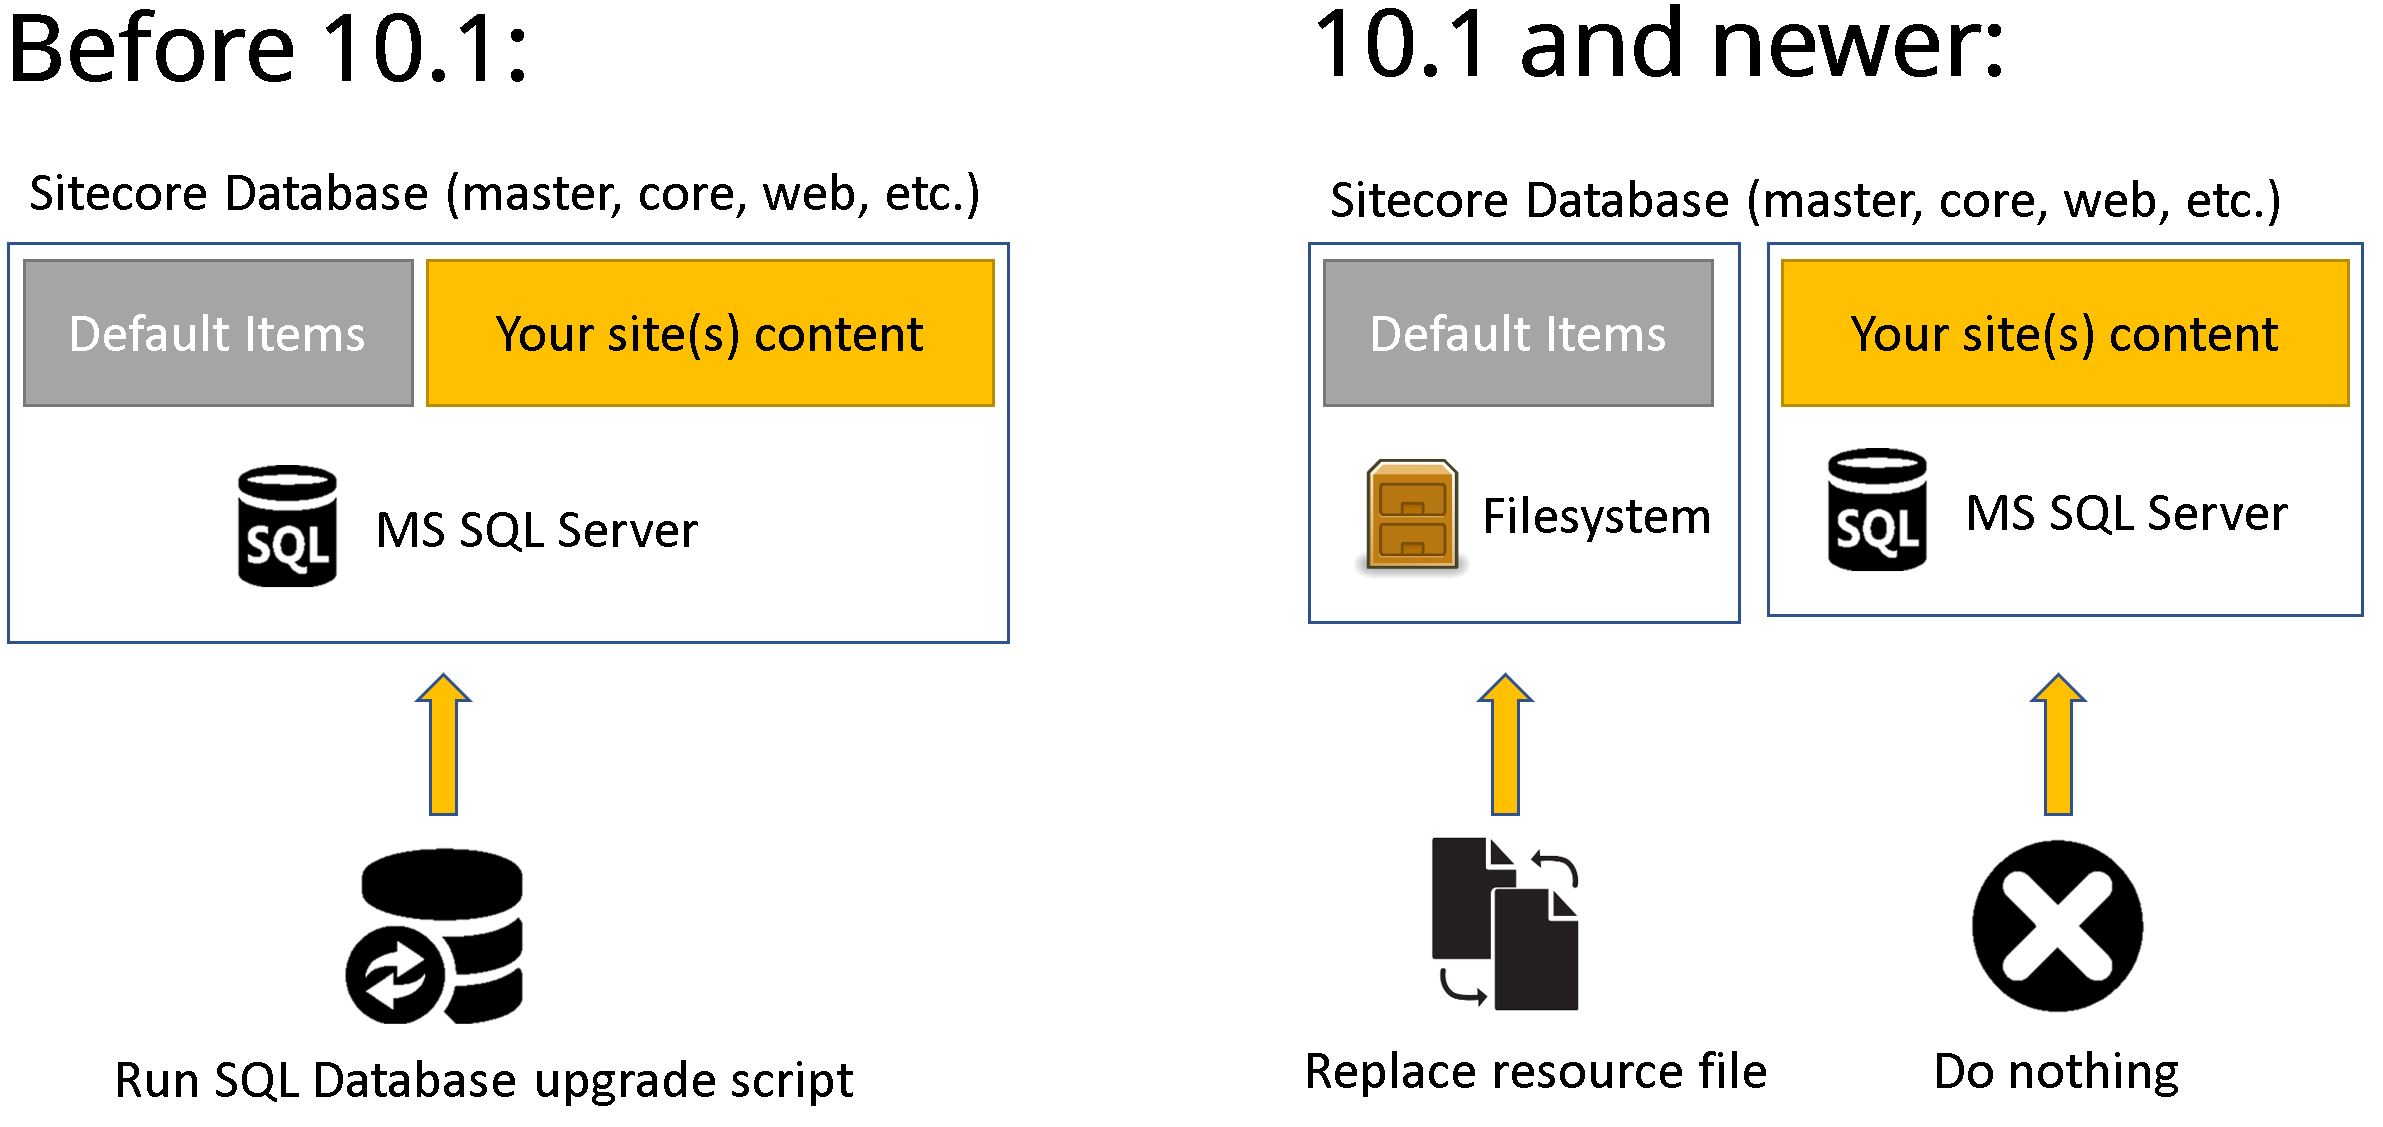
3. Items as Resources
With that in mind, now having a database full of content you can upgrade the version without even touching it. SQL Databases stay up to date, and the rest of the default content gets updated by just substituting Protobuf Data resource files.
Sitecore called this approach Items as Resources.
I would strongly recommend you look into the items as a resources plugin for the Sitecore CLI - instead of going through all the trouble of making asset images, you can create Protobuf files that contain all your items and bake them directly into your container image.
You can create your own resource files from *.item serialization using Sitecore CLI Items as Resources plugin (version of CLI 4.0 or newer). You cannot delete items from Resource File it is read-only, but this trick (by Jeroen De Groot) helps you "remove" items at the Provider level.
4. Sitecore UpdateApp
But how do we upgrade let’s say 8.2 databases to 10.2?
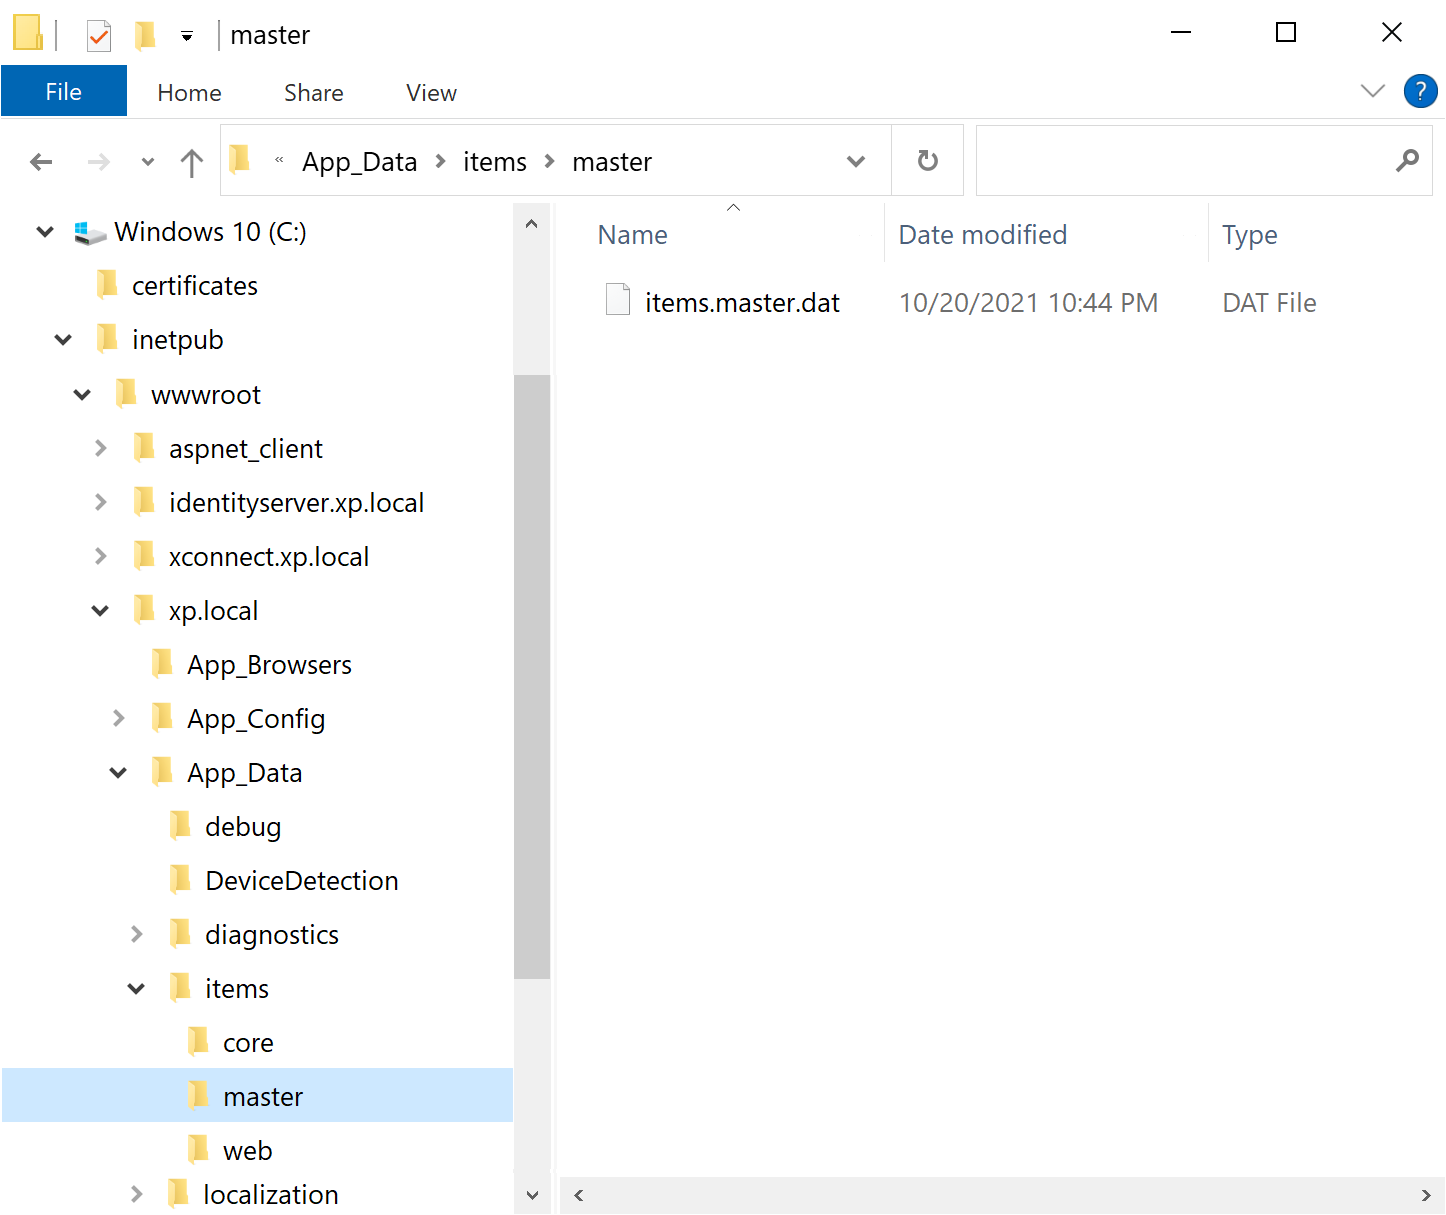
From 10.1 and onwards databases come with no content – it becomes a matter of removing the default items from the SQL database, leaving the rest of the content untouched. That default content would come from the actual
items resource file which will be placed in App_Data\Items folder.
For Upgrading to Sitecore 10.1 with UpdateApp Tool it comes to purely replacing
resource files which naturally fits the container filesystem way of doing business.
That is where a new tool comes into play, please welcome Sitecore UpdateApp Tool!
This tool updates the Core, Master, and Web databases of the Sitecore Experience Platform. You must download and use the version of the tool that is appropriate for the version and topology of the Sitecore Experience
Platform that you are upgrading from.
It also works with official modules resource files for upgrading Core, Master, and Web. (SXA, SPE, DEF, Horizon, both CRMs, etc.)
Sitecore UpdateApp Tool 1.2.0
5. Asset images
To containerize modules we now use Sitecore Asset images, instead of packages as we did before. But why?
First of all, you won’t be able to install a package that drops DLL due to the instance \bin folder being locked for an IIS user.
Secondly, containers are immutable and are assumed to be killed and instantiated - any changes to a container will go away with it.
Also, since a module is a logical unit of functionality with its own lifecycle and assets - it should be treated by the "works together, ships together" principle. Also, you as a package maintainer provide sample usage Dockerfiles for the required roles so that your users could pick it up with ease.
Sitecore Asset images are in fact storage of your module’s assets in the relevant folders, based on the smallest windows image - nanoserver. You can create those manually, as I show on this diagram.
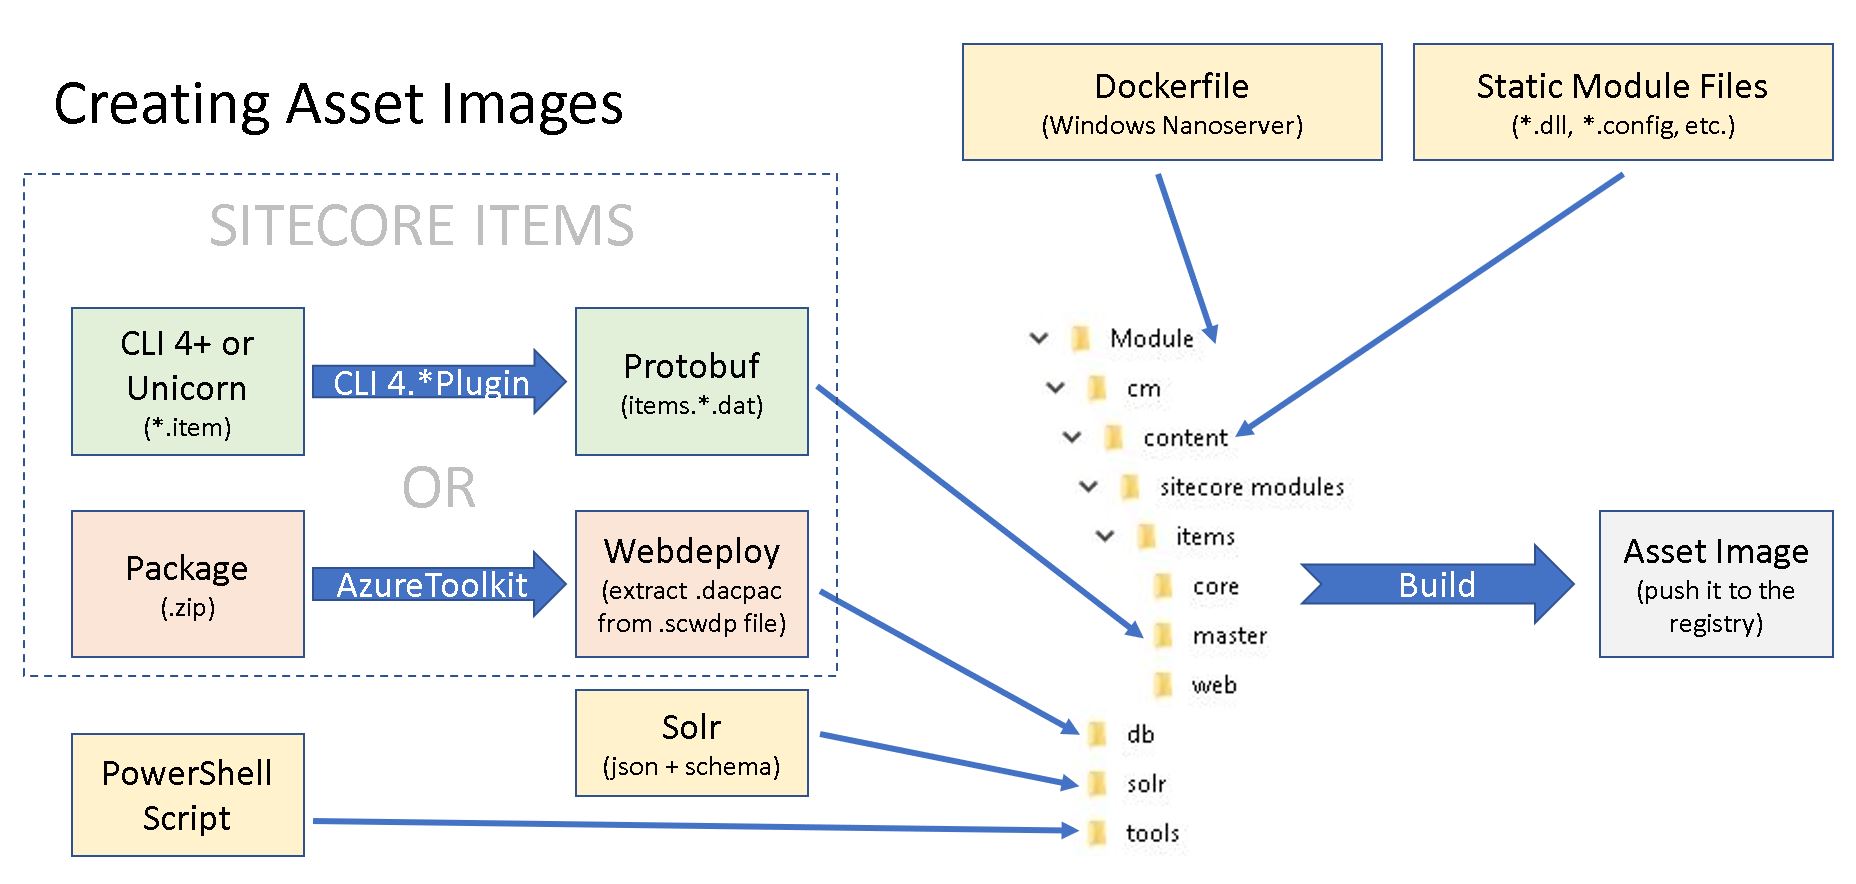
With the recent platform, there are two ways of managing the items: either creating an Items Resource file or converting the package zip file into a WebDeploy package, then extracting its DACPAC file and placing it into the DB folder. In either case, the file structure will stay as pictured in the diagram above.
There is a tool called Docker Asset Image for a given Sitecore module (by Robbert Hock) which aims to automate Asset Image creation for you.
I would recommend going through these materials for better understanding:
Testing and going live
You will definitely need to conduct one (or if things go wrong - a series of) Regression Testing. The first question comes to clarify, what exactly to test?
Depending on the upgrade scope, you will need to at least ensure the following:
- Overall site(s) health look & feel
- 3-rd party integrations aren’t broken
- Editing experience is not broken
- Most recent tasks/fixes function well
Another question: manual, automated, or a mix of both?
There is no exact answer - but without automation regression testing becomes effort-consuming. especially when you need to repeat it again and again. At the same time, it does not make sense to automate everything (and sometimes is not even possible).
Since you do the upgrade into a new instance of Sitecore in parallel to the existing one, you definitely need to conduct Load Testing prior to this new instance becoming live. The metrics must not mandatory me better than previously had as new Sitecore releases have much of new features and the number of assemblies within \bin folder always grows up. But as soon as it meets the projected SLA - that should be fine.
Monitoring is also crucial when going live. Once the new Sitecore instance is up and running, the first thing to check would be Sitecore logs to inspect and fix any errors that are being logged. We have a comprehensive set of automated UI tests that cover the majority of business use cases and are executed overnight. Watch the metrics for anomalies
Another exercise to undertake before going live would be Security Hardening - the process of securing a system by reducing its surface of vulnerability, which is high for systems that perform more functions like Sitecore is. From older versions, Sitecore comes up with the Security hardening guide and considerations to be followed.
In case you have the luxury of organizing Content Freeze for the going live period - that is great. If not you will need to pick up and care for the content delta produced meanwhile going live. The best thing to advise would be to use PowerShell Extensions to identify and pack all the content produced at a specific timestamp onwards. After installing this package the delta would be applied to the updated instance.
The actual moment of Going Live is when you switch DNS records from a previous instance to the new one. Once done, the traffic will go and be served by the updated instance. There are a few considerations, however:
- you will need to reduce TTL values for the domain DNS record well in advance to make the switch immediate; then bring it back once done.
- you may consider slightly increasing traffic (ie. 5% of visitors) to new instances and monitor logs rather than switch it entirely.
If everything went well and the updated instance works fine, you still need to keep both instances running in parallel for a certain amount of time, Maturing Period. If something goes totally wrong you could still revert to an old instance and address the issues.
That's it!
Hope my presentation helps your future Sitecore upgrades!
Finally, I want to thank all the
event organizers for making it happen and giving me the opportunity to share the experience with you.